Configuring your Fuse REST project to enable OpenAPI docs
Apache Camel supports multiple approaches to defining REST services. In particular, Apache Camel provides the REST DSL (Domain Specific Language), which is a simple but powerful API that can be layered over any REST component and provides integration with the Content from github.com is not included.OpenAPI 2.0 specification. OpenAPI (formerly Content from swagger.io is not included.Swagger) is a vendor-neutral and portable open description format for API services.
For information about using the Camel Rest DSL, see the “Defining REST services” chapter of the This content is not included.Apache Camel Development Guide.
With Red Hat Fuse Tooling, you can view and edit Rest DSL components that are in your Camel Context file.
You can also configure your Fuse Integration project to expose your REST API to an OpenAPI client. You can then use any OpenAPI client to test your API by sending requests and receiving responses.
Spring Boot standalone example
Here is a summary of the options that you must configure to enable OpenAPI docs in a Fuse Integration project for Spring Boot standalone:
-
Add a REST configuration to your Camel Context file.
-
Add the following components to the REST configuration:
- Add this attribute: apiContextPath="api-docs"
- Add this child element: apiProperty key="cors" value="true"
-
Add a REST element and at least one REST operator.
-
In the project’s
pom.xmlfile, in the Dependency Management section, add a new dependency with these values:- Group Id: org.apache.camel
- Artifact Id: camel-spring-boot-dependencies
- Version: Use the same version as is set for your camel-spring-boot-starter dependency (for example, 2.21.0.fuse-731003-redhat-00003)
- type: pom
- scope: import
-
In the project’s
pom.xmlfile, in the Dependencies section:- Change the
camel-servletdependency's name (Artifact Id) to**camel-servlet-starter**(which is the correct dependency for Spring Boot standalone). - Add a new dependency with these values:
* Group Id: org.apache.camel
* Artifact Id: camel-swagger-java
* type: jar
* scope: compile
- Change the
Prerequisite
- Install CodeReady Studio with Fuse Tooling for Spring Boot standalone: https://developers.redhat.com/products/codeready-studio/download
Steps
These steps describe how to:
- Create a simple Apache Camel route that utilizes the Rest DSL to create an API.
- Configure the Fuse Integration project to expose your API to an OpenAPI client.
- Complete the route.
- Test your API by sending requests and receiving responses with an OpenAPI client.
Create a simple Apache Camel route that utilizes the Rest DSL to create an API
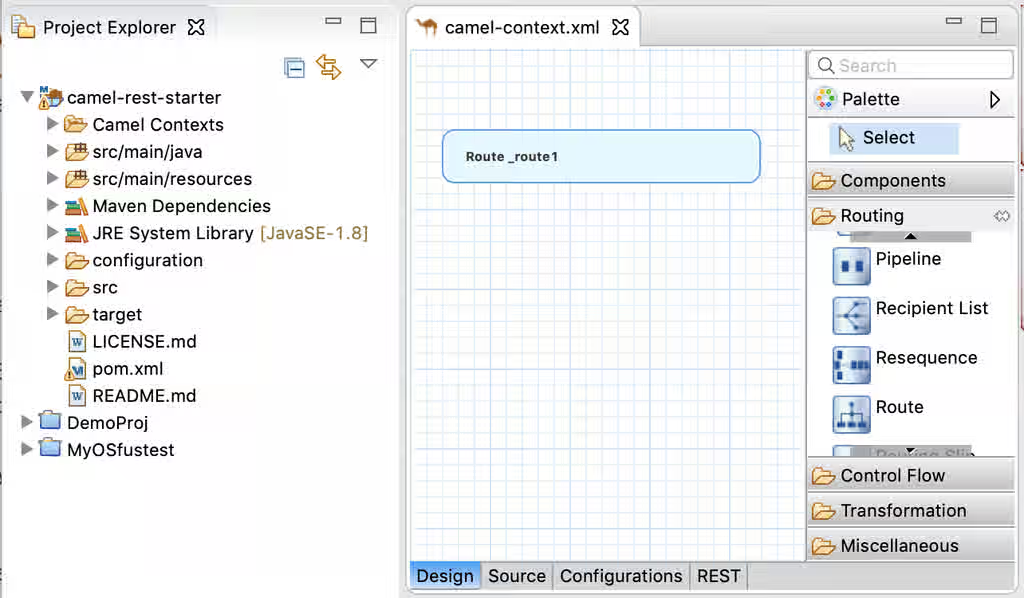
- In CodeReady Studio, create a new Fuse Integration project:
a. Select File -> New -> Fuse Integration Project.
b. Name the project camel-rest-starter and then click Next.
c. On the Select a Target Environment page, select Standalone as the deployment platform, select Spring Boot for the runtime, and then click Next.
The default starting example is the Spring Boot/Fuse example with a simple log route to start.
d. Click Finish.
When the wizard completes the project, it shows a simple Camel route in the Fuse Tooling route editor.
-
Edit the project to replace the existing route with a route that a REST operation can use to process our data.
For this simple example, the REST operation will act as a simple Greeting service with a GET operation that sends a request with a name and returns a “Hello” response with the same name.
a. Delete the
simple-routeby hovering the mouse over the route until the corner menu appears and then select the trashcan icon to delete it.b. Add a new route. In the Palette, open the Routing category and then click and drag the Route item onto the Design canvas.
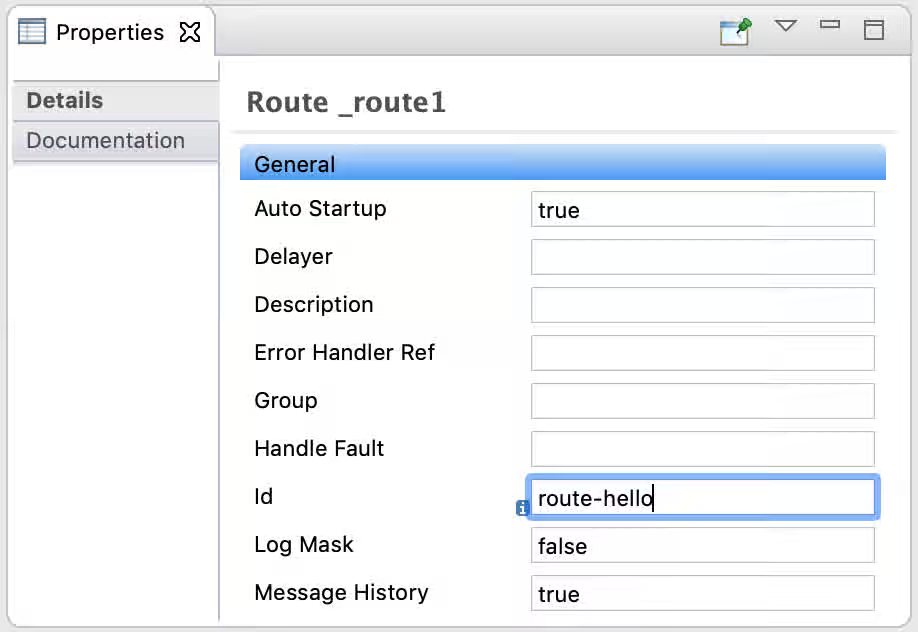
c. Change the default name of the route. In the Properties view, change the value of the Id field to route-hello.
d. Add a from element so the route knows which path to take with the REST operation (that you will define in a later step).
In the Palette, open the Components category and then click and drag the Direct item onto the
route-helloroute in the Design canvas.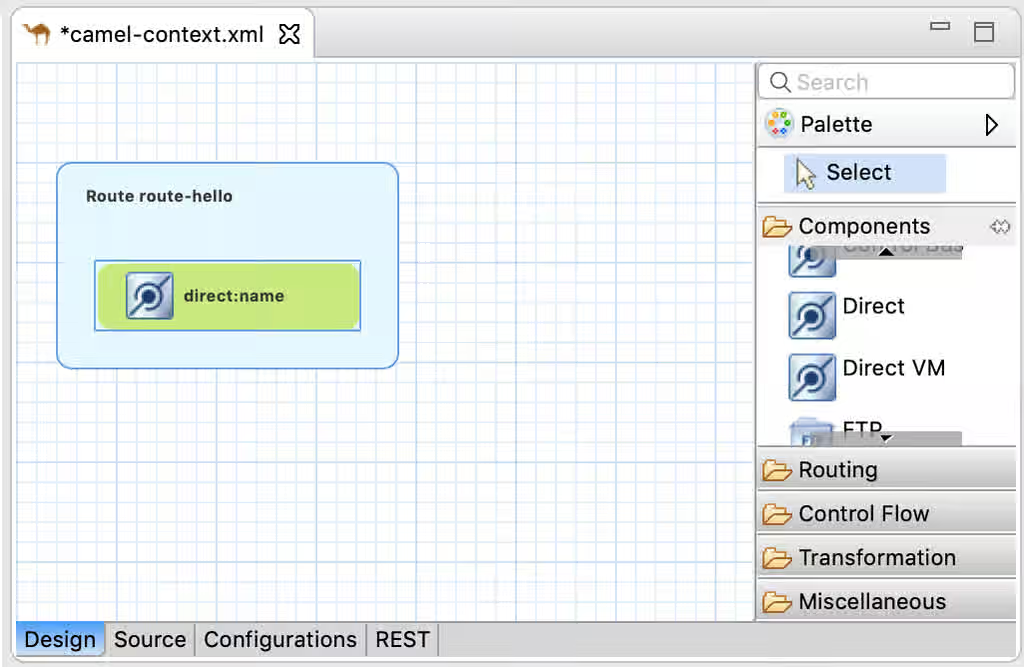
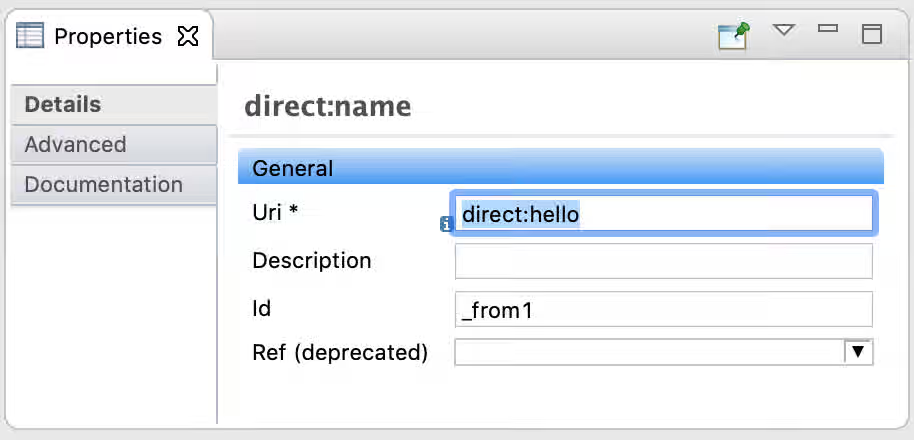
e. In the Properties view for the new direct:name component, change the Uri value to direct:hello.
f. Save the
CamelContext.xmlfile.You will complete the route after you define the REST configuration.
Configure the Fuse Integration project to expose your API to an OpenAPI client
-
Create the REST configuration.
a. At the bottom of the Route editor, click the REST tab.
b. Click "+" at the top right of the editor tab to add a REST Configuration element.
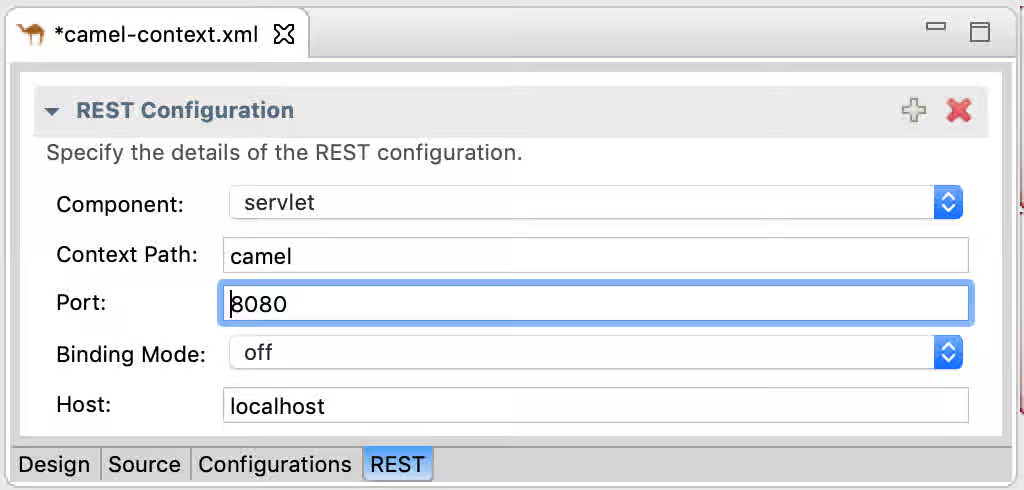
c. Specify these values:
- Component: servlet
- Context Path: camel
- Port: 8080
- Binding Mode: off
- Host: localhost
-
Edit the configuration.
a. Click the Source tab.
b. Add the following components to the REST configuration:
- Add this attribute: apiContextPath="api-docs"
- Add this child element:
- Optionally, add these child elements:
apiProperty key="api.version" value="0.0.1"
apiProperty key="api.title" value="Camel REST Greetings Example API"
- Add this attribute: apiContextPath="api-docs"
The restConfiguration element should look similar to the following:
<restConfiguration bindingMode="off" component="servlet"
    contextPath="camel" host="localhost" port="8080" apiContextPath="api-docs">
    <apiProperty key="cors" value="true"/>
    <apiProperty key="api.version" value="0.0.1"/>
    <apiProperty key="api.title" value="Camel REST Greetings Example API"/>
</restConfiguration>
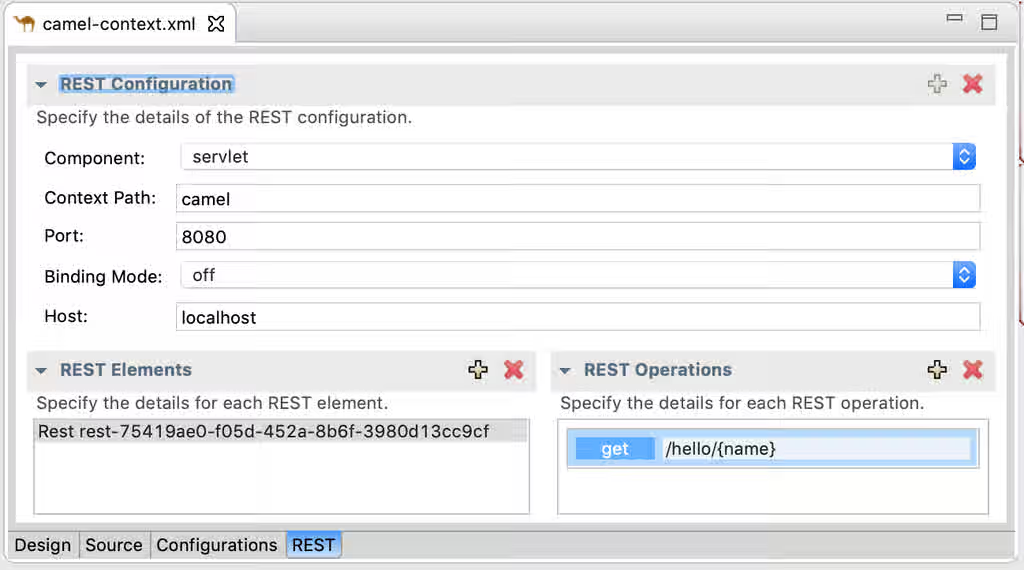
- Return to the REST tab.
a. Create a REST element by clicking the “+” at the top right of the REST Elements section.
b. Create a REST operation by clicking the “+” at the top right of the REST Operations section.
c. In the dialog that opens, enter these property values:
* URI: /hello/{name}
* Operation Type: get
* Referenced Route ID: direct:hello
Selecting **direct:hello** as the `Referenced Route ID` connects the GET operation to the Camel route.

d. Click Finish.
e. In the Properties for the GET operation, set these values:
* Produces: **text/plain**
* Consumes: **text/plain**
The Properties for the GET operation should look like this:

The REST configuration tab should look like this:
Complete the route
-
Open the Design tab.
-
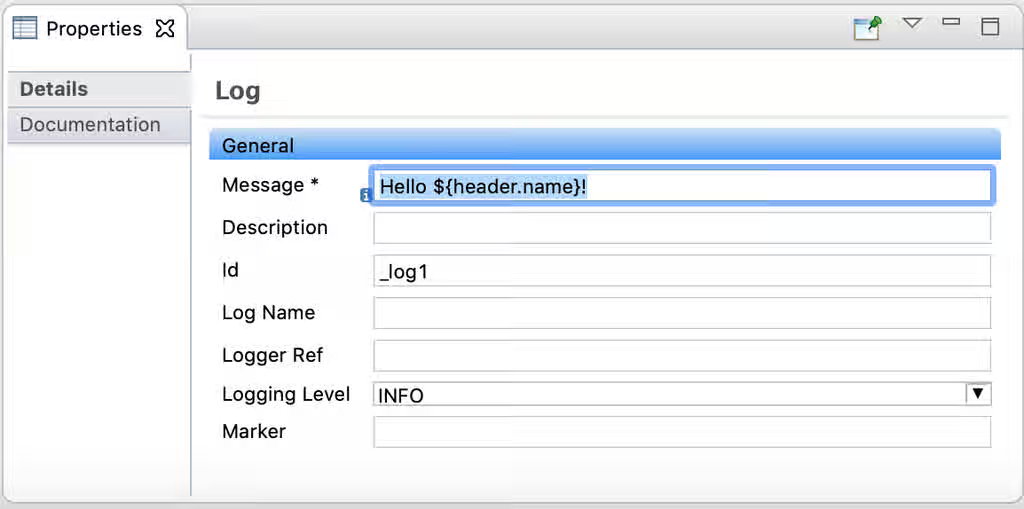
Add a Log component to display a message in the console when you run the application.
From the Palette’s Components category, click and drag Log to the “direct:hello” element of the
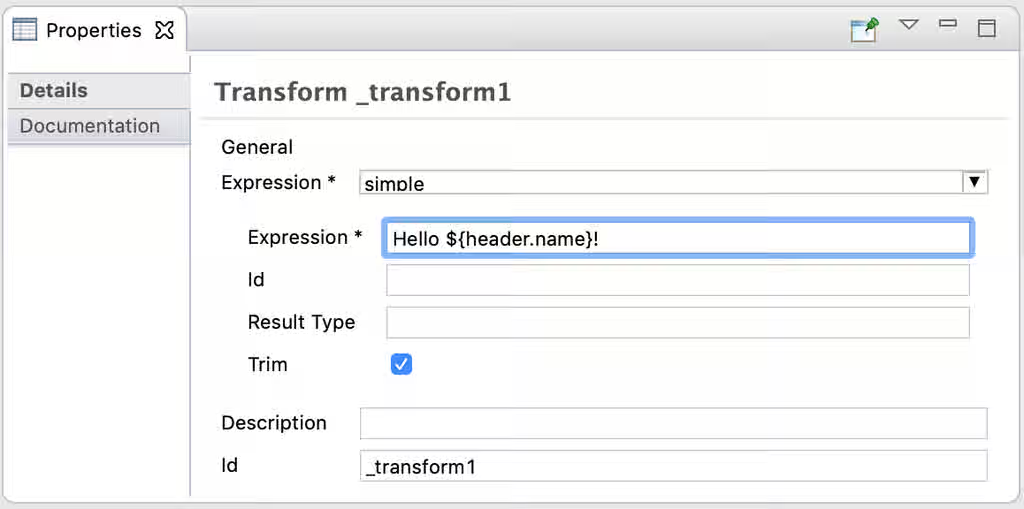
route-helloroute.a. In the Properties section, for the Message, specify Hello ${header.name}!.
b. Add a Transformation element to provide data for the GET operation response.
From the Palette’s Transformation category, click and drag Transform onto the Log element.
c. In the Properties for the Transform element, specify these values:
- For the primary Expression field, select simple.
- For the secondary Expression field type: Hello ${header.name}!
-
Save the file.
-
Update the project’s Maven configuration to pull in the correct dependencies.
a. Open the project’s pom.xml file.
b. Click the Dependencies tab, select camel-servlet and then click Properties.
c. Change the Artifact Id to camel-servlet-starter and then click OK.
d. Add a new dependency with org.apache.camel as the Group Id and camel-swagger-java as the Artifact Id.

e. Click the Dependency Management tab.
f. Click Add and then specify the following property values:
- Group Id : org.apache.camel
- Artifact Id: camel-spring-boot-dependencies
- Version: Use the same version as is set for your camel-spring-boot-starter dependency (for example, 2.21.0.fuse-731003-redhat-00003)
g. Click OK and then click Properties.
-
For Type, select pom.
-
For Scope, select import.
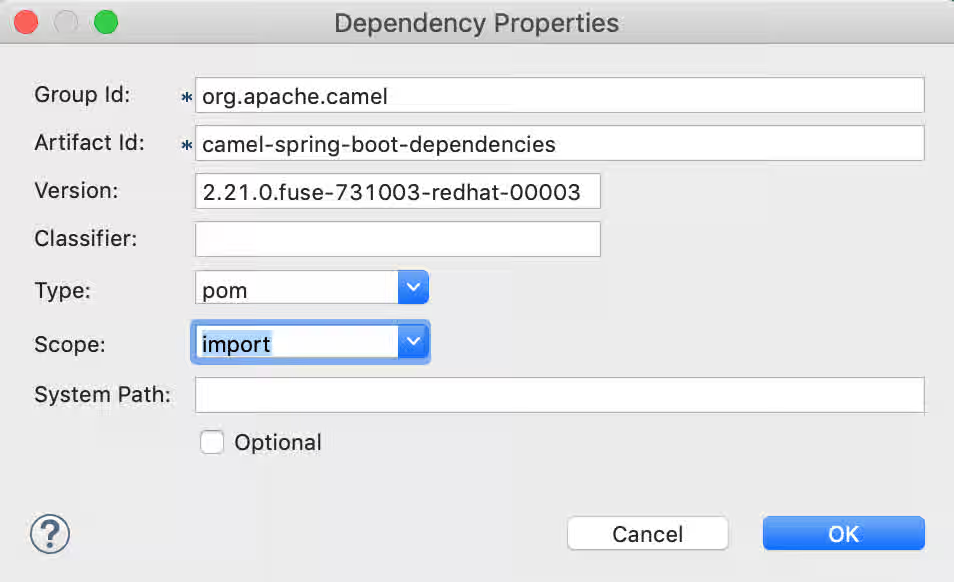
h. Click OK and then save the file.
Test your API by sending requests and receiving responses with an OpenAPI client
-
In the Project Explorer view, right-click the camel-rest-starter project and then select Maven -> Update Project to ensure that everything is up to date.
-
In the Project Explorer view, select the camel-rest-starter project.
-
In the toolbar, click the green “play” button () and then select Run As -> Local Camel Context.
You can watch the progress of the project build in the Console view.
When it’s complete, you should see the “Started Application” line in the Console view.
-
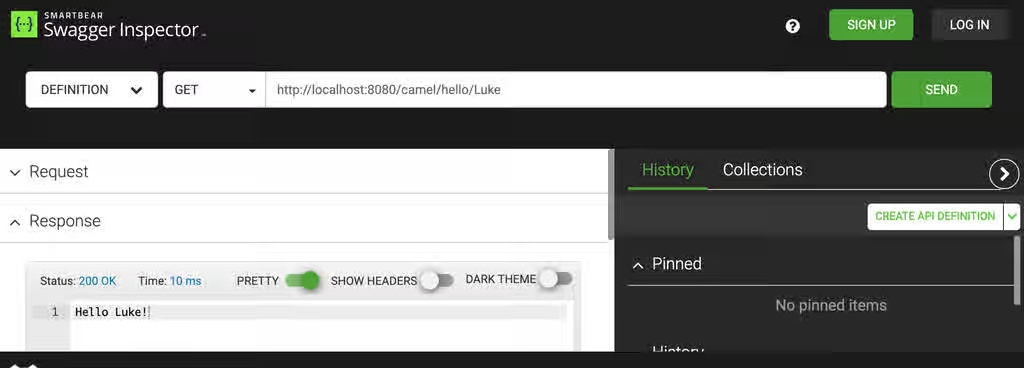
To test the API:
a. Open a Swagger Client tool, such as the Swagger Inspector (https://inspector.swagger.io/builder).
b. Send a test Get request with the
http://localhost:8080/camel/hello/{name}URL.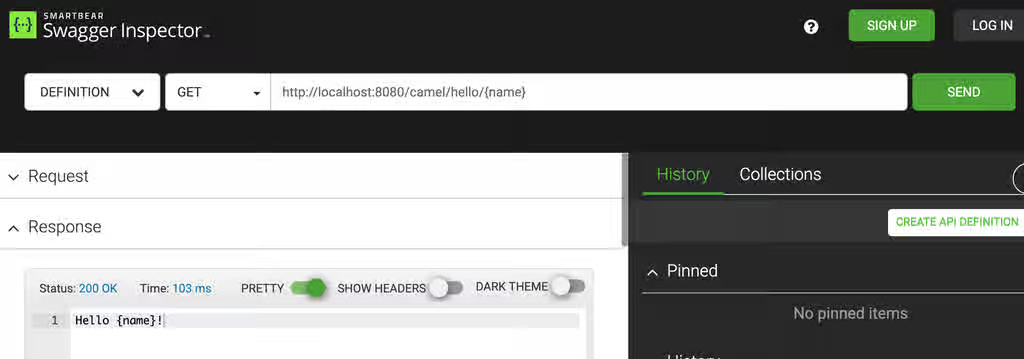
You can substitute
{name}with a name of your choosing, for example, Luke: