Managing AMQ Broker
For Use with AMQ Broker 7.13
Abstract
Making open source more inclusive
Red Hat is committed to replacing problematic language in our code, documentation, and web properties. We are beginning with these four terms: master, slave, blacklist, and whitelist. Because of the enormity of this endeavor, these changes will be implemented gradually over several upcoming releases. For more details, see our CTO Chris Wright’s message.
Chapter 1. Overview
AMQ Broker is a high-performance messaging system based on ActiveMQ Artemis. It supports fast message persistence and multiple protocols, languages, and platforms.
AMQ Broker provides multiple interfaces for managing and interacting with your broker instances, such as a management console, management APIs, and a command-line interface. In addition, you can monitor broker performance by collecting runtime metrics, configure brokers to proactively monitor for problems such as deadlock conditions, and interactively check the health of brokers and queues.
This guide provides detailed information about typical broker management tasks such as:
- Upgrading your broker instances
- Using the command-line interface and management API
- Checking the health of brokers and queues
- Collecting broker runtime metrics
- Proactively monitoring critical broker operations
1.1. Supported configurations
Refer to the article "Red Hat AMQ 7 Supported Configurations" on the Red Hat Customer Portal to view the latest supported configurations for AMQ Broker.
1.2. Document conventions
This document uses the following conventions for the sudo command, file paths, and replaceable values.
1.2.1. The sudo command
In this document, sudo is used for any command that requires root privileges. You should always exercise caution when using sudo, as any changes can affect the entire system.
For more information about using sudo, see Managing sudo access.
1.2.2. About the use of file paths in this document
In this document, all file paths are valid for Linux, UNIX, and similar operating systems (for example, /home/...). If you are using Microsoft Windows, you should use the equivalent Microsoft Windows paths (for example, C:\Users\...).
1.2.3. Replaceable values
This document sometimes uses replaceable values that you must replace with values specific to your environment. Replaceable values are lowercase, enclosed by angle brackets (< >), and are styled using italics and monospace font. Multiple words are separated by underscores (_) .
For example, in the following command, replace <install_dir> with your own directory name.
$ <install_dir>/bin/artemis create mybrokerChapter 2. Upgrading your broker
Red Hat releases new versions of AMQ Broker to the Customer Portal. Learn how to upgrade your AMQ Broker instances to the latest version to access new features and security fixes.
In general, Red Hat releases a new version of AMQ Broker in one of three ways:
- Major Release
- A major upgrade or migration is required when an application is transitioned from one major release to the next, for example, from AMQ Broker 6 to AMQ Broker 7. This type of upgrade is not addressed in this guide.
- Minor Release
- AMQ Broker periodically provides minor releases, which are updates that include new features, bug fixes and security fixes. If you plan to upgrade from one AMQ Broker minor release to another, for example, from AMQ Broker 7.0 to AMQ Broker 7.1, code changes should not be required for applications that do not use private, unsupported, or tech preview components.
- Micro Release
- AMQ Broker also periodically provides micro releases that contain minor enhancements and fixes. Micro releases increment the minor release version by the last digit, for example from 7.0.1 to 7.0.2. A micro release should not require code changes, however, some releases may require configuration changes.
2.1. Upgrading older 7.x versions
Learn how to upgrade older 7.x versions of AMQ Broker.
2.1.1. Upgrading a broker instance from 7.0.x to 7.0.y
Learn how to upgrade from one 7.0 version to another for different operating systems.
2.1.1.1. Upgrading from 7.0.x to 7.0.y on Linux
Download the new archive to upgrade from one 7.0 version to another on Linux.
Prerequisites
Before upgrading AMQ Broker, review the release notes for the target release.
The release notes describe important enhancements, known issues, and changes to behavior in the target release.
For more information, see the AMQ Broker 7.0 Release Notes.
Procedure
- Download the required archive from the Red Hat Customer Portal by following the instructions provided in Downloading the AMQ Broker archive.
Change the owner of the archive to the same user that owns the AMQ Broker installation to be upgraded.
sudo chown amq-broker:amq-broker jboss-amq-7.x.x.redhat-1.zip
Move the archive to the directory created during the original installation of AMQ Broker. In the following example, the directory
/opt/redhatis used.sudo mv jboss-amq-7.x.x.redhat-1.zip /opt/redhat
As the directory owner, extract the contents of the compressed archive. The archive is kept in a compressed format. In the following example, the user
amq-brokerextracts the archive by using the unzip command.su - amq-broker cd /opt/redhat unzip jboss-amq-7.x.x.redhat-1.zip
Stop the broker if it is running.
<broker_instance_dir>/bin/artemis stopBack up the instance directory of the broker by copying it to the home directory of the current user.
cp -r <broker_instance_dir> ~/(Optional) Note the current version of the broker. After the broker stops, a line similar to the one below is displayed at the end of its log file, which can be found at
<broker_instance_dir>/log/artemis.log.INFO [org.apache.activemq.artemis.core.server] AMQ221002: Apache ActiveMQ Artemis Message Broker version 2.0.0.amq-700005-redhat-1 [4782d50d-47a2-11e7-a160-9801a793ea45] stopped, uptime 28 minutes
Edit the
<broker_instance_dir>/etc/artemis.profileconfiguration file to set theARTEMIS_HOMEproperty to the new directory created when the archive was extracted.ARTEMIS_HOME='/opt/redhat/jboss-amq-7.x.x-redhat-1'
Start the upgraded broker.
<broker_instance_dir>/bin/artemis run(Optional) Confirm that the broker is running and that the version has changed. After starting the broker, open the log file
<broker_instance_dir>/log/artemis.logand find two lines similar to the ones below. Note the new version number that appears in the log after the broker is live.INFO [org.apache.activemq.artemis.core.server] AMQ221007: Server is now live ... INFO [org.apache.activemq.artemis.core.server] AMQ221001: Apache ActiveMQ Artemis Message Broker version 2.1.0.amq-700005-redhat-1 [0.0.0.0, nodeID=4782d50d-47a2-11e7-a160-9801a793ea45]
2.1.1.2. Upgrading from 7.0.x to 7.0.y on Windows
Download the new archive to upgrade from one 7.0 version to another on Windows.
Prerequisites
Before upgrading AMQ Broker, review the release notes for the target release.
The release notes describe important enhancements, known issues, and changes to behavior in the target release.
For more information, see the AMQ Broker 7.0 Release Notes.
Procedure
- Download the required archive from the Red Hat Customer Portal by following the instructions provided in Downloading the AMQ Broker archive.
- Use a file manager to move the archive to the folder you created during the last installation of AMQ Broker.
- Extract the contents of the archive. Right-click the .zip file and select Extract All.
Stop the broker if it is running by entering the following command.
<broker_instance_dir>\bin\artemis-service.exe stopBack up the broker by using a file manager.
-
Right-click the
<broker_instance_dir>folder and select Copy. - Right-click in the same window and select Paste.
-
Right-click the
(Optional) Note the current version of the broker. After the broker stops, a line similar to the one below is displayed at the end of its log file, which can be found at
<broker_instance_dir>\log\artemis.log.INFO [org.apache.activemq.artemis.core.server] AMQ221002: Apache ActiveMQ Artemis Message Broker version 2.0.0.amq-700005-redhat-1 [4782d50d-47a2-11e7-a160-9801a793ea45] stopped, uptime 28 minutes
Edit the
<broker_instance_dir>\etc\artemis.profileconfiguration file to set theARTEMIS_HOMEproperty to the new directory created when the archive was extracted.ARTEMIS_HOME=<install_dir>Start the upgraded broker.
<broker_instance_dir>\bin\artemis-service.exe start(Optional) Confirm that the broker is running and that the version has changed. After starting the broker, open the log file
<broker_instance_dir>\log\artemis.logand find two lines similar to the ones below. Note the new version number that appears in the log after the broker is live.INFO [org.apache.activemq.artemis.core.server] AMQ221007: Server is now live ... INFO [org.apache.activemq.artemis.core.server] AMQ221001: Apache ActiveMQ Artemis Message Broker version 2.1.0.amq-700005-redhat-1 [0.0.0.0, nodeID=4782d50d-47a2-11e7-a160-9801a793ea45]
2.1.2. Upgrading a broker instance from 7.0.x to 7.1.0
Learn how to upgrade a 7.0.x broker instance to 7.1.0 for different operating systems.
AMQ Broker 7.1.0 includes configuration files and settings that were not included with previous versions. Upgrading a broker instance from 7.0.x to 7.1.0 requires adding these new files and settings to your existing 7.0.x broker instances.
Starting with AMQ Broker 7.1.0, you can access AMQ Management Console only from the local host by default. To learn about configuring remote access to the console, see link:https://access.redhat.com/documentation/en-us/red_hat_amq_broker/7.13/html-single/managing_amq_broker/ #proc-br-configuring-local-and-remote-access-to-console_managing[Configuring local and remote access to AMQ Management Console].
2.1.2.1. Upgrading from 7.0.x to 7.1.0 on Linux
Before you can upgrade a 7.0.x broker, you need to install Red Hat AMQ Broker 7.1.0 and create a temporary broker instance. This will generate the 7.1.0 configuration files required to upgrade a 7.0.x broker.
Prerequisites
Before upgrading AMQ Broker, review the release notes for the target release.
The release notes describe important enhancements, known issues, and changes to behavior in the target release.
For more information, see the AMQ Broker 7.1 Release Notes.
Before upgrading your 7.0.x brokers, you must first install version 7.1.
For steps on installing 7.1 on Linux, see This content is not included.Installing AMQ Broker.
Procedure
If it is running, stop the 7.0.x broker you want to upgrade.
$ <broker_instance_dir>/bin/artemis stopBack up the instance directory of the broker by copying it to the home directory of the current user.
cp -r <broker_instance_dir> ~/Open the file
artemis.profilein the<broker_instance_dir>/etc/directory of the 7.0.x broker.Update the
ARTEMIS_HOMEproperty so that its value refers to the installation directory for AMQ Broker 7.1.0:ARTEMIS_HOME="<7.1.0_install_dir>"On the line below the one you updated, add the property
ARTEMIS_INSTANCE_URIand assign it a value that refers to the 7.0.x broker instance directory:ARTEMIS_INSTANCE_URI="file://<7.0.x_broker_instance_dir>"Update the
JAVA_ARGSproperty by adding thejolokia.policyLocationparameter and assigning it the following value:-Djolokia.policyLocation=${ARTEMIS_INSTANCE_URI}/etc/jolokia-access.xml
Create a 7.1.0 broker instance. The creation procedure generates the configuration files required to upgrade from 7.0.x to 7.1.0. In the following example, note that the instance is created in the directory
upgrade_tmp:$ <7.1.0_install_dir>/bin/artemis create --allow-anonymous --user admin --password admin upgrade_tmpCopy configuration files from the
etcdirectory of the temporary 7.1.0 instance into the<broker_instance_dir>/etc/directory of the 7.0.x broker.Copy the
management.xmlfile:$ cp <temporary_7.1.0_broker_instance_dir>/etc/management.xml <7.0_broker_instance_dir>/etc/
Copy the
jolokia-access.xmlfile:$ cp <temporary_7.1.0_broker_instance_dir>/etc/jolokia-access.xml <7.0_broker_instance_dir>/etc/
Open up the
bootstrap.xmlfile in the<broker_instance_dir>/etc/directory of the 7.0.x broker.Comment out or delete the following two lines:
<app url="jolokia" war="jolokia.war"/>
<app url="hawtio" war="hawtio-no-slf4j.war"/>
Add the following to replace the two lines removed in the previous step:
<app url="console" war="console.war"/>
Start the broker that you upgraded:
$ <broker_instance_dir>/bin/artemis run
Additional resources
2.1.2.2. Upgrading from 7.0.x to 7.1.0 on Windows
Before you can upgrade a 7.0.x broker, you need to install Red Hat AMQ Broker 7.1.0 and create a temporary broker instance. This will generate the 7.1.0 configuration files required to upgrade a 7.0.x broker.
Prerequisites
Before upgrading AMQ Broker, review the release notes for the target release.
The release notes describe important enhancements, known issues, and changes to behavior in the target release.
For more information, see the AMQ Broker 7.1 Release Notes.
Before upgrading your 7.0.x brokers, you must first install version 7.1.
For steps on installing 7.1 on Windows, see Installing AMQ Broker.
Procedure
If it is running, stop the 7.0.x broker you want to upgrade:
> <broker_instance_dir>\bin\artemis-service.exe stopBack up the instance directory of the broker by using a file manager.
-
Right-click the
<broker_instance_dir>folder and select Copy. - Right-click in the same window and select Paste.
-
Right-click the
Open the file
artemis.profilein the<broker_instance_dir>/etc/directory of the 7.0.x broker.Update the
ARTEMIS_HOMEproperty so that its value refers to the installation directory for AMQ Broker 7.1.0:ARTEMIS_HOME="<7.1.0_install_dir>"On the line below the one you updated, add the property
ARTEMIS_INSTANCE_URIand assign it a value that refers to the 7.0.x broker instance directory:ARTEMIS_INSTANCE_URI="file://<7.0.x_broker_instance_dir>"Update the
JAVA_ARGSproperty by adding thejolokia.policyLocationparameter and assigning it the following value:-Djolokia.policyLocation=${ARTEMIS_INSTANCE_URI}/etc/jolokia-access.xml
Create a 7.1.0 broker instance. The creation procedure generates the configuration files required to upgrade from 7.0.x to 7.1.0. In the following example, note that the instance is created in the directory
upgrade_tmp:> <7.1.0_install_dir>/bin/artemis create --allow-anonymous --user admin --password admin upgrade_tmpCopy configuration files from the
etcdirectory of the temporary 7.1.0 instance into the<broker_instance_dir>/etc/directory of the 7.0.x broker.Copy the
management.xmlfile:> cp <temporary_7.1.0_broker_instance_dir>/etc/management.xml <7.0_broker_instance_dir>/etc/
Copy the
jolokia-access.xmlfile:> cp <temporary_7.1.0_broker_instance_dir>/etc/jolokia-access.xml <7.0_broker_instance_dir>/etc/
Open up the
bootstrap.xmlfile in the<broker_instance_dir>/etc/directory of the 7.0.x broker.Comment out or delete the following two lines:
<app url="jolokia" war="jolokia.war"/>
<app url="hawtio" war="hawtio-no-slf4j.war"/>
Add the following to replace the two lines removed in the previous step:
<app url="console" war="console.war"/>
Start the broker that you upgraded:
> <broker_instance_dir>\bin\artemis-service.exe start
Additional resources
2.1.3. Upgrading a broker instance from 7.1.x to 7.2.0
Learn how to upgrade a 7.1.x broker instance to 7.2.0 for different operating systems.
AMQ Broker 7.2.0 includes configuration files and settings that were not included with 7.0.x versions. If you are running 7.0.x instances, you must first upgrade those broker instances from 7.0.x to 7.1.0 before upgrading to 7.2.0.
Starting with AMQ Broker 7.1.0, you can access AMQ Management Console only from the local host by default. To learn about configuring remote access to the console, see link:https://access.redhat.com/documentation/en-us/red_hat_amq_broker/7.13/html-single/managing_amq_broker/ #proc-br-configuring-local-and-remote-access-to-console_managing[Configuring local and remote access to AMQ Management Console].
2.1.3.1. Upgrading from 7.1.x to 7.2.0 on Linux
Download the new archive to upgrade from 7.1.x to 7.2.0 on Linux.
Procedure
- Download the required archive from the Red Hat Customer Portal by following the instructions provided in Downloading the AMQ Broker archive.
Change the owner of the archive to the same user that owns the AMQ Broker installation to be upgraded.
sudo chown amq-broker:amq-broker amq-7.x.x.redhat-1.zip
Move the archive to the directory created during the original installation of AMQ Broker. In the following example, the directory
/opt/redhatis used.sudo mv amq-7.x.x.redhat-1.zip /opt/redhat
As the directory owner, extract the contents of the compressed archive. In the following example, the user
amq-brokerextracts the archive by using the unzip command.su - amq-broker cd /opt/redhat unzip jboss-amq-7.x.x.redhat-1.zip
Stop the broker if it is running.
<broker_instance_dir>/bin/artemis stopBack up the instance directory of the broker by copying it to the home directory of the current user.
cp -r <broker_instance_dir> ~/(Optional) Note the current version of the broker. After the broker stops, a line similar to the one below is displayed at the end of its log file, which can be found at
<broker_instance_dir>/log/artemis.log.INFO [org.apache.activemq.artemis.core.server] AMQ221001: Apache ActiveMQ Artemis Message Broker version 2.5.0.amq-720001-redhat-1 [0.0.0.0, nodeID=554cce00-63d9-11e8-9808-54ee759954c4]
Edit the
<broker_instance_dir>/etc/artemis.profileconfiguration file to set theARTEMIS_HOMEproperty to the new directory created when the archive was extracted.ARTEMIS_HOME='/opt/redhat/amq-7.x.x-redhat-1'
Start the upgraded broker.
<broker_instance_dir>/bin/artemis run(Optional) Confirm that the broker is running and that the version has changed. After starting the broker, open the log file
<broker_instance_dir>/log/artemis.logand find two lines similar to the ones below. Note the new version number that appears in the log after the broker is live.INFO [org.apache.activemq.artemis.core.server] AMQ221007: Server is now live ... INFO [org.apache.activemq.artemis.core.server] AMQ221001: Apache ActiveMQ Artemis Message Broker version 2.5.0.amq-720001-redhat-1 [0.0.0.0, nodeID=554cce00-63d9-11e8-9808-54ee759954c4]
NoteYou can now store a broker instance’s configuration files and data in any custom directory, including locations outside of the broker instance’s directory. In the
<broker_instance_dir>/etc/artemis.profilefile, update theARTEMIS_INSTANCE_ETC_URIproperty by specifying the location of the custom directory after creating the broker instance. Previously, these configuration files and data could only be stored in theetc/anddata/directories within the broker instance’s directory.
2.1.3.2. Upgrading from 7.1.x to 7.2.0 on Windows
Download the new archive to upgrade from 7.1.x to 7.2.0 on Windows.
Procedure
- Download the required archive from the Red Hat Customer Portal by following the instructions provided in Downloading the AMQ Broker archive.
- Use a file manager to move the archive to the folder you created during the last installation of AMQ Broker.
- Extract the contents of the archive. Right-click the .zip file and select Extract All.
Stop the broker if it is running by entering the following command.
<broker_instance_dir>\bin\artemis-service.exe stopBack up the broker by using a file manager.
-
Right-click the
<broker_instance_dir>folder and select Copy. - Right-click in the same window and select Paste.
-
Right-click the
(Optional) Note the current version of the broker. After the broker stops, a line similar to the one below is displayed at the end of its log file, which can be found at
<broker_instance_dir>\log\artemis.log.INFO [org.apache.activemq.artemis.core.server] AMQ221002: Apache ActiveMQ Artemis Message Broker version 2.0.0.amq-700005-redhat-1 [4782d50d-47a2-11e7-a160-9801a793ea45] stopped, uptime 28 minutes
Edit the
<broker_instance_dir>\etc\artemis.profile.cmdand<broker_instance_dir>\bin\artemis-service.xmlconfiguration files to set theARTEMIS_HOMEproperty to the new directory created when the archive was extracted.ARTEMIS_HOME=
<install_dir>Start the upgraded broker.
<broker_instance_dir>\bin\artemis-service.exe start(Optional) Confirm that the broker is running and that the version has changed. After starting the broker, open the log file
<broker_instance_dir>\log\artemis.logand find two lines similar to the ones below. Note the new version number that appears in the log after the broker is live.INFO [org.apache.activemq.artemis.core.server] AMQ221007: Server is now live ... INFO [org.apache.activemq.artemis.core.server] AMQ221001: Apache ActiveMQ Artemis Message Broker version 2.5.0.amq-720001-redhat-1 [0.0.0.0, nodeID=554cce00-63d9-11e8-9808-54ee759954c4]
NoteYou can now store a broker instance’s configuration files and data in any custom directory, including locations outside of the broker instance’s directory. In the
<broker_instance_dir>\etc\artemis.profilefile, update theARTEMIS_INSTANCE_ETC_URIproperty by specifying the location of the custom directory after creating the broker instance. Previously, these configuration files and data could only be stored in the\etcand\datadirectories within the broker instance’s directory.
Additional resources
2.1.4. Upgrading a broker instance from 7.2.x to 7.3.0
Learn how to upgrade a 7.2.x broker instance to 7.3.0 for different operating systems.
2.1.4.1. Resolve exception due to deprecated dispatch console
Starting in version 7.3.0, AMQ Broker no longer includes the Hawtio dispatch console plugin dispatch-hawtio-console.war. Previously, the dispatch console was used to manage AMQ Interconnect. However, AMQ Interconnect now uses its own, standalone web console. This change affects the upgrade procedures in the sections that follow.
If you take no further action before upgrading your broker instance to 7.3.0, the upgrade process produces an exception that looks like the following:
2019-04-11 18:00:41,334 WARN [org.eclipse.jetty.webapp.WebAppContext] Failed startup of context o.e.j.w.WebAppContext@1ef3efa8{/dispatch-hawtio-console,null,null}{/opt/amqbroker/amq-broker-7.3.0/web/dispatch-hawtio-console.war}: java.io.FileNotFoundException: /opt/amqbroker/amq-broker-7.3.0/web/dispatch-hawtio-console.war.You can safely ignore the preceding exception without affecting the success of your upgrade.
However, if you would prefer not to see this exception during your upgrade, you must first remove a reference to the Hawtio dispatch console plugin in the bootstrap.xml file of your existing broker instance. The bootstrap.xml file is in the {instance_directory}/etc/ directory of your broker instance. The following example shows some of the contents of the bootstrap.xml file for a AMQ Broker 7.2.4 instance:
<broker xmlns="http://activemq.org/schema">
....
   <!-- The web server is only bound to localhost by default -->
   <web bind="http://localhost:8161" path="web">
       <app url="redhat-branding" war="redhat-branding.war"/>
       <app url="artemis-plugin" war="artemis-plugin.war"/>
       <app url="dispatch-hawtio-console" war="dispatch-hawtio-console.war"/>
       <app url="console" war="console.war"/>
   </web>
</broker>
To avoid an exception when upgrading AMQ Broker to version 7.3.0, delete the line <app url="dispatch-hawtio-console" war="dispatch-hawtio-console.war"/>, as shown in the preceding example. Then, save the modified bootstrap file and start the upgrade process, as described in the sections that follow.
Starting with AMQ Broker 7.1.0, you can access AMQ Management Console only from the local host by default. To learn about configuring remote access to the console, see link:https://access.redhat.com/documentation/en-us/red_hat_amq_broker/7.13/html-single/managing_amq_broker/ #proc-br-configuring-local-and-remote-access-to-console_managing[Configuring local and remote access to AMQ Management Console].
2.1.4.2. Upgrading from 7.2.x to 7.3.0 on Linux
Download the new archive to upgrade from 7.2.x to 7.3.0 on Linux.
Procedure
- Download the required archive from the Red Hat Customer Portal by following the instructions provided in Downloading the AMQ Broker archive.
Change the owner of the archive to the same user that owns the AMQ Broker installation to be upgraded.
sudo chown amq-broker:amq-broker amq-7.x.x.redhat-1.zip
Move the archive to the directory created during the original installation of AMQ Broker. In the following example, the directory
/opt/redhatis used.sudo mv amq-7.x.x.redhat-1.zip /opt/redhat
As the directory owner, extract the contents of the compressed archive. In the following example, the user
amq-brokerextracts the archive by using the unzip command.su - amq-broker cd /opt/redhat unzip jboss-amq-7.x.x.redhat-1.zip
Stop the broker if it is running.
<broker_instance_dir>/bin/artemis stopBack up the instance directory of the broker by copying it to the home directory of the current user.
cp -r <broker_instance_dir> ~/(Optional) Note the current version of the broker. After the broker stops, a line similar to the one below is displayed at the end of its log file, which can be found at
<broker_instance_dir>/log/artemis.log.INFO [org.apache.activemq.artemis.core.server] AMQ221001: Apache ActiveMQ Artemis Message Broker version 2.6.3.amq-720001-redhat-1 [0.0.0.0, nodeID=554cce00-63d9-11e8-9808-54ee759954c4]
Edit the
<broker_instance_dir>/etc/artemis.profileconfiguration file to set theARTEMIS_HOMEproperty to the new directory created when the archive was extracted.ARTEMIS_HOME='/opt/redhat/amq-7.x.x-redhat-1'
Start the upgraded broker.
<broker_instance_dir>/bin/artemis run(Optional) Confirm that the broker is running and that the version has changed. After starting the broker, open the log file
<broker_instance_dir>/log/artemis.logand find two lines similar to the ones below. Note the new version number that appears in the log after the broker is live.INFO [org.apache.activemq.artemis.core.server] AMQ221007: Server is now live ... INFO [org.apache.activemq.artemis.core.server] AMQ221001: Apache ActiveMQ Artemis Message Broker version 2.7.0.redhat-00054 [0.0.0.0, nodeID=554cce00-63d9-11e8-9808-54ee759954c4]
Note* You can now store a broker instance’s configuration files and data in any custom directory, including locations outside of the broker instance’s directory. In the
<broker_instance_dir>/etc/artemis.profilefile, update theARTEMIS_INSTANCE_ETC_URIproperty by specifying the location of the custom directory after creating the broker instance. Previously, these configuration files and data could only be stored in theetc/anddata/directories within the broker instance’s directory.
2.1.4.3. Upgrading from 7.2.x to 7.3.0 on Windows
Download the new archive to upgrade from 7.2.x to 7.3.0 on Windows.
Procedure
- Download the required archive from the Red Hat Customer Portal by following the instructions provided in Downloading the AMQ Broker archive.
- Use a file manager to move the archive to the folder you created during the last installation of AMQ Broker.
- Extract the contents of the archive. Right-click the .zip file and select Extract All.
Stop the broker if it is running by entering the following command.
<broker_instance_dir>\bin\artemis-service.exe stopBack up the broker by using a file manager.
-
Right-click the
<broker_instance_dir>folder and select Copy. - Right-click in the same window and select Paste.
-
Right-click the
(Optional) Note the current version of the broker. After the broker stops, a line similar to the one below is displayed at the end of its log file, which can be found at
<broker_instance_dir>\log\artemis.log.INFO [org.apache.activemq.artemis.core.server] AMQ221002: Apache ActiveMQ Artemis Message Broker version 2.6.3.amq-720001-redhat-1 [4782d50d-47a2-11e7-a160-9801a793ea45] stopped, uptime 28 minutes
Edit the
<broker_instance_dir>\etc\artemis.profile.cmdand<broker_instance_dir>\bin\artemis-service.xmlconfiguration files to set theARTEMIS_HOMEproperty to the new directory created when the archive was extracted.ARTEMIS_HOME=
<install_dir>Edit the
<broker_instance_dir>\etc\artemis.profile.cmdconfiguration file to set the JAVA_ARGS environment variable to reference the correct log manager version.JAVA_ARGS=
<install_dir>\lib\jboss-logmanager-2.0.3.Final-redhat-1.jarEdit the
<broker_instance_dir>\bin\artemis-service.xmlconfiguration file to set the bootstrap class path start argument to reference the correct log manager version.<startargument>Xbootclasspath/a:%ARTEMIS_HOME%\lib\jboss-logmanager-2.0.3.Final-redhat-1.jar</startargument>
Start the upgraded broker.
<broker_instance_dir>\bin\artemis-service.exe start(Optional) Confirm that the broker is running and that the version has changed. After starting the broker, open the log file
<broker_instance_dir>\log\artemis.logand find two lines similar to the ones below. Note the new version number that appears in the log after the broker is live.INFO [org.apache.activemq.artemis.core.server] AMQ221007: Server is now live ... INFO [org.apache.activemq.artemis.core.server] AMQ221001: Apache ActiveMQ Artemis Message Broker version 2.7.0.redhat-00054 [0.0.0.0, nodeID=554cce00-63d9-11e8-9808-54ee759954c4]
You can now store a broker instance’s configuration files and data in any custom directory, including locations outside of the broker instance’s directory. In the
<broker_instance_dir>\etc\artemis.profilefile, update theARTEMIS_INSTANCE_ETC_URIproperty by specifying the location of the custom directory after creating the broker instance. Previously, these configuration files and data could only be stored in the\etcand\datadirectories within the broker instance’s directory.
Additional resources
2.1.5. Upgrading a broker instance from 7.3.0 to 7.4.0
Learn how to upgrade a 7.3.0 broker instance to 7.4.0 for different operating systems.
Starting with AMQ Broker 7.1.0, you can access AMQ Management Console only from the local host by default. To learn about configuring remote access to the console, see link:https://access.redhat.com/documentation/en-us/red_hat_amq_broker/7.13/html-single/managing_amq_broker/ #proc-br-configuring-local-and-remote-access-to-console_managing[Configuring local and remote access to AMQ Management Console].
2.1.5.1. Upgrading from 7.3.0 to 7.4.0 on Linux
Download the new archive to upgrade from 7.3.0 to 7.4.0 on Linux.
Procedure
- Download the required archive from the Red Hat Customer Portal. Follow the instructions provided in Downloading the AMQ Broker archive.
Change the owner of the archive to the same user that owns the AMQ Broker installation to be upgraded. The following example shows a user called
amq-broker.sudo chown amq-broker:amq-broker amq-broker-7.x.x.redhat-1.zip
Move the archive to the directory created during the original installation of AMQ Broker. The following example uses
/opt/redhat.sudo mv amq-broker-7.x.x.redhat-1.zip /opt/redhat
As the directory owner, extract the contents of the compressed archive. In the following example, the user
amq-brokerextracts the archive using theunzipcommand.su - amq-broker cd /opt/redhat unzip amq-broker-7.x.x.redhat-1.zip
If the broker is running, stop it.
<broker_instance_dir>/bin/artemis stopBack up the instance directory of the broker by copying it to the home directory of the current user.
cp -r <broker_instance_dir> ~/(Optional) Note the current version of the broker. After the broker stops, you see a line similar to the one below at the end of the
<broker_instance_dir>/log/artemis.logfile.INFO [org.apache.activemq.artemis.core.server] AMQ221001: Apache ActiveMQ Artemis Message Broker version 2.7.0.redhat-00054 [0.0.0.0, nodeID=554cce00-63d9-11e8-9808-54ee759954c4]
Edit the
<broker_instance_dir>/etc/artemis.profileconfiguration file.Set the
ARTEMIS_HOMEproperty to the new directory created when the archive was extracted.ARTEMIS_HOME='/opt/redhat/amq-broker-7.x.x-redhat-1'
Edit the
JAVA_ARGSproperty. Add the bootstrap class path argument, which references a dependent file for the log manager.-Xbootclasspath/a:$ARTEMIS_HOME/lib/wildfly-common-1.5.1.Final-redhat-00001.jar
Edit the
<broker_instance_dir>/etc/bootstrap.xmlconfiguration file. In the<web>configuration element, add a reference to the metrics plugin file for AMQ Broker.<app url="metrics" war="metrics.war"/>
Start the upgraded broker.
<broker_instance_dir>/bin/artemis run(Optional) Confirm that the broker is running and that the version has changed. After starting the broker, open the
<broker_instance_dir>/log/artemis.logfile. Find two lines similar to the ones below. Note the new version number that appears in the log when the broker is live.INFO [org.apache.activemq.artemis.core.server] AMQ221007: Server is now live ... INFO [org.apache.activemq.artemis.core.server] AMQ221001: Apache ActiveMQ Artemis Message Broker version 2.9.0.redhat-00001 [0.0.0.0, nodeID=554cce00-63d9-11e8-9808-54ee759954c4]
Additional resources
2.1.5.2. Upgrading from 7.3.0 to 7.4.0 on Windows
Download the new archive to upgrade from 7.3.0 to 7.4.0 on Windows.
Procedure
- Download the required archive from the Red Hat Customer Portal by following the instructions provided in Downloading the AMQ Broker archive.
- Use a file manager to move the archive to the folder you created during the last installation of AMQ Broker.
- Extract the contents of the archive. Right-click the .zip file and select Extract All.
If the broker is running, stop it.
<broker_instance_dir>\bin\artemis-service.exe stopBack up the broker using a file manager.
-
Right-click the
<broker_instance_dir>folder and select Copy. - Right-click in the same window and select Paste.
-
Right-click the
(Optional) Note the current version of the broker. After the broker stops, you see a line similar to the one below at the end of the
<broker_instance_dir>\log\artemis.logfile.INFO [org.apache.activemq.artemis.core.server] AMQ221002: Apache ActiveMQ Artemis Message Broker version 2.7.0.redhat-00054 [4782d50d-47a2-11e7-a160-9801a793ea45] stopped, uptime 28 minutes
Edit the
<broker_instance_dir>\etc\artemis.profile.cmdand<broker_instance_dir>\bin\artemis-service.xmlconfiguration files. Set theARTEMIS_HOMEproperty to the new directory created when the archive was extracted.ARTEMIS_HOME=
<install_dir>Edit the
<broker_instance_dir>\etc\artemis.profile.cmdconfiguration file. Set the JAVA_ARGS environment variable to reference the correct log manager version and dependent file.JAVA_ARGS=
-Xbootclasspath/%ARTEMIS_HOME%\lib\jboss-logmanager-2.1.10.Final-redhat-00001.jar;%ARTEMIS_HOME%\lib\wildfly-common-1.5.1.Final-redhat-00001.jarEdit the
<broker_instance_dir>\bin\artemis-service.xmlconfiguration file. Set the bootstrap class path start argument to reference the correct log manager version and dependent file.<startargument>-Xbootclasspath/a:%ARTEMIS_HOME%\lib\jboss-logmanager-2.1.10.Final-redhat-00001.jar;%ARTEMIS_HOME%\lib\wildfly-common-1.5.1.Final-redhat-00001.jar</startargument>
Edit the
<broker_instance_dir>\etc\bootstrap.xmlconfiguration file. In the<web>configuration element, add a reference to the metrics plugin file for AMQ Broker.<app url="metrics" war="metrics.war"/>
Start the upgraded broker.
<broker_instance_dir>\bin\artemis-service.exe start(Optional) Confirm that the broker is running and that the version has changed. After starting the broker, open the
<broker_instance_dir>\log\artemis.logfile. Find two lines similar to the ones below. Note the new version number that appears in the log when the broker is live.INFO [org.apache.activemq.artemis.core.server] AMQ221007: Server is now live ... INFO [org.apache.activemq.artemis.core.server] AMQ221001: Apache ActiveMQ Artemis Message Broker version 2.9.0.redhat-00001 [0.0.0.0, nodeID=554cce00-63d9-11e8-9808-54ee759954c4]
You can now store a broker instance’s configuration files and data in any custom directory, including locations outside of the broker instance’s directory. In the
<broker_instance_dir>\etc\artemis.profilefile, update theARTEMIS_INSTANCE_ETC_URIproperty by specifying the location of the custom directory after creating the broker instance. Previously, these configuration files and data could only be stored in the\etcand\datadirectories within the broker instance’s directory.
Additional resources
2.2. Upgrading a broker instance from 7.4.0 to 7.4.x
Learn how to upgrade a 7.4.0 broker instance to 7.4.x for different operating systems.
AMQ Broker 7.4 has been designated as a Long Term Support (LTS) release version. Bug fixes and security advisories will be made available for AMQ Broker 7.4 in a series of micro releases (7.4.1, 7.4.2, and so on) for a period of at least 12 months. This means that you will be able to get recent bug fixes and security advisories for AMQ Broker without having to upgrade to a new minor release. For more information, see This content is not included.Long Term Support for AMQ Broker.
Starting with AMQ Broker 7.1.0, you can access AMQ Management Console only from the local host by default. To learn about configuring remote access to the console, see link:https://access.redhat.com/documentation/en-us/red_hat_amq_broker/7.13/html-single/managing_amq_broker/ #proc-br-configuring-local-and-remote-access-to-console_managing[Configuring local and remote access to AMQ Management Console].
2.2.1. Upgrading from 7.4.0 to 7.4.x on Linux
Download the new archive to upgrade from 7.4.0 to 7.4.x on Linux.
Procedure
- Download the required archive from the Red Hat Customer Portal. Follow the instructions provided in Downloading the AMQ Broker archive.
Change the owner of the archive to the same user that owns the AMQ Broker installation to be upgraded. The following example shows a user called
amq-broker.sudo chown amq-broker:amq-broker amq-broker-7.4.x.redhat-1.zip
Move the archive to the directory created during the original installation of AMQ Broker. The following example uses
/opt/redhat.sudo mv amq-broker-7.4.x.redhat-1.zip /opt/redhat
As the directory owner, extract the contents of the compressed archive. In the following example, the user
amq-brokerextracts the archive using theunzipcommand.su - amq-broker cd /opt/redhat unzip amq-broker-7.4.x.redhat-1.zip
If the broker is running, stop it.
<broker_instance_dir>/bin/artemis stopBack up the instance directory of the broker by copying it to the home directory of the current user.
cp -r <broker_instance_dir> ~/(Optional) Note the current version of the broker. After the broker stops, you see a line similar to the one below at the end of the
<broker_instance_dir>/log/artemis.logfile.INFO [org.apache.activemq.artemis.core.server] AMQ221001: Apache ActiveMQ Artemis Message Broker version 2.7.0.redhat-00054 [0.0.0.0, nodeID=554cce00-63d9-11e8-9808-54ee759954c4]
Edit the
<broker_instance_dir>/etc/artemis.profileconfiguration file. Set theARTEMIS_HOMEproperty to the new directory created when the archive was extracted.ARTEMIS_HOME='/opt/redhat/amq-broker-7.4.x-redhat-1'
Start the upgraded broker.
<broker_instance_dir>/bin/artemis run(Optional) Confirm that the broker is running and that the version has changed. After starting the broker, open the
<broker_instance_dir>/log/artemis.logfile. Find two lines similar to the ones below. Note the new version number that appears in the log when the broker is live.INFO [org.apache.activemq.artemis.core.server] AMQ221007: Server is now live ... INFO [org.apache.activemq.artemis.core.server] AMQ221001: Apache ActiveMQ Artemis Message Broker version 2.9.0.redhat-00001 [0.0.0.0, nodeID=554cce00-63d9-11e8-9808-54ee759954c4]
NoteYou can now store a broker instance’s configuration files and data in any custom directory, including locations outside of the broker instance’s directory. In the
<broker_instance_dir>/etc/artemis.profilefile, update theARTEMIS_INSTANCE_ETC_URIproperty by specifying the location of the custom directory after creating the broker instance. Previously, these configuration files and data could only be stored in theetc/anddata/directories within the broker instance’s directory.
Additional resources
2.2.2. Upgrading from 7.4.0 to 7.4.x on Windows
Download the new archive to upgrade from 7.4.0 to 7.4.x on Windows.
Procedure
- Download the required archive from the Red Hat Customer Portal by following the instructions provided in Downloading the AMQ Broker archive.
- Use a file manager to move the archive to the folder you created during the last installation of AMQ Broker.
- Extract the contents of the archive. Right-click the .zip file and select Extract All.
If the broker is running, stop it.
<broker_instance_dir>\bin\artemis-service.exe stopBack up the broker using a file manager.
-
Right-click the
<broker_instance_dir>folder and select Copy. - Right-click in the same window and select Paste.
-
Right-click the
(Optional) Note the current version of the broker. After the broker stops, you see a line similar to the one below at the end of the
<broker_instance_dir>\log\artemis.logfile.INFO [org.apache.activemq.artemis.core.server] AMQ221002: Apache ActiveMQ Artemis Message Broker version 2.7.0.redhat-00054 [4782d50d-47a2-11e7-a160-9801a793ea45] stopped, uptime 28 minutes
Edit the
<broker_instance_dir>\etc\artemis.profile.cmdand<broker_instance_dir>\bin\artemis-service.xmlconfiguration files. Set theARTEMIS_HOMEproperty to the new directory created when the archive was extracted.ARTEMIS_HOME=
<install_dir>Start the upgraded broker.
<broker_instance_dir>\bin\artemis-service.exe start(Optional) Confirm that the broker is running and that the version has changed. After starting the broker, open the
<broker_instance_dir>\log\artemis.logfile. Find two lines similar to the ones below. Note the new version number that appears in the log when the broker is live.INFO [org.apache.activemq.artemis.core.server] AMQ221007: Server is now live ... INFO [org.apache.activemq.artemis.core.server] AMQ221001: Apache ActiveMQ Artemis Message Broker version 2.9.0.redhat-00001 [0.0.0.0, nodeID=554cce00-63d9-11e8-9808-54ee759954c4]
NoteYou can now store a broker instance’s configuration files and data in any custom directory, including locations outside of the broker instance’s directory. In the
<broker_instance_dir>\etc\artemis.profilefile, update theARTEMIS_INSTANCE_ETC_URIproperty by specifying the location of the custom directory after creating the broker instance. Previously, these configuration files and data could only be stored in the\etcand\datadirectories within the broker instance’s directory.
Additional resources
2.3. Upgrading a broker instance from 7.4.x to 7.5.0
Learn how to upgrade a 7.4.x broker instance to 7.5.0 for different operating systems.
Starting with AMQ Broker 7.1.0, you can access AMQ Management Console only from the local host by default. To learn about configuring remote access to the console, see link:https://access.redhat.com/documentation/en-us/red_hat_amq_broker/7.13/html-single/managing_amq_broker/ #proc-br-configuring-local-and-remote-access-to-console_managing[Configuring local and remote access to AMQ Management Console].
2.3.1. Upgrading from 7.4.x to 7.5.0 on Linux
Download the new archive to upgrade from 7.4.x to 7.5.0 on Linux.
Procedure
- Download the required archive from the Red Hat Customer Portal. Follow the instructions provided in Downloading the AMQ Broker archive.
Change the owner of the archive to the same user that owns the AMQ Broker installation to be upgraded. The following example shows a user called
amq-broker.sudo chown amq-broker:amq-broker amq-broker-7.5.0.redhat-1.zip
Move the archive to the directory created during the original installation of AMQ Broker. The following example uses
/opt/redhat.sudo mv amq-broker-7.5.0.redhat-1.zip /opt/redhat
As the directory owner, extract the contents of the compressed archive. In the following example, the user
amq-brokerextracts the archive using theunzipcommand.su - amq-broker cd /opt/redhat unzip amq-broker-7.5.0.redhat-1.zip
If the broker is running, stop it.
<broker_instance_dir>/bin/artemis stopBack up the instance directory of the broker by copying it to the home directory of the current user.
cp -r <broker_instance_dir> ~/(Optional) Note the current version of the broker. After the broker stops, you see a line similar to the one below at the end of the
<broker_instance_dir>/log/artemis.logfile.INFO [org.apache.activemq.artemis.core.server] AMQ221001: Apache ActiveMQ Artemis Message Broker version 2.7.0.redhat-00054 [0.0.0.0, nodeID=554cce00-63d9-11e8-9808-54ee759954c4]
Edit the
<broker_instance_dir>/etc/artemis.profileconfiguration file.Set the
ARTEMIS_HOMEproperty to the new directory created when the archive was extracted.ARTEMIS_HOME='/opt/redhat/amq-broker-7.5.0-redhat-1'
Edit the
JAVA_ARGSproperty. Add the bootstrap class path argument, which references a dependent file for the log manager.-Xbootclasspath/a:$ARTEMIS_HOME/lib/wildfly-common-1.5.2.Final-redhat-00001.jar
Start the upgraded broker.
<broker_instance_dir>/bin/artemis run(Optional) Confirm that the broker is running and that the version has changed. After starting the broker, open the
<broker_instance_dir>/log/artemis.logfile. Find two lines similar to the ones below. Note the new version number that appears in the log when the broker is live.INFO [org.apache.activemq.artemis.core.server] AMQ221007: Server is now live ... INFO [org.apache.activemq.artemis.core.server] AMQ221001: Apache ActiveMQ Artemis Message Broker version 2.9.0.redhat-00001 [0.0.0.0, nodeID=554cce00-63d9-11e8-9808-54ee759954c4]
NoteYou can now store a broker instance’s configuration files and data in any custom directory, including locations outside of the broker instance’s directory. In the
<broker_instance_dir>/etc/artemis.profilefile, update theARTEMIS_INSTANCE_ETC_URIproperty by specifying the location of the custom directory after creating the broker instance. Previously, these configuration files and data could only be stored in theetc/anddata/directories within the broker instance’s directory.
Additional resources
2.3.2. Upgrading from 7.4.x to 7.5.0 on Windows
Download the new archive to upgrade from 7.4.x to 7.5.0 on Windows.
Procedure
- Download the required archive from the Red Hat Customer Portal by following the instructions provided in Downloading the AMQ Broker archive.
- Use a file manager to move the archive to the folder you created during the last installation of AMQ Broker.
- Extract the contents of the archive. Right-click the .zip file and select Extract All.
If the broker is running, stop it.
<broker_instance_dir>\bin\artemis-service.exe stopBack up the broker using a file manager.
-
Right-click the
<broker_instance_dir>folder and select Copy. - Right-click in the same window and select Paste.
-
Right-click the
(Optional) Note the current version of the broker. After the broker stops, you see a line similar to the one below at the end of the
<broker_instance_dir>\log\artemis.logfile.INFO [org.apache.activemq.artemis.core.server] AMQ221002: Apache ActiveMQ Artemis Message Broker version 2.7.0.redhat-00054 [4782d50d-47a2-11e7-a160-9801a793ea45] stopped, uptime 28 minutes
Edit the
<broker_instance_dir>\etc\artemis.profile.cmdand<broker_instance_dir>\bin\artemis-service.xmlconfiguration files. Set theARTEMIS_HOMEproperty to the new directory created when the archive was extracted.ARTEMIS_HOME=
<install_dir>Edit the
<broker_instance_dir>\etc\artemis.profile.cmdconfiguration file. Set theJAVA_ARGSenvironment variable to reference the correct log manager version and dependent file.JAVA_ARGS=-Xbootclasspath/%ARTEMIS_HOME%\lib\jboss-logmanager-2.1.10.Final-redhat-00001.jar;%ARTEMIS_HOME%\lib\wildfly-common-1.5.2.Final-redhat-00001.jar
Edit the
<broker_instance_dir>\bin\artemis-service.xmlconfiguration file. Set the bootstrap class path start argument to reference the correct log manager version and dependent file.<startargument>-Xbootclasspath/a:%ARTEMIS_HOME%\lib\jboss-logmanager-2.1.10.Final-redhat-00001.jar;%ARTEMIS_HOME%\lib\wildfly-common-1.5.2.Final-redhat-00001.jar</startargument>
Start the upgraded broker.
<broker_instance_dir>\bin\artemis-service.exe start(Optional) Confirm that the broker is running and that the version has changed. After starting the broker, open the
<broker_instance_dir>\log\artemis.logfile. Find two lines similar to the ones below. Note the new version number that appears in the log when the broker is live.INFO [org.apache.activemq.artemis.core.server] AMQ221007: Server is now live ... INFO [org.apache.activemq.artemis.core.server] AMQ221001: Apache ActiveMQ Artemis Message Broker version 2.9.0.redhat-00001 [0.0.0.0, nodeID=554cce00-63d9-11e8-9808-54ee759954c4]
NoteYou can now store a broker instance’s configuration files and data in any custom directory, including locations outside of the broker instance’s directory. In the
<broker_instance_dir>\etc\artemis.profilefile, update theARTEMIS_INSTANCE_ETC_URIproperty by specifying the location of the custom directory after creating the broker instance. Previously, these configuration files and data could only be stored in the\etcand\datadirectories within the broker instance’s directory.
Additional resources
2.4. Upgrading a broker instance from 7.5.0 to 7.6.0
Learn how to upgrade a 7.5.0 broker instance to 7.6.0 for different operating systems.
Starting with AMQ Broker 7.1.0, you can access AMQ Management Console only from the local host by default. To learn about configuring remote access to the console, see link:https://access.redhat.com/documentation/en-us/red_hat_amq_broker/7.13/html-single/managing_amq_broker/ #proc-br-configuring-local-and-remote-access-to-console_managing[Configuring local and remote access to AMQ Management Console].
2.4.1. Upgrading from 7.5.0 to 7.6.0 on Linux
Download the new archive to upgrade from 7.5.0 to 7.6.0 on Linux.
Procedure
- Download the required archive from the Red Hat Customer Portal by following the instructions provided in Downloading the AMQ Broker archive.
Change the owner of the archive to the same user that owns the AMQ Broker installation to be upgraded. The following example shows a user called
amq-broker.sudo chown amq-broker:amq-broker amq-broker-7.6.0.redhat-1.zip
Move the archive to the directory created during the original installation of AMQ Broker. The following example uses
/opt/redhat.sudo mv amq-broker-7.6.0.redhat-1.zip /opt/redhat
As the directory owner, extract the contents of the compressed archive. In the following example, the user
amq-brokerextracts the archive using theunzipcommand.su - amq-broker cd /opt/redhat unzip amq-broker-7.6.0.redhat-1.zip
If the broker is running, stop it.
<broker_instance_dir>/bin/artemis stopBack up the instance directory of the broker by copying it to the home directory of the current user.
cp -r <broker_instance_dir> ~/(Optional) Note the current version of the broker. After the broker stops, you see a line similar to the one below at the end of the
<broker_instance_dir>/log/artemis.logfile.INFO [org.apache.activemq.artemis.core.server] AMQ221001: Apache ActiveMQ Artemis Message Broker version 2.9.0.redhat-00054 [0.0.0.0, nodeID=554cce00-63d9-11e8-9808-54ee759954c4]
Edit the
<broker_instance_dir>/etc/artemis.profileconfiguration file.Set the
ARTEMIS_HOMEproperty to the new directory created when the archive was extracted.ARTEMIS_HOME='/opt/redhat/amq-broker-7.6.0-redhat-1'
Edit the
JAVA_ARGSproperty. Add the bootstrap class path argument, which references a dependent file for the log manager.-Xbootclasspath/a:$ARTEMIS_HOME/lib/wildfly-common-1.5.2.Final-redhat-00002.jar
Start the upgraded broker.
<broker_instance_dir>/bin/artemis run(Optional) Confirm that the broker is running and that the version has changed. After starting the broker, open the
<broker_instance_dir>/log/artemis.logfile. Find two lines similar to the ones below. Note the new version number that appears in the log when the broker is live.INFO [org.apache.activemq.artemis.core.server] AMQ221007: Server is now live ... INFO [org.apache.activemq.artemis.core.server] AMQ221001: Apache ActiveMQ Artemis Message Broker version 2.11.0.redhat-00001 [0.0.0.0, nodeID=554cce00-63d9-11e8-9808-54ee759954c4]
NoteYou can now store a broker instance’s configuration files and data in any custom directory, including locations outside of the broker instance’s directory. In the
<broker_instance_dir>/etc/artemis.profilefile, update theARTEMIS_INSTANCE_ETC_URIproperty by specifying the location of the custom directory after creating the broker instance. Previously, these configuration files and data could only be stored in theetc/anddata/directories within the broker instance’s directory.
Additional resources
2.4.2. Upgrading from 7.5.0 to 7.6.0 on Windows
Download the new archive to upgrade from 7.5.0 to 7.6.0 on Windows.
Procedure
- Download the required archive from the Red Hat Customer Portal by following the instructions provided in Downloading the AMQ Broker archive.
- Use a file manager to move the archive to the folder you created during the last installation of AMQ Broker.
- Extract the contents of the archive. Right-click the .zip file and select Extract All.
If the broker is running, stop it.
<broker_instance_dir>\bin\artemis-service.exe stopBack up the broker using a file manager.
-
Right-click the
<broker_instance_dir>folder and select Copy. - Right-click in the same window and select Paste.
-
Right-click the
(Optional) Note the current version of the broker. After the broker stops, you see a line similar to the one below at the end of the
<broker_instance_dir>\log\artemis.logfile.INFO [org.apache.activemq.artemis.core.server] AMQ221002: Apache ActiveMQ Artemis Message Broker version 2.9.0.redhat-00054 [4782d50d-47a2-11e7-a160-9801a793ea45] stopped, uptime 28 minutes
Edit the
<broker_instance_dir>\etc\artemis.profile.cmdand<broker_instance_dir>\bin\artemis-service.xmlconfiguration files. Set theARTEMIS_HOMEproperty to the new directory created when the archive was extracted.ARTEMIS_HOME=
<install_dir>Edit the
<broker_instance_dir>\etc\artemis.profile.cmdconfiguration file. Set theJAVA_ARGSenvironment variable to reference the correct log manager version and dependent file.JAVA_ARGS=-Xbootclasspath/%ARTEMIS_HOME%\lib\jboss-logmanager-2.1.10.Final-redhat-00001.jar;%ARTEMIS_HOME%\lib\wildfly-common-1.5.2.Final-redhat-00002.jar
Edit the
<broker_instance_dir>\bin\artemis-service.xmlconfiguration file. Set the bootstrap class path start argument to reference the correct log manager version and dependent file.<startargument>-Xbootclasspath/a:%ARTEMIS_HOME%\lib\jboss-logmanager-2.1.10.Final-redhat-00001.jar;%ARTEMIS_HOME%\lib\wildfly-common-1.5.2.Final-redhat-00002.jar</startargument>
Start the upgraded broker.
<broker_instance_dir>\bin\artemis-service.exe start(Optional) Confirm that the broker is running and that the version has changed. After starting the broker, open the
<broker_instance_dir>\log\artemis.logfile. Find two lines similar to the ones below. Note the new version number that appears in the log when the broker is live.INFO [org.apache.activemq.artemis.core.server] AMQ221007: Server is now live ... INFO [org.apache.activemq.artemis.core.server] AMQ221001: Apache ActiveMQ Artemis Message Broker version 2.11.0.redhat-00001 [0.0.0.0, nodeID=554cce00-63d9-11e8-9808-54ee759954c4]
NoteYou can now store a broker instance’s configuration files and data in any custom directory, including locations outside of the broker instance’s directory. In the
<broker_instance_dir>\etc\artemis.profilefile, update theARTEMIS_INSTANCE_ETC_URIproperty by specifying the location of the custom directory after creating the broker instance. Previously, these configuration files and data could only be stored in the\etcand\datadirectories within the broker instance’s directory.
Additional resources
2.5. Upgrading a broker instance from 7.6.0 to 7.7.0
Learn how to upgrade a 7.6.0 broker instance to 7.7.0 for different operating systems.
Starting with AMQ Broker 7.1.0, you can access AMQ Management Console only from the local host by default. To learn about configuring remote access to the console, see link:https://access.redhat.com/documentation/en-us/red_hat_amq_broker/7.13/html-single/managing_amq_broker/ #proc-br-configuring-local-and-remote-access-to-console_managing[Configuring local and remote access to AMQ Management Console].
2.5.1. Upgrading from 7.6.0 to 7.7.0 on Linux
Download the new archive to upgrade from 7.6.0 to 7.7.0 on Linux.
Procedure
- Download the required archive from the Red Hat Customer Portal by following the instructions provided in Downloading the AMQ Broker archive.
Change the owner of the archive to the same user that owns the AMQ Broker installation to be upgraded. The following example shows a user called
amq-broker.sudo chown amq-broker:amq-broker amq-broker-7.7.0.redhat-1.zip
Move the archive to the directory created during the original installation of AMQ Broker. The following example uses
/opt/redhat.sudo mv amq-broker-7.7.0.redhat-1.zip /opt/redhat
As the directory owner, extract the contents of the compressed archive. In the following example, the user
amq-brokerextracts the archive using theunzipcommand.su - amq-broker cd /opt/redhat unzip amq-broker-7.7.0.redhat-1.zip
If the broker is running, stop it.
<broker_instance_dir>/bin/artemis stopBack up the instance directory of the broker by copying it to the home directory of the current user.
cp -r <broker_instance_dir> ~/(Optional) Note the current version of the broker. After the broker stops, you see a line similar to the one below at the end of the
<broker_instance_dir>/log/artemis.logfile.INFO [org.apache.activemq.artemis.core.server] AMQ221001: Apache ActiveMQ Artemis Message Broker version 2.11.0.redhat-00001 [0.0.0.0, nodeID=554cce00-63d9-11e8-9808-54ee759954c4]
Edit the
<broker_instance_dir>/etc/artemis.profileconfiguration file.Set the
ARTEMIS_HOMEproperty to the new directory created when the archive was extracted. For example:ARTEMIS_HOME='/opt/redhat/amq-broker-7.7.0-redhat-1'
Locate the
JAVA_ARGSproperty. Ensure that the bootstrap class path argument references the required version of a dependent file for the log manager, as shown below.-Xbootclasspath/a:$ARTEMIS_HOME/lib/wildfly-common-1.5.2.Final-redhat-00002.jar
Edit the
<broker_instance_dir>/etc/logging.propertiesconfiguration file.On the list of additional loggers to be configured, include the
org.apache.activemq.audit.resourceresource logger that was added in AMQ Broker 7.7.0.loggers=org.eclipse.jetty,org.jboss.logging,org.apache.activemq.artemis.core.server,org.apache.activemq.artemis.utils,org.apache.activemq.artemis.journal,org.apache.activemq.artemis.jms.server,org.apache.activemq.artemis.integration.bootstrap,org.apache.activemq.audit.base,org.apache.activemq.audit.message,org.apache.activemq.audit.resourceBefore the Console handler configuration section, add a default configuration for the resource logger.
..

logger.org.apache.activemq.audit.resource.level=ERROR
logger.org.apache.activemq.audit.resource.handlers=AUDIT_FILE
logger.org.apache.activemq.audit.resource.useParentHandlers=false

# Console handler configuration
..
Start the upgraded broker.
<broker_instance_dir>/bin/artemis run(Optional) Confirm that the broker is running and that the version has changed. After starting the broker, open the
<broker_instance_dir>/log/artemis.logfile. Find two lines similar to the ones below. Note the new version number that appears in the log when the broker is live.INFO [org.apache.activemq.artemis.core.server] AMQ221007: Server is now live ... INFO [org.apache.activemq.artemis.core.server] AMQ221001: Apache ActiveMQ Artemis Mesq.audit.resource.handlers=AUDIT_FILE logger.org.apache.activemq.audit.resource.useParentHandlers=false sage Broker version 2.13.0.redhat-00003 [0.0.0.0, nodeID=554cce00-63d9-11e8-9808-54ee759954c4]
NoteYou can now store a broker instance’s configuration files and data in any custom directory, including locations outside of the broker instance’s directory. In the
<broker_instance_dir>/etc/artemis.profilefile, update theARTEMIS_INSTANCE_ETC_URIproperty by specifying the location of the custom directory after creating the broker instance. Previously, these configuration files and data could only be stored in theetc/anddata/directories within the broker instance’s directory.
Additional resources
2.5.2. Upgrading from 7.6.0 to 7.7.0 on Windows
Download the new archive to upgrade from 7.6.0 to 7.7.0 on Windows.
Procedure
- Download the required archive from the Red Hat Customer Portal by following the instructions provided in Downloading the AMQ Broker archive.
- Use a file manager to move the archive to the folder you created during the last installation of AMQ Broker.
- Extract the contents of the archive. Right-click the .zip file and select Extract All.
If the broker is running, stop it.
<broker_instance_dir>\bin\artemis-service.exe stopBack up the broker using a file manager.
-
Right-click the
<broker_instance_dir>folder and select Copy. - Right-click in the same window and select Paste.
-
Right-click the
(Optional) Note the current version of the broker. After the broker stops, you see a line similar to the one below at the end of the
<broker_instance_dir>\log\artemis.logfile.INFO [org.apache.activemq.artemis.core.server] AMQ221002: Apache ActiveMQ Artemis Message Broker version 2.11.0.redhat-00001 [4782d50d-47a2-11e7-a160-9801a793ea45] stopped, uptime 28 minutes
Edit the
<broker_instance_dir>\etc\artemis.profile.cmdand<broker_instance_dir>\bin\artemis-service.xmlconfiguration files. Set theARTEMIS_HOMEproperty to the new directory created when the archive was extracted.ARTEMIS_HOME=
<install_dir>Edit the
<broker_instance_dir>\etc\artemis.profile.cmdconfiguration file. Ensure that theJAVA_ARGSenvironment variable references the correct versions for the log manager and dependent file, as shown below.JAVA_ARGS=-Xbootclasspath/%ARTEMIS_HOME%\lib\jboss-logmanager-2.1.10.Final-redhat-00001.jar;%ARTEMIS_HOME%\lib\wildfly-common-1.5.2.Final-redhat-00002.jar
Edit the
<broker_instance_dir>\bin\artemis-service.xmlconfiguration file. Ensure that the bootstrap class path start argument references the correct versions for the log manager and dependent file, as shown below.<startargument>-Xbootclasspath/a:%ARTEMIS_HOME%\lib\jboss-logmanager-2.1.10.Final-redhat-00001.jar;%ARTEMIS_HOME%\lib\wildfly-common-1.5.2.Final-redhat-00002.jar</startargument>
Edit the
<broker_instance_dir>\etc\logging.propertiesconfiguration file.On the list of additional loggers to be configured, include the
org.apache.activemq.audit.resourceresource logger that was added in AMQ Broker 7.7.0.loggers=org.eclipse.jetty,org.jboss.logging,org.apache.activemq.artemis.core.server,org.apache.activemq.artemis.utils,org.apache.activemq.artemis.journal,org.apache.activemq.artemis.jms.server,org.apache.activemq.artemis.integration.bootstrap,org.apache.activemq.audit.base,org.apache.activemq.audit.message,org.apache.activemq.audit.resourceBefore the Console handler configuration section, add a default configuration for the resource logger.
..

logger.org.apache.activemq.audit.resource.level=ERROR
logger.org.apache.activemq.audit.resource.handlers=AUDIT_FILE
logger.org.apache.activemq.audit.resource.useParentHandlers=false

# Console handler configuration
..
Start the upgraded broker.
<broker_instance_dir>\bin\artemis-service.exe start(Optional) Confirm that the broker is running and that the version has changed. After starting the broker, open the
<broker_instance_dir>\log\artemis.logfile. Find two lines similar to the ones below. Note the new version number that appears in the log when the broker is live.INFO [org.apache.activemq.artemis.core.server] AMQ221007: Server is now live ... INFO [org.apache.activemq.artemis.core.server] AMQ221001: Apache ActiveMQ Artemis Message Broker version 2.13.0.redhat-00003 [0.0.0.0, nodeID=554cce00-63d9-11e8-9808-54ee759954c4]
NoteYou can now store a broker instance’s configuration files and data in any custom directory, including locations outside of the broker instance’s directory. In the
<broker_instance_dir>\etc\artemis.profilefile, update theARTEMIS_INSTANCE_ETC_URIproperty by specifying the location of the custom directory after creating the broker instance. Previously, these configuration files and data could only be stored in the\etcand\datadirectories within the broker instance’s directory.
Additional resources
2.6. Upgrading a broker instance from 7.7.0 to 7.8.0
Learn how to upgrade a 7.7.0 broker instance to 7.8.0 for different operating systems.
Starting with AMQ Broker 7.1.0, you can access AMQ Management Console only from the local host by default. To learn about configuring remote access to the console, see link:https://access.redhat.com/documentation/en-us/red_hat_amq_broker/7.13/html-single/managing_amq_broker/ #proc-br-configuring-local-and-remote-access-to-console_managing[Configuring local and remote access to AMQ Management Console].
2.6.1. Upgrading from 7.7.0 to 7.8.0 on Linux
Download the new archive to upgrade from 7.7.0 to 7.8.0 on Linux.
Procedure
- Download the required archive from the Red Hat Customer Portal by following the instructions provided in Downloading the AMQ Broker archive.
Change the owner of the archive to the same user that owns the AMQ Broker installation to be upgraded. The following example shows a user called
amq-broker.sudo chown amq-broker:amq-broker amq-broker-7.8.0.redhat-1.zip
Move the archive to the directory created during the original installation of AMQ Broker. The following example uses
/opt/redhat.sudo mv amq-broker-7.8.0.redhat-1.zip /opt/redhat
As the directory owner, extract the contents of the compressed archive. In the following example, the user
amq-brokerextracts the archive using theunzipcommand.su - amq-broker cd /opt/redhat unzip amq-broker-7.8.0.redhat-1.zip
If the broker is running, stop it.
<broker_instance_dir>/bin/artemis stopBack up the instance directory of the broker by copying it to the home directory of the current user.
cp -r <broker_instance_dir> ~/(Optional) Note the current version of the broker. After the broker stops, you see a line similar to the one below at the end of the
<broker_instance_dir>/log/artemis.logfile.INFO [org.apache.activemq.artemis.core.server] AMQ221001: Apache ActiveMQ Artemis Message Broker version 2.13.0.redhat-00003 [0.0.0.0, nodeID=554cce00-63d9-11e8-9808-54ee759954c4]
Edit the
<broker_instance_dir>/etc/artemis.profileconfiguration file.Set the
ARTEMIS_HOMEproperty to the new directory created when the archive was extracted. For example:ARTEMIS_HOME='/opt/redhat/amq-broker-7.8.0-redhat-1'
Locate the
JAVA_ARGSproperty. Ensure that the bootstrap class path argument references the required version of a dependent file for the log manager, as shown below.-Xbootclasspath/a:$ARTEMIS_HOME/lib/wildfly-common-1.5.2.Final-redhat-00002.jar
Edit the
<broker_instance_dir>/etc/bootstrap.xmlconfiguration file. In thewebelement, update the name of the.warfile required by AMQ Management Console in 7.8.<web bind="http://localhost:8161" path="web"> ... <app url="console" war="hawtio.war"/> ... </web>Start the upgraded broker.
<broker_instance_dir>/bin/artemis run(Optional) Confirm that the broker is running and that the version has changed. After starting the broker, open the
<broker_instance_dir>/log/artemis.logfile. Find two lines similar to the ones below. Note the new version number that appears in the log when the broker is live.INFO [org.apache.activemq.artemis.core.server] AMQ221007: Server is now live ... INFO [org.apache.activemq.artemis.core.server] AMQ221001: Apache ActiveMQ Artemis Mesq.audit.resource.handlers=AUDIT_FILE logger.org.apache.activemq.audit.resource.useParentHandlers=false sage Broker version 2.16.0.redhat-00007 [0.0.0.0, nodeID=554cce00-63d9-11e8-9808-54ee759954c4]
NoteYou can now store a broker instance’s configuration files and data in any custom directory, including locations outside of the broker instance’s directory. In the
<broker_instance_dir>/etc/artemis.profilefile, update theARTEMIS_INSTANCE_ETC_URIproperty by specifying the location of the custom directory after creating the broker instance. Previously, these configuration files and data could only be stored in theetc/anddata/directories within the broker instance’s directory.
Additional resources
2.6.2. Upgrading from 7.7.0 to 7.8.0 on Windows
Download the new archive to upgrade from 7.7.0 to 7.8.0 on Windows.
Procedure
- Download the required archive from the Red Hat Customer Portal by following the instructions provided in Downloading the AMQ Broker archive.
- Use a file manager to move the archive to the folder you created during the last installation of AMQ Broker.
- Extract the contents of the archive. Right-click the .zip file and select Extract All.
If the broker is running, stop it.
<broker_instance_dir>\bin\artemis-service.exe stopBack up the broker using a file manager.
-
Right-click the
<broker_instance_dir>folder and select Copy. - Right-click in the same window and select Paste.
-
Right-click the
(Optional) Note the current version of the broker. After the broker stops, you see a line similar to the one below at the end of the
<broker_instance_dir>\log\artemis.logfile.INFO [org.apache.activemq.artemis.core.server] AMQ221002: Apache ActiveMQ Artemis Message Broker version 2.13.0.redhat-00003 [4782d50d-47a2-11e7-a160-9801a793ea45] stopped, uptime 28 minutes
Edit the
<broker_instance_dir>\etc\artemis.profile.cmdand<broker_instance_dir>\bin\artemis-service.xmlconfiguration files. Set theARTEMIS_HOMEproperty to the new directory created when the archive was extracted.ARTEMIS_HOME=
<install_dir>Edit the
<broker_instance_dir>\etc\artemis.profile.cmdconfiguration file. Ensure that theJAVA_ARGSenvironment variable references the correct versions for the log manager and dependent file, as shown below.JAVA_ARGS=-Xbootclasspath/%ARTEMIS_HOME%\lib\jboss-logmanager-2.1.10.Final-redhat-00001.jar;%ARTEMIS_HOME%\lib\wildfly-common-1.5.2.Final-redhat-00002.jar
Edit the
<broker_instance_dir>\bin\artemis-service.xmlconfiguration file. Ensure that the bootstrap class path start argument references the correct versions for the log manager and dependent file, as shown below.<startargument>-Xbootclasspath/a:%ARTEMIS_HOME%\lib\jboss-logmanager-2.1.10.Final-redhat-00001.jar;%ARTEMIS_HOME%\lib\wildfly-common-1.5.2.Final-redhat-00002.jar</startargument>
Edit the
<broker_instance_dir>\etc\bootstrap.xmlconfiguration file. In thewebelement, update the name of the.warfile required by AMQ Management Console in 7.8.<web bind="http://localhost:8161" path="web"> ... <app url="console" war="hawtio.war"/> ... </web>Start the upgraded broker.
<broker_instance_dir>\bin\artemis-service.exe start(Optional) Confirm that the broker is running and that the version has changed. After starting the broker, open the
<broker_instance_dir>\log\artemis.logfile. Find two lines similar to the ones below. Note the new version number that appears in the log when the broker is live.INFO [org.apache.activemq.artemis.core.server] AMQ221007: Server is now live ... INFO [org.apache.activemq.artemis.core.server] AMQ221001: Apache ActiveMQ Artemis Message Broker version 2.16.0.redhat-00007 [0.0.0.0, nodeID=554cce00-63d9-11e8-9808-54ee759954c4]
NoteYou can now store a broker instance’s configuration files and data in any custom directory, including locations outside of the broker instance’s directory. In the
<broker_instance_dir>\etc\artemis.profilefile, update theARTEMIS_INSTANCE_ETC_URIproperty by specifying the location of the custom directory after creating the broker instance. Previously, these configuration files and data could only be stored in the\etcand\datadirectories within the broker instance’s directory.
Additional resources
2.7. Upgrading a broker instance from 7.8.x to 7.9.x
Learn how to upgrade a 7.8.x broker instance to 7.9.x for different operating systems.
Starting with AMQ Broker 7.1.0, you can access AMQ Management Console only from the local host by default. To learn about configuring remote access to the console, see link:https://access.redhat.com/documentation/en-us/red_hat_amq_broker/7.13/html-single/managing_amq_broker/ #proc-br-configuring-local-and-remote-access-to-console_managing[Configuring local and remote access to AMQ Management Console].
2.7.1. Upgrading from 7.8.x to 7.9.x on Linux
Download the new archive to upgrade from 7.8.x to 7.9.x on Linux.
Procedure
- Download the required archive from the Red Hat Customer Portal by following the instructions provided in Downloading the AMQ Broker archive.
Change the owner of the archive to the same user that owns the AMQ Broker installation to be upgraded. The following example shows a user called
amq-broker.sudo chown amq-broker:amq-broker amq-broker-7.x.x-bin.zip
Move the archive to the directory created during the original installation of AMQ Broker. The following example uses
/opt/redhat.sudo mv amq-broker-7.x.x-bin.zip /opt/redhat
As the directory owner, extract the contents of the compressed archive. In the following example, the user
amq-brokerextracts the archive using theunzipcommand.su - amq-broker cd /opt/redhat unzip amq-broker-7.x.x-bin.zip
If the broker is running, stop it.
<broker_instance_dir>/bin/artemis stopBack up the instance directory of the broker by copying it to the home directory of the current user.
cp -r <broker_instance_dir> ~/(Optional) Note the current version of the broker. After the broker stops, you see a line similar to the one below at the end of the
<broker_instance_dir>/log/artemis.logfile.INFO [org.apache.activemq.artemis.core.server] AMQ221001: Apache ActiveMQ Artemis Message Broker version 2.13.0.redhat-00003 [0.0.0.0, nodeID=554cce00-63d9-11e8-9808-54ee759954c4]
Edit the
<broker_instance_dir>/etc/artemis.profileconfiguration file.Set the
ARTEMIS_HOMEproperty to the new directory created when the archive was extracted. For example:ARTEMIS_HOME='/opt/redhat/amq-broker-7.x.x-bin'
Locate the
JAVA_ARGSproperty. Ensure that the bootstrap class path argument references the required version of a dependent file for the log manager, as shown below.-Xbootclasspath/a:$ARTEMIS_HOME/lib/wildfly-common-1.5.2.Final-redhat-00002.jar
Edit the
<broker_instance_dir>/etc/bootstrap.xmlconfiguration file. In thewebelement, update the name of the.warfile required by AMQ Management Console in 7.9.<web bind="http://localhost:8161" path="web"> ... <app url="console" war="hawtio.war"/> ... </web>Start the upgraded broker.
<broker_instance_dir>/bin/artemis run(Optional) Confirm that the broker is running and that the version has changed. After starting the broker, open the
<broker_instance_dir>/log/artemis.logfile. Find two lines similar to the ones below. Note the new version number that appears in the log when the broker is live.INFO [org.apache.activemq.artemis.core.server] AMQ221001: Apache ActiveMQ Artemis Mes INFO [org.apache.activemq.artemis.core.server] AMQ221007: Server is now live ... sage Broker version 2.18.0.redhat-00010 [0.0.0.0, nodeID=554cce00-63d9-11e8-9808-54ee759954c4]
NoteYou can now store a broker instance’s configuration files and data in any custom directory, including locations outside of the broker instance’s directory. In the
<broker_instance_dir>/etc/artemis.profilefile, update theARTEMIS_INSTANCE_ETC_URIproperty by specifying the location of the custom directory after creating the broker instance. Previously, these configuration files and data could only be stored in theetc/anddata/directories within the broker instance’s directory.
Additional resources
2.7.2. Upgrading from 7.8.x to 7.9.x on Windows
Download the new archive to upgrade from 7.8.x to 7.9.x on Windows.
Procedure
- Follow the instructions provided in Downloading the AMQ Broker archive to download the AMQ Broker archive.
- Use a file manager to move the archive to the folder you created during the last installation of AMQ Broker.
- Extract the contents of the archive. Right-click the .zip file and select Extract All.
If the broker is running, stop it.
<broker_instance_dir>\bin\artemis-service.exe stopBack up the broker using a file manager.
-
Right-click the
<broker_instance_dir>folder amd select Copy. - Right-click in the same window and select Paste.
-
Right-click the
(Optional) Note the current version of the broker. After the broker stops, you see a line similar to the one below at the end of the
<broker_instance_dir>\log\artemis.logfile.INFO [org.apache.activemq.artemis.core.server] AMQ221002: Apache ActiveMQ Artemis Message Broker version 2.13.0.redhat-00003 [4782d50d-47a2-11e7-a160-9801a793ea45] stopped, uptime 28 minutes
Edit the
<broker_instance_dir>\etc\artemis.profile.cmdand<broker_instance_dir>\bin\artemis-service.xmlconfiguration files. Set theARTEMIS_HOMEproperty to the new directory created when the archive was extracted.ARTEMIS_HOME=
<install_dir>Edit the
<broker_instance_dir>\etc\artemis.profile.cmdconfiguration file. Ensure that theJAVA_ARGSenvironment variable references the correct versions for the log manager and dependent file, as shown below.JAVA_ARGS=-Xbootclasspath/%ARTEMIS_HOME%\lib\jboss-logmanager-2.1.10.Final-redhat-00001.jar;%ARTEMIS_HOME%\lib\wildfly-common-1.5.2.Final-redhat-00002.jar
Edit the
<broker_instance_dir>\bin\artemis-service.xmlconfiguration file. Ensure that the bootstrap class path start argument references the correct versions for the log manager and dependent file, as shown below.<startargument>-Xbootclasspath/a:%ARTEMIS_HOME%\lib\jboss-logmanager-2.1.10.Final-redhat-00001.jar;%ARTEMIS_HOME%\lib\wildfly-common-1.5.2.Final-redhat-00002.jar</startargument>
Edit the
<broker_instance_dir>\etc\bootstrap.xmlconfiguration file. In thewebelement, update the name of the.warfile required by AMQ Management Console in 7.9.<web bind="http://localhost:8161" path="web"> ... <app url="console" war="hawtio.war"/> ... </web>Start the upgraded broker.
<broker_instance_dir>\bin\artemis-service.exe start(Optional) Confirm that the broker is running and that the version has changed. After starting the broker, open the
<broker_instance_dir>\log\artemis.logfile. Find two lines similar to the ones below. Note the new version number that appears in the log when the broker is live.INFO [org.apache.activemq.artemis.core.server] AMQ221007: Server is now live ... INFO [org.apache.activemq.artemis.core.server] AMQ221001: Apache ActiveMQ Artemis Message Broker version 2.18.0.redhat-00010 [0.0.0.0, nodeID=554cce00-63d9-11e8-9808-54ee759954c4]
NoteYou can now store a broker instance’s configuration files and data in any custom directory, including locations outside of the broker instance’s directory. In the
<broker_instance_dir>\etc\artemis.profilefile, update theARTEMIS_INSTANCE_ETC_URIproperty by specifying the location of the custom directory after creating the broker instance. Previously, these configuration files and data could only be stored in the\etcand\datadirectories within the broker instance’s directory.
Additional resources
2.8. Upgrading a broker instance from 7.9.x to 7.10.x
Learn how to upgrade a 7.9.x broker instance to 7.10.x for different operating systems.
Starting with AMQ Broker 7.1.0, you can access AMQ Management Console only from the local host by default. To learn about configuring remote access to the console, see link:https://access.redhat.com/documentation/en-us/red_hat_amq_broker/7.13/html-single/managing_amq_broker/ #proc-br-configuring-local-and-remote-access-to-console_managing[Configuring local and remote access to AMQ Management Console].
2.8.1. Upgrading from 7.9.x to 7.10.x on Linux
Download the new archive to upgrade from 7.9.x to 7.10.x on Linux.
Prerequisites
- At a minimum, AMQ Broker 7.10.x requires Java version 11 to run. Ensure that each AMQ Broker host is running Java version 11 or higher. For more information on supported configurations, see Red Hat AMQ Broker 7 Supported Configurations.
-
If AMQ Broker 7.9 is configured to persist message data in a database, the data type of the HOLDER_EXPIRATION_TIME column is
timestampin the node manager database table. In AMQ Broker 7.10, the data type of the column changed tonumber. Before you upgrade to AMQ Broker 7.10.x, you must drop the node manager table, that is, remove it from the database. After you drop the table, it is recreated with the new schema when you restart the upgraded broker. In a shared store high availability (HA) configuration, the node manager table is shared between brokers. Therefore, you must ensure that all brokers that share the table are stopped before you drop the table. The following example drops a node manager table calledNODE_MANAGER_TABLE:
DROP TABLE NODE_MANAGER_TABLE
Procedure
- Download the required archive from the Red Hat Customer Portal by following the instructions provided in Downloading the AMQ Broker archive.
Change the owner of the archive to the same user that owns the AMQ Broker installation to be upgraded. The following example shows a user called
amq-broker.sudo chown amq-broker:amq-broker amq-broker-7.x.x-bin.zip
Move the archive to the directory created during the original installation of AMQ Broker. The following example uses
/opt/redhat.sudo mv amq-broker-7.x.x-bin.zip /opt/redhat
As the directory owner, extract the contents of the compressed archive. In the following example, the user
amq-brokerextracts the archive using theunzipcommand.su - amq-broker cd /opt/redhat unzip amq-broker-7.x.x-bin.zip
If the broker is running, stop it.
<broker_instance_dir>/bin/artemis stopBack up the instance directory of the broker by copying it to the home directory of the current user.
cp -r <broker_instance_dir> ~/(Optional) Note the current version of the broker. After the broker stops, you see a line similar to the one below at the end of the
<broker_instance_dir>/log/artemis.logfile.INFO [org.apache.activemq.artemis.core.server] AMQ221001: Apache ActiveMQ Artemis Message Broker version 2.18.0.redhat-00010 [0.0.0.0, nodeID=554cce00-63d9-11e8-9808-54ee759954c4]
Edit the
<broker_instance_dir>/etc/artemis.profileconfiguration file.Set the
ARTEMIS_HOMEproperty to the new directory created when the archive was extracted. For example:ARTEMIS_HOME='/opt/redhat/amq-broker-7.x.x-bin'
Edit the
<broker_instance_dir>/etc/bootstrap.xmlconfiguration file.In the
webelement, update the name of the.warfile required by AMQ Management Console in 7.10.x.<web path="web"> <binding uri="https://localhost:8161" ... <app url="console" war="hawtio.war"/> ... </web>In the
broker xmlnselement, change the schema value from"http://activemq.org/schema"to"http://activemq.apache.org/schema".<broker xmlns="http://activemq.apache.org/schema">
Edit the
<broker_instance_dir>/etc/management.xmlfile.In the
management-context xmlnselement, change the schema value from"http://activemq.org/schema"to"http://activemq.apache.org/schema".<management-context xmlns="http://activemq.apache.org/schema">
Start the upgraded broker.
<broker_instance_dir>/bin/artemis run(Optional) Confirm that the broker is running and that the version has changed. After starting the broker, open the
<broker_instance_dir>/log/artemis.logfile. Find two lines similar to the ones below. Note the new version number that appears in the log when the broker is live.INFO [org.apache.activemq.artemis.core.server] AMQ221001: Apache ActiveMQ Artemis Mes INFO [org.apache.activemq.artemis.core.server] AMQ221007: Server is now live ... sage Broker version 2.21.0.redhat-00025 [0.0.0.0, nodeID=554cce00-63d9-11e8-9808-54ee759954c4]
NoteYou can now store a broker instance’s configuration files and data in any custom directory, including locations outside of the broker instance’s directory. In the
<broker_instance_dir>/etc/artemis.profilefile, update theARTEMIS_INSTANCE_ETC_URIproperty by specifying the location of the custom directory after creating the broker instance. Previously, these configuration files and data could only be stored in theetc/anddata/directories within the broker instance’s directory.
Additional resources
2.8.2. Upgrading from 7.9.x to 7.10.x on Windows
Download the new archive to upgrade from 7.9.x to 7.10.x on Windows.
Prerequisites
- At a minimum, AMQ Broker 7.10.x requires Java version 11 to run. Ensure that each AMQ Broker host is running Java version 11 or higher. For more information on supported configurations, see Red Hat AMQ Broker 7 Supported Configurations.
-
If AMQ Broker 7.9 is configured to persist message data in a database, the data type of the HOLDER_EXPIRATION_TIME column is
timestampin the node manager database table. In AMQ Broker 7.10, the data type of the column changed tonumber. Before you upgrade to AMQ Broker 7.10.x, you must drop the node manager table, that is, remove it from the database. After you drop the table, it is recreated with the new schema when you restart the upgraded broker. In a shared store high availability (HA) configuration, the node manager table is shared between brokers. Therefore, you must ensure that all brokers that share the table are stopped before you drop the table. The following example drops a node manager table calledNODE_MANAGER_TABLE:
DROP TABLE NODE_MANAGER_TABLE
Procedure
- Follow the instructions provided in Downloading the AMQ Broker archive to download the AMQ Broker archive.
- Use a file manager to move the archive to the folder you created during the last installation of AMQ Broker.
- Extract the contents of the archive. Right-click the .zip file and select Extract All.
If the broker is running, stop it.
<broker_instance_dir>\bin\artemis-service.exe stopBack up the broker using a file manager.
-
Right-click the
<broker_instance_dir>folder and select Copy. - Right-click in the same window and select Paste.
-
Right-click the
(Optional) Note the current version of the broker. After the broker stops, you see a line similar to the one below at the end of the
<broker_instance_dir>\log\artemis.logfile.INFO [org.apache.activemq.artemis.core.server] AMQ221002: Apache ActiveMQ Artemis Message Broker version 2.18.0.redhat-00010[4782d50d-47a2-11e7-a160-9801a793ea45] stopped, uptime 28 minutes
Edit the
<broker_instance_dir>\etc\artemis.profile.cmdand<broker_instance_dir>\bin\artemis-service.xmlconfiguration files. Set theARTEMIS_HOMEproperty to the new directory created when the archive was extracted.ARTEMIS_HOME=
<install_dir>Edit the
<broker_instance_dir>\etc\artemis.profile.cmdconfiguration file. Ensure that theJAVA_ARGSenvironment variable references the correct versions for the log manager and dependent file, as shown below.JAVA_ARGS=-Xbootclasspath/%ARTEMIS_HOME%\lib\jboss-logmanager-2.1.10.Final-redhat-00001.jar;%ARTEMIS_HOME%\lib\wildfly-common-1.5.2.Final-redhat-00002.jar
Edit the
<broker_instance_dir>\bin\artemis-service.xmlconfiguration file. Ensure that the bootstrap class path start argument references the correct versions for the log manager and dependent file, as shown below.<startargument>-Xbootclasspath/a:%ARTEMIS_HOME%\lib\jboss-logmanager-2.1.10.Final-redhat-00001.jar;%ARTEMIS_HOME%\lib\wildfly-common-1.5.2.Final-redhat-00002.jar</startargument>
Edit the
<broker_instance_dir>\etc\bootstrap.xmlconfiguration file.In the
webelement, update the name of the.warfile required by AMQ Management Console in 7.10.x.<web path="web"> <binding uri="https://localhost:8161" ... <app url="console" war="hawtio.war"/> ... </web>In the
broker xmlnselement, change the schema value from"http://activemq.org/schema"to"http://activemq.apache.org/schema".<broker xmlns="http://activemq.apache.org/schema">
Edit the
<broker_instance_dir>/etc/management.xmlfile.In the
management-context xmlnselement, change the schema value from"http://activemq.org/schema"to"http://activemq.apache.org/schema".<management-context xmlns="http://activemq.apache.org/schema">
Start the upgraded broker.
<broker_instance_dir>\bin\artemis-service.exe start(Optional) Confirm that the broker is running and that the version has changed. After starting the broker, open the
<broker_instance_dir>\log\artemis.logfile. Find two lines similar to the ones below. Note the new version number that appears in the log when the broker is live.INFO [org.apache.activemq.artemis.core.server] AMQ221007: Server is now live ... INFO [org.apache.activemq.artemis.core.server] AMQ221001: Apache ActiveMQ Artemis Message Broker version 2.21.0.redhat-00025 [0.0.0.0, nodeID=554cce00-63d9-11e8-9808-54ee759954c4]
NoteYou can now store a broker instance’s configuration files and data in any custom directory, including locations outside of the broker instance’s directory. In the
<broker_instance_dir>\etc\artemis.profilefile, update theARTEMIS_INSTANCE_ETC_URIproperty by specifying the location of the custom directory after creating the broker instance. Previously, these configuration files and data could only be stored in the\etcand\datadirectories within the broker instance’s directory.
Additional resources
2.9. Upgrading a broker instance from 7.10.x to 7.11.x
Learn how to upgrade a 7.10.x broker instance to 7.11.x for different operating systems.
Starting with AMQ Broker 7.1.0, you can access AMQ Management Console only from the local host by default. To learn about configuring remote access to the console, see link:https://access.redhat.com/documentation/en-us/red_hat_amq_broker/7.13/html-single/managing_amq_broker/ #proc-br-configuring-local-and-remote-access-to-console_managing[Configuring local and remote access to AMQ Management Console].
2.9.1. Upgrading from 7.10.x to 7.11.x on Linux
Upgrade from 7.10.x to 7.11.x on Linux by downloading the new archive and running the artemis upgrade command.
The name of the archive that you download could differ from what is used in the following examples.
Prerequisites
- At a minimum, AMQ Broker 7.11.x requires Java version 11 to run. Ensure that each AMQ Broker host is running Java version 11 or higher. For more information on supported configurations, see Red Hat AMQ Broker 7 Supported Configurations.
Procedure
- Follow the instructions provided in Downloading the AMQ Broker archive to download the AMQ Broker archive.
Change the owner of the archive that you downloaded to the same user that owns the AMQ Broker installation to be upgraded. The following example shows a user called
amq-broker.sudo chown amq-broker:amq-broker amq-broker-7.x.x-bin.zip
Move the archive to the directory created during the original installation of AMQ Broker. The following example uses
/opt/redhat.sudo mv amq-broker-7.x.x-bin.zip /opt/redhat
As the directory owner, extract the contents of the compressed archive. In the following example, the user
amq-brokerextracts the archive using theunzipcommand.su - amq-broker cd /opt/redhat unzip amq-broker-7.x.x-bin.zip
NoteThe contents of the latest archive are extracted to a directory called
apache-artemis-2.28.0.redhat-00022in your current directory.If the broker is running, stop it.
<broker_instance_dir>/bin/artemis stop(Optional) Note the current version of the broker. After the broker stops, you see a line similar to the one below at the end of the
<broker_instance_dir>/log/artemis.logfile.INFO [org.apache.activemq.artemis.core.server] AMQ221001: Apache ActiveMQ Artemis Message Broker version 2.18.0.redhat-00010 [0.0.0.0, nodeID=554cce00-63d9-11e8-9808-54ee759954c4]
Back up the instance directory of the broker by copying it to the home directory of the current user.
cp -r <broker_instance_dir> ~/Change to directory to which you extracted the contents of the compressed archive.
cd /opt/redhat/apache-artemis-2.28.0.redhat-00022/bin
Run the
artemis upgradecommand to upgrade your existing broker. The following example upgrades a broker instance in the/var/opt/amq-broker/mybrokerdirectory../artemis upgrade /var/opt/amq-broker/mybroker
The
artemis upgradecommand completes the following steps to upgrade the broker.-
Makes a backup of each file it modifies in an
old-config-bkp.<n>subdirectory of the broker instance directory for the broker that you are upgrading. -
Sets the
ARTEMIS_HOMEproperty in the<broker_instance_dir>/etc/artemis.profilefile to the new directory created when you extracted the archive. -
Updates the
<broker_instance_dir>bin/artemisscript to use the Apache Log4j 2 logging utility, which is bundled with AMQ Broker 7.11.x, instead of the the JBoss Logging framework used in previous versions. -
Deletes the existing
<broker_instance_dir>/etc/logging.propertiesfile used by JBoss and creates a new<broker_instance_dir>/etc/log4j2.propertiesfile for the Apache Log4j 2 logging utility.
-
Makes a backup of each file it modifies in an
If the Prometheus metrics plugin included with AMQ Broker is enabled in 7.10.x, change the class name of the plugin from
org.apache.activemq.artemis.core.server.metrics.plugins.ArtemisPrometheusMetricsPlugintocom.redhat.amq.broker.core.server.metrics.plugins.ArtemisPrometheusMetricsPlugin, which is the new class name of the plugin in AMQ Broker 7.11.x.-
Open the
<broker_instance_dir>/etc/broker.xmlconfiguration file. In the
<plugin>sub-element of the<metrics>element, update the plugin class name tocom.redhat.amq.broker.core.server.metrics.plugins.ArtemisPrometheusMetricsPlugin.<metrics> <plugin class-name="com.redhat.amq.broker.core.server.metrics.plugins.ArtemisPrometheusMetricsPlugin"/> </metrics>-
Save the
broker.xmlconfiguration file.
-
Open the
Start the upgraded broker.
<broker_instance_dir>/bin/artemis run(Optional) Confirm that the broker is running and that the version has changed. After starting the broker, open the
<broker_instance_dir>/log/artemis.logfile. Find lines similar to the ones below. Note the new version number that appears in the log after the broker starts.2023-02-08 20:53:50,128 INFO [org.apache.activemq.artemis.integration.bootstrap] AMQ101000: Starting ActiveMQ Artemis Server version 2.28.0.redhat-00022 2023-02-08 20:53:51,077 INFO [org.apache.activemq.artemis.core.server] AMQ221001: Apache ActiveMQ Artemis Message Broker version 2.28.0.redhat-00022 [0.0.0.0, nodeID=be02a2b2-3e42-11ec-9b8a-4c796e887ecb]
NoteYou can now store a broker instance’s configuration files and data in any custom directory, including locations outside of the broker instance’s directory. In the
<broker_instance_dir>/etc/artemis.profilefile, update theARTEMIS_INSTANCE_ETC_URIproperty by specifying the location of the custom directory after creating the broker instance. Previously, these configuration files and data could only be stored in theetc/anddata/directories within the broker instance’s directory.
Additional resources
2.9.2. Upgrading from 7.10.x to 7.11.x on Windows
Upgrade from 7.10.x to 7.11.x on Windows by downloading the new archive and running the artemis upgrade command.
Prerequisites
- At a minimum, AMQ Broker 7.11.x requires Java version 11 to run. Ensure that each AMQ Broker host is running Java version 11 or higher. For more information on supported configurations, see Red Hat AMQ Broker 7 Supported Configurations.
Procedure
- Follow the instructions provided in Downloading the AMQ Broker archive to download the AMQ Broker archive.
- Use a file manager to move the archive to the folder you created during the last installation of AMQ Broker.
Extract the contents of the archive. Right-click the .zip file and select Extract All.
NoteThe contents of the latest archive are extracted to a folder called
apache-artemis-2.28.0.redhat-00022in the current folder.If the broker is running, stop it.
<broker_instance_dir>\bin\artemis-service.exe stop(Optional) Note the current version of the broker. After the broker stops, you see a line similar to the one below at the end of the
<broker_instance_dir>\log\artemis.logfile.INFO [org.apache.activemq.artemis.core.server] AMQ221002: Apache ActiveMQ Artemis Message Broker version 2.18.0.redhat-00010[4782d50d-47a2-11e7-a160-9801a793ea45] stopped, uptime 28 minutes
Back up the broker using a file manager.
-
Right-click the
<broker_instance_dir>folder and select Copy. - Right-click in the same window and select Paste.
-
Right-click the
Change to directory to which you extracted the contents of the compressed archive. For example:
cd \redhat\amq-broker\apache-artemis-2.28.0.redhat-00022\bin
Run the
artemis upgradecommand to upgrade your existing broker. The following example upgrades the broker instance in theC:\redhat\amq-broker\mybrokerdirectory.artemis upgrade C:\redhat\amq-broker\mybroker
The
artemis upgradecommand completes the following steps to upgrade the broker.-
Makes a backup of each file it modifies in an
old-config-bkp.<n>subdirectory of the broker instance directory for the broker that you are upgrading. -
Sets the
ARTEMIS_HOMEproperty in the<broker_instance_dir>\etc\artemis.cmd.profilefile to the new directory created when you extracted the archive. -
Updates the
<broker_instance_dir>\bin\artemis.cmdscript to use the Apache Log4j 2 logging utility, which is bundled with AMQ Broker 7.11.x, instead of the the JBoss Logging framework used in previous versions. -
Deletes the existing
<broker_instance_dir>\etc\logging.propertiesfile used by JBoss and creates a new<broker_instance_dir>\etc\log4j2.propertiesfile for the Apache Log4j 2 logging utility.
-
Makes a backup of each file it modifies in an
If the Prometheus metrics plugin included with AMQ Broker was enabled in 7.10.x, change the class name of the plugin from
org.apache.activemq.artemis.core.server.metrics.plugins.ArtemisPrometheusMetricsPlugintocom.redhat.amq.broker.core.server.metrics.plugins.ArtemisPrometheusMetricsPlugin, which is the new class name of the plugin in 7.11.x.-
Open the
<broker_instance_dir>\etc\broker.xmlconfiguration file. In the
<plugin>sub-element of the<metrics>element, update the plugin class name tocom.redhat.amq.broker.core.server.metrics.plugins.ArtemisPrometheusMetricsPlugin.<metrics> <plugin class-name="com.redhat.amq.broker.core.server.metrics.plugins.ArtemisPrometheusMetricsPlugin"/> </metrics>-
Save the
broker.xmlconfiguration file.
-
Open the
Start the upgraded broker.
<broker_instance_dir>\bin\artemis-service.exe start(Optional) Confirm that the broker is running and that the version has changed. After starting the broker, open the
<broker_instance_dir>\log\artemis.logfile. Find two lines similar to the ones below. Note the new version number that appears in the log when the broker is live.2023-02-08 20:53:50,128 INFO [org.apache.activemq.artemis.integration.bootstrap] AMQ101000: Starting ActiveMQ Artemis Server version 2.28.0.redhat-00022 2023-02-08 20:53:51,077 INFO [org.apache.activemq.artemis.core.server] AMQ221001: Apache ActiveMQ Artemis Message Broker version 2.28.0.redhat-00022 [0.0.0.0, nodeID=be02a2b2-3e42-11ec-9b8a-4c796e887ecb]
NoteYou can now store a broker instance’s configuration files and data in any custom directory, including locations outside of the broker instance’s directory. In the
<broker_instance_dir>\etc\artemis.profilefile, update theARTEMIS_INSTANCE_ETC_URIproperty by specifying the location of the custom directory after creating the broker instance. Previously, these configuration files and data could only be stored in the\etcand\datadirectories within the broker instance’s directory.
Additional resources
2.10. Upgrading a broker instance from 7.11.x to 7.12.x
Learn how to upgrade a 7.11.x broker instance to 7.12.x for different operating systems.
Starting with AMQ Broker 7.1.0, you can access AMQ Management Console only from the local host by default. To learn about configuring remote access to the console, see link:https://access.redhat.com/documentation/en-us/red_hat_amq_broker/7.13/html-single/managing_amq_broker/ #proc-br-configuring-local-and-remote-access-to-console_managing[Configuring local and remote access to AMQ Management Console].
2.10.1. Upgrading from 7.11.x to 7.12.x on Linux
Upgrade from 7.11.x to 7.12.x on Linux by downloading the new archive and running the artemis upgrade command.
Prerequisites
- At a minimum, AMQ Broker 7.12.x requires Java version 11 to run. Ensure that each AMQ Broker host is running Java version 11 or higher. For more information on supported configurations, see Red Hat AMQ 7 Supported Configurations.
Procedure
- Follow the instructions provided in Downloading the AMQ Broker archive to download the AMQ Broker archive.
Change the owner of the archive that you downloaded to the same user that owns the AMQ Broker installation to be upgraded. The following example shows a user called
amq-broker.sudo chown amq-broker:amq-broker amq-broker-7.x.x-bin.zip
Move the AMQ Broker archive to the directory created during the original installation of AMQ Broker. The following example uses
/opt/redhat.sudo mv amq-broker-7.x.x-bin.zip /opt/redhat
As the directory owner, extract the contents of the compressed archive. In the following example, the user
amq-brokerextracts the archive using theunzipcommand.su - amq-broker cd /opt/redhat unzip amq-broker-7.x.x-bin.zip
NoteThe contents of the latest archive are extracted to a directory called
apache-artemis-2.33.0.redhat-00013in your current directory.If the broker is running, stop it.
<broker_instance_dir>/bin/artemis stop(Optional) Note the current version of the broker. After the broker stops, you see a line similar to the one below at the end of the
<broker_instance_dir>/log/artemis.logfile.INFO [org.apache.activemq.artemis.core.server] AMQ221001: Apache ActiveMQ Artemis Message Broker version 2.28.0.redhat-00019 [0.0.0.0, nodeID=554cce00-63d9-11e8-9808-54ee759954c4]
Back up the instance directory of the broker by copying it to the home directory of the current user.
cp -r <broker_instance_dir> ~/Change to directory to which you extracted the contents of the compressed archive.
cd /opt/redhat/apache-artemis-2.33.0.redhat-00013/bin
Run the
artemis upgradecommand to upgrade your existing broker. The following example upgrades a broker instance in the/var/opt/amq-broker/mybrokerdirectory../artemis upgrade /var/opt/amq-broker/mybroker
The
artemis upgradecommand completes the following steps to upgrade the broker.-
Makes a backup of each file it modifies in an
old-config-bkp.<n>subdirectory of the broker instance directory for the broker that you are upgrading. -
Sets the
ARTEMIS_HOMEproperty in the<broker_instance_dir>/etc/artemis.profilefile to the new directory created when you extracted the archive.
-
Makes a backup of each file it modifies in an
Start the upgraded broker.
<broker_instance_dir>/bin/artemis run(Optional) Confirm that the broker is running and that the version has changed. After starting the broker, open the
<broker_instance_dir>/log/artemis.logfile. Find lines similar to the ones below. Note the new version number that appears in the log after the broker starts.2023-02-08 20:53:50,128 INFO [org.apache.activemq.artemis.integration.bootstrap] AMQ101000: Starting ActiveMQ Artemis Server version 2.33.0.redhat-00013 2023-02-08 20:53:51,077 INFO [org.apache.activemq.artemis.core.server] AMQ221001: Apache ActiveMQ Artemis Message Broker version 2.33.0.redhat-00013 [0.0.0.0, nodeID=be02a2b2-3e42-11ec-9b8a-4c796e887ecb]
NoteYou can now store a broker instance’s configuration files and data in any custom directory, including locations outside of the broker instance’s directory. In the
<broker_instance_dir>\etc\artemis.profilefile, update theARTEMIS_INSTANCE_ETC_URIproperty by specifying the location of the custom directory after creating the broker instance. Previously, these configuration files and data could only be stored in the\etcand\datadirectories within the broker instance’s directory.
Additional resources
2.10.2. Upgrading from 7.11.x to 7.12.x on Windows
Upgrade from 7.11.x to 7.12.x on Windows by downloading the new archive and running the artemis upgrade command.
Prerequisites
- At a minimum, AMQ Broker 7.12.x requires Java version 11 to run. Ensure that each AMQ Broker host is running Java version 11 or higher. For more information on supported configurations, see Red Hat AMQ 7 Supported Configurations.
Procedure
- Follow the instructions provided in Downloading the AMQ Broker archive to download the AMQ Broker archive.
- Use a file manager to move the archive to the folder you created during the last installation of AMQ Broker.
Extract the contents of the archive. Right-click the .zip file and select Extract All.
NoteThe contents of the latest archive are extracted to a folder called
apache-artemis-2.33.0.redhat-00013in the current folder.If the broker is running, stop it.
<broker_instance_dir>\bin\artemis-service.exe stop(Optional) Note the current version of the broker. After the broker stops, you see a line similar to the one below at the end of the
<broker_instance_dir>\log\artemis.logfile.INFO [org.apache.activemq.artemis.core.server] AMQ221002: Apache ActiveMQ Artemis Message Broker version 2.28.0.redhat-00019[4782d50d-47a2-11e7-a160-9801a793ea45] stopped, uptime 28 minutes
Back up the broker using a file manager.
-
Right-click the
<broker_instance_dir>folder and select Copy. - Right-click in the same window and select Paste.
-
Right-click the
Change to directory to which you extracted the contents of the compressed archive. For example:
cd \redhat\amq-broker\apache-artemis-2.33.0.redhat-00013\bin
Run the
artemis upgradecommand to upgrade your existing broker. The following example upgrades the broker instance in theC:\redhat\amq-broker\mybrokerdirectory.artemis upgrade C:\redhat\amq-broker\mybroker
The
artemis upgradecommand completes the following steps to upgrade the broker.-
Makes a backup of each file it modifies in an
old-config-bkp.<n>subdirectory of the broker instance directory for the broker that you are upgrading. -
Sets the
ARTEMIS_HOMEproperty in the<broker_instance_dir>\etc\artemis.cmd.profilefile to the new directory created when you extracted the archive.
-
Makes a backup of each file it modifies in an
Start the upgraded broker.
<broker_instance_dir>\bin\artemis-service.exe start(Optional) Confirm that the broker is running and that the version has changed. After starting the broker, open the
<broker_instance_dir>\log\artemis.logfile. Find two lines similar to the ones below. Note the new version number that appears in the log when the broker is live.2023-02-08 20:53:50,128 INFO [org.apache.activemq.artemis.integration.bootstrap] AMQ101000: Starting ActiveMQ Artemis Server version 2.33.0.redhat-00013 2023-02-08 20:53:51,077 INFO [org.apache.activemq.artemis.core.server] AMQ221001: Apache ActiveMQ Artemis Message Broker version 2.33.0.redhat-00013 [0.0.0.0, nodeID=be02a2b2-3e42-11ec-9b8a-4c796e887ecb]
NoteYou can now store a broker instance’s configuration files and data in any custom directory, including locations outside of the broker instance’s directory. In the
<broker_instance_dir>\etc\artemis.profilefile, update theARTEMIS_INSTANCE_ETC_URIproperty by specifying the location of the custom directory after creating the broker instance. Previously, these configuration files and data could only be stored in the\etcand\datadirectories within the broker instance’s directory.
Additional resources
2.11. Upgrading a broker instance from 7.12.x to 7.13.x
Learn how to upgrade a 7.12.x broker instance to 7.13.x for different operating systems.
Starting with AMQ Broker 7.1.0, you can access AMQ Management Console only from the local host by default. To learn about configuring remote access to the console, see link:https://access.redhat.com/documentation/en-us/red_hat_amq_broker/7.13/html-single/managing_amq_broker/ #proc-br-configuring-local-and-remote-access-to-console_managing[Configuring local and remote access to AMQ Management Console].
2.11.1. Upgrading from 7.12.x to 7.13.x on Linux
Upgrade from 7.12.x to 7.13.x on Linux by downloading the new archive and running the artemis upgrade command.
Prerequisites
- At a minimum, AMQ Broker 7.13.x requires Java version 17 to run. Ensure that each AMQ Broker host is running Java version 17 or higher. For more information on supported configurations, see Red Hat AMQ 7 Supported Configurations.
Procedure
- Follow the instructions provided in Downloading the AMQ Broker archive to download the AMQ Broker archive.
Change the owner of the archive that you downloaded to the same user that owns the AMQ Broker installation to be upgraded. The following example shows a user called
amq-broker.sudo chown amq-broker:amq-broker amq-broker-7.x.x-bin.zip
Move the archive to the directory created during the original installation of AMQ Broker. The following example uses
/opt/redhat.sudo mv amq-broker-7.x.x-bin.zip /opt/redhat
As the directory owner, extract the contents of the compressed archive. In the following example, the user
amq-brokerextracts the archive using theunzipcommand.su - amq-broker cd /opt/redhat unzip amq-broker-7.x.x-bin.zip
NoteThe contents of the latest archive are extracted to a directory called
apache-artemis-2.40.0.redhat-00015in your current directory.If the broker is running, stop it.
<broker_instance_dir>/bin/artemis stop(Optional) Note the current version of the broker. After the broker stops, you see a line similar to the one below at the end of the
<broker_instance_dir>/log/artemis.logfile.INFO [org.apache.activemq.artemis.core.server] AMQ221001: Apache ActiveMQ Artemis Message Broker version 2.40.0.redhat-00009 [0.0.0.0, nodeID=554cce00-63d9-11e8-9808-54ee759954c4]
Back up the instance directory of the broker by copying it to the home directory of the current user.
cp -r <broker_instance_dir> ~/Change to directory to which you extracted the contents of the compressed archive.
cd /opt/redhat/apache-artemis-2.40.0.redhat-00015/bin
Run the
artemis upgradecommand to upgrade your existing broker. The following example upgrades a broker instance in the/var/opt/amq-broker/mybrokerdirectory../artemis upgrade /var/opt/amq-broker/mybroker
The
artemis upgradecommand completes the following steps to upgrade the broker.-
Makes a backup of each file it modifies in an
old-config-bkp.<n>subdirectory of the broker instance directory for the broker that you are upgrading. -
Sets the
ARTEMIS_HOMEproperty in the<broker_instance_dir>/etc/artemis.profilefile to the new directory created when you extracted the archive.
-
Makes a backup of each file it modifies in an
Start the upgraded broker.
<broker_instance_dir>/bin/artemis run(Optional) Confirm that the broker is running and that the version has changed. After starting the broker, open the
<broker_instance_dir>/log/artemis.logfile. Find lines similar to the ones below. Note the new version number that is displayed in the log after the broker starts.2023-02-08 20:53:50,128 INFO [org.apache.activemq.artemis.integration.bootstrap] AMQ101000: Starting ActiveMQ Artemis Server version 2.40.0.redhat-00015 2023-02-08 20:53:51,077 INFO [org.apache.activemq.artemis.core.server] AMQ221001: Apache ActiveMQ Artemis Message Broker version 2.40.0.redhat-00015 [0.0.0.0, nodeID=be02a2b2-3e42-11ec-9b8a-4c796e887ecb]
NoteYou can now store a broker instance’s configuration files and data in any custom directory, including locations outside of the broker instance’s directory. In the
<broker_instance_dir>/etc/artemis.profilefile, update theARTEMIS_INSTANCE_ETC_URIproperty by specifying the location of the custom directory after creating the broker instance. Previously, these configuration files and data could only be stored in theetc/anddata/directories within the broker instance’s directory.
Additional resources
2.11.2. Upgrading from 7.12.x to 7.13.x on Windows
Upgrade from 7.12.x to 7.13.x on Windows by downloading the new archive and running the artemis upgrade command.
Prerequisites
- At a minimum, AMQ Broker 7.13.x requires Java version 17 to run. Ensure that each AMQ Broker host is running Java version 17 or higher. For more information on supported configurations, see Red Hat AMQ Broker 7 Supported Configurations.
Procedure
- Follow the instructions provided in Downloading the AMQ Broker archive to download the AMQ Broker archive.
- Use a file manager to move the archive to the folder you created during the last installation of AMQ Broker.
Extract the contents of the archive. Right-click the .zip file and select Extract All.
NoteThe contents of the latest archive are extracted to a folder called
apache-artemis-2.40.0.redhat-00015in the current folder.If the broker is running, stop it.
<broker_instance_dir>\bin\artemis-service.exe stop(Optional) Note the current version of the broker. After the broker stops, you see a line similar to the one below at the end of the
<broker_instance_dir>\log\artemis.logfile.INFO [org.apache.activemq.artemis.core.server] AMQ221002: Apache ActiveMQ Artemis Message Broker version 2.40.0.redhat-00009[4782d50d-47a2-11e7-a160-9801a793ea45] stopped, uptime 28 minutes
Back up the broker using a file manager.
-
Right-click the
<broker_instance_dir>folder and select Copy. - Right-click in the same window and select Paste.
-
Right-click the
Change to directory to which you extracted the contents of the compressed archive. For example:
cd \redhat\amq-broker\apache-artemis-2.40.0.redhat-00015\bin
Run the
artemis upgradecommand to upgrade your existing broker. The following example upgrades the broker instance in theC:\redhat\amq-broker\mybrokerdirectory.artemis upgrade C:\redhat\amq-broker\mybroker
The
artemis upgradecommand completes the following steps to upgrade the broker.-
Makes a backup of each file it modifies in an
old-config-bkp.<n>subdirectory of the broker instance directory for the broker that you are upgrading. -
Sets the
ARTEMIS_HOMEproperty in the<broker_instance_dir>\etc\artemis.cmd.profilefile to the new directory created when you extracted the archive.
-
Makes a backup of each file it modifies in an
Start the upgraded broker.
<broker_instance_dir>\bin\artemis-service.exe start(Optional) Confirm that the broker is running and that the version has changed. After starting the broker, open the
<broker_instance_dir>\log\artemis.logfile. Find two lines similar to the ones below. Note the new version number that is displayed in the log when the broker is live.2023-02-08 20:53:50,128 INFO [org.apache.activemq.artemis.integration.bootstrap] AMQ101000: Starting ActiveMQ Artemis Server version 2.40.0.redhat-00015 2023-02-08 20:53:51,077 INFO [org.apache.activemq.artemis.core.server] AMQ221001: Apache ActiveMQ Artemis Message Broker version 2.40.0.redhat-00015 [0.0.0.0, nodeID=be02a2b2-3e42-11ec-9b8a-4c796e887ecb]
NoteYou can now store a broker instance’s configuration files and data in any custom directory, including locations outside of the broker instance’s directory. In the
<broker_instance_dir>\etc\artemis.profilefile, update theARTEMIS_INSTANCE_ETC_URIproperty by specifying the location of the custom directory after creating the broker instance. Previously, these configuration files and data could only be stored in the\etcand\datadirectories within the broker instance’s directory.
Additional resources
Chapter 3. Using the command line interface
You can interact with the message broker by using the command line interface (CLI). You can manage broker actions, configure messages, and modify users and roles through an interactive shell.
You can use the CLI to interact with the broker in a Bash or zsh shell, or a custom artemis shell. The same commands are available in each shell. By default, the artemis shell has built-in auto-completion of commands and command parameters. You can add auto-completion of the CLI commands and command parameters to a Bash or zsh shell also.
3.1. Using the CLI in an artemis shell
The artemis shell interface provides auto-completion of commands and parameters that are available with the artemis command. The shell remembers your broker URI and credentials for subsequent commands that you run in the same shell session.
Procedure
Switch to the user account you created during installation, for example:
$ su - amq-broker
Use the
artemiscommand to start the shell, for example:$ /var/opt/amq-broker/mybroker/bin/artemis
If you want to supply the broker connection details when you start an
artemisshell, use theartemis shellcommand. For example:$ /var/opt/amq-broker/mybroker/bin/artemis shell --user myuser --password mypassword --url tcp://localhost:61616
The credentials and URI provided are reused for any subsequent command run in the shell that requires authentication with a broker.
Press Tab to display auto-completion information anywhere in the shell. For example:
-
To display a list of commands available in the
artemisshell, press Tab at the shell prompt. -
To display sub-commands for a command, press Tab after the command. For example, type
checkand press Tab to display the sub-commands for thecheckcommand. The auto-completion information shows that thecheckcommand supports three sub-commands:cluster,nodeandqueue. -
To display auto-completion information for a sub-command, press Tab after the sub-command. For example, type
check nodeand press Tab. If no further auto-completion information is displayed, type--, for example,check node --, and press Tab to display the parameters available for the command.
-
To display a list of commands available in the
3.2. Enabling auto-completion in a Bash or Zsh shell
You can enable auto-completion of CLI commands and command parameters in a Bash or Zsh shell.
Procedure
Switch to the user account you created during installation, for example:
$ su - amq-broker
Use the following command to create a command auto-completion script called
auto-complete-artemis.sh.$ /var/opt/amq-broker/mybroker/bin/artemis auto-complete
To run the
auto-complete-artemis.sh, use the following command:$ source /var/opt/amq-broker/mybroker/bin/artemis/auto-complete-artemis.sh
-
To view auto-completion information for the
artemiscommand, type/var/opt/amq-broker/mybroker/artemisand press Tab. A list of commands available for theartemiscommand is displayed. -
To view auto-completion information for an available command, press Tab after the command. For example, type
/var/opt/amq-broker/mybroker/artemis check nodeand press Tab. If no further auto-completion information is displayed, type--, for example,check node --, and press Tab to display the parameters available for the command.
3.3. Starting broker instances
A broker instance is a directory that contains all the configuration and runtime data, such as logs and data files. The runtime data is associated with a unique broker process. You can start a broker in the foreground by using the artemis script, as a Linux service, or as a Windows service.
3.3.1. Starting the broker instance
After the broker instance is created, you use the artemis run command to start it.
Procedure
Switch to the user account you created during installation.
$ su - amq-broker
Use the
artemis runcommand to start the broker instance.$ /var/opt/amq-broker/mybroker/bin/artemis run __ __ ____ ____ _ /\ | \/ |/ __ \ | _ \ | | / \ | \ / | | | | | |_) |_ __ ___ | | _____ _ __ / /\ \ | |\/| | | | | | _ <| '__/ _ \| |/ / _ \ '__| / ____ \| | | | |__| | | |_) | | | (_) | < __/ | /_/ \_\_| |_|\___\_\ |____/|_| \___/|_|\_\___|_| Red Hat JBoss AMQ 7.2.1.GA 10:53:43,959 INFO [org.apache.activemq.artemis.integration.bootstrap] AMQ101000: Starting ActiveMQ Artemis Server 10:53:44,076 INFO [org.apache.activemq.artemis.core.server] AMQ221000: live Message Broker is starting with configuration Broker Configuration (clustered=false,journalDirectory=./data/journal,bindingsDirectory=./data/bindings,largeMessagesDirectory=./data/large-messages,pagingDirectory=./data/paging) 10:53:44,099 INFO [org.apache.activemq.artemis.core.server] AMQ221012: Using AIO Journal ...The broker starts and displays log output with the following information:
- The location of the transaction logs and cluster configuration.
- The type of journal being used for message persistence (AIO in this case).
The URI(s) that can accept client connections.
By default, port 61616 can accept connections from any of the supported protocols (CORE, MQTT, AMQP, STOMP, HORNETQ, and OPENWIRE). There are separate, individual ports for each protocol as well.
- The web console is available at Content from localhost is not included.http://localhost:8161.
- The Jolokia service (JMX over REST) is available at Content from localhost is not included.http://localhost:8161/jolokia.
3.3.2. Starting a broker as a Linux service
If the broker is installed on Linux, you can run it as a service.
Procedure
-
Create a new
amq-broker.servicefile in the/etc/systemd/system/directory. Copy the following text into the file.
Modify the path and user fields according to the information provided during the broker instance creation. In the example below, the user
amq-brokerstarts the broker service installed under the/var/opt/amq-broker/mybroker/directory.[Unit] Description=AMQ Broker After=syslog.target network.target [Service] ExecStart=/var/opt/amq-broker/mybroker/bin/artemis run Restart=on-failure User=amq-broker Group=amq-broker # A workaround for Java signal handling SuccessExitStatus=143 [Install] WantedBy=multi-user.target
- Open a terminal.
Enable the broker service using the following command:
sudo systemctl enable amq-broker
Run the broker service using the following command:
sudo systemctl start amq-broker
3.3.3. Starting a broker as a Windows service
If the broker is installed on Windows, you can run it as a service.
Procedure
- Open a command prompt to enter the commands
Install the broker as a service with the following command:
<broker_instance_dir>\bin\artemis-service.exe installStart the service by using the following command:
<broker_instance_dir>\bin\artemis-service.exe start(Optional) Uninstall the service:
<broker_instance_dir>\bin\artemis-service.exe uninstall
3.4. Stopping broker instances
You can stop a broker instance manually for immediate shutdown, or configure it to shut down gracefully to allow active connections to close.
3.4.1. Stopping the broker instance
You can stop the broker instance manually using the artemis stop command. This action forcefully closes all client connections.
In a production environment, you should configure the broker to stop gracefully so that client connections can be closed properly.
Procedure
Use the
artemis stopcommand to stop the broker instance:$ /var/opt/amq-broker/mybroker/bin/artemis stop 2018-12-03 14:37:30,630 INFO [org.apache.activemq.artemis.core.server] AMQ221002: Apache ActiveMQ Artemis Message Broker version 2.6.1.amq-720004-redhat-1 [b6c244ef-f1cb-11e8-a2d7-0800271b03bd] stopped, uptime 35 minutes Server stopped!
3.4.2. Stopping a broker instance gracefully
Configure a graceful shutdown to allow existing clients to disconnect before the broker stops. This prevents forceful disconnection of active clients.
Configure a graceful shutdown by using the graceful-shutdown-enabled configuration element to allow existing clients to disconnect before the broker stops.
When graceful-shutdown-enabled is set to true, no new client connections are allowed after a stop command is entered. However, existing connections are allowed to close on the client-side before the shutdown process is started. The default value for graceful-shutdown-enabled is false.
Use the graceful-shutdown-timeout configuration element to set a length of time, in milliseconds, for clients to disconnect before connections are forcefully closed from the broker side. After all connections are closed, the shutdown process is started. One advantage of using graceful-shutdown-timeout is that it prevents client connections from delaying a shutdown. The default value for graceful-shutdown-timeout is -1, meaning the broker waits indefinitely for clients to disconnect.
The following procedure demonstrates how to configure a graceful shutdown that uses a timeout.
Procedure
-
Open the configuration file
<broker_instance_dir>\etc\broker.xml. Add the
graceful-shutdown-enabledconfiguration element and set the value totrue.<configuration> <core> ... <graceful-shutdown-enabled> true </graceful-shutdown-enabled> ... </core> </configuration>Add the
graceful-shutdown-timeoutconfiguration element and set a value for the timeout in milliseconds. In the following example, client connections are forcefully closed 30 seconds (30000milliseconds) after thestopcommand is issued.<configuration> <core> ... <graceful-shutdown-enabled> true </graceful-shutdown-enabled> <graceful-shutdown-timeout> 30000 </graceful-shutdown-timeout> ... </core> </configuration>
3.5. Auditing messages by intercepting packets
You can use interceptors to audit or filter packets entering or exiting the broker. Interceptors can modify packets, so use them carefully to avoid unintended side effects.
Develop interceptors to meet your business requirements. Interceptors are protocol specific and must implement the appropriate interface.
Interceptors must implement the intercept() method, which returns a boolean value. If the value is true, the message packet continues onward. If false, the process is aborted, no other interceptors are called, and the message packet is not processed further.
3.5.1. Creating interceptors
Create custom incoming and outgoing interceptors to audit or modify packets. You must implement the appropriate protocol-specific interface for your needs.
Interceptors and their dependencies must be placed in the Java classpath of the broker. You can use the <broker_instance_dir>/lib directory because it is part of the classpath by default.
The following examples demonstrate how to create an interceptor that checks the size of each packet passed to it.
The examples implement a specific interface for each protocol.
Procedure
Implement the appropriate interface and override its
intercept()method.If you are using the AMQP protocol, implement the
org.apache.activemq.artemis.protocol.amqp.broker.AmqpInterceptorinterface.package com.example; import org.apache.activemq.artemis.protocol.amqp.broker.AMQPMessage; import org.apache.activemq.artemis.protocol.amqp.broker.AmqpInterceptor; import org.apache.activemq.artemis.spi.core.protocol.RemotingConnection; public class MyInterceptor implements AmqpInterceptor { private final int ACCEPTABLE_SIZE = 1024; @Override public boolean intercept(final AMQPMessage message, RemotingConnection connection) { int size = message.getEncodeSize(); if (size <= ACCEPTABLE_SIZE) { System.out.println("This AMQPMessage has an acceptable size."); return true; } return false; } }If you are using Core Protocol, your interceptor must implement the
org.apache.artemis.activemq.api.core.Interceptorinterface.package com.example; import org.apache.artemis.activemq.api.core.Interceptor; import org.apache.activemq.artemis.core.protocol.core.Packet; import org.apache.activemq.artemis.spi.core.protocol.RemotingConnection; public class MyInterceptor implements Interceptor { private final int ACCEPTABLE_SIZE = 1024; @Override boolean intercept(Packet packet, RemotingConnection connection) throws ActiveMQException { int size = packet.getPacketSize(); if (size <= ACCEPTABLE_SIZE) { System.out.println("This Packet has an acceptable size."); return true; } return false; } }If you are using the MQTT protocol, implement the
org.apache.activemq.artemis.core.protocol.mqtt.MQTTInterceptorinterface.package com.example; import org.apache.activemq.artemis.core.protocol.mqtt.MQTTInterceptor; import io.netty.handler.codec.mqtt.MqttMessage; import org.apache.activemq.artemis.spi.core.protocol.RemotingConnection; public class MyInterceptor implements Interceptor { private final int ACCEPTABLE_SIZE = 1024; @Override boolean intercept(MqttMessage mqttMessage, RemotingConnection connection) throws ActiveMQException { byte[] msg = (mqttMessage.toString()).getBytes(); int size = msg.length; if (size <= ACCEPTABLE_SIZE) { System.out.println("This MqttMessage has an acceptable size."); return true; } return false; } }If you are using the STOMP protocol, implement the
org.apache.activemq.artemis.core.protocol.stomp.StompFrameInterceptorinterface.package com.example; import org.apache.activemq.artemis.core.protocol.stomp.StompFrameInterceptor; import org.apache.activemq.artemis.core.protocol.stomp.StompFrame; import org.apache.activemq.artemis.spi.core.protocol.RemotingConnection; public class MyInterceptor implements Interceptor { private final int ACCEPTABLE_SIZE = 1024; @Override boolean intercept(StompFrame stompFrame, RemotingConnection connection) throws ActiveMQException { int size = stompFrame.getEncodedSize(); if (size <= ACCEPTABLE_SIZE) { System.out.println("This StompFrame has an acceptable size."); return true; } return false; } }
3.5.2. Configuring the broker to use interceptors
Register your custom interceptor classes in the broker.xml configuration file to enable them for incoming or outgoing traffic.
Prerequisites
-
Create an interceptor class and add it (and its dependencies) to the Java classpath of the broker. You can use the
<broker_instance_dir>/libdirectory since it is part of the classpath by default.
Procedure
-
Open
<broker_instance_dir>/etc/broker.xml Configure the broker to use an interceptor by adding configuration to
<broker_instance_dir>/etc/broker.xmlIf the interceptor is intended for incoming messages, add its
class-nameto the list ofremoting-incoming-interceptors.<configuration> <core> ... <remoting-incoming-interceptors> <class-name>org.example.MyIncomingInterceptor</class-name> </remoting-incoming-interceptors> ... </core> </configuration>If the interceptor is intended for outgoing messages, add its
class-nameto the list ofremoting-outgoing-interceptors.<configuration> <core> ... <remoting-outgoing-interceptors> <class-name>org.example.MyOutgoingInterceptor</class-name> </remoting-outgoing-interceptors> </core> </configuration>
3.5.3. Interceptors on the client side
Implement client-side interceptors to process packets sent to or received from the server. If an interceptor returns a false value, processing stops.
If an an interceptor returns a false value, processing stops transparently unless an outgoing packet is sent in a blocking fashion. In this case, an ActiveMQException is thrown to the caller. The ActiveMQException thrown contains the name of the interceptor that returned the false value.
On the server, the client interceptor classes and their dependencies must be added to the Java classpath of the client, to be properly instantiated and invoked.
3.6. Checking the health of brokers, queues and the cluster
Use the command-line utility to perform health checks on brokers, queues, and cluster topologies to ensure your system is operating correctly.
Procedure
See the list of checks that you can run for a particular broker (that is, node) in your broker topology.
$ <broker_instance_dir>/bin/artemis help check nodeYou see output that describes the set of options that you can use with the
artemis check nodecommand.NAME artemis check node - Check a node SYNOPSIS artemis check node [--backup] [--clientID <clientID>] [--diskUsage <diskUsage>] [--fail-at-end] [--live] [--memoryUsage <memoryUsage>] [--name <name>] [--password <password>] [--peers <peers>] [--protocol <protocol>] [--silent] [--timeout <timeout>] [--up] [--url <brokerURL>] [--user <user>] [--verbose] OPTIONS --backup Check that the node has a backup --clientID <clientID> ClientID to be associated with connection --diskUsage <diskUsage> Disk usage percentage to check or -1 to use the max-disk-usage --fail-at-end If a particular module check fails, continue the rest of the checks --live Check that the node has a live --memoryUsage <memoryUsage> Memory usage percentage to check --name <name> Name of the target to check --password <password> Password used to connect --peers <peers> Number of peers to check --protocol <protocol> Protocol used. Valid values are amqp or core. Default=core. --silent It will disable all the inputs, and it would make a best guess for any required input --timeout <timeout> Time to wait for the check execution, in milliseconds --up Check that the node is started, it is executed by default if there are no other checks --url <brokerURL> URL towards the broker. (default: tcp://localhost:61616) --user <user> User used to connect --verbose Adds more information on the executionFor example, check that the disk usage of the local broker is below the maximum disk usage configured for the broker.
$ <broker_instance_dir>/bin/artemis check node --url tcp://localhost:61616 --diskUsage -1 Connection brokerURL = tcp://localhost:61616 Running NodeCheck Checking that the disk usage is less then the max-disk-usage ... success Checks run: 1, Failures: 0, Errors: 0, Skipped: 0, Time elapsed: 0.065 sec - NodeCheckIn the preceding example, specifying a value of
-1for the--diskUsageoption means that the utility checks disk usage against the maximum disk usage configured for the broker. The maximum disk usage of a broker is configured using themax-disk-usageparameter in thebroker.xmlconfiguration file. The value specified formax-disk-usagerepresents the percentage of available physical disk space that the broker is allowed to consume.See the list of checks that you can run for a particular queue in your broker topology.
$ <broker_instance_dir>/bin/artemis help check queueYou see output that describes the set of options that you can use with the
artemis check queuecommand.NAME artemis check queue - Check a queue SYNOPSIS artemis check queue [--browse <browse>] [--clientID <clientID>] [--consume <consume>] [--fail-at-end] [--name <name>] [--password <password>] [--produce <produce>] [--protocol <protocol>] [--silent] [--timeout <timeout>] [--up] [--url <brokerURL>] [--user <user>] [--verbose] OPTIONS --browse <browse> Number of the messages to browse or -1 to check that the queue is browsable --clientID <clientID> ClientID to be associated with connection --consume <consume> Number of the messages to consume or -1 to check that the queue is consumable --fail-at-end If a particular module check fails, continue the rest of the checks --name <name> Name of the target to check --password <password> Password used to connect --produce <produce> Number of the messages to produce --protocol <protocol> Protocol used. Valid values are amqp or core. Default=core. --silent It will disable all the inputs, and it would make a best guess for any required input --timeout <timeout> Time to wait for the check execution, in milliseconds --up Check that the queue exists and is not paused, it is executed by default if there are no other checks --url <brokerURL> URL towards the broker. (default: tcp://localhost:61616) --user <user> User used to connect --verbose Adds more information on the executionThe utility can execute multiple options with a single command. For example, to check production, browsing, and consumption of 1000 messages on the default
helloworldqueue on the local broker, use the following command:$ <broker_instance_dir>/bin/artemis check queue --name helloworld --produce 1000 --browse 1000 --consume 1000 Connection brokerURL = tcp://localhost:61616 Running QueueCheck Checking that a producer can send 1000 messages to the queue helloworld ... success Checking that a consumer can browse 1000 messages from the queue helloworld ... success Checking that a consumer can consume 1000 messages from the queue helloworld ... success Checks run: 3, Failures: 0, Errors: 0, Skipped: 0, Time elapsed: 2.882 sec - QueueCheckIn the preceding example, observe that you did not specify a broker URL when running the queue check. If you do not explicitly specify a URL, the utility uses a default value of
tcp://localhost:61616.If your brokers are clustered, see the list of checks that you can run for the cluster topology.
$ <broker_instance_dir>/bin/artemis help check clusterYou see output that describes the set of options that you can use with the
artemis check clustercommand.NAME artemis check cluster - Verify if all the nodes on the cluster match the same topology and time configuration. SYNOPSIS artemis check cluster [--acceptor=<acceptor>] [--clientID=<clientID>] [--password=<password>] [--protocol=<protocol>] [--silent] [--url=<brokerURL>] [--user=<user>] [--variance=<variance>] [--verbose] OPTIONS --acceptor=<acceptor> Name used to find the default connection URL on the acceptor list. If an acceptor with that name cannot be found, the command looks for a connector with the same name. --clientID <clientID> ClientID to be associated with connection. --password <password> Password used to connect. --protocol <protocol> Protocol used. Valid values are amqp or core. Default=core. --silent Disables all the input options and make a best guess for any required input. --url <brokerURL> URL of the broker (default: tcp://localhost:61616). --user <user> User used to connect. --variance <variance> Allowed time variance in milliseconds after which check is deemed to have failed (default=1000). --verbose Adds more information on the execution.
3.7. Command line tools
Use the provided command-line interface (CLI) tools to manage your messaging journal, including data export, import, and maintenance tasks.
The following table describes the purpose of each tool.
Table 3.1. Command line tools
| Tool | Description |
|---|---|
| address |
Addresses tool groups (create/delete/update/show) (example |
| browser | Browses messages on an instance. |
| consumer | Consumes messages on an instance. |
| data | Prints reports about journal records and compacts the data. |
| decode | Imports the internal journal format from encode. |
| encode | Shows an internal format of the journal encoded to String. |
| exp | Exports the message data using a special and independent XML format. |
| help | Displays help information. |
| imp |
Imports the journal to a running broker using the output provided by |
| kill | Kills a broker instance started with --allow-kill. |
| mask | Masks a password and prints it out. |
| perf-journal | Calculates the journal-buffer timeout you should use with the current data folder. |
| queue |
Queues tool groups (create/delete/update/stat) (example |
| run | Runs the broker instance. |
| stop | Stops the broker instance. |
| user |
Default file-based user managament (add/rm/list/reset) (example |
For a full list of commands available for each tool, use the help parameter followed by the tool’s name. For instance, in the example below, the CLI output lists all the commands available to the data tool after the user enters the command ./artemis help data.
$ ./artemis help data

NAME
        artemis data - data tools group
        (print|imp|exp|encode|decode|compact) (example ./artemis data print)

SYNOPSIS
        artemis data
        artemis data compact [--broker <brokerConfig>] [--verbose]
                [--paging <paging>] [--journal <journal>]
                [--large-messages <largeMessges>] [--bindings <binding>]
        artemis data decode [--broker <brokerConfig>] [--suffix <suffix>]
                [--verbose] [--paging <paging>] [--prefix <prefix>] [--file-size <size>]
                [--directory <directory>] --input <input> [--journal <journal>]
                [--large-messages <largeMessges>] [--bindings <binding>]
        artemis data encode [--directory <directory>] [--broker <brokerConfig>]
                [--suffix <suffix>] [--verbose] [--paging <paging>] [--prefix <prefix>]
                [--file-size <size>] [--journal <journal>]
                [--large-messages <largeMessges>] [--bindings <binding>]
        artemis data exp [--broker <brokerConfig>] [--verbose]
                [--paging <paging>] [--journal <journal>]
                [--large-messages <largeMessges>] [--bindings <binding>]
        artemis data imp [--host <host>] [--verbose] [--port <port>]
                [--password <password>] [--transaction] --input <input> [--user <user>]
        artemis data print [--broker <brokerConfig>] [--verbose]
                [--paging <paging>] [--journal <journal>]
                [--large-messages <largeMessges>] [--bindings <binding>]

COMMANDS
        With no arguments, Display help information

        print
            Print data records information (WARNING: don't use while a
            production server is running)

        ...
You can use the help parameter for more information on how to execute each of the commands. For example, the CLI lists more information about the data print command after the user enters the ./artemis help data print.
$ ./artemis help data print

NAME
        artemis data print - Print data records information (WARNING: don't use
        while a production server is running)

SYNOPSIS
        artemis data print [--bindings <binding>] [--journal <journal>]
                [--paging <paging>]

OPTIONS
        --bindings <binding>
            The folder used for bindings (default ../data/bindings)

        --journal <journal>
            The folder used for messages journal (default ../data/journal)

        --paging <paging>
The folder used for paging (default ../data/paging)Chapter 4. Using AMQ Management Console
You can manage your AMQ Broker installation in a web browser by using AMQ Management Console, which is included in the AMQ Broker installation.
AMQ Management Console is based on Content from hawt.io is not included.hawtio.
4.1. Overview
AMQ Broker is a full-featured, message-oriented middleware broker. It offers specialized queuing behaviors, message persistence, and manageability. It supports multiple protocols and client languages, freeing you to use many of your application assets.
AMQ Broker’s key features allow you to:
monitor your AMQ brokers and clients
- view the topology
- view network health at a glance
manage AMQ brokers using:
- AMQ Management Console
- Command-line Interface (CLI)
- Management API
The supported web browsers for AMQ Management Console are Firefox and Chrome. For more information on supported browser versions, see AMQ 7 Supported Configurations.
4.2. Configuring local and remote access to AMQ Management Console
Configure the broker to allow access to the AMQ Management Console from local or remote hosts.
Remote access to the console can take one of two forms:
- Within a console session on a local broker, you use the Connect tab to connect to another, remote broker
- From a remote host, you connect to the console for the local broker, using an externally-reachable IP address for the local broker
Prerequisites
-
You must upgrade to at least AMQ Broker 7.1.0. As part of this upgrade, an access-management configuration file named
jolokia-access.xmlis added to the broker instance. For more information about upgrading, see Upgrading a Broker instance from 7.0.x to 7.1.0.
Procedure
-
Open the
<broker_instance_dir>/etc/bootstrap.xmlfile. Within the
webelement, observe that the web port is bound only tolocalhostby default.<web path="web"> <binding uri="http://localhost:8161"> <app url="redhat-branding" war="redhat-branding.war"/> <app url="artemis-plugin" war="artemis-plugin.war"/> <app url="dispatch-hawtio-console" war="dispatch-hawtio-console.war"/> <app url="console" war="console.war"/> </binding> </web>To enable connection to the console for the local broker from a remote host, change the web port binding to a network-reachable interface. For example:
<web path="web">
  <binding uri="http://0.0.0.0:8161">
In the preceding example, by specifying
0.0.0.0, you bind the web port to all interfaces on the local broker.-
Save the
bootstrap.xmlfile. -
Open the
<broker_instance_dir>/etc/jolokia-access.xmlfile. Within the
<cors>(that is, Cross-Origin Resource Sharing) element, add anallow-originentry for each HTTP origin request header that you want to allow to access the console. For example:<cors> <allow-origin>*://localhost*</allow-origin> <allow-origin>*://192.168.0.49*</allow-origin> <allow-origin>*://192.168.0.51*</allow-origin> <!-- Check for the proper origin on the server side, too --> <strict-checking/> </cors>
In the preceding configuration, you specify that the following connections are allowed:
Connection from the local host (that is, the host machine for your local broker instance) to the console.
-
The first asterisk (
*) wildcard character allows either thehttporhttpsscheme to be specified in the connection request, based on whether you have configured the console for secure connections. - The second asterisk wildcard character allows any port on the host machine to be used for the connection.
-
The first asterisk (
-
Connection from a remote host to the console for the local broker, using the externally-reachable IP address of the local broker. In this case, the externally-reachable IP address of the local broker is
192.168.0.49. -
Connection from within a console session opened on another, remote broker to the local broker. In this case, the IP address of the remote broker is
192.168.0.51.
-
Save the
jolokia-access.xmlfile. -
Open the
<broker_instance_dir>/etc/artemis.profilefile. To enable the Connect tab in the console, set the value of the
Dhawtio.disableProxyargument tofalse.-Dhawtio.disableProxy=false
ImportantIt is recommended that you enable remote connections from the console (that is, set the value of the
Dhawtio.disableProxyargument tofalse) only if the console is exposed to a secure network.Add a new argument,
Dhawtio.proxyWhitelist, to theJAVA_ARGSlist of Java system arguments. As a comma-separated list, specify IP addresses for any remote brokers that you want to connect to from the local broker (that is, by using the Connect tab within a console session running on the local broker). For example:-Dhawtio.proxyWhitelist=192.168.0.51
Based on the preceding configuration, you can use the Connect tab within a console session on the local broker to connect to another, remote broker with an IP address of
192.168.0.51.-
Save the
aretmis.profilefile.
4.3. Accessing AMQ Management Console
You can access the console from a local or remote host, and connect to other brokers within the console session.
- Open a console instance for the local broker from a remote host using the externally-reachable IP address of the local broker
Prerequisites
- You must have already configured local and remote access to the console. For more information, see Section 4.2, “Configuring local and remote access to AMQ Management Console”.
Procedure
In your web browser, navigate to the console address for the local broker.
The console address is
http://<host:port>/console/login. If you are using the default address, navigate to Content from localhost is not included.http://localhost:8161/console/login. Otherwise, use the values of host and port that are defined for thebindattribute of thewebelement in the<broker_instance_dir>/etc/bootstrap.xmlconfiguration file.- Log in to AMQ Management Console using the default user name and password that you created when you created the broker.
To connect to another, remote broker from the console session of the local broker:
- In the left menu, click the Connect tab.
- In the main pane, on the Remote tab, click the Add connection button.
In the Add Connection dialog box, specify the following details:
- Name
-
Name for the remote connection, for example,
my_other_broker. - Scheme
-
Protocol to use for the remote connection. Select
httpfor a non-secured connection, orhttpsfor a secured connection. - Host
- IP address of a remote broker. You must have already configured console access for this remote broker.
- Port
-
Port on the local broker to use for the remote connection. Specify the port value that is defined for the
bindattribute of thewebelement in the<broker_instance_dir>/etc/bootstrap.xmlconfiguration file. The default value is8161. - Path
-
Path to use for console access. Specify
console/jolokia.
To test the connection, click the Test Connection button.
If the connection test is successful, click the Add button. If the connection test fails, review and modify the connection details as needed. Test the connection again.
On the Remote page, for a connection that you have added, click the Connect button.
A new web browser tab opens for the console instance on the remote broker.
In the Log In dialog box, enter the user name and password for the remote broker. Click Log In.
The console instance for the remote broker opens.
To connect to the console for the local broker from a remote host, specify the Jolokia endpoint for the local broker in a web browser. This endpoint includes the externally-reachable IP address that you specified for the local broker when configuring remote console access. For example:
http://192.168.0.49/console/jolokia
4.4. Configuring AMQ Management Console
Configure authentication and authorization settings for the AMQ Management Console to control user access to broker resources.
4.4.1. Securing AMQ Management Console using Red Hat Single Sign-On
Integrate Red Hat Single Sign-On (RH-SSO) with AMQ Broker to secure the AMQ Management Console by using centralized authentication.
Prerequisites
- Red Hat Single Sign-On 7.4
Procedure
Configure Red Hat Single Sign-On:
-
Navigate to the realm in Red Hat Single Sign-On that you want to use for securing AMQ Management Console. Each realm in Red Hat Single Sign-On includes a client named
Broker. This client is not related to AMQ. -
Create a new client in Red Hat Single Sign-On, for example
artemis-console. Navigate to the client settings page and set:
Valid Redirect URIs to the AMQ Management Console URL followed by
*, for example:https://broker.example.com:8161/console/*
-
Web Origins to the same value as Valid Redirect URIs. Red Hat Single Sign-On allows you enter
+, indicating that allowed CORS origins includes the value for Valid Redirect URIs.
-
Create a role for the client, for example
guest. - Make sure all users who require access to AMQ Management Console are assigned the above role, for example, using Red Hat Single Sign-On groups.
-
Navigate to the realm in Red Hat Single Sign-On that you want to use for securing AMQ Management Console. Each realm in Red Hat Single Sign-On includes a client named
Configure the AMQ Broker instance:
Add the following to your
<broker-instance-dir>/instances/broker0/etc/login.configfile to configure AMQ Management Console to use Red Hat Single Sign-On:console { org.keycloak.adapters.jaas.BearerTokenLoginModule required keycloak-config-file="${artemis.instance}/etc/keycloak-bearer-token.json" role-principal-class=org.apache.activemq.artemis.spi.core.security.jaas.RolePrincipal ; };Adding this configuration sets up a JAAS principal and a requirement for a bearer token from Red Hat Single Sign-On. The connection to Red Hat Single Sign-On is defined in the
keycloak-bearer-token.jsonfile, as described in the next step.Create a file
<broker-instance-dir>/etc/keycloak-bearer-token.jsonwith the following contents to specify the connection to Red Hat Single Sign-On used for the bearer token exchange:{ "realm": "<realm-name>", "resource": "<client-name>", "auth-server-url": "<RHSSO-URL>/auth", "principal-attribute": "preferred_username", "use-resource-role-mappings": true, "ssl-required": "external", "confidential-port": 0 }<realm-name>- the name of the realm in Red Hat Single Sign-On
<client-name>- the name of the client in Red Hat Single Sign-On
<RHSSO-URL>- the URL of Red Hat Single Sign-On
Create a file
<broker-instance-dir>/etc/keycloak-js-token.jsonwith the following contents to specify the Red Hat Single Sign-On authentication endpoint:{ "realm": "<realm-name>", "clientId": "<client-name>", "url": "<RHSSO-URL>/auth" }Configure the security settings by editing the the
<broker-instance-dir>/etc/broker.xmlfile.For example, to allow users with the
amqrole consume messages and allow users with theguestrole send messages, add the following:<security-setting match="Info"> <permission roles="amq" type="createDurableQueue"/> <permission roles="amq" type="deleteDurableQueue"/> <permission roles="amq" type="createNonDurableQueue"/> <permission roles="amq" type="deleteNonDurableQueue"/> <permission roles="guest" type="send"/> <permission roles="amq" type="consume"/> </security-setting>
- Run the AMQ Broker instance and validate AMQ Management Console configuration.
4.4.2. Setting up user access to AMQ Management Console
You can configure user access to the AMQ Management Console by using guest, basic, or LDAP authentication methods.
The following table describes the different methods you can use to grant users access to the AMQ Management Console:
Table 4.1. Methods to grant users access to AMQ Management Console
| Authentication Method | Description |
|---|---|
| Guest authentication | Enables anonymous access. In this configuration, any user who connects without credentials or with the wrong credentials will be authenticated automatically and assigned a specific user and role. For more information, see Configuring guest access in Configuring AMQ Broker. |
| Basic user and password authentication | For each user, you must define a username and password and assign a security role. Users can only log into AMQ Management Console using these credentials. For more information, see Configuring basic user and password authentication in Configuring AMQ Broker. |
| LDAP authentication | Users are authenticated and authorized by checking the credentials against user data stored in a central X.500 directory server. For more information, see Configuring LDAP to authenticate clients in Configuring AMQ Broker. |
4.4.3. Securing network access to AMQ Management Console
You can secure network access to the AMQ Management Console by using SSL/TLS to encrypt traffic over a WAN or the internet.
Prerequisites
The following should be located in the <broker_instance_dir>/etc/ directory:
- Java key store
- Java trust store (needed only if you require client authentication)
Procedure
-
Open the
<broker_instance_dir>/etc/bootstrap.xmlfile. In the
<web>element, add the following attributes:<web path="web"> <binding uri="https://0.0.0.0:8161" keyStorePath="<path_to_keystore>" keyStorePassword="<password>" clientAuth="<true/false>" trustStorePath="<path_to_truststore>" trustStorePassword="<password>"> </binding> </web>- bind
-
For secure connections to the console, change the URI scheme to
https. - keyStorePath
Path of the keystore file. For example:
keyStorePath="<broker_instance_dir>/etc/keystore.jks"- keyStorePassword
- Key store password. This password can be encrypted.
- clientAuth
-
Specifies whether client authentication is required. The default value is
false. - trustStorePath
-
Path of the trust store file. You need to define this attribute only if
clientAuthis set totrue. - trustStorePassword
- Trust store password. This password can be encrypted.
Additional resources
4.4.4. Configuring AMQ Management Console to use certificate-based authentication
You can configure AMQ Management Console to authenticate users by using SSL certificates, eliminating the need for passwords.
Procedure
Obtain certificates for the broker and clients from a trusted certificate authority or generate self-signed certificates. If you want to generate self-signed certificates, complete the following steps:
Generate a self-signed certificate for the broker.
$ keytool -storetype pkcs12 -keystore broker-keystore.p12 -storepass securepass -keypass securepass -alias client -genkey -keyalg "RSA" -keysize 2048 -dname "CN=ActiveMQ Broker, OU=Artemis, O=ActiveMQ, L=AMQ, S=AMQ, C=AMQ" -ext bc=ca:false -ext eku=cA
Export the certificate from the broker keystore, so that it can be shared with clients.
$ keytool -storetype pkcs12 -keystore broker-keystore.p12 -storepass securepass -alias client -exportcert -rfc > broker.crt
On the client, import the broker certificate into the client truststore.
$ keytool -storetype pkcs12 -keystore client-truststore.p12 -storepass securepass -keypass securepass -importcert -alias client-ca -file broker.crt -noprompt
On the client, generate a self-signed certificate for the client.
$ keytool -storetype pkcs12 -keystore client-keystore.p12 -storepass securepass -keypass securepass -alias client -genkey -keyalg "RSA" -keysize 2048 -dname "CN=ActiveMQ Client, OU=Artemis, O=ActiveMQ, L=AMQ, S=AMQ, C=AMQ" -ext bc=ca:false -ext eku=cA
Export the client certificate from the client keystore to a file so that it can be added to the broker truststore.
$ keytool -storetype pkcs12 -keystore client-keystore.p12 -storepass securepass -alias client -exportcert -rfc > client.crt
Import the client certificate into the broker truststore.
$ keytool -storetype pkcs12 -keystore client-truststore.p12 -storepass securepass -keypass securepass -importcert -alias client-ca -file client.crt -noprompt
NoteOn the broker machine, ensure that the keystore and truststore files are in a location that is accessible to the broker.
In the
<broker_instance_dir>/etc/bootstrap.xmlfile, update the web configuration to enable the HTTPS protocol and client authentication for the broker console. For example:... <web path="web"> <binding uri="https://localhost:8161" keyStorePath="${artemis.instance}/etc/server-keystore.p12" keyStorePassword="password" clientAuth="true" trustStorePath="${artemis.instance}/etc/client-truststore.p12" trustStorePassword="password"> ... </binding> </web> ...binding uri- Specify the https protocol to enable SSL and add a host name and port.
keystorePath- The path to the keystore where the broker certificate is installed.
keystorePassword- The password of the keystore where the broker certificate is installed.
ClientAuth- Set to true to configure the broker to require that each client presents a certificate when a client tries to connect to the broker console.
trustStorePath- If clients are using self-signed certificates, specify the path to the truststore where client certificates are installed.
trustStorePasswordIf clients are using self-signed certificates, specify the password of the truststore where client certificates are installed .
NOTE. You need to configure the
trustStorePathandtrustStorePasswordproperties only if clients are using self-signed certificates.
Obtain the Subject Distinguished Names (DNs) from each client certificate so you can create a mapping between each client certificate and a broker user.
Export each client certificate from the client’s keystore file into a temporary file. For example:
keytool -export -file <file_name> -alias broker-localhost -keystore broker.ks -storepass <password>
Print the contents of the exported certificate:
keytool -printcert -file <file_name>The output is similar to that shown below:
Owner: CN=AMQ Client, OU=Artemis, O=AMQ, L=AMQ, ST=AMQ, C=AMQ
Issuer: CN=AMQ Client, OU=Artemis, O=AMQ, L=AMQ, ST=AMQ, C=AMQ
Serial number: 51461f5d
Valid from: Sun Apr 17 12:20:14 IST 2022 until: Sat Jul 16 12:20:14 IST 2022
Certificate fingerprints:
	 SHA1: EC:94:13:16:04:93:57:4F:FD:CA:AD:D8:32:68:A4:13:CC:EA:7A:67
	 SHA256: 85:7F:D5:4A:69:80:3B:5B:86:27:99:A7:97:B8:E4:E8:7D:6F:D1:53:08:D8:7A:BA:A7:0A:7A:96:F3:6B:98:81
The
Ownerentry is the Subject DN. The format used to enter the Subject DN depends on your platform. The string above could also be represented as;Owner: `CN=localhost,\ OU=broker,\ O=Unknown,\ L=Unknown,\ ST=Unknown,\ C=Unknown`
Enable certificate-based authentication for the broker’s console.
Open the
<broker_instance_dir>/etc/login.configconfiguration file. Add the certificate login module and reference the user and roles properties files. For example:activemq { org.apache.activemq.artemis.spi.core.security.jaas.TextFileCertificateLoginModule debug=true org.apache.activemq.jaas.textfiledn.user="artemis-users.properties" org.apache.activemq.jaas.textfiledn.role="artemis-roles.properties"; };org.apache.activemq.artemis.spi.core.security.jaas.TextFileCertificateLoginModule- The implementation class.
org.apache.activemq.jaas.textfiledn.user- Specifies the location of the user properties file relative to the directory that contains the login configuration file.
org.apache.activemq.jaas.textfiledn.roleSpecifies the properties file that maps users to defined roles for the login module implementation.
NoteIf you change the default name of the certificate login module configuration in the
<broker_instance_dir>/etc/login.configfile, you must update the value of the-dhawtio.realmargument in the<broker_instance_dir>/etc/artemis.profilefile to match the new name. The default name isactivemq.
Open the
<broker_instance_dir>/etc/artemis-users.propertiesfile. Create a mapping between client certificates and broker users by adding the Subject DNS that you obtained from each client certificate to a broker user. For example:user1=CN=user1,O=Progress,C=US user2=CN=user2,O=Progress,C=US
In this example, the user1 broker user is mapped to the client certificate that has a Subject Distinguished Name of CN=user1,O=Progress,C=US Subject DN. After you create a mapping between a client certificate and a broker user, the broker can authenticate the user by using the certificate.
Open the
<broker_instance_dir>/etc/artemis-roles.propertiesfile. Grant users permission to log in to the console by adding them to the role that is specified for the HAWTIO_ROLE variable in the<broker_instance_dir>/etc/artemis.profilefile. The default value of the HAWTIO_ROLE variable isamq. For example:amq=user1, user2
Configure the following recommended security properties for the HTTPS protocol.
-
Open the
<broker_instance_dir>/etc/artemis.profilefile. Set the
hawtio.http.strictTransportSecurityproperty to allow only HTTPS requests to the AMQ Management Console and to convert any HTTP requests to HTTPS. For example:hawtio.http.strictTransportSecurity = max-age=31536000; includeSubDomains; preload
Set the
hawtio.http.publicKeyPinsproperty to instruct the web browser to associate a specific cryptographic public key with the AMQ Management Console to decrease the risk of “man-in-the-middle” attacks using forged certificates. For example:hawtio.http.publicKeyPins = pin-sha256="..."; max-age=5184000; includeSubDomains
-
Open the
4.4.5. Configuring AMQ Management Console to handle X-forwarded headers
If requests to the AMQ Management Console go through a proxy server, you can configure the AMQ Broker embedded web server, which hosts AMQ Management Console, to handle X-Forwarded headers. This allows the AMQ Management Console to correctly identify the protocols in use when it is accessed behind a proxy server.
For example, the proxy can expose AMQ Management Console using HTTPS, and the AMQ Management Console, which uses HTTP, can identify from the X-Forwarded header that the connection between the browser and the proxy uses HTTPS and switch to HTTPS to serve browser requests.
Procedure
-
Open the
<broker_instance_dir>/etc/bootstrap.xmlfile. In the
<web>element, add thecustomizerattribute with a value oforg.eclipse.jetty.server.ForwardedRequestCustomizer. For example:<web path="web" customizer="org.eclipse.jetty.server.ForwardedRequestCustomizer"> .. </web>
-
Save the
bootstrap.xmlfile. Start or restart the broker by entering the following command:
-
On Linux:
<broker_instance_dir>/bin/artemis run -
On Windows:
<broker_instance_dir>\bin\artemis-service.exe start
-
On Linux:
4.5. Managing brokers using AMQ Management Console
View broker status and manage resources like connections, addresses, and queues using the AMQ Management Console.
4.5.1. Viewing details about the broker
You can view configuration details, status, connections, and runtime metrics for your broker from the Artemis menu in the console.
To see how the broker is configured, in the left menu, click Artemis.
In the main pane, the following tabs are available:
StatusDisplays information about the current status of the broker, such as version information, uptime and the high availability policy deployed. Also displays the amount of address memory that the broker is currently using. The graph shows this value as a proportion of the
global-max-sizeconfiguration parameter.Figure 4.1. Status tab
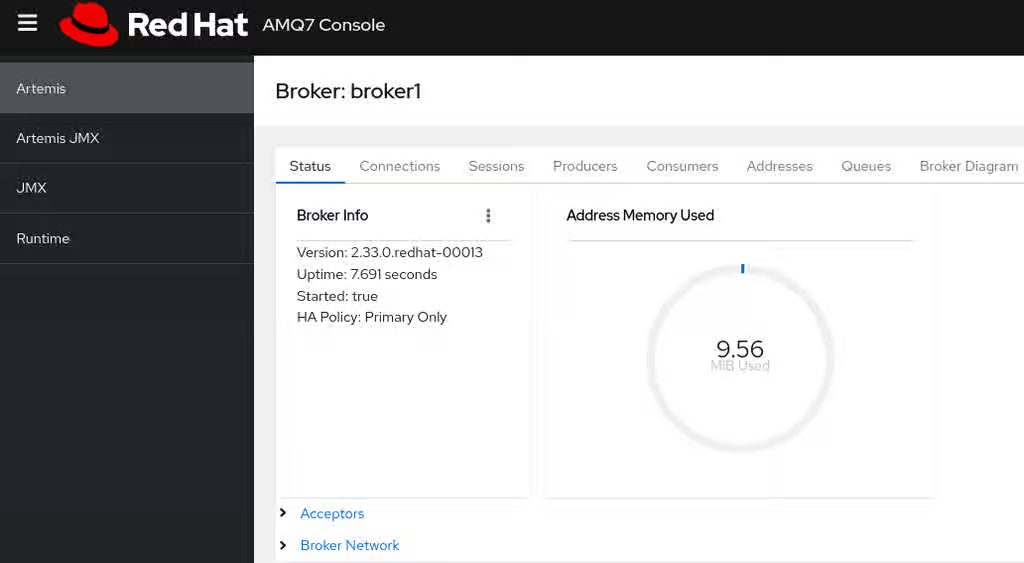
Connections- Displays information about broker connections, including client, cluster, and bridge connections.
Sessions- Displays information about all sessions currently open on the broker.
Consumers- Displays information about all consumers currently open on the broker.
Producers- Displays information about producers currently open on the broker.
Addresses- Displays information about addresses on the broker. This includes internal addresses, such as store-and-forward addresses.
Queues- Displays information about queues on the broker. This includes internal queues, such as store-and-forward queues.
Broker diagram- Displays a diagram of the cluster topology. This includes all brokers in the cluster and any addresses and queues on the local broker.
4.5.2. Viewing the broker diagram
You can visualize your cluster topology, including brokers, addresses, queues, and clients, by using the broker diagram.
Procedure
- In the left menu, click Artemis.
In the main pane, click the Broker Diagram tab.
The console displays a diagram of the cluster topology. This includes all brokers in the cluster and any addresses and queues on the local broker, as shown in the figure.
Figure 4.2. Broker diagram tab
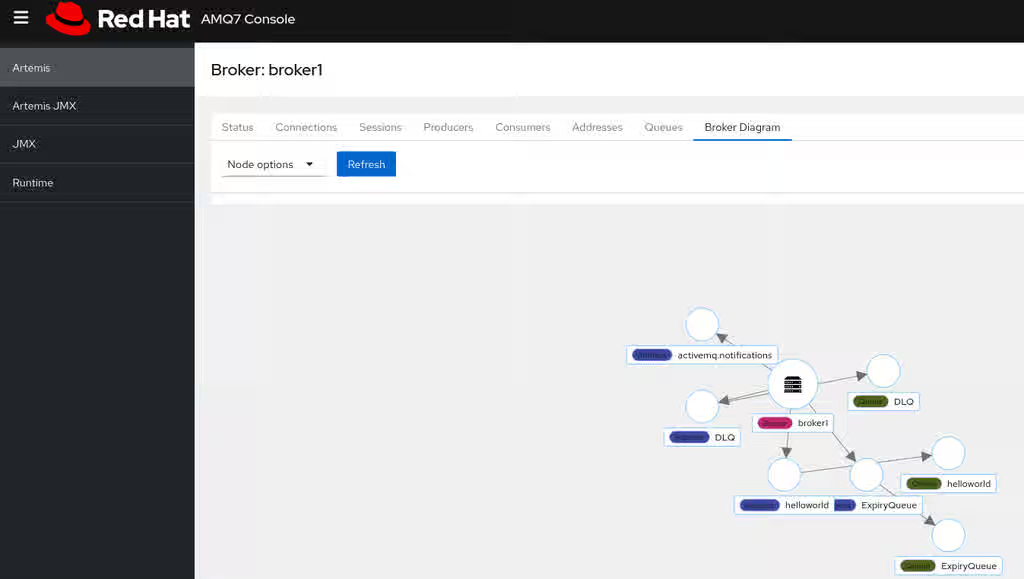
- To change the items displayed in the diagram, in the Node options list, select the checkboxes for the items you want to display.
To show attributes for the local broker or an address or queue that is connected to it, click that node in the diagram. For example, the following figure shows a diagram that also includes attributes for the local broker.
Figure 4.3. Broker diagram tab, including attributes
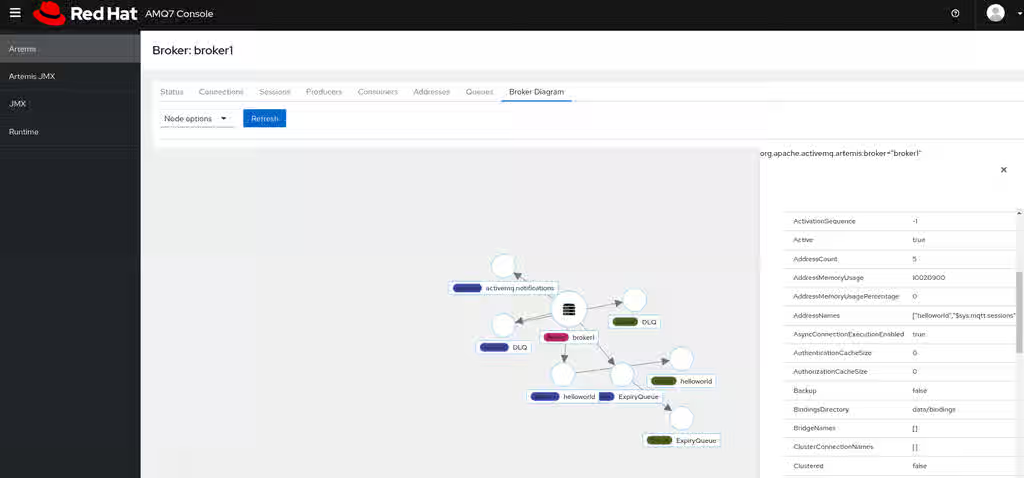
4.5.3. Viewing acceptors
Inspect the attributes and operations of configured acceptors to understand how the broker listens for connections.
Procedure
- In the left menu, click Artemis JMX.
- In the folder tree, click acceptors.
To view details about how an acceptor is configured, click the acceptor.
The console shows the acceptor attributes on the Attributes tab and the operations you can execute for the acceptor on the Operations tab.
The following examples shows the attributes for the
amqpacceptor.Figure 4.4. AMQP acceptor attributes

- To see complete details for an attribute, click the attribute. An additional pane opens to show the details.
- To execute an operation on the acceptor, click the Operations tab, expand the operation and click the Execute button.
4.5.4. Managing addresses and queues
You can create, configure, and delete addresses and queues to manage messaging endpoints within the broker configuration.
An address represents a messaging endpoint. Within the configuration, a typical address is given a unique name.
A queue is associated with an address. There can be multiple queues per address. Once an incoming message is matched to an address, the message is sent on to one or more of its queues, depending on the routing type configured. Queues can be automatically created and deleted.
4.5.4.1. Creating addresses
You create new addresses by specifying a unique name and a routing type. A routing type determines how messages are sent to the queues associated with an address.
Addresses can be configured with two different routing types.
| If you want your messages routed to… | Use this routing type… |
| A single queue within the matching address, in a point-to-point manner. | Anycast |
| Every queue within the matching address, in a publish-subscribe manner. | Multicast |
You can create and configure addresses and queues, and then delete them when they are no longer in use.
Procedure
- In the left menu, click Artemis.
- In the main pane, click the Addresses tab.
Click Create Address.
The Create Address dialog is displayed.
Figure 4.5. Create Address dialog
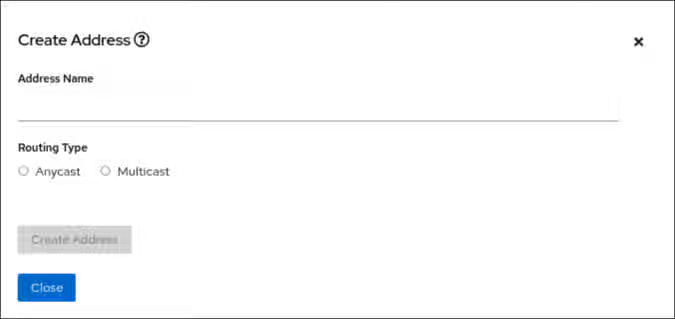
Complete the following fields:
Address Name- The routing name of the address.
Routing typeSelect one of the following options:
-
Multicast: Messages sent to the address are distributed to all subscribers in a publish-subscribe manner. -
Anycast: Messages sent to this address are distributed to only one subscriber in a point-to-point manner.
-
- Click Create Address.
4.5.4.2. Sending messages to an address
You can use the AMQ Management Console to send messages to an address.
Procedure
- In the left menu, click Artemis.
- In the main pane, click the Addresses tab.
- Click the three-dot icon for the selected address.
Click Send Message.
The Send Message to Address <address name> dialog is displayed.
Figure 4.6. Send Message to Address
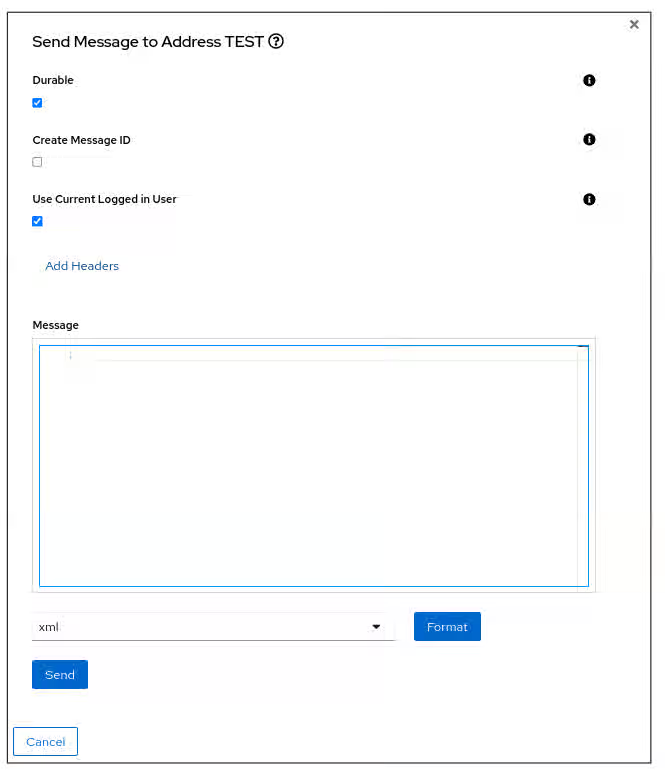
- By default messages are sent using the credentials that you used to log in to AMQ Management Console. If you want to use different credentials, clear the Use Current Logged in User checkbox and specify values in the Username and Password fields, which are displayed after you clear the checkbox.
- If necessary, click the Add Header button to add message header information.
- Enter the message body.
- In the Format drop-down menu, select an option for the format of the message body, and then click Format. The message body is formatted in a human-readable style for the format you selected.
Click Send.
The message is sent.
- To send additional messages, change any of the information you entered, and then click Send.
4.5.4.3. Creating queues
Create queues bound to specific addresses to enable message delivery to consumers.
Prerequisites
- The address to which you want to bind the queue must exist. To learn how to use the console to create an address, see Section 4.5.4.1, “Creating addresses”.
Procedure
- In the left menu, click Artemis.
- In the main pane, click the Addresses tab.
- Click the three-dot icon for the address to which you want to bind the queue.
Click Create Queue.
The Create Queue on Address <address name> dialog is displayed
Figure 4.7. Create Queue on Address dialog
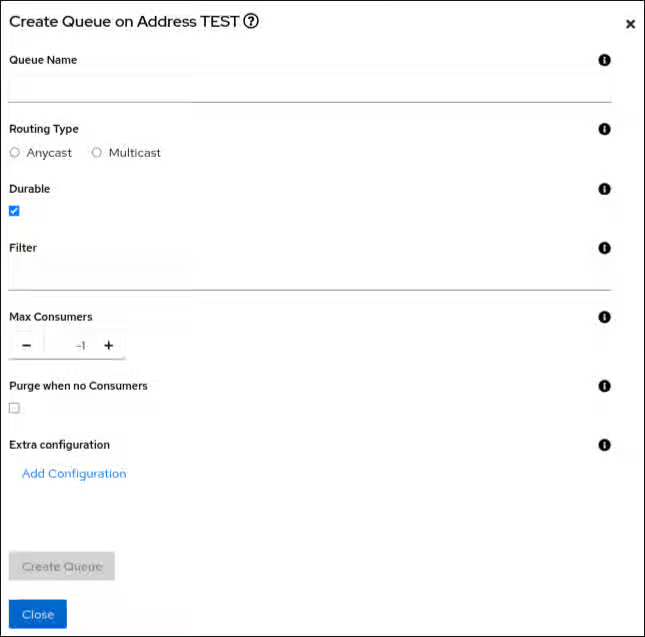
Complete the following fields:
Queue name- A unique name for the queue.
Routing TypeSelect one of the following options:
-
Multicast: Messages sent to the parent address will be distributed to all queues bound to the address. -
Anycast: Only one queue bound to the parent address will receive a copy of the message. Messages will be distributed evenly among all of the queues bound to the address.
-
Durable- If you select this option, the queue and its messages are persistent.
Filter- The username to be used when connecting to the broker.
Max Consumers- The maximum number of consumers that can access the queue at a given time.
Purge when no Consumers- If selected, the queue will be purged when no consumers are connected.
- Click Create Queue.
4.5.4.4. Checking the status of a queue
Charts provide a real-time view of the status of a queue on a broker.
Procedure
- In the left menu, click Artemis JMX.
- In the folder tree, navigate to a queue.
Click the Chart tab.
The console displays a chart that shows real-time data for the queue attributes.
Figure 4.8. Chart tab for a queue
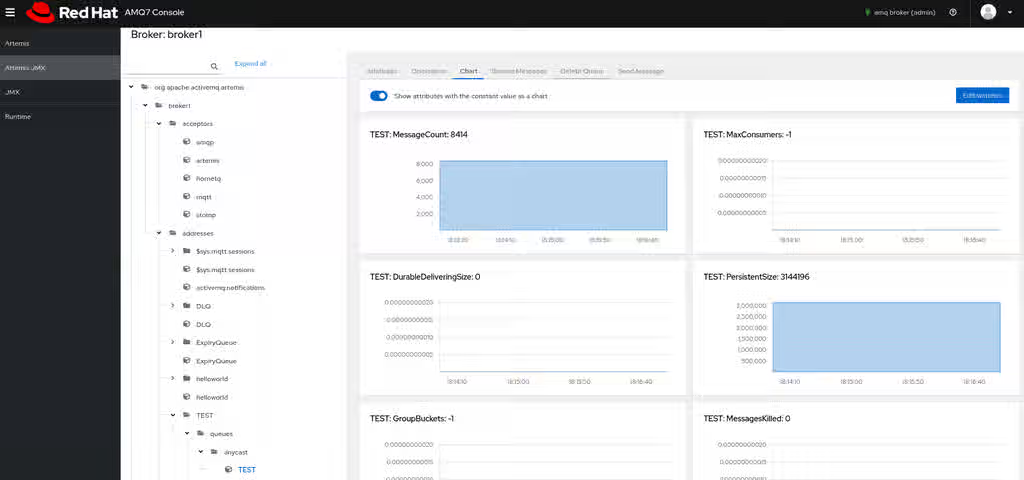 Note
NoteTo view a chart for multiple queues on an address, select the
anycastormulticastfolder that contains the queues.By default, all attributes for a queue are displayed on the chart. If necessary, change the list of attributes displayed on the chart:
- Click Edit watches.
-
On the
Watched attributeslist, select the checkbox beside each attribute that you do not want to include in the chart. - Click the right arrow icon to remove the selected attributes from the chart.
- Click Close.
4.5.4.5. Browsing queues
Browsing a queue displays all of the messages in the queue. You can also filter and sort the list of messages to find specific messages.
Procedure
- In the left menu, click Artemis.
- In the main pane, click the Queues tab.
- Click the three-dot icon for the queue that you want to browse.
Click Browse Messages.
The messages in the queue are displayed. By default, the first 200 messages are displayed.
Figure 4.9. Browse Queue dialog
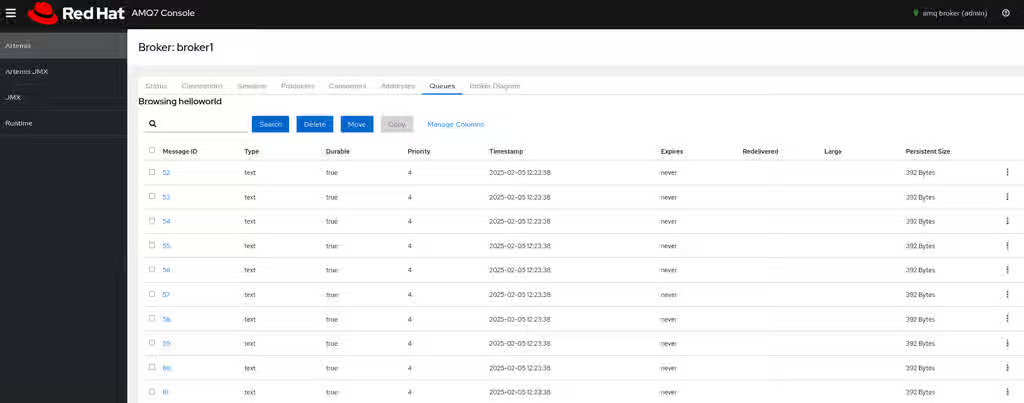
To view the content of a message, click the three-dot icon for the message and click View.
You can view the message body, header and properties.
4.5.4.6. Sending messages to a queue
You can send messages directly to a queue in the AMQ Management Console.
Procedure
- In the left menu, click Artemis.
- In the main pane, click the Queues tab.
- Click the three-dot icon for the queue to which you want to send a message .
Click Send Message.
The Send Message to Queue <queue name> dialog is displayed
Figure 4.10. Send Message to Queue dialog
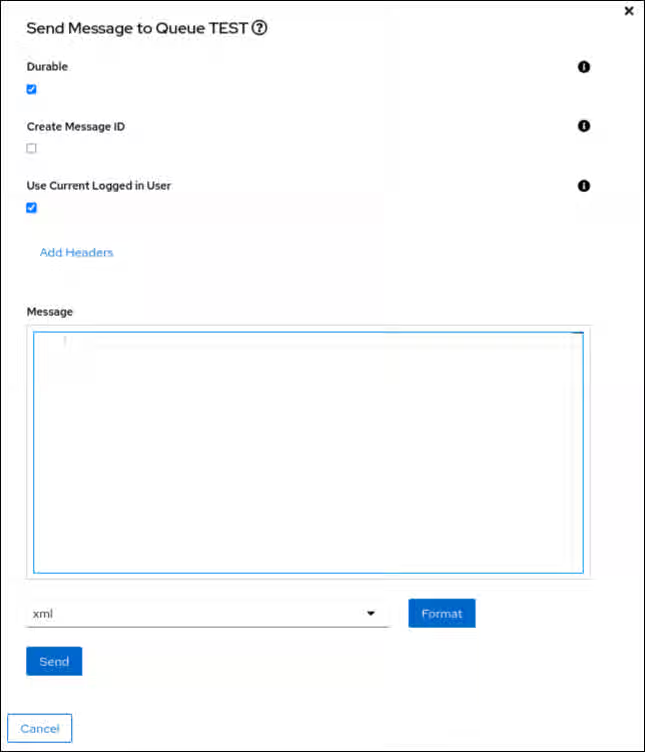
- By default messages are sent using the credentials that you used to log in to AMQ Management Console. If you want to use different credentials, clear the Use Current Logged in User checkbox and specify values in the Username and Password fields, which are displayed after you clear the checkbox.
- If necessary, click the Add Header button to add message header information.
- Enter the message body.
- In the Format drop-down menu, select an option for the format of the message body, and then click Format. The message body is formatted in a human-readable style for the format you selected.
- Click Send.
- To send additional messages, change any of the information you entered, and then click Send.
4.5.4.7. Resending messages to a queue
You can resend messages previously sent to a queue in the AMQ Management Console.
Procedure
- Browse for the message you want to resend.
- Click the three-dot icon for the message that you want to resend.
Click Resend.
The Resend Message dialog is displayed.
- Update the message header and body as needed, and then click Send.
4.5.4.8. Moving messages to a different queue
You can move one or more messages in a queue to a different queue in AMQ Management Console.
Procedure
- Browse for the messages you want to move.
- Click the checkbox next to each message that you want to move.
Click Move.
A confirmation dialog box is displayed.
- From the drop-down menu, select the name of the queue to which you want to move the messages. Click Confirm.
4.5.4.9. Deleting messages or queues
You can delete all of the messages in a queue and retain the queue, or you can delete the queue entirely.
Procedure
- In the left menu, click Artemis.
- In the main pane, click the Queues tab.
Click the three-dot icon for the queue you want to purge or delete.
- To delete all the message in the selected queue without deleting the queue, click Purge.
- To delete all the messages and the queue itself, click Delete.
- In the confirmation dialog, click Confirm.
Chapter 5. Monitoring broker runtime metrics
When you install AMQ Broker, a Prometheus metrics plugin is installed. You must enable the Prometheus metrics plugin in the broker configuration so it collects runtime metrics for the broker and exports these metrics in Prometheus format.
You can then use Prometheus to review the metrics. You might also use a graphical tool such as Grafana to configure more advanced visualizations of the data.
The Prometheus metrics plugin enables you to collect and export broker metrics in Prometheus format. However, Red Hat does not provide support for installation or configuration of Prometheus itself, nor of visualization tools such as Grafana. If you require support with installing, configuring, or running Prometheus or Grafana, visit the product websites for resources such as community support and documentation.
In addition to the broker metrics collected by the Prometheus plugin, you can modify the broker configuration to capture standard sets of metrics relating to the host Java Virtual Machine (JVM) for the broker. Specifically, you can capture JVM metrics for Garbage Collection (GC), memory, and threads.
5.1. Metrics overview
You can use the Prometheus plugin for AMQ Broker to collect runtime metrics, which you can use monitor the health and performance of brokers. The AMQ Broker Prometheus plugin exports the runtime metrics in Prometheus format, enabling you to use Prometheus itself to visualize and query the data.
You can also use a graphical tool, such as Grafana, to configure more advanced visualizations and dashboards for the metrics that the Prometheus plugin collects.
The metrics that the plugin exports to Prometheus format are described below.
For higher-level broker metrics that are not listed below, you can calculate these by aggregating lower-level metrics. For example, to calculate total message count, you can aggregate the artemis_message_count metrics from all queues in your broker deployment.
For a standalone deployment of AMQ Broker on RHEL, metrics for the Java Virtual Machine (JVM) hosting the broker are also exported to Prometheus format. This does not apply to a deployment of AMQ Broker on OpenShift Container Platform.
5.1.1. Broker metrics
artemis_address_memory_usage- Number of bytes used by all addresses on this broker for in-memory messages.
artemis_address_memory_usage_percentage-
Memory used by all the addresses on this broker as a percentage of the
global-max-sizeparameter. artemis_connection_count- Number of clients connected to this broker.
artemis_session_count- Number of sessions on this broker.
artemis_total_session_count- Total number of sessions created on this broker since it was started.
artemis_total_connection_count- Number of clients that have connected to this broker since it was started.
artemis_disk_store_usage- The fraction of the total disk store used.
artemis_replica_sync- Is the initial replication synchronization process between primary and backup brokers complete.
artemis_active- Is the broker active in a primary-backup group configuration.
artemis_authentication_count- Number of successful and failed authentication attempts.
artemis_authorization_count- Number of successful and failed authorization attempts.
5.1.2. Address metrics
artemis_routed_message_count- Number of messages routed to one or more queue bindings.
artemis_unrouted_message_count- Number of messages not routed to any queue bindings.
artemis_address_size- The size in bytes used by all queues bound to this address.
artemis_number_of_pages- The number of page files used to store messages for this address.
artemis_limit_percent-
The percentage of a configured memory limit that is used by this address. If a memory limit is set for the address by using the
max-size-bytesattribute, the percentage reported is based on that value. If themax-size-bytesattribute is not set, the percentage reported is based on the value of theglobal-max-sizeattribute. If neither attribute is set, a value of 0 is reported.
5.1.3. Queue metrics
artemis_consumer_count- Number of clients consuming messages from a given queue.
artemis_delivering_durable_message_count- Number of durable messages that a given queue is currently delivering to consumers.
artemis_delivering_durable_persistent_size- Persistent size of durable messages that a given queue is currently delivering to consumers.
artemis_delivering_message_count- Number of messages that a given queue is currently delivering to consumers.
artemis_delivering_persistent_size- Persistent size of messages that a given queue is currently delivering to consumers.
artemis_durable_message_count- Number of durable messages currently in a given queue. This includes scheduled, paged, and in-delivery messages.
artemis_durable_persistent_size- Persistent size of durable messages currently in a given queue. This includes scheduled, paged, and in-delivery messages.
artemis_messages_acknowledged- Number of messages acknowledged from a given queue since the queue was created.
artemis_messages_added- Number of messages added to a given queue since the queue was created.
artemis_message_count- Number of messages currently in a given queue. This includes scheduled, paged, and in-delivery messages.
artemis_messages_killed- Number of messages removed from a given queue since the queue was created. The broker kills a message when the message exceeds the configured maximum number of delivery attempts.
artemis_messages_expired- Number of messages expired from a given queue since the queue was created.
artemis_persistent_size- Persistent size of all messages (both durable and non-durable) currently in a given queue. This includes scheduled, paged, and in-delivery messages.
artemis_scheduled_durable_message_count- Number of durable, scheduled messages in a given queue.
artemis_scheduled_durable_persistent_size- Persistent size of durable, scheduled messages in a given queue.
artemis_scheduled_message_count- Number of scheduled messages in a given queue.
artemis_scheduled_persistent_size- Persistent size of scheduled messages in a given queue.
5.2. Enabling the Prometheus metrics plugin for AMQ Broker
You must enable the Prometheus metrics plugin in the broker configuration so it collects runtime metrics for the broker and exports these metrics in Prometheus format.
Procedure
-
Open the
<broker_instance_dir>/etc/broker.xmlconfiguration file. Enable the Prometheus plugin in the broker configuration. Add a
<metrics>element with a<plugin>sub-element, configured as shown below.<metrics> <plugin class-name="com.redhat.amq.broker.core.server.metrics.plugins.ArtemisPrometheusMetricsPlugin"/> </metrics>-
Save the
broker.xmlconfiguration file. The metrics plugin starts to gather broker runtime metrics in Prometheus format.
5.3. Configuring the broker to collect JVM metrics
You can configure the broker to collect JVM metrics, including garbage collection, memory, and threads, for more detailed performance analysis.
Prerequisites
- You enabled the Prometheus metrics plugin in your broker configuration. For more information, see Section 5.2, “Enabling the Prometheus metrics plugin for AMQ Broker”.
Procedure
-
Open the
<broker_instance_dir>/etc/broker.xmlconfiguration file. In the
<metrics>element that you added to the configuration when enabling the Prometheus metrics plugin, specify whether the broker collects JVM metrics for Garbage Collection (GC), memory, and threads. For example:<metrics> <jvm-gc>true</jvm-gc> <jvm-memory>true</jvm-memory> <jvm-threads>true</jvm-threads> <plugin class-name="com.redhat.amq.broker.core.server.metrics.plugins.ArtemisPrometheusMetricsPlugin"/> </metrics>NoteIf you do not explicitly add the
jvm-memoryparameter to your configuration and specify a value, the broker uses a default value oftrue. This means that the broker exports JVM memory metrics by default. The default values of thejvm-gcandjvm-threadsparameters arefalse.-
Save the
broker.xmlconfiguration file. The broker starts to gather the JVM metrics that you have enabled. These metrics are also exported to Prometheus format.
5.4. Disabling metrics collection for specific addresses
You can disable metrics collection for specific addresses in the configuration to reduce overhead or exclude irrelevant data.
Procedure
-
Open the
<broker_instance_dir>/etc/broker.xmlconfiguration file. In the
address-settingelement of a matching address or set of addresses, add theenable-metricsparameter and set the value of the parameter tofalse. For example, the following configuration disables metrics collection for an address calledorders.<configuration> <core> ... <address-settings> <address-setting match="orders"> ... <enable-metrics>false</enable-metrics> ... </address-setting> </address-settings> ... </core> </configuration>
5.5. Accessing broker runtime data using Prometheus
You can use the Prometheus web console to query and visualize the broker runtime data that was collected by the Prometheus plugin.
Prerequisites
- To query and visualize the broker runtime data collected by the Prometheus plugin, you need to install Prometheus. For more information, see Content from prometheus.io is not included.Installing Prometheus in the Prometheus documentation.
Procedure
-
From your Prometheus installation directory, open the
prometheus.ymlconfiguration file. -
In the
static_configssection of the configuration file, change thetargetselement tolocalhost:8161. This location is where the broker runs its web server. By default,/metricsis appended to this host name, forming the full path to the metrics stored on the broker web server. To view the broker runtime metrics collected by the Prometheus plugin, open
localhost:8161/metricsin a web browser.On the resulting web page, you see the current values of the metrics collected by the plugin, based on the queues and addresses that you have configured on the broker. If you have more than one running broker instance in your JVM, you see metrics for each broker.
From your Prometheus installation directory, run Prometheus.
$ ./prometheus
When Prometheus starts, the shell output includes the following line:
component=web, msg=”Start listening for connections” address=0.0.0.0:9090
The preceding line indicates that Prometheus is listening for HTTP traffic on port 9090.
-
To access the Prometheus web console, open
127.0.0.1:9090in a web browser. In the Prometheus web console, you can use the
Expressionfield to create a query on your broker data. The queries you create are based on the Prometheus query language, PromQL. Broker metrics that are available to insert in your query are in theInsert metricdrop-down list.As a simple example, suppose you want to query the message count on the DLQ queue, over time. In this case, select
artemis_message_countfrom the metrics drop-down list. Complete your query by specifying the DLQ queue name and address. This example query is shown below.artemis_message_count{address=“DLQ”, queue=“DLQ”}For more advanced visualizations, you can use regular expressions to create complex queries that overlay several metrics, for example. Or, you can perform mathematical operations on a number of metrics, such as aggregating them. For more information about creating Prometheus queries, see Content from prometheus.io is not included.Querying Prometheus in the Prometheus documentation.
Chapter 6. Using the management API
Use the AMQ Broker management API to configure the broker and to create and manage resources such as queues and addresses.
In addition, clients can use the management API to manage the broker and subscribe to management notifications.
6.1. Methods for managing AMQ Broker using the management API
You can manage the broker either by using Java Management Extensions (JMX) or the Java Message Service (JMS) API. JMX is the standard way to manage Java applications. When using the JMS API, management operations are sent to the broker in JMS messages from the Red Hat build of Apache Qpid JMS client.
Although there are two different ways to manage the broker, each API supports the same functionality. If it is possible to manage a resource using JMX it is also possible to achieve the same result by using JMS messages and the Red Hat build of Apache Qpid JMS client.
This choice depends on your particular requirements, application settings, and environment. Regardless of the way you invoke management operations, the management API is the same.
For each managed resource, there exists a Java interface describing what can be invoked for this type of resource. The broker exposes its managed resources in the org.apache.activemq.artemis.api.core.management package. The way to invoke management operations depends on whether JMX messages or JMS messages and the Red Hat build of Apache Qpid JMS client are used.
Some management operations require a filter parameter to choose which messages are affected by the operation. Passing null or an empty string means that the management operation will be performed on all messages.
6.2. Managing AMQ Broker by using JMX
You can use Java Management Extensions (JMX) and MBeans to manage broker resources registered under the org.apache.activemq domain.
For example, the ObjectName to manage a queue named exampleQueue is:
org.apache.activemq.artemis:broker="__BROKER_NAME__",component=addresses,address="exampleQueue",subcomponent=queues,routing-type="anycast",queue="exampleQueue"
The MBean is:
org.apache.activemq.artemis.api.management.QueueControl
The MBean’s ObjectName is built by using the helper class org.apache.activemq.artemis.api.core.management.ObjectNameBuilder. You can also use JConsole to find the ObjectName of the MBeans you want to manage.
Managing the broker by using JMX is identical to management of any Java applications by using JMX. It can be done by reflection or by creating proxies of the MBeans.
6.2.1. Configuring JMX management
You can enable or disable JMX management by setting the jmx-management-enabled property in the broker.xml configuration file. By default, JMX is enabled to manage the broker.
Procedure
-
Open the
<broker_instance_dir>/etc/broker.xmlconfiguration file. Set
<jmx-management-enabled>.<jmx-management-enabled>true</jmx-management-enabled>
If JMX is enabled, the broker can be managed locally using
jconsole.NoteRemote connections to JMX are not enabled by default for security reasons.
If you want to manage multiple brokers from the same
MBeanServer, configure the JMX domain for each of the brokers.By default, the broker uses the JMX domain
org.apache.activemq.artemis.<jmx-domain>my.org.apache.activemq</jmx-domain>
NoteIf you are using AMQ Broker on a Windows system, system properties must be set in
artemis, orartemis.cmd. A shell script is located under<install_dir>/bin.
Additional resources
6.2.2. Configuring JMX management access
By default, remote JMX access to a broker is disabled for security reasons. However, AMQ Broker has a JMX agent that allows remote access to JMX MBeans. You enable JMX access by configuring a connector element in the broker management.xml configuration file.
While it is also possible to enable JMX access using the `com.sun.management.jmxremote ` JVM system property, that method is not supported and is not secure. Modifying that JVM system property can bypass RBAC on the broker. To minimize security risks, consider limited access to localhost.
Exposing the JMX agent of a broker for remote management has security implications.
To secure your configuration as described in this procedure:
- Use SSL for all connections.
- Explicitly define the connector host, that is, the host and port to expose the agent on.
- Explicitly define the port that the RMI (Remote Method Invocation) registry binds to.
Prerequisites
- A working broker instance
-
The Java
jconsoleutility
Procedure
-
Open the
<broker-instance-dir>/etc/management.xmlconfiguration file. Define a connector for the JMX agent. The connector-port setting establishes an RMI registry that clients such as jconsole query for the JMX connector server. For example, to allow remote access on port 1099:
<connector connector-port="1099"/>
Verify the connection to the JMX agent using
jconsole:service:jmx:rmi:///jndi/rmi://localhost:1099/jmxrmi
Define additional properties on the connector, as described below.
- connector-host
-
The broker server host to expose the agent on. To prevent remote access, set
connector-hostto127.0.0.1(localhost). - rmi-registry-port
- The port that the JMX RMI connector server binds to. If not set, the port is always random. Set this property to avoid problems with remote JMX connections tunnelled through a firewall.
- jmx-realm
-
JMX realm to use for authentication. The default value is
activemqto match the JAAS configuration. - object-name
-
Object name to expose the remote connector on. The default value is
connector:name=rmi. - secured
-
Specify whether the connector is secured using SSL. The default value is
false. Set the value totrueto ensure secure communication. - key-store-path
-
Location of the keystore. Required if you have set
secured="true". - key-store-password
-
Keystore password. Required if you have set
secured="true". The password can be encrypted. - key-store-provider
-
Keystore provider. Required if you have set
secured="true". The default value isJKS. - trust-store-path
-
Location of the truststore. Required if you have set
secured="true". - trust-store-password
-
Truststore password. Required if you have set
secured="true". The password can be encrypted. - trust-store-provider
-
Truststore provider. Required if you have set
secured="true". The default value isJKS - password-codec
- The fully qualified class name of the password codec to use. See the password masking documentation, linked below, for more details on how this works.
NoteThe RMI registry picks an IP address to bind to. If you have multiple IP addresses/NICs present on the system, then you can choose the IP address to use by adding the following to the
artemis.profilefile:-Djava.rmi.server.hostname=localhost-
Set an appropriate value for the endpoint serialization using
jdk.serialFilteras described in the Content from docs.oracle.com is not included.Java Platform documentation.
Additional resources
6.2.3. MBeanServer configuration
When the broker runs in standalone mode, it uses the Java Virtual Machine’s Platform MBeanServer to register its MBeans. By default, Content from www.jolokia.org is not included.Jolokia is also deployed to allow access to the MBean server using REST.
6.2.4. How JMX is exposed with Jolokia
By default, AMQ Broker includes the Content from www.jolokia.org is not included.Jolokia HTTP agent deployed as a web application. Jolokia is a remote JMX over HTTP bridge that exposes MBeans.
To use Jolokia, the user must belong to the role defined by the hawtio.roles system property in the <broker_instance_dir>/etc/artemis.profile configuration file. By default, this role is amq.
You can send Jolokia requests to the broker as HTTP GET requests. These requests encode all their parameters within the Jolokia REST URL.
Example Jolokia REST URLs
The following is an example of a Jolokia REST URL in a request to find the version of a broker. The Origin flag should specify the domain name or DNS host name for the broker server. In addition, the value you specify for Origin must correspond to an entry for <allow-origin> in your Jolokia Cross-Origin Resource Sharing (CORS) specification.
$ curl http://admin:admin@localhost:8161/console/jolokia/read/org.apache.activemq.artemis:broker=\"0.0.0.0\"/Version -H "Origin: mydomain.com"
{"request":{"mbean":"org.apache.activemq.artemis:broker=\"0.0.0.0\"","attribute":"Version","type":"read"},"value":"2.4.0.amq-710002-redhat-1","timestamp":1527105236,"status":200}The following is an example of a Jolokia REST URL in a request to obtain a message count for the myQueue0 queue.
$ curl -u http://admin:admin@localhost:8161/console/jolokia/read/org.apache.activemq.artemis:broker\=\!%22amq-broker\!%22,component\=addresses,address\=\!%22myAddress0\!%22,subcomponent\=queues,routing-type\=\!%22anycast\!%22,queue\=\!%22myQueue0\!%22/MessageCount
You can find the Jolokia URL to use in a specific HTTP GET request by copying the Jolokia URL for the corresponding operation in AMQ Management Console. The following example copies the Jolokia URL for use in a HTTP GET request that browses the myQueue0 queue. After you copy the URL, you can customize it for your request.
Figure 6.1. Operations page
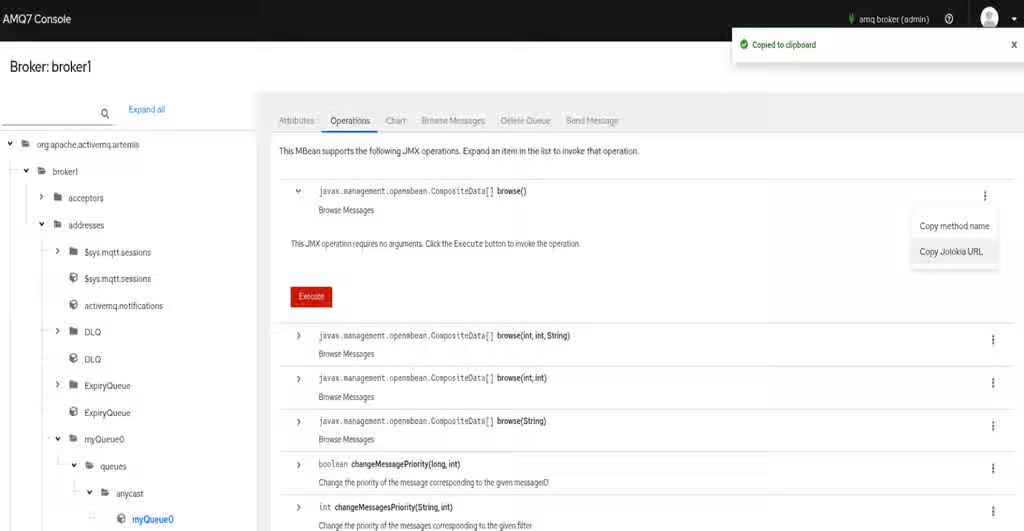
6.2.5. Subscribing to JMX management notifications
If JMX is enabled in your broker configuration, you can subscribe to management notifications to receive alerts about broker events and state changes.
Procedure
-
Subscribe to
ObjectName org.apache.activemq.artemis:broker="<broker-name>".
Additional resources
6.3. Managing AMQ Broker using the JMS API
You can manage brokers by sending specially formatted JMS messages to the management queue using the Red Hat build of Apache Qpid JMS client.
6.3.1. Configuring broker management using JMS messages and the Red Hat build of Apache Qpid JMS Client
If you want to manage the broker by using JMS messages, you must grant the broker’s management address the manage permission.
Procedure
-
Open the
<broker_instance_dir>/etc/broker.xmlconfiguration file. Add the
<management-address>element, and specify a management address.By default, the management address is
activemq.management. You only need to specify a different address if you do not want to use the default.<management-address>my.management.address</management-address>
Provide the management address with the
manageuser permission type.This permission type enables the management address to receive and handle management messages.
<security-setting-match="activemq.management">
    <permission-type="manage" roles="admin"/>
</security-setting>
6.3.2. Managing brokers using the JMS API and Red Hat build of Apache Qpid JMS Client
To invoke management operations by using JMS messages, the Red Hat build of Apache Qpid JMS client must instantiate the special management queue.
Procedure
-
Create a
QueueRequestorto send messages to the management address and receive replies. -
Create a
Message. -
Use the helper class
org.apache.activemq.artemis.api.jms.management.JMSManagementHelperto fill the message with the management properties. -
Send the message using the
QueueRequestor. -
Use the helper class
org.apache.activemq.artemis.api.jms.management.JMSManagementHelperto retrieve the operation result from the management reply.
Example 6.1. Viewing the number of messages in a queue
This example shows how to use the JMS API to view the number of messages in the JMS queue exampleQueue:
Queue managementQueue = ActiveMQJMSClient.createQueue("activemq.management");

QueueSession session = ...
QueueRequestor requestor = new QueueRequestor(session, managementQueue);
connection.start();
Message message = session.createMessage();
JMSManagementHelper.putAttribute(message, "queue.exampleQueue", "messageCount");
Message reply = requestor.request(message);
int count = (Integer)JMSManagementHelper.getResult(reply);
System.out.println("There are " + count + " messages in exampleQueue");6.4. Management operations
You can use the same management operations to manage brokers, addresses, and queues regardless of whether you use JMX or JMS.
6.4.1. Broker management operations
You can use the management API to manage your brokers.
- Listing, creating, deploying, and destroying queues
A list of deployed queues can be retrieved using the
getQueueNames()method.Queues can be created or destroyed using the management operations
createQueue(),deployQueue(), ordestroyQueue()on theActiveMQServerControl(with theObjectNameorg.apache.activemq.artemis:broker="BROKER_NAME"or the resource nameserver).createQueuewill fail if the queue already exists whiledeployQueuewill do nothing.- Pausing and resuming queues
-
The
QueueControlcan pause and resume the underlying queue. When a queue is paused, it will receive messages but will not deliver them. When it is resumed, it will begin delivering the queued messages, if any. - Listing and closing remote connections
Retrieve a client’s remote addresses by using
listRemoteAddresses(). It is also possible to close the connections associated with a remote address using thecloseConnectionsForAddress()method.Alternatively, list connection IDs using
listConnectionIDs()and list all the sessions for a given connection ID usinglistSessions().- Managing transactions
In case of a broker crash, when the broker restarts, some transactions might require manual intervention. Use the the following methods to help resolve issues you encounter.
List the transactions which are in the prepared states (the transactions are represented as opaque Base64 Strings) using the
listPreparedTransactions()method lists.Commit or rollback a given prepared transaction using
commitPreparedTransaction()orrollbackPreparedTransaction()to resolve heuristic transactions.List heuristically completed transactions using the
listHeuristicCommittedTransactions()andlistHeuristicRolledBackTransactionsmethods.- Enabling and resetting message counters
Enable and disable message counters using the
enableMessageCounters()ordisableMessageCounters()method.Reset message counters by using the
resetAllMessageCounters()andresetAllMessageCounterHistories()methods.- Retrieving broker configuration and attributes
-
The
ActiveMQServerControlexposes the broker’s configuration through all its attributes (for example,getVersion()method to retrieve the broker’s version, and so on). - Listing, creating, and destroying Core Bridge and diverts
List deployed Core Bridge and diverts using the
getBridgeNames()andgetDivertNames()methods respectively.Create or destroy using bridges and diverts using
createBridge()anddestroyBridge()orcreateDivert()anddestroyDivert()on theActiveMQServerControl(with theObjectNameorg.apache.activemq.artemis:broker="BROKER_NAME"or the resource nameserver).- Stopping the broker and forcing failover to occur with any currently attached clients
Use the
forceFailover()on theActiveMQServerControl(with theObjectNameorg.apache.activemq.artemis:broker="BROKER_NAME"or the resource nameserver)NoteBecause this method actually stops the broker, you will likely receive an error. The exact error depends on the management service you used to call the method.
6.4.2. Address management operations
You can use the management API to manage addresses by using the AddressControl class.
Manage addresses using the AddressControl class with ObjectName org.apache.activemq.artemis:broker="<broker-name>", component=addresses,address="<address-name>" or the resource name address.<address-name>.
Modify roles and permissions for an address using the addRole() or removeRole() methods. You can list all the roles associated with the queue with the getRoles() method.
6.4.3. Queue management operations
You can use the management API to manage queues by using the QueueControl class.
The core management API deals with queues. The QueueControl class defines the queue management operations (with the ObjectName,org.apache.activemq.artemis:broker="<broker-name>",component=addresses,address="<bound-address>",subcomponent=queues,routing-type="<routing-type>",queue="<queue-name>" or the resource name queue.<queue-name>).
Most of the management operations on queues take either a single message ID (for example, to remove a single message) or a filter (for example, to expire all messages with a given property).
- Expiring, sending to a dead letter address, and moving messages
Expire messages from a queue using the
expireMessages()method. If an expiry address is defined, messages are sent to this address, otherwise they are discarded. You can define the expiry address for an address or set of addresses (and hence the queues bound to those addresses) in theaddress-settingselement of thebroker.xmlconfiguration file. For an example, see the "Default message address settings" section in Understanding the default broker configuration.Send messages to a dead letter address using the
sendMessagesToDeadLetterAddress()method. This method returns the number of messages sent to the dead letter address. If a dead letter address is defined, messages are sent to this address, otherwise they are removed from the queue and discarded. You can define the dead letter address for an address or set of addresses (and hence the queues bound to those addresses) in theaddress-settingselement of thebroker.xmlconfiguration file. For an example, see the "Default message address settings" section in Understanding the default broker configuration.Move messages from one queue to another using the
moveMessages()method.- Listing and removing messages
List messages from a queue using the
listMessages()method. It will return an array ofMap, oneMapfor each message.Remove messages from a queue using the
removeMessages()method, which returns abooleanfor the single message ID variant or the number of removed messages for the filter variant. This method takes afilterargument to remove only filtered messages. Setting the filter to an empty string will in effect remove all messages.- Counting messages
-
The number of messages in a queue is returned by the
getMessageCount()method. Alternatively, thecountMessages()will return the number of messages in the queue which match a given filter. - Changing message priority
-
The message priority can be changed by using the
changeMessagesPriority()method which returns abooleanfor the single message ID variant or the number of updated messages for the filter variant. - Message counters
-
Message counters can be listed for a queue with the
listMessageCounter()andlistMessageCounterHistory()methods (see Section 6.6, “Using message counters”). The message counters can also be reset for a single queue using theresetMessageCounter()method. - Retrieving the queue attributes
-
The
QueueControlexposes queue settings through its attributes (for example,getFilter()to retrieve the queue’s filter if it was created with one,isDurable()to know whether the queue is durable, and so on). - Pausing and resuming queues
-
The
QueueControlcan pause and resume the underlying queue. When a queue is paused, it will receive messages but will not deliver them. When it is resumed, it will begin delivering the queued messages, if any.
6.4.4. Remote resource management operations
You can use the management API to start and stop a broker’s remote resources, such as acceptors, diverts, bridges and so on, so that the broker can be taken offline for a period of time without a full shutdown.
- Acceptors
-
Start or stop an acceptor using the
start()or.stop()method on theAcceptorControlclass (with theObjectNameorg.apache.activemq.artemis:broker="<broker-name>",component=acceptors,name="<acceptor-name>"or the resource nameacceptor.<address-name>). Acceptor parameters can be retrieved using theAcceptorControlattributes. See Network Connections: Acceptors and Connectors for more information about Acceptors. - Diverts
-
Start or stop a divert using the
start()orstop()method on theDivertControlclass (with theObjectNameorg.apache.activemq.artemis:broker="<broker-name>",component=diverts,name="<divert-name>"or the resource namedivert.<divert-name>). Divert parameters can be retrieved using theDivertControlattributes. - Bridges
-
Start or stop a bridge using the
start()(resp.stop()) method on theBridgeControlclass (with theObjectNameorg.apache.activemq.artemis:broker="<broker-name>",component=bridge,name="<bridge-name>"or the resource namebridge.<bridge-name>). Bridge parameters can be retrieved using theBridgeControlattributes. - Broadcast groups
-
Start or stop a broadcast group using the
start()orstop()method on theBroadcastGroupControlclass (with theObjectNameorg.apache.activemq.artemis:broker="<broker-name>",component=broadcast-group,name="<broadcast-group-name>"or the resource namebroadcastgroup.<broadcast-group-name>). Broadcast group parameters can be retrieved using theBroadcastGroupControlattributes. See Broker discovery methods for more information. - Discovery groups
-
Start or stop a discovery group using the
start()orstop()method on theDiscoveryGroupControlclass (with theObjectNameorg.apache.activemq.artemis:broker="<broker-name>",component=discovery-group,name="<discovery-group-name>"or the resource namediscovery.<discovery-group-name>). Discovery groups parameters can be retrieved using theDiscoveryGroupControlattributes. See Broker discovery methods for more information. - Cluster connections
-
Start or stop a cluster connection using the
start()orstop()method on theClusterConnectionControlclass (with theObjectNameorg.apache.activemq.artemis:broker="<broker-name>",component=cluster-connection,name="<cluster-connection-name>"or the resource nameclusterconnection.<cluster-connection-name>). Cluster connection parameters can be retrieved using theClusterConnectionControlattributes. See Creating a broker cluster for more information.
6.5. Management notifications
Review the list of available management notifications and their headers to monitor specific broker events.
Below is a list of all the different kinds of notifications as well as which headers are on the messages. Every notification has a _AMQ_NotifType (value noted in parentheses) and _AMQ_NotifTimestamp header. The time stamp is the unformatted result of a call to java.lang.System.currentTimeMillis().
Table 6.1. Management notifications
| Notification type | Headers |
|---|---|
|
|
|
|
|
|
|
|
|
|
|
|
|
|
|
|
|
|
|
|
|
|
|
|
|
|
|
|
|
|
|
|
|
|
|
|
|
|
|
|
|
|
|
|
|
|
|
|
|
|
|
|
|
|
|
|
|
6.6. Using message counters
You can use message counters to track queue statistics over time and identify usage trends.
For example, you could use message counters to determine how a particular queue is being used over time. You could also attempt to obtain this information by using the management API to query the number of messages in the queue at regular intervals, but this would not show how the queue is actually being used. The number of messages in a queue can remain constant because no clients are sending or receiving messages on it, or because the number of messages sent to the queue is equal to the number of messages consumed from it. In both of these cases, the number of messages in the queue remains the same even though it is being used in very different ways.
6.6.1. Types of message counters
Understand the different types of message counters that are available for monitoring queue activity and history.
count- The total number of messages added to the queue since the broker was started.
countDelta- The number of messages added to the queue since the last message counter update.
lastAckTimestamp- The time stamp of the last time a message from the queue was acknowledged.
lastAddTimestamp- The time stamp of the last time a message was added to the queue.
messageCount- The current number of messages in the queue.
messageCountDelta-
The overall number of messages added/removed from the queue since the last message counter update. For example, if
messageCountDeltais-10, then 10 messages overall have been removed from the queue. udpateTimestamp- The time stamp of the last message counter update.
You can combine message counters to determine other meaningful data as well. For example, to know specifically how many messages were consumed from the queue since the last update, you would subtract the messageCountDelta from countDelta.
6.6.2. Enabling message counters
You must enable message counters in the broker configuration file to start collecting queue metrics. Be aware that enabling message counters can have a small impact on the broker’s memory.
Procedure
-
Open the
<broker_instance_dir>/etc/broker.xmlconfiguration file. Enable message counters.
<message-counter-enabled>true</message-counter-enabled>
Set the message counter history and sampling period.
<message-counter-max-day-history>7</message-counter-max-day-history>
<message-counter-sample-period>60000</message-counter-sample-period>
message-counter-max-day-history- The number of days the broker should store queue metrics. The default is 10 days.
message-counter-sample-period- How often (in milliseconds) the broker should sample its queues to collect metrics. The default is 10000 milliseconds.
6.6.3. Retrieving message counters
You can use the management API to retrieve message counters.
Prerequisites
Message counters must be enabled on the broker.
For more information, see Section 6.6.2, “Enabling message counters”.
Procedure
Use the management API to retrieve message counters.
// Retrieve a connection to the broker's MBeanServer.
MBeanServerConnection mbsc = ...
JMSQueueControlMBean queueControl = (JMSQueueControl)MBeanServerInvocationHandler.newProxyInstance(mbsc,
   on,
   JMSQueueControl.class,
   false);

// Message counters are retrieved as a JSON string.
String counters = queueControl.listMessageCounter();

// Use the MessageCounterInfo helper class to manipulate message counters more easily.
MessageCounterInfo messageCounter = MessageCounterInfo.fromJSON(counters);
System.out.format("%s message(s) in the queue (since last sample: %s)\n",
messageCounter.getMessageCount(),
messageCounter.getMessageCountDelta());
Additional resources
Chapter 7. Monitoring brokers for problems
AMQ Broker includes a tool called the Critical Analyzer that actively monitors running brokers for problems such as deadlock conditions.
A problem such as a deadlock condition can be caused by IO errors, a defective disk, memory shortage, or excess CPU usage caused by other processes.
The Critical Analyzer periodically measures the response time for critical operations such as queue delivery (that is, adding of messages to a queue on the broker) and journal operations. If the response time of a checked operation exceeds a configurable timeout value, the broker is considered unstable. In this case, you can configure the Critical Analyzer to simply log a message or take action to protect the broker, such as shutting down the broker or stopping the virtual machine (VM) that is running the broker.
7.1. Configuring the Critical Analyzer
You can configure the time allowed for Critical Analyzer checks to complete, the interval at which the Critical Analyzer checks run and the response to a check failure.
Procedure
Open the
<broker_instance_dir>/etc/broker.xmlconfiguration file.<critical-analyzer>true</critical-analyzer> <critical-analyzer-timeout>120000</critical-analyzer-timeout> <critical-analyzer-check-period>60000</critical-analyzer-check-period> <critical-analyzer-policy>HALT</critical-analyzer-policy>
Specify parameter values, as described below.
critical-analyzer-
Specifies whether to enable or disable the Critical Analyzer tool. The default value is
true, which means that the tool is enabled. critical-analyzer-timeout- Timeout, in milliseconds, for the checks run by the Critical Analyzer. If the time taken by one of the checked operations exceeds this value, the broker is considered unstable.
critical-analyzer-check-period- Time period, in milliseconds, between consecutive checks by the Critical Analyzer for each operation.
critical-analyzer-policyIf the broker fails a check and is considered unstable, this parameter specifies whether the broker logs a message (
LOG), stops the virtual machine (VM) hosting the broker (HALT), or shuts down the broker (SHUTDOWN).Based on the policy option that you have configured, if the response time for a critical operation exceeds the configured timeout value, you see output that resembles one of the following:
critical-analyzer-policy=LOG
[Artemis Critical Analyzer] 18:11:52,145 ERROR [org.apache.activemq.artemis.core.server] AMQ224081: The component org.apache.activemq.artemis.tests.integration.critical.CriticalSimpleTest$2@5af97850 is not responsive
critical-analyzer-policy=HALT
[Artemis Critical Analyzer] 18:10:00,831 ERROR [org.apache.activemq.artemis.core.server] AMQ224079: The process for the virtual machine will be killed, as component org.apache.activemq.artemis.tests.integration.critical.CriticalSimpleTest$2@5af97850 is not responsive
critical-analyzer-policy=SHUTDOWN
[Artemis Critical Analyzer] 18:07:53,475 ERROR [org.apache.activemq.artemis.core.server] AMQ224080: The server process will now be stopped, as component org.apache.activemq.artemis.tests.integration.critical.CriticalSimpleTest$2@5af97850 is not responsive
You also see a thread dump on the broker that resembles the following:
[Artemis Critical Analyzer] 18:10:00,836 ERROR  [org.apache.activemq.artemis.core.server] AMQ222199: Thread dump: AMQ119001: Generating thread dump
===============================================================================
AMQ119002: Thread Thread[Thread-1 (ActiveMQ-scheduled-threads),5,main] name = Thread-1 (ActiveMQ-scheduled-threads) id = 19 group = java.lang.ThreadGroup[name=main,maxpri=10]
sun.misc.Unsafe.park(Native Method)
java.util.concurrent.locks.LockSupport.park(LockSupport.java:175)
java.util.concurrent.locks.AbstractQueuedSynchronizer$ConditionObject.await(AbstractQueuedSynchronizer.java:2039)
java.util.concurrent.ScheduledThreadPoolExecutor$DelayedWorkQueue.take(ScheduledThreadPoolExecutor.java:1088)
java.util.concurrent.ScheduledThreadPoolExecutor$DelayedWorkQueue.take(ScheduledThreadPoolExecutor.java:809)
java.util.concurrent.ThreadPoolExecutor.getTask(ThreadPoolExecutor.java:1067)
java.util.concurrent.ThreadPoolExecutor.runWorker(ThreadPoolExecutor.java:1127)
java.util.concurrent.ThreadPoolExecutor$Worker.run(ThreadPoolExecutor.java:617)
java.lang.Thread.run(Thread.java:745)
===============================================================================
..... ..........
===============================================================================
AMQ119003: End Thread dump
Revised on 2026-05-06 15:45:03 UTC