Kaoto Camel Designer
Create, edit, and deploy Apache Camel integrations with ease by leveraging the Kaoto Open Source Designer.
Abstract
Chapter 1. Overview of Kaoto
Content from kaoto.io is not included.Kaoto is an acronym for KAmel Orchestration TOol. It is an integration designer to create and edit integrations based on Content from camel.apache.org is not included.Apache Camel. Kaoto is extendable, flexible, and adaptable to different use cases.
Kaoto offers a rich catalog of building blocks for use in graphical design. By default, Kaoto loads the official upstream Content from camel.apache.org is not included.Camel Catalog and Content from camel.apache.org is not included.Kamelet Catalog, while also providing Red Hat supported Catalogs.
Kaoto stands out as an intuitive visual platform for Apache Camel integrations, specifically designed to streamline the development process. It offers an accessible entry point for junior integration engineers through its low-code/no-code capabilities, making the initial steps of integration development straightforward. Moreover, Kaoto supports a seamless transition to more sophisticated features, allowing expert Camel developers to develop and fine-tune complex integration routes effectively.
The audience for this guide is Apache Camel developers. This guide assumes familiarity with Apache Camel and the processing requirements for your organization.
Benefits of using Kaoto can be listed as follows:
Enhanced Visual Development Experience
By leveraging Kaoto’s visual designing capabilities, users can intuitively create, view, and edit Camel integrations through the user interface. This low-code/no-code approach significantly reduces the learning curve for new users and accelerates the development process for seasoned developers.
Comprehensive Component Catalog Accessibility
Kaoto provides immediate access to a rich catalog of Camel components, enterprise integration patterns (EIPs), and Kamelets. This extensive Catalog enables developers to easily find and implement the necessary components for their integration solutions. By having these resources readily available, developers can focus more on solving business problems rather than spending time searching for and learning about different components.
Streamlined Integration Development Process
The platform is designed with an efficient user experience in mind, optimizing the steps required to create comprehensive integrations. This efficiency is achieved through features like auto-completion, configuration forms, and interactive feedback mechanisms. As a result, developers can quickly assemble and configure integrations, reducing the overall development time. This streamlined process encourages experimentation and innovation by making it easier to prototype and test different approaches.
Chapter 2. Installing Kaoto
Get started by installing Kaoto in your environment!
This guide covers multiple installation options to get you started quickly.
2.1. Overview
Choose the installation method that best fits your needs:
- Content from kaoto.io is not included.VS Code Extension - Recommended for local development and testing
- Content from kaoto.io is not included.Online Testing Instance - Try Kaoto without installing anything
- Content from kaoto.io is not included.Podman - Run Kaoto in a containerized environment
2.2. Using Online Testing Instance
The fastest way to try Kaoto is through our openly available Content from red.ht is not included.testing instance.
Perfect for:
- Quick evaluation and testing
- Following our Content from kaoto.io is not included.workshops as guides
- Learning Kaoto basics without local setup
Next steps:
- Learn more about how to use Kaoto in the Content from kaoto.io is not included.Quickstart
- Explore our Content from kaoto.io is not included.workshops for hands-on tutorials
2.3. Using Visual Studio Code
The VS Code extension provides the most complete Kaoto experience with local development capabilities.
2.3.1. Prerequisites
Before installing the Kaoto extension, ensure you have:
- Content from code.visualstudio.com is not included.Visual Studio Code - The code editor
Content from www.jbang.dev is not included.JBang - Required for running Camel integrations locally
macOS/Linux:
curl -Ls https://sh.jbang.dev | bash -s - trust add https://github.com/apache/camel
Windows:
curl -Ls https://sh.jbang.dev | bash -s - app setup add https://github.com/apache/camel
Verify the installation
jbang version
JBang is the only hard requirement. The Kaoto extension will automatically install Camel CLI, and other required dependencies as needed during extension installation and first use.
2.3.2. Installing the Kaoto VS Code Extension
The Kaoto extension provides all the required functionality to create and run your integrations locally as a standalone extension.
- Open Visual Studio Code
-
Open the Extensions view on the left side panel (or press
Ctrl+Shift+X/Cmd+Shift+X) -
Type
Kaotoin the search field Click the Install button on the Kaoto extension

Result
- Visual designer for Apache Camel routes
- Integrated catalog of Camel components and patterns
- YAML and XML DSL support
- Real-time validation and error checking
2.4. Using Podman
Run Kaoto in a containerized environment using Podman.
2.4.1. Prerequisites
- Content from podman.io is not included.Podman installed and running.
2.4.2. Installation Steps
Pull the Kaoto image:
podman pull quay.io/kaotoio/kaoto-app:main
Run the container:
podman run -p 8080:8080 quay.io/kaotoio/kaoto-app:main
Access Kaoto:
- Open your browser and navigate to Content from localhost is not included.http://localhost:8080
-
If you used a different port in the
-pparameter, adjust the URL accordingly
2.5. Verifying installation
After installation, verify that Kaoto is working correctly:
2.5.1. Verifying for VS Code Extension
-
Open
VS Code -
Click the
Kaotoicon in the left sidebar -
Create a new
Camel routefile -
You should see the
visual designer interface
2.5.2. Verifying for Podman
- Access Content from localhost is not included.http://localhost:8080
-
You should see the
Kaoto web interface - Try creating a simple route to test functionality
2.5.3. Verifying for Online Instance
- Visit Content from red.ht is not included.https://red.ht/kaoto
- The Kaoto interface should load in your browser
- Try exploring the catalog and creating a test route
2.6. Troubleshooting issues
VS CodeExtension not appearing:- Ensure VS Code is up to date
- Restart VS Code after installation
- Check the Extensions view to confirm installation
JBangnot found:-
Verify JBang is installed:
jbang version - Ensure your PATH includes JBang binaries
-
Verify JBang is installed:
Podmancontainer won’t start:-
Verify Podman is running:
podman ps -
Check if
port 8080is already in use -
Review Podman logs:
podman logs kaoto-app
-
Verify Podman is running:
Javaversion issues:-
Verify Java 17 or later is installed:
java -version -
Set
JAVA_HOMEenvironment variable if needed
-
Verify Java 17 or later is installed:
2.6.1. Getting Help
If you encounter issues:
2.7. Additional Resources
2.7.1. Kaoto Resources
- Content from marketplace.visualstudio.com is not included.VS Code Kaoto Extension on Marketplace - Download and reviews
- Content from github.com is not included.Kaoto GitHub - Main project source code
- Content from github.com is not included.VS Code Kaoto GitHub Repository - Extension source code
- Content from github.com is not included.Kaoto Examples - Sample integrations and use cases
2.7.2. Apache Camel Resources
- Content from camel.apache.org is not included.Apache Camel Documentation - Learn about Apache Camel
- Content from camel.apache.org is not included.Camel JBang Documentation - JBang integration guide
2.7.3. Community
- This content is not included.Community Resources - Get involved with the Kaoto community
- Content from camel.zulipchat.com is not included.Zulip Chat - Real-time chat support
- Content from github.com is not included.Discussion Forums - Community discussions
Chapter 3. Getting started with Kaoto
In this quickstart guide, you’ll build a Camel route that automatically summarizes text files using a local AI model. The route will monitor a folder for new text files, send their content to Ollama (running the Granite AI model), and output concise summaries.
3.1. Prerequisites
Before starting, ensure you have:
- VS Code installed on your system - Follow the Content from code.visualstudio.com is not included.installation guide
- Kaoto VS Code extension - See the installation guide for setup instructions
- Ollama installed and running - Follow the Ollama Content from ollama.com is not included.installation guide to set it up
-
Granite 4 model pulled in Ollama - Run
ollama pull granite4:tiny-hin your terminal (Content from ollama.com is not included.Granite 4 on Ollama))
3.2. Creating first Camel Route
3.2.1. Navigating to Kaoto Perspective
- Open VS Code.
- Click on the Kaoto icon in the Activity Bar (left sidebar).
The Kaoto perspective will open, showing the route designer.

3.2.2. Creating a new Camel Route
In the Kaoto perspective, click Camel File in the Integrations section.

Choose Camel Route as the route type.

Choose between
YAML DSLorXML DSLas the route type.
Provide a name for the new route.

A basic timer-based route will be created automatically.

3.2.3. Running the Camel Route
Click the Run: Workspace button in the Integrations panel.

The route will start executing, check the terminal output - you should see Hello Camel from route1 printed every second.

To stop the route, you can click on the Terminate button.

3.3. Adding AI Summarization
This section describes how to add AI Summarization to your Camel Route using Kaoto. For this route, use Apache Camel 4.18 (or newer), make sure to select that version in the Runtime selector when creating your route.

For starters, instead of automatically producing empty messages with the timer component, use a file component for reading text files from a directory and place the text to summarize.
3.3.1. Adding the file component
Hover over the timer node and click the replace button.

In the component selection dialog, search for file and select the File component.

You’ll end up having something like this, notice how hovering over the exclamation mark tells you that the
directoryNameconfiguration is missing!
Click on the file component, and fill the
directoryNamefield with./input.
Click on the All toggle, and search for the
noopproperty and enable it.
Search for the
idempotentproperty and enable it.
Hover over the
setBodynode and click the delete button.
Switch to the File explorer.

Create a new folder called
inputwith astory.txtfile inside where you’ll be writing the text to summarize. Note
NoteFor a text example, visit the wonderful Content from www.gutenberg.org is not included.Project Gutenberg and use a paragraph from the Content from www.gutenberg.org is not included.Alice’s Adventures in Wonderland, book by Lewis Carroll.
You can also use the following text:
First, she dreamed of little Alice herself, and once again the tiny hands were clasped upon her knee, and the bright eager eyes were looking up into hers—she could hear the very tones of her voice, and see that queer little toss of her head to keep back the wandering hair that would always get into her eyes—and still as she listened, or seemed to listen, the whole place around her became alive with the strange creatures of her little sister’s dream.
The long grass rustled at her feet as the White Rabbit hurried by—the frightened Mouse splashed his way through the neighbouring pool—she could hear the rattle of the teacups as the March Hare and his friends shared their never-ending meal, and the shrill voice of the Queen ordering off her unfortunate guests to execution—once more the pig-baby was sneezing on the Duchess’s knee, while plates and dishes crashed around it—once more the shriek of the Gryphon, the squeaking of the Lizard’s slate-pencil, and the choking of the suppressed guinea-pigs, filled the air, mixed up with the distant sobs of the miserable Mock Turtle.
Navigate back to the Kaoto perspective and run the route, you should get a similar output like this. Notice how you see the text as the route output.

Stop the route now. In the next step, add the
OpenAIcomponent to perform the summary.
3.3.2. Adding the OpenAI component
For the summary process, use the OpenAI component to leverage our local Ollama instance with the Granite model.
Hover in the edge between the
fileandlogcomponents, and click on the Add step button.
In the component catalog, search for openai and select the
OpenAIcomponent.
Click on the newly added
OpenAIcomponent and select the All view to configure the following options:
Property Value Operation
chat-completion
API Key
OLLAMA-LOCAL-KEYBase URL
Content from localhost is not included.http://localhost:11434/v1
Model
granite4:tiny-hSystem Message
Summarize this text into a couple of short sentences and give it a funny twist
NoteTo run Ollama locally, an API Key is not really needed. You can fill this field with any string, or the actual
OLLAMA-LOCAL-KEYstring.After editing the option, click on the Modified toggle to see what has changed in the route configuration.
NoteFor the next step, make sure to run
ollama run granite4:tiny-hin your terminal beforehand.Time of truth, run the route and see the summary. If everything went well, you should get a similar output like this:
2026-03-26 13:09:37.293 INFO 592754 --- [ Content from . is not included.file://./input] demo.camel.yaml:19 : Once upon a time in Wonderland, Alice dreamt that her childhood fascination turned into a reality where she met her favorite characters from "Alice in Wonderland," but this time it’s all around her, filling her ears and eyes! Oh, and let’s not forget about the sneezing pig-baby and execution-ordered rabbit. Truly an unforgettable experience!
(Note: This is a lighthearted re-imagining of the original text.)
Chapter 4. The Visual Designer
Kaoto provides a powerful visual designer for building Apache Camel integrations without writing code. Whether you’re creating simple file processors or complex AI-powered workflows, the designer helps you to:
- Create and manage integrations visually using drag-and-drop components
- Configure components through intuitive forms instead of YAML syntax
- Build routes by connecting Camel components, Kamelets, and EIPs (Enterprise Integration Patterns)
- Test and run your integrations directly from VS Code
The designer supports all major Camel resource types including Routes, Kamelets, and Pipes, giving you the flexibility to build integrations that match your specific needs.
4.1. Managing Integrations
Managing integrations is a core part of working with Kaoto. This guide covers everything you need to know about creating, organizing, and managing integrations in your projects.
4.2. Understanding Resource Types
Kaoto supports three main resource types for building integrations, each determined by its file extension:
4.2.1. Camel Route (.camel.yaml | .camel.xml)
In Apache Camel, a route is a set of processing steps that are applied to a message as it travels from a source to a destination. A route typically consists of a series of processing steps that are connected in a linear sequence.
Key characteristics:
- Supports multiple integrations per file (though single integration per file is recommended)
- Full access to all Camel components and patterns
- Ideal for complex integration scenarios
Content from camel.apache.org is not included.Learn more about Apache Camel Routes
4.2.2. Kamelet (.kamelet.yaml)
Kamelets are reusable integration templates that encapsulate integration logic. Think of them as pre-built, configurable integration components that you can use across multiple projects.
Key characteristics:
- Single integration per file only
- Designed for reusability and sharing
Content from camel.apache.org is not included.Learn more about Apache Camel Kamelets
4.2.3. Pipe (.pipe.yaml)
Pipes connect Kamelets together to create simple integration flows. They provide a declarative way to build integrations by connecting sources to sinks through Kamelets.
Key characteristics:
- Single integration per file only
- Simplified syntax for connecting Kamelets
Content from camel.apache.org is not included.Learn more about Apache Camel Pipes
4.3. Working with Camel Routes
4.3.1. Best Practice: Single Integration Per File
We strongly recommend organizing your Camel Routes with one integration per file. This approach provides several important benefits:
- Better organization: Each file has a clear, single purpose
- Easier version control: Changes to one integration don’t affect others
- Clearer file structure: Project organization is more intuitive
- Improved maintainability: Easier to find, update, and test individual integrations
- Better collaboration: Reduces merge conflicts in team environments
When to use multi-integration files: - Legacy code that already uses this pattern - Tightly coupled integrations that must be deployed together - Very simple integrations that are logically grouped
For most projects, stick with single integration per file as your default approach.
4.4. Creating a New Integration
Refer: Getting Started with Kaoto for a step-by-step guide on creating your first integration.
The integration name doesn’t need to match the file name.
You can add multiple integrations to the same file using the same workflow.
4.5. The Flows List
For Camel Routes, the flows list in the top toolbar is your central control panel for managing all integrations and entities in your current file. It provides quick access to:
- Rename: Edit integration names inline
- Visibility control: Show or hide integrations on the canvas
- Delete: Remove integrations from the file

4.5.1. Renaming Integrations
To rename an existing integration:
- Locate the integration in the flows list
Click on the pencil button

Type the new name

- Press Enter or click in the accept button
- Save the file
- The file name does NOT automatically update when you rename an integration.
- Only the integration ID inside the file changes.
- An unsaved changes indicator will appear until you save.
4.5.2. Controlling Integration Visibility
When working with files containing multiple integrations, you can control which integrations are visible on the canvas:
- Locate the integration in the flows list
Click the eye icon next to the integration name

The integration toggles between visible and hidden on the canvas

Hidden integrations remain in the file but don’t clutter your canvas, making it easier to focus on specific integrations in complex files.
4.5.3. Deleting Integrations
To delete an integration:
- Locate the integration in the flows list
Click the delete icon next to the integration name

Confirm deletion in the dialog that appears

- The integration content is removed from the file
- The file itself is NOT deleted, only the integration content is removed.
- For single-integration files, the file becomes empty after deletion.
- For multi-integration files, a new demo integration is created.
4.6. Other Camel Entities in Kaoto
Beyond integrations, Kaoto supports additional Apache Camel entities for advanced integration patterns. All of these can be created via the "Add new" dropdown in the top toolbar.

4.6.1. RouteConfiguration
RouteConfiguration defines reusable configuration that can be applied to multiple integrations, such as error handlers, interceptors, and other cross-cutting concerns.
Use case: Centralize common integration behaviors across your integration, reducing duplication and ensuring consistency.
Content from camel.apache.org is not included.Learn more about RouteConfiguration
4.6.2. Intercept, InterceptFrom, and InterceptSendToEndpoint
Intercept intercepts and processes all messages passing through the integration, regardless of their source or destination.
Content from camel.apache.org is not included.Learn more about Intercept
4.6.2.1. Intercept
Intercept is a simple Intercept that intercepts all messages passing through the integration.
Use case: Implement global error handling, logging, or metrics collection across your integrations.
Content from camel.apache.org is not included.Learn more about Intercept
4.6.2.2. InterceptSendToEndpoint
InterceptSendToEndpoint intercepts messages being sent to specific endpoints, allowing you to monitor or modify messages before they reach their destination.
Use case: Monitor, modify, or redirect messages going to particular destinations, useful for debugging or implementing conditional routing.
Content from camel.apache.org is not included.Learn more about InterceptSendToEndpoint
4.6.2.3. InterceptFrom
InterceptFrom intercepts messages coming from specific endpoints, allowing you to process or validate messages before they enter your integration logic.
Use case: Process or validate messages from particular sources before integration processing begins, ensuring data quality and consistency.
Content from camel.apache.org is not included.Learn more about InterceptFrom
4.6.3. ErrorHandler
ErrorHandler defines how errors are handled during message processing, including retry policies, dead letter channels, and error logging strategies.
Use case: Implement robust error handling strategies for your integrations, ensuring failures are handled gracefully and consistently.
Content from camel.apache.org is not included.Learn more about ErrorHandler
4.6.4. OnException
OnException catches specific exceptions and defines custom handling logic for different error types, allowing you to respond differently based on the type of error encountered.
Use case: Handle different exceptions differently - for example, retry network errors automatically but log validation errors for manual review.
Content from camel.apache.org is not included.Learn more about OnException
4.7. Working with Nodes
In this section we will cover the basic operations you can perform on the nodes in your integration. This includes adding, replacing, deleting and enabling / disabling steps as well as generating documentation for your integration.
4.7.1. Adding a step
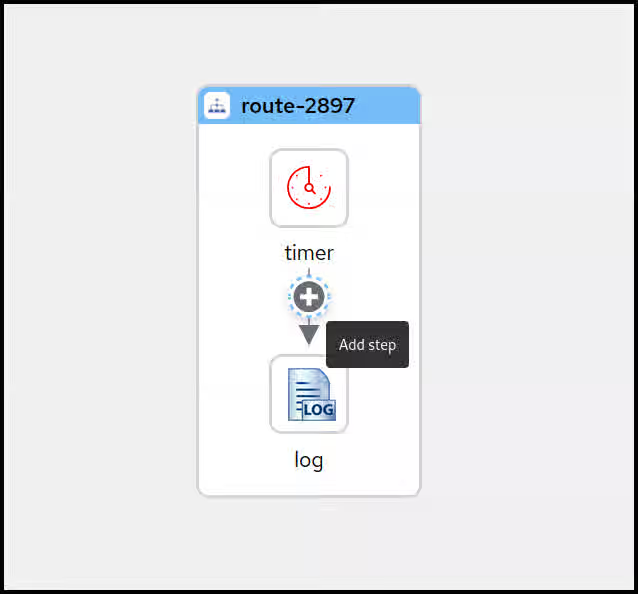
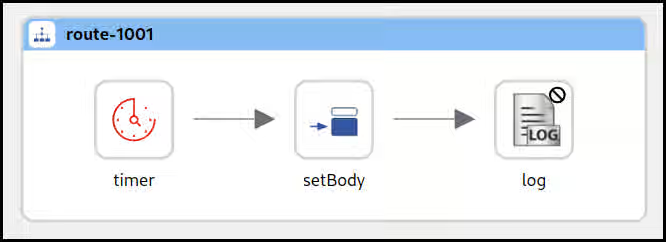
Now lets add a new step between the Timer and the Log component to modify the message body.
There are two ways of adding a step to the route.
- You can either Right-Click on the step you want to insert before or after. This will bring up a context menu with the available actions to choose from.
- An easier alternative would be to hover over the connection between the two steps you want to insert between and then click on the + button that appears.
Hover over the connection between the Timer and the Log steps now and click the + button to execute the Add step action.
 Note
NoteWhen using the right-click context menu, the set of available actions depend on the selected step and can vary. There are actions for appending, prepending, replacing and deleting steps as well as some more specialized actions.
This will open up the Camel Catalog where you can search the step you want to add.
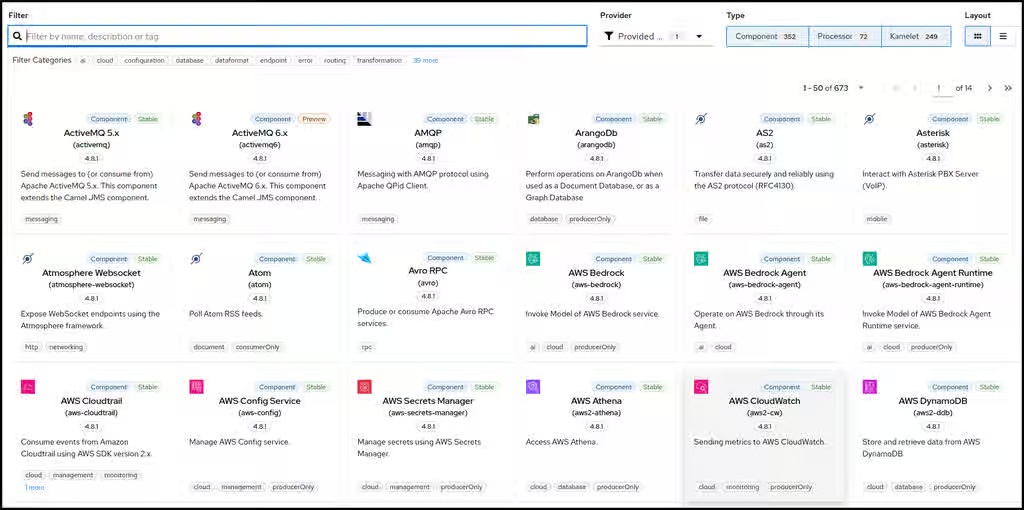
As already mentioned we would like to modify the message body before sending it along to the Log component. To achieve that we need to add a Processor called setBody. Let’s enter this name into the filter text field on top of the Catalog.
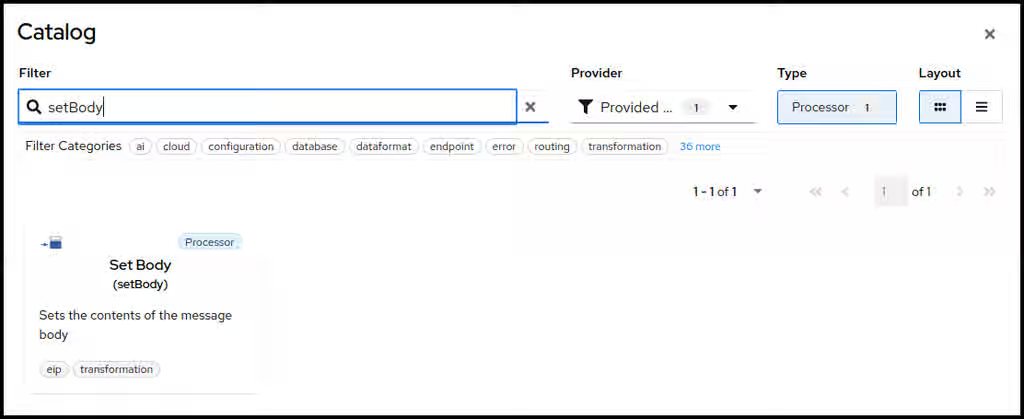
You can now select the setBody tile to add it to your route. Select the new added step now on the canvas to open the configuration form to the right.
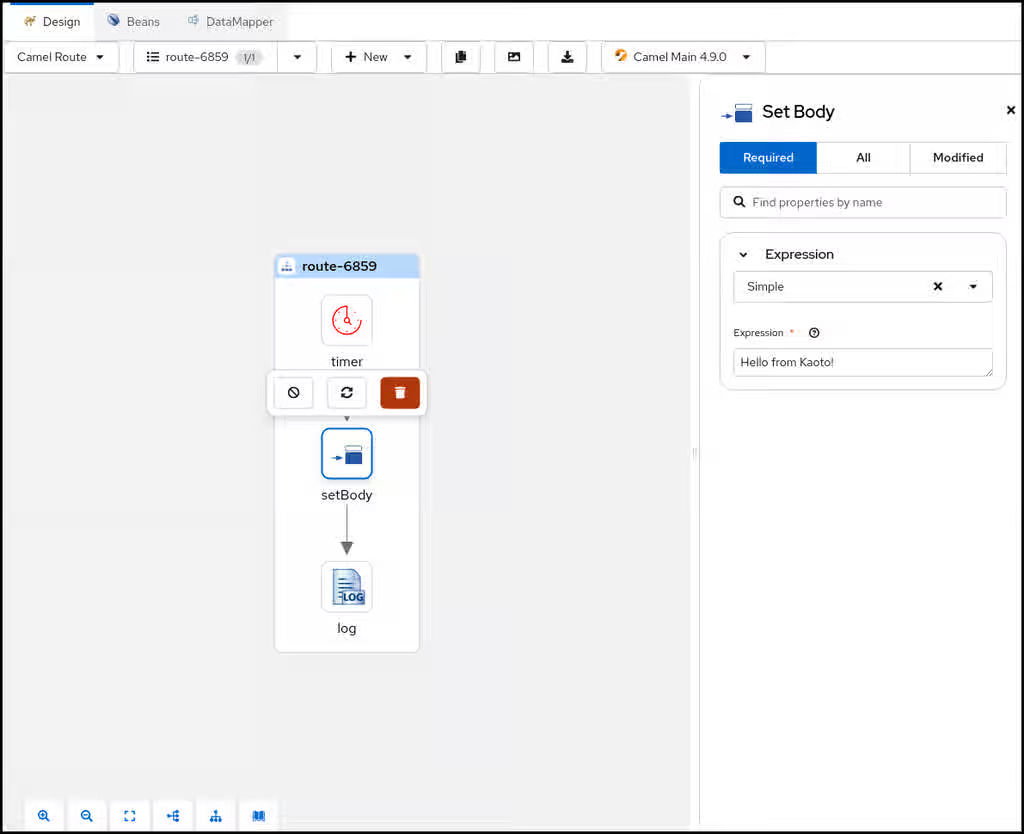
- Let’s change the Expression text field to <code>Hello from Kaoto!</code>.
Now the Log component will receive a <code>Hello from Kaoto!</code> message every second and logs it to the console.
NoteWhen using the right click context menu of a step, adding new steps is usually done with two actions.
- Prepend can be used to add a step before the selected step
- Append will add the new step after the selected step.
However, on the first step of a flow and on steps that can have children, the Add Step action is used.
4.7.2. Replacing a step
You can replace any step on the canvas by hovering over or by selecting the step. This will spawn a toolbar which contains a button for the Replace action.

- Alternatively you can do that also by invoking the context menu on a step and selecting the item Replace. Both ways it will open up the Camel Catalog and you can choose the replacement from there.
4.7.3. Deleting a step
When invoking the Delete action on a step with children or on a container element containing children there will be a confirmation dialog because you are about to delete not just the single step or container but also all the contained children.
Be cautious!
You can delete any step on the canvas by hovering over or by selecting the step. This will spawn a toolbar which contains a button for the Delete action.

- Alternatively you can do that also by invoking the context menu on a step and selecting the item Delete. This will remove the step from your integration.
4.7.4. Enabling / Disabling a step
You can enable or disable any step on the canvas by hovering over or by selecting the step. This will spawn a toolbar which contains a button for the Enable / Disable action.
NoteDisabling a step will instruct the Content from camel.apache.org is not included.Apache Camel runtime to ignore the step when executing the flow. This can be convenient when prototyping a new route.

Alternatively you can enable / disable any step in your route by invoking the context menu on a step and selecting the item Enable / Disable.
- In the picture above the Log component has been disabled. The icon is grayed out and there is a marker icon at the top right of the step to indicate it is disabled.
4.7.5. Generating Integration Documentation
You can use the built-in documentation generating feature to create a Markdown file containing all the steps in your integration and all the changed parameters for these steps together with an image of your integration.

When you click the button it will open up a dialog with a preview of your integration documentation.
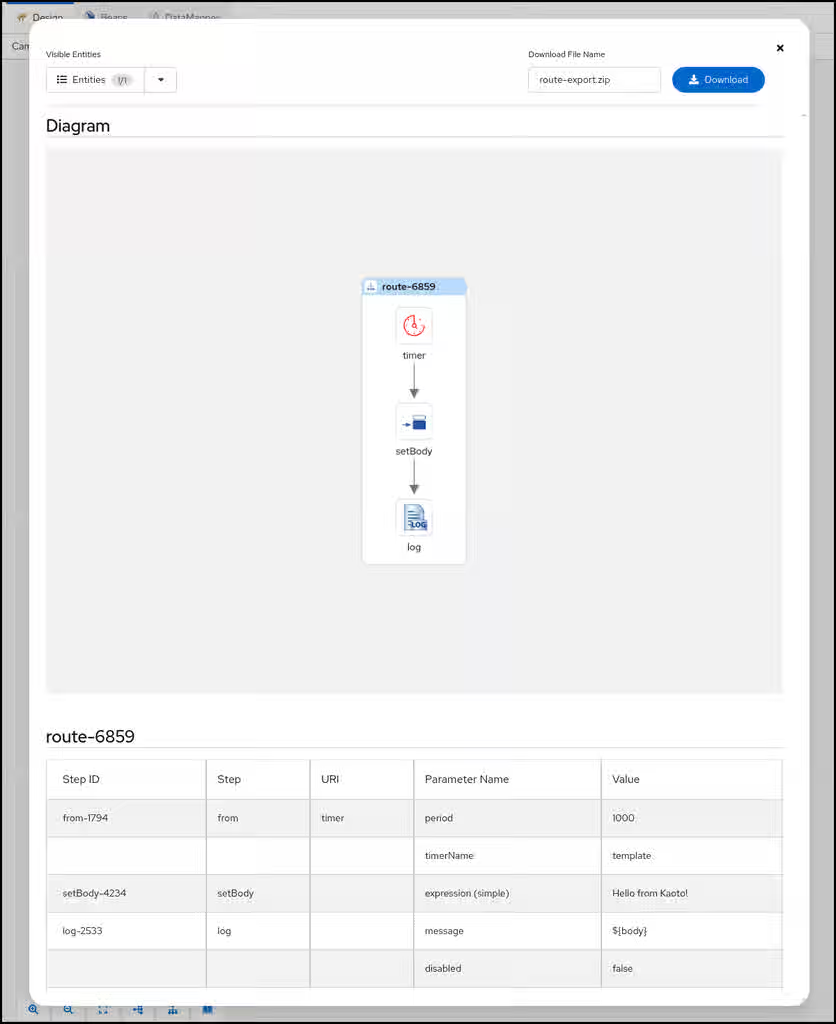
- You can use the Visible Entities control in the top left of the dialog to control which routes are part of the documentation. You can either select all, just a subset or even just a single route.
- Once you have made your choice you can specify a file name in the top right and then hit the Download button to retrieve the file in ZIP format.
4.8. Reordering Nodes
Kaoto provides multiple ways to reorganize Apache Camel routes on the canvas. You can reorder steps using drag-and-drop, copy/paste nodes between routes, or use move-before/after operations for precise positioning.
Kaoto offers three primary methods for reordering nodes:
- Drag and Drop: Visually reorganize nodes by dragging them to new positions with real-time feedback
- Copy/Paste: Duplicate nodes within or across routes while preserving their configuration
- Move Before/After: Precisely reposition nodes using context menu actions
Each method serves different use cases and can be combined for efficient workflow design.
4.9. Drag and Drop
Kaoto’s drag-and-drop functionality allows you to reorganize Apache Camel routes directly on the canvas with real-time visual feedback. You can reorder steps within a route, move steps across routes, and reorganize container structures intuitively.
How it works:
Click and hold on the node you want to move:
- For regular steps: Click anywhere on the node
- For container nodes: Click on the blue header/title bar of the container
- The cursor changes to a grab icon when hovering over a draggable area
- Once you click and start dragging, the cursor changes to a grabbing icon
- Drag it to the desired position on the canvas
Visual indicators show valid drop zones:
- Blue dashed outlines appear on all compatible drop targets
- Green highlights appear when hovering over a specific valid target
- No feedback means the location is not a valid drop zone
- Release the mouse to place the node in its new location
What you can drag:
Drag and drop works with various node types:
-
Regular steps – Move individual processing steps within or across routes (e.g., Content from camel.apache.org is not included.
log, Content from camel.apache.org is not included.transform, Content from camel.apache.org is not included.filter) -
Container nodes – Relocate entire containers with their nested content (e.g., Content from camel.apache.org is not included.
choice, Content from camel.apache.org is not included.doTry) Sub-containers – Reorder branches within parent containers:
-
Content from camel.apache.org is not included.
whenbranches inside Content from camel.apache.org is not included.choice -
Content from camel.apache.org is not included.
doCatchblocks inside Content from camel.apache.org is not included.doTry - Other nested container structures
-
Content from camel.apache.org is not included.
Drop targets:
You can drop nodes on different types of targets:
- Edges – Drop on the connector between two steps to insert the node between them
- Placeholders – Drop on placeholder nodes to append at the end of a sequence
- Compatible containers – Drop sub-containers onto other compatible containers to reorder them
Use cases:
- Reorder steps within a route to optimize processing flow
- Move steps between different routes for better organization
-
Reorganize conditional branches within a Content from camel.apache.org is not included.
choiceprocessor -
Reposition exception handlers within a Content from camel.apache.org is not included.
doTryblock - Move steps into or out of container nodes
- Transfer sub-containers between compatible parent containers
Watch the visual feedback carefully - blue dashed outlines show all possible drop zones, while green highlights indicate where you’ll drop if you release. If you don’t see any feedback, the target is incompatible with what you’re dragging.
To drag container nodes, you must click on their blue header/title bar. Clicking elsewhere on the container will not initiate a drag operation.
For detailed examples with video demonstrations, see our Content from kaoto.io is not included.Drag and Drop blog post.
4.10. Copy and Paste Nodes
Copy and paste functionality allows you to duplicate nodes within the same route or across different routes while preserving their complete configuration. The paste options are context-aware, appearing only where the copied node can be validly inserted.
How it works:
- Right-click on any node to open the context menu
- Select Copy to copy the node to the clipboard
- Navigate to the desired location (same route or different route)
- Right-click on a compatible target position
- Select the appropriate Paste option based on the context
Paste Options:
The paste option label varies depending on where you’re pasting. You may see up to three different paste options:
Paste as next step – Pastes the copied step as the immediate next node in the sequence.

Paste as child – Available only on nodes that can contain children (e.g., Content from camel.apache.org is not included.
from, Content from camel.apache.org is not included.doTry, Content from camel.apache.org is not included.multicast)
Paste as special child – Appears only when pasting into special processors like Content from camel.apache.org is not included.
doTryor Content from camel.apache.org is not included.choice, and only if the copied content is a special node like Content from camel.apache.org is not included.whenor Content from camel.apache.org is not included.doCatch
You can copy any node, but paste options will only appear where it’s contextually valid. If no paste option appears, the copied node cannot be inserted at that location.
Use cases:
- Duplicate commonly used processing steps across multiple routes
- Quickly replicate complex node configurations without manual reconfiguration
- Build similar routes faster by copying and modifying existing nodes
- Rebuild complete routes from scratch by copying and pasting them on the canvas (or simply duplicate the route)
-
Copy error handling blocks (like Content from camel.apache.org is not included.
doCatch) to standardize exception handling across routes
Copied nodes retain all their property configurations, making it easy to create consistent processing patterns across your integrations.
4.11. Move Before/After
The move-before/after functionality provides precise control over node positioning, ideal when you need exact placement without dragging. These operations are available through both the context menu and the floating toolbar that appears when you select a node.
How it works:
- Hover over the node you want to reposition (the floating toolbar will appear)
- Click Move Before or Move After buttons on the floating toolbar, or
- Right-click on the node and select Move Before or Move After from the context menu
- The node is repositioned relative to its previous position
What you can move:
Move-before/after works with all types of nodes, including:
Regular step nodes (e.g., Content from camel.apache.org is not included.
log, Content from camel.apache.org is not included.transform)
Container nodes (e.g., Content from camel.apache.org is not included.
choice, Content from camel.apache.org is not included.doTry)
Sub-containers within special processors:
-
Content from camel.apache.org is not included.
whenbranches inside Content from camel.apache.org is not included.choice -
Content from camel.apache.org is not included.
doCatchblocks inside Content from camel.apache.org is not included.doTry Other nested container structures

-
Content from camel.apache.org is not included.
Use cases:
- Precisely reorder nodes when drag-and-drop is less convenient
- Reposition nodes in complex routes with many steps
-
Reorder conditional branches within a Content from camel.apache.org is not included.
choiceprocessor -
Reorganize exception handlers within a Content from camel.apache.org is not included.
doTryblock - Make fine adjustments to node order without visual dragging
- Quickly move nodes to specific positions in long sequences
Move-before/after operations are particularly useful in routes with many nodes where scrolling and dragging might be cumbersome. Use the floating toolbar for quick access when a node is selected.
4.11.1. Best Practices
To get the most out of Kaoto’s node reordering capabilities:
- Choose the right method: Use drag-and-drop for visual reorganization, copy/paste for duplication, and move-before/after for precise positioning
- Plan before you reorganize: Think about the logical flow before moving or copying steps
- Use visual feedback: When dragging, pay attention to the visual indicators showing valid drop zones and compatible targets
- Test after reorganizing: Validate your routes after significant changes
- Leverage undo/redo: Don’t hesitate to experiment - you can always undo
- Combine methods: Use drag-and-drop, copy/paste, and move operations together for efficient workflow design
- Save frequently: While undo/redo is available, regular saves ensure you don’t lose your work
4.12. Runtime Selector
By default, every Kaoto release includes the latest Camel version available at the moment of the build, nevertheless, generating a different set of catalogs is possible.
4.12.1. Catalog generator CLI
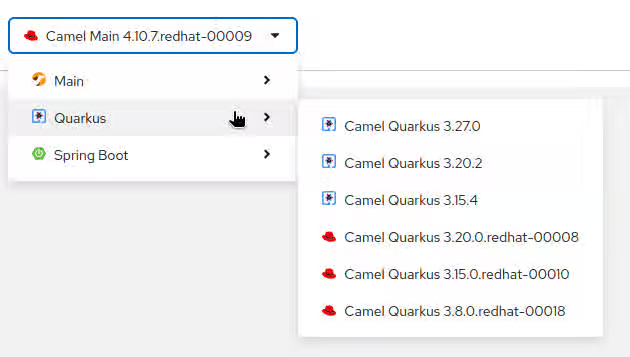
Kaoto provides a Camel catalog generator CLI to ease this process, it supports the following runtimes:
- Main
- Quarkus
- Spring Boot
How to use?
- Clone Content from github.com is not included.Kaoto Camel catalog project
-
Navigate to the
camel-catalogdirectory Install the project dependencies
yarn install
Build the default catalogs
yarn build
This will generate a Catalog library containing:
- Camel Main versions
- Camel extensions for Quarkus
- Camel Spring boot
Camel Kamelets
NoteTo check what specific versions are included, please visit the Content from github.com is not included.index file
The resulting files will be in the
catalogfolderNoteThe latest catalog is version is available in the Content from github.com is not included.GitHub repository
- Providing that folder through a http server will make it available for using it in Kaoto
4.12.2. Creating a Catalog library with different runtimes
In order to add multiple runtimes to the Catalog library, we can provide each runtime with its version using the following flags:
-m,--main <version> Camel Main version. If not specified, it will use the generator installed version -q,--quarkus <version> Camel Extensions for Quarkus version -s,--springboot <version> Camel SpringBoot versionFor instance, running the following command will create a Catalog library with Camel Main 4.15.0 and Camel extensions for Quarkus 3.27.0:
./mvnw package; java -jar ./target/catalog-generator-0.0.1-SNAPSHOT.jar -o ./dist/camel-catalog -k 4.15.0 -m 4.15.0 -q 3.27.0 -n "My Catalog"
For a different Kamelets catalog version, the
--kamelets or -kflag can be specified./mvnw package; java -jar ./target/catalog-generator-0.0.1-SNAPSHOT.jar -o ./dist/camel-catalog -k 4.15.0 -m 4.15.0 -n "My Catalog"
4.12.3. Instructing Kaoto to use a specific Catalog library
In VSCode, go to the settings page and look for "Kaoto"
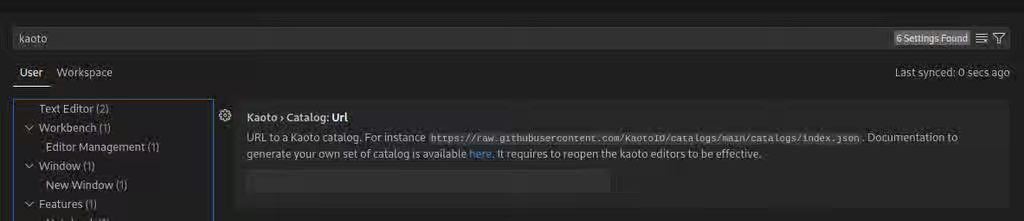
In the
TextField, provide the URL of theindex.jsonfile that specifies the location of the subsequent catalogs, for instance, the public Kaoto catalog can be used:
Restart Kaoto for the changes to have effect
4.13. Executing Integrations
Kaoto makes it easy to run and test your Apache Camel integrations directly from VS Code. You can execute a single integration file, all integrations in a folder, or your entire workspace with just a click. This guide covers everything you need to know about running integrations locally using Kaoto’s built-in execution capabilities.
4.13.1. Prerequisites
Before running integrations in Kaoto, ensure you have completed the installation process. Visit the [Installation Guide](Content from kaoto.io is not included.https://kaoto.io/docs/installation/) for detailed setup instructions.
4.14. Understanding Execution Scopes
Kaoto provides three execution scopes to match your workflow:
4.14.1. Single Integration Execution
Run a specific .camel.yaml or .camel.xml file to test individual integrations in isolation.

Use when:
- Testing a specific integration
- Debugging a single integration
- Developing a new integration
4.14.2. Folder Execution
Run all Camel integration files within a specific folder.

Use when:
- Testing related integrations together
- Running a module or feature set
- Verifying folder-level integration
4.14.3. Workspace Execution
Run all Camel integration files in your entire workspace.

Use when:
- Testing the complete application
- Running all integrations together
- Verifying end-to-end integration flows
4.15. Creating Your First Integration
Before executing integrations, you need to create one. Let’s create a simple integration to demonstrate execution.
Refer: Quickstart Guide
4.16. Running a Single Integration
To run a single integration file:
- Open the Kaoto perspective in VS Code
-
In the Integrations panel, locate your integration file (e.g.,
demo.camel.yaml) Click the Play button (▶️) next to the integration file name
- A new terminal will open showing Camel JBang starting your integration
Expected Output:
INFO 26484 --- [           main] e.camel.impl.engine.AbstractCamelContext : Routes startup (total:1)
INFO 26484 --- [           main] e.camel.impl.engine.AbstractCamelContext :     Started route-3169 (timer://template)
INFO 26484 --- [           main] e.camel.impl.engine.AbstractCamelContext : Apache Camel 4.18.0 (demo) started in 276ms (build:0ms init:0ms start:276ms boot:275ms)
The integration is now running and will continue until you stop it.
Configuration Files: If an application-dev.properties file exists in the same directory as your integration file, Kaoto will automatically load it to configure your integration. This is useful for development-specific settings like connection strings, ports, or feature flags.
4.16.1. Stopping a Running Integration
You have two options to stop a running integration:
Option 1: Using the Deployments Panel
Navigate to the Deployments panel and click the Stop button (⏹️) next to your running integration:

Option 2: Using the Terminal
- Go to the terminal where Camel is running
-
Press
Ctrl + C(orCmd + Con macOS)
4.17. Running a Folder
To run all integrations within a specific folder:
- In the Integrations panel, locate the folder containing your integrations
-
Ensure the folder contains one or more
.camel.yamlor.camel.xmlfiles Click the Play button (▶️) next to the folder name
- Kaoto will start all integration files within that folder in a single Camel context
- A new terminal opens showing all integrations starting together
Classpath Behavior: When running a folder, all files in that folder are automatically added to the classpath. This includes:
-
application.propertiesandapplication-dev.propertiesfor configuration -
.jarfiles for custom dependencies - Resource files needed by your integrations
This makes it easy to organize related integrations with their configuration and dependencies in a single folder.
4.18. Running the Workspace
To run all integrations in your entire workspace:
- In the Integrations panel, locate the workspace root or "Integrations" label
Look for the Play button (▶️) at the workspace level
- Click the Play button (▶️) next to "Integrations" or the workspace root
- Kaoto will discover and start all integration files in your workspace
- A new terminal opens showing all integrations starting together
Workspace Execution Benefits:
- Ideal for testing how all your integrations work together in a complete application context
- All workspace files are added to the classpath, including properties files, JARs, and resources
-
Configuration files like
application.propertiesat the workspace root apply to all integrations
4.19. Common Execution Patterns
4.19.1. Development Workflow
- Create an integration in Kaoto’s visual designer
- Run** the single integration to test basic functionality
- Modify the integration based on test results
- Run the folder to test with related integrations
- Run the workspace to verify complete integration
4.19.2. Testing Strategy
- Unit testing: Run single integrations in isolation
- Integration testing: Run folders with related integrations
- System testing: Run the entire workspace
4.19.3. Debugging Approach
- Start with single integration execution to isolate issues
- Add log processors to track message flow
- Use the terminal output to identify problems
- Make incremental changes and re-run
4.20. Troubleshooting
4.20.1. Integration Won’t Start
Problem: Clicking the play button does nothing or shows an error.
Solutions:
-
Verify JBang is installed by running:
jbang version -
Check Java is installed by running:
java -version(Java 17 or later required) - Look for error messages in the VS Code
Output panel (View → Output)
- Check the Terminal panel for startup errors
- Ensure your integration file has valid YAML/XML syntax
4.20.2. Port Already in Use
Problem: Error message indicating port 8080 (or another port) is already in use.
Solutions:
- Stop other running integrations using the Deployments panel
- Check for other applications using the same port
- Configure a different port in your integration or application properties
-
Kill the process using the port:
lsof -ti:8080 | xargs kill -9(macOS/Linux)
4.20.3. Integration Starts But Doesn’t Work
Problem: Integration starts successfully but doesn’t process messages.
Solutions:
- Check component configuration (URIs, parameters)
- Verify file paths and directories exist
- Add log processors to track message flow
- Review terminal output for warnings
4.20.4. Multiple Integrations Conflict
Problem: Integrations interfere with each other when running together.
Solutions:
- Check for duplicate endpoint URIs
- Verify integrations don’t compete for the same resources
- Use unique IDs for all integrations and components
- Consider running integrations in separate folders
4.21. Best Practices
4.21.1. Integration Organization
- Group related integrations: Keep related integrations in the same folder for easier management
-
Use meaningful names: Name files descriptively (e.g.,
order-processing.camel.yaml,customer-sync.camel.yaml) - One integration per file: Recommended approach for better organization, testing, and version control
- Separate concerns: Use different folders for different modules, features, or business domains
-
Consistent naming: Follow a naming convention across your project (e.g.,
domain-action.camel.yaml)
4.21.2. Execution Strategy
- Test incrementally: Start with single integrations, then folders, then workspace
-
Use workspace settings: Configure Kaoto settings at workspace level (
.vscode/settings.json), not globally - Monitor output: Keep the terminal visible during development to catch errors early
- Stop when done: Always stop integrations when finished testing to free up resources
- Clean restarts: Stop all integrations before making significant changes
- Use logs effectively: Add log processors at key points for debugging
4.21.3. Configuration Management
4.21.3.1. Understanding Property Files
Kaoto supports two types of property files for configuring your integrations:
application.properties
- Base configuration file for all environments
- Contains common settings shared across development, testing, and production
- Always loaded when present in the integration directory
- Example use cases: component URIs, timeout values, retry policies
application-dev.properties
- Development-specific configuration file
- Automatically loaded by Kaoto when running integrations locally
-
Overrides values from
application.propertieswhen both exist - Perfect for: local database connections, debug settings, development API keys
- Not deployed to production environments
Priority Order:
When both files exist, application-dev.properties takes precedence over application.properties for any overlapping properties.
Example Setup:
# application.properties (shared settings)
api.timeout=30000
# application-dev.properties (development overrides)
api.debug=true
Best Practices
-
Use property files: Store configuration in
application.propertiesfor shared settings -
Development overrides: Use
application-dev.propertiesfor local development settings - Environment-specific settings: Create separate property files for test/prod environments
- Secure credentials: Never hardcode sensitive data in integrations or commit secrets to version control
- Document settings: Add comments to property files explaining each configuration value
-
Version control: Commit
application.propertiesbut consider excludingapplication-dev.propertiesif it contains sensitive local settings
Chapter 5. Kaoto DataMapper
The Kaoto DataMapper is a visual tool for creating data transformations in Apache Camel routes. It provides a graphical interface to map data between XML and JSON structures using drag-and-drop operations, eliminating the need to write complex XSLT code manually.

Whether you’re transforming XML to JSON, merging multiple data sources, or applying complex business logic to your data, the DataMapper helps you:
- Map data visually using drag-and-drop between source and target fields
-
Work with schemas to visualize
XMLandJSONdata structures - Create conditional logic with if, choose-when-otherwise, and for-each mappings
-
Build complex transformations using the
XPathexpression editor - Test and validate your mappings in real-time
The DataMapper generates optimized XSLT 3.0 code that executes at runtime, giving you the power of XSLT without writing it manually.
5.1. Getting Started with Kaoto DataMapper
To use the DataMapper for creating data transformations, you need to add and configure a DataMapper step in your Camel route. This guide covers the essential steps to get started with the DataMapper interface.
5.2. Adding a DataMapper step
Now, add a DataMapper step to your Camel route. The DataMapper provides a visual interface for creating data transformations without writing XSLT code manually.
Add a Kaoto DataMapper step in your Camel route. When you
Append,Prepend, orReplacea step in the Kaoto Design view, you can find the Kaoto DataMapper step in the catalog.
Click the added Kaoto DataMapper step in the Kaoto Design to open the config form.

In the config form, click the
Configurebutton, to open the visual DataMapper editor.
This will open the visual DataMapper editor where you can create your data mappings.

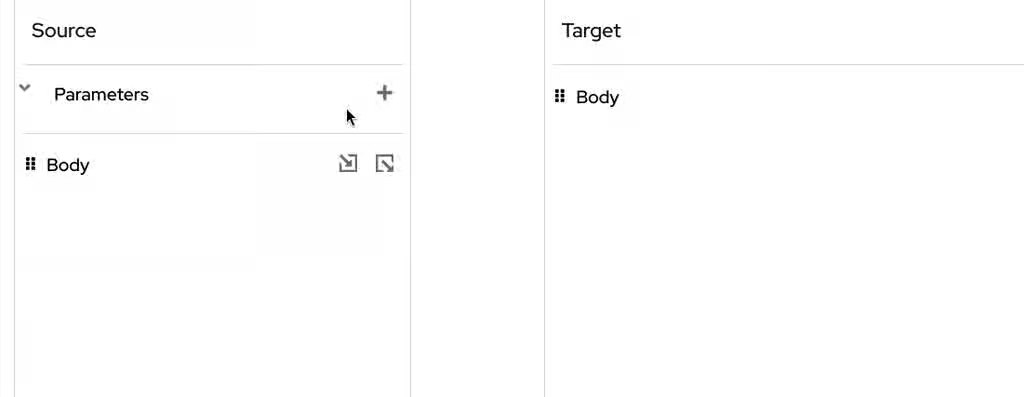
5.3. Understanding the Interface
The DataMapper editor is divided into two main sections that represent the data transformation flow:

5.3.1. Source Section (Left Side)
The Source section represents where your data comes from - the input side of your mappings. This is where the DataMapper step reads the data from.
- Body - The incoming Camel Message Body (the main data payload)
- Parameters - Additional data from Camel Variables and Message Headers
Think of this as the input side of your transformation - the data you’re reading from.
5.3.2. Target Section (Right Side)
The Target section represents where your data goes to - the output side of your mappings. This is where the DataMapper step writes the transformed data.
- Body - The outgoing Camel Message Body (the transformed result)
Think of this as the output side of your transformation - the data structure you’re creating.
You can adjust the font size in the DataMapper interface to match your preference. Use the + and - magnifier icons in the toolbar to make the text larger or smaller for better readability.

5.4. Working with Parameters
Parameters allow you to access Camel Variables and Message Headers in your mappings. This is useful when you need to combine data from multiple sources in your transformation.
5.4.1. Adding a Parameter
Follow the below steps to add a parameter:
Click the plus + button on the right side of the
Parameterstitle.
Now type the parameter name and click the check button on the right.

When you have many parameters, you can improve readability by hiding them visually. Click the eye icon next to the Parameters section to toggle the visibility of the parameter list.

While Camel Exchange Properties are also mapped to Parameters in current camel-xslt-saxon implementation, after the Content from camel.apache.org is not included.Camel Variables has been introduced, it is no longer recommended to store application data into Camel Exchange Properties. We encourage to use Content from camel.apache.org is not included.Camel Variables instead.
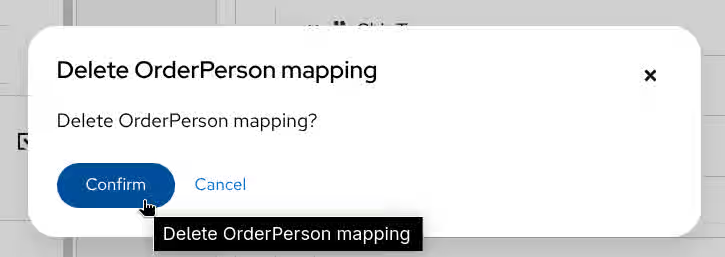
5.4.2. Deleting a parameter
To remove a parameter, click the trash icon next to it and confirm the deletion.

You then have to confirm the deletion by clicking the
Confirmbutton.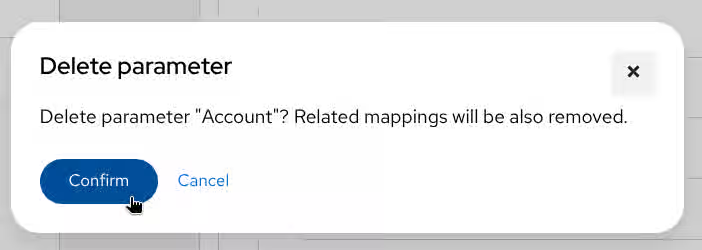
The parameter is deleted.
If the parameter is used in any mappings, those mappings will become invalid after deletion. Review your mappings before removing parameters.
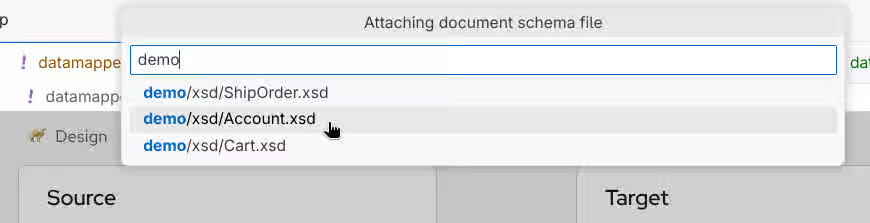
5.5. Attaching Document schema files
Schemas define the structure of your data and enable the visual tree representation in the DataMapper. The DataMapper supports both XML Schema (XSD) and JSON Schema files for Source Body, Target Body, and Parameters.
If the data is not structured and just a primitive value, you don’t need to attach a schema file.
Follow these steps to attach a schema file to Source Body, Target Body, or Parameters:
-
Place schema file (
.xsdor.json) in the workspace directory. Click
Attach a schemabutton in one of theSource Body,Target BodyorParameterssections.
In the Attach schema modal, click the file button.
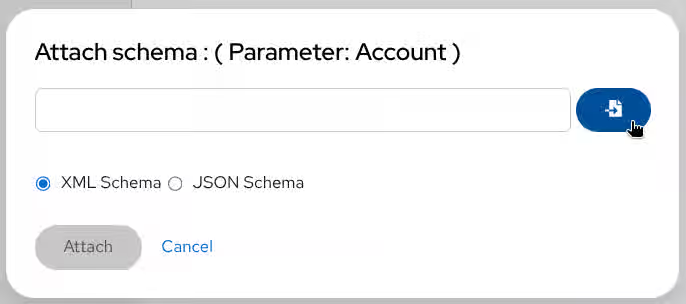
Select the schema file to attach.
 Note
NoteYou can select and upload multiple schema files at once.

For XML schemas only: Choose the root element - Select which top-level element to use if your schema defines multiple.

Click
Attachbutton.
The document structure appears as a tree - The schema is parsed and rendered as an expandable tree view, showing all elements, attributes, and their hierarchical relationships. You can now navigate through the structure and create mappings by dragging fields between source and target sections.

5.6. Detaching a schema
Similar to attaching a schema you can also remove / detach a schema.
To remove a schema from Source Body, Target Body, or Parameters, click the Detach schema button Detach schema button and confirm the action.

Detaching a schema will remove all mappings associated with that schema. This action cannot be undone.
5.7. Understanding JSON field labels
Kaoto DataMapper uses XSLT 3.0 json-to-xml() and xml-to-json() functions to support JSON mappings. The field labels reflect this internal representation.
JSON schemas use type-based labels since fields can be anonymous:
| Label | Description |
|---|---|
|
| Object field |
|
| Array field |
|
| String field |
|
| Number field |
5.7.1. Field Label Examples
5.7.2. Array Fields and Collections
5.8. JSON Parameter References
When using structured JSON parameters, they’re internally converted to XML. Reference them with a -x suffix in XPath expressions:
-
Parameter
Accountbecomes$Account-x -
Parameter
Cartbecomes$Cart-x

When creating mappings through drag and drop, Kaoto DataMapper automatically handles the -x suffix. You only need to remember this when editing XPath expressions manually.
5.9. Creating Mappings
Once you have schemas attached, you can create mappings between source and target fields.
The DataMapper offers two primary methods:
- drag-and-drop for quick mappings and
- XPath expressions for more control
5.10. Drag and Drop Mapping
The easiest way to create a mapping is by dragging a source field onto a target field. A line will be drawn between the fields to visualize the connection.
5.10.1. Map the Name Field

Drag-and-drop is the fastest way to create simple field mappings. The DataMapper automatically generates the correct XPath expression for you.
5.11. XPath Expression Mapping
For more control over your mappings, you can type XPath expressions directly.
5.11.1. Creating a Mapping with XPath
Click the 3 dots context menu on the target field and select
Add selector expression.
Then enter the XPath expression to define the mapping.

XPath expressions give you full control over data transformation, including string manipulation, calculations, and conditional logic. For complex expressions, consider using the Content from kaoto.io is not included.XPath Editor.
5.12. Delete a Mapping
To delete a mapping, click the trash bin icon next to the target field and confirm the deletion.


Deleting a mapping is permanent and cannot be undone. Make sure you want to remove the mapping before confirming.
5.13. Conditional Mappings
The DataMapper supports three types of conditional mappings to handle complex transformation logic:
-
if- Execute mapping only when a condition is met -
choose-when-otherwise- Branch based on multiple conditions -
for-each- Iterate over collection fields (arrays)
5.13.1. Creating an if mapping
Create a mapping that only executes when a specific condition is true.
Click the 3 dots context menu on the target section’s field. Then select
wrap with "if"to create a mapping.
Configure the
ifcondition. You can drag the source field and drop it into the input field to build a condition, or alternatively type everything manually.
Create the mapping for when the condition is true.

You can drag source fields into the condition input to quickly build expressions like $sourceField > 100 or $status = 'active'.
5.13.2. Creating a choose-when-otherwise mapping
Create branching logic with multiple conditions, similar to switch-case statements.
Click the 3 dots context menu on the target section’s field. Then select
wrap with "choose-when-otherwise"to create a mapping.
Configure when and otherwise conditions - Similar to if mapping, configure the condition and create mappings for both when and otherwise branches

Add more when branches (optional) - If you need multiple conditions, click the 3-dot menu on the choose field and select “Add when” to create additional when branches. Each branch can have its own condition and mappings.

The otherwise branch executes when none of the when conditions are satisfied, providing a default fallback.
5.13.3. Creating a for-each mapping
When working with arrays or repeating elements, use for-each mappings to transform each item in the collection. Collection fields are identified by a layer icon Layer icon in the document tree.
Identify the target collection field - Look for fields marked with the layer icon Layer icon, indicating they contain multiple items.

Create the for-each mapping - Click the 3 dots context menu on the target section’s collection field. Then select
Wrap with "for-each"to create a mapping.
Specify the source collection - Choose which source collection to iterate over. This determines what data will be processed for each target item.

Map the collection item fields - Create mappings for individual fields within each collection item. These mappings will be applied to every item in the collection.

Inside a for-each mapping, field paths are relative to the collection item. For example, if iterating over Items, you reference Name instead of Items/Name.
5.13.4. Creating multiple for-each mappings
Merge multiple source collections into a single target collection by adding multiple for-each mappings.
After creating a first
for-eachmapping by following previous section, clickAdd Conditional Mappingin the placeholder below the addedfor-eachmapping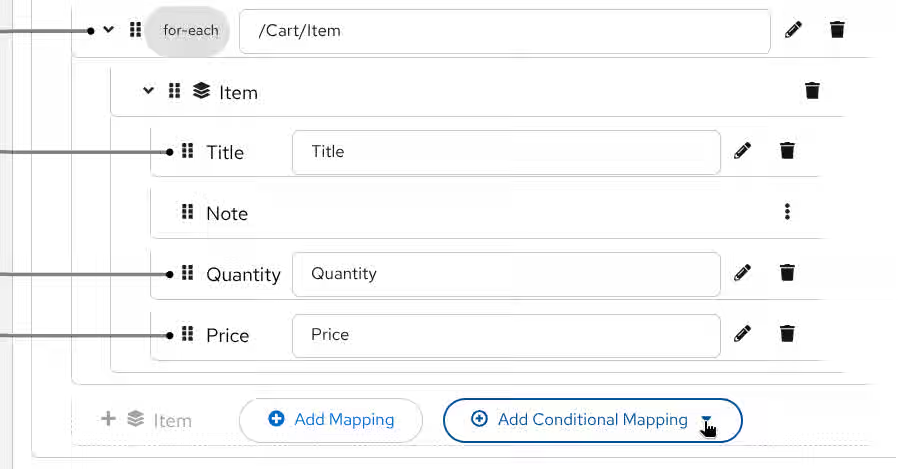
Click
Wrap with "for-each"
Configure the second collection mappings - Select the second source collection to iterate over, then create field mappings for each item. This allows you to merge data from multiple collections into a single target array, combining items from different sources.

Here is a demo screencast for merging 2 source collection fields with multiple for-each mappings.

This technique is useful for merging data from multiple sources, such as combining orders from different systems into a single output array.
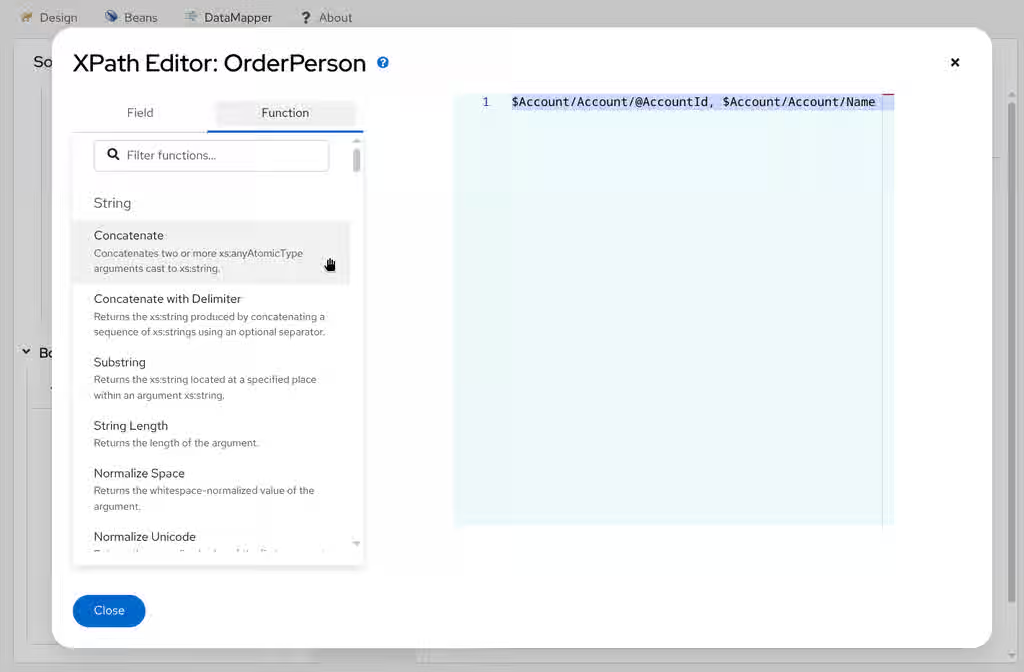
5.14. XPath Editor
The XPath Editor provides a powerful way to create complex data transformations beyond simple field-to-field mappings. While drag-and-drop is great for basic mappings, the XPath Editor lets you combine fields, apply functions, perform calculations, and implement sophisticated business logic.
When to use the XPath Editor:
- Combining multiple source fields into one target field
- Applying string manipulation (concatenation, substring, case conversion)
- Performing mathematical calculations
- Using conditional expressions within a single mapping
- Applying XPath functions for date formatting, number formatting, and more
The XPath Editor is under active development. Current features include drag-and-drop for fields and functions, with more syntax assistance planned for future releases.
5.14.1. Opening the XPath Editor
To edit or create complex XPath expressions, click the pencil icon next to a target field that has an existing mapping. This will launch the editor where you can modify and build the expression for that mapping.

5.14.2. Building XPath Expressions
The XPath Editor interface provides two main areas: a palette on the left with fields and functions, and an expression editor on the right.
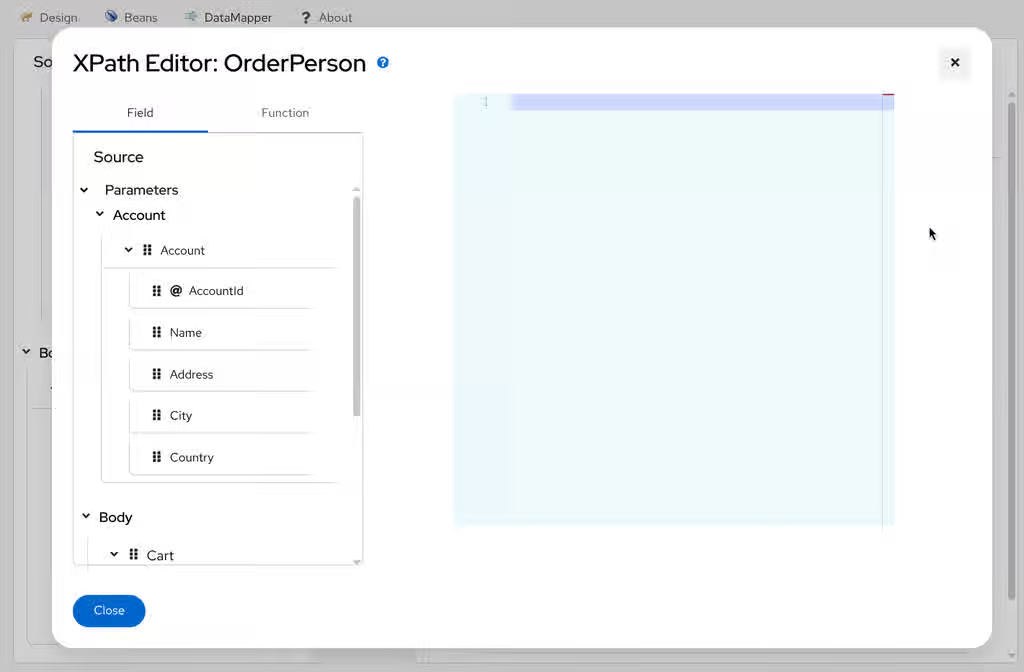
5.14.2.1. Adding Fields
You can add source fields to your expression by:
- Typing directly - Enter field paths manually using XPath syntax
Drag and drop - Drag fields from the Fields tab and drop them into the editor

5.14.3. Using XPath Functions
The XPath Editor provides access to a comprehensive library of functions for data transformation:
String Functions:
-
concat()- Combine multiple strings -
substring()- Extract part of a string -
upper-case(),lower-case()- Change text case -
normalize-space()- Remove extra whitespace
Numeric Functions:
-
sum(),avg(),min(),max()- Aggregate calculations -
round(),floor(),ceiling()- Number rounding -
format-number()- Number formatting
Date/Time Functions:
-
current-date(),current-time()- Get current date/time -
format-date(),format-time()- Format date/time values
Conditional Functions:
-
if()- Inline conditional logic -
choose()- Multi-branch conditionals
To use functions:
Switch to the Functions tab in the left palette.
Drag the function you need and drop it into the editor.
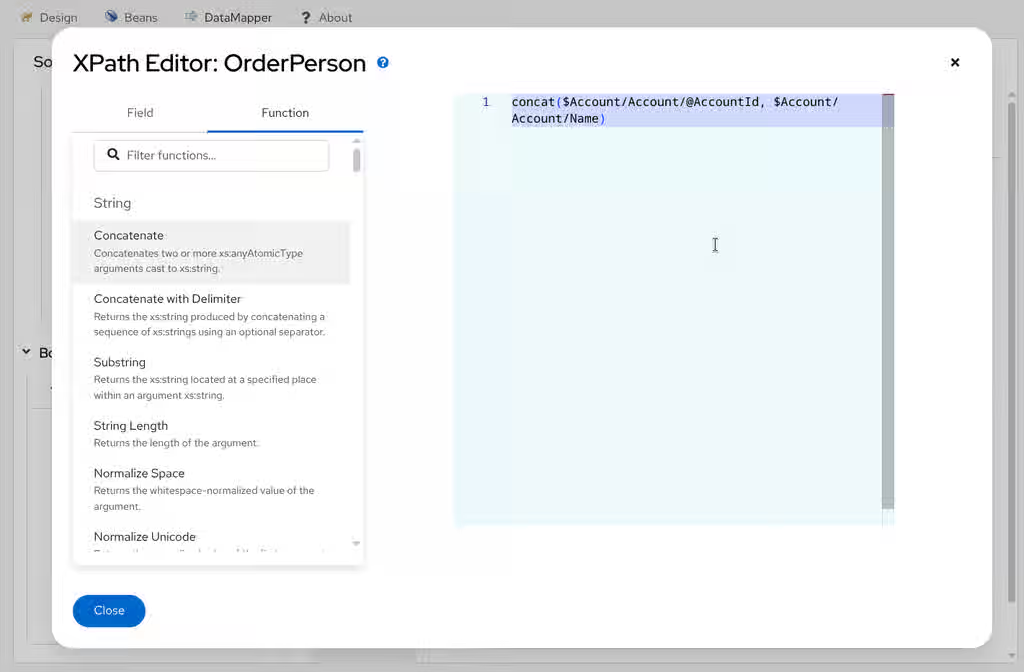
- Fill in the function parameters with field references or literal values
5.14.4. Saving Your Expression
Once you’ve built your XPath expression, click the Close button to apply it to the mapping.
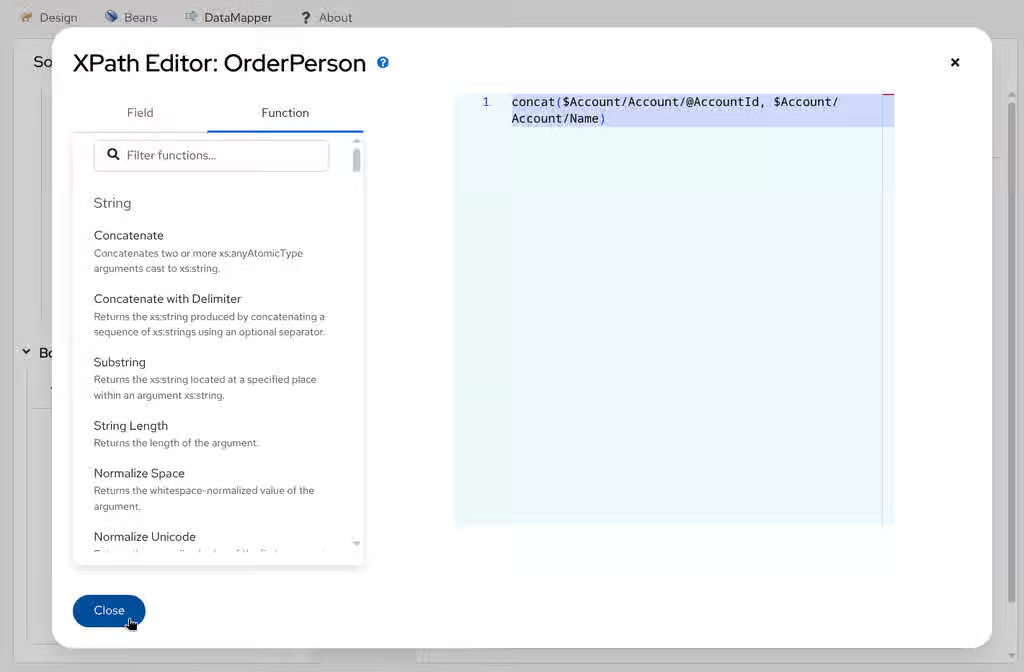
The mapping will now appear in the tree view with your custom XPath expression.

Start with simple expressions and test them before adding complexity. You can always reopen the XPath Editor to refine your expression.
Chapter 6. REST DSL
The REST DSL (Domain Specific Language) in Apache Camel provides a powerful way to define REST APIs. Kaoto offers multiple approaches to work with REST DSL, each suited for different workflows and preferences.
This guide demonstrates two distinct approaches to building REST APIs with Kaoto:
- API-First Approach- Link OpenAPI specifications at runtime
- Code-First Approach - Generate endpoints from OpenAPI using the REST Import Wizard or create endpoints manually from scratch using the visual REST Editor
Each approach builds a REST API that fetches books from Project Gutenberg via RapidAPI and generates AI-powered summaries using the Apache Camel OpenAI component.
6.1. Prerequisites
Before starting any of the approaches, ensure you have:
- VS Code installed on your system - Follow the Content from code.visualstudio.com is not included.installation guide
- Kaoto VS Code extension - See the installation guide for setup instructions
- RapidAPI account and API key - Sign up at Content from rapidapi.com is not included.RapidAPI and subscribe to the Content from rapidapi.com is not included.Project Gutenberg Free Books API
- Ollama installed and running - Follow the Ollama Content from ollama.com is not included.installation guide to set it up
-
Granite 4 model pulled in Ollama - Run
ollama pull granite4:tiny-hin your terminal (Content from ollama.com is not included.Granite 4 on Ollama)) -
Camel catalog - This documentation was created with Camel version
4.18.0, though other versions and distributions are available on Content from camel.apache.org is not included.Apache Camel Catalog. Ensure you have the appropriate version of Camel installed and configured in your development environment.
6.1.2. Comparison of Approaches
| Aspect | API-First | Code-First |
|---|---|---|
| Workflow | Link OpenAPI spec | Generate + Visual design |
| OpenAPI Usage | Runtime link (required) | Import wizard (not needed at runtime) or create from scratch |
| Best For | API contract enforcement | Learning |
| prototyping | UI Interaction | Minimal |
| Moderate | Examples |
|
6.1.3. Choose Your Approach
6.1.3.1. 1. API-First Approach
Best for: Teams with strict API contracts, when the OpenAPI spec is the source of truth, or when you need runtime flexibility to update the API by changing the spec.
What you’ll build: A REST endpoint that fetches book summaries from Project Gutenberg by linking an OpenAPI specification.
Key characteristic: The OpenAPI file must be present at runtime - Camel reads it to create endpoints. The OpenAPI file is the source of truth.
6.1.3.2. 2. Code-First Approach
Best for: Rapid prototyping without OpenAPI available.
What you’ll build: The same REST endpoint as API-First, but with added AI-powered fun extracts using OpenAI, generated from the OpenAPI spec.
Key characteristic: OpenAPI can be used only during development - endpoints are generated into your route file or create from scratch. The Camel route file is the source of truth.
6.2. API-First Approach
Link OpenAPI specifications to REST endpoints in Kaoto!
The API-first approach in Kaoto allows you to link an OpenAPI specification directly to your REST service. Instead of manually creating each endpoint, you reference the OpenAPI file and Apache Camel reads the specification at runtime to create all REST endpoints. The OpenAPI specification file must be kept with your integration as Camel needs it to run. Kaoto visualizes the direct route in the Design view.
OpenAPI vs OpenAI: OpenAPI (formerly known as Swagger) is an API specification standard and is not related to OpenAI (the company behind ChatGPT). The Apache Camel OpenAPI component works with OpenAPI specifications for REST API integration.
6.2.1. Creating the route file in Kaoto
This can be done in two ways:
6.2.1.1. Linking the OpenAPI Specification
This is the key step in the API-first approach.
- Click Rest in the top navigation, then Actions, and select + Add Service from the dropdown.
-
Add the
book-summary-api.openapi.yamlfile to your workspace at the same level as your route file. -
Click the pencil icon next to Open Api and enter the path to your OpenAPI file (e.g.,
book-summary-api.openapi.yaml). This adds the REST DSL block with the
openApi.specificationproperty:- rest: id: rest-1736 openApi: specification: book-summary-api.openapi.yaml
This is the API-first magic: By linking the OpenAPI specification, Apache Camel:
- Reads the OpenAPI file at runtime (the file must be present when running)
- Creates all REST endpoints defined in the specification
-
Maps operations to direct routes using
operationId - Builds the complete REST API structure from the specification
The specification path is relative to your workspace folder. The OpenAPI specification file (book-summary-api.openapi.yaml) must be kept with your integration - Camel needs it at runtime to create the REST endpoints. Make sure it’s in the same directory as your route file. Kaoto will validate the file path.
6.2.1.2. Implementing the direct route
The OpenAPI specification uses the operationId property to map the operation to direct:getBookFunExtract. Now you’ll implement this direct route in Kaoto using the Design view to add steps visually.
- Replace the timer component: Click on the timer component and replace it with a Direct component.
-
Configure the direct endpoint: In Endpoint Properties > name, enter
getBookFunExtract Add removeHeaders processor: Insert a removeHeaders processor between the direct endpoint and the setBody processor.
-
Set the pattern to
CamelHttp* -
This removes all headers starting with
CamelHttpthat might interfere with the external API call
-
Set the pattern to
Add first setHeader processor: After removeHeaders, add a setHeader processor
-
Set name to
x-rapidapi-host - Change the expression type from Simple to Constant
-
Set expression to
project-gutenberg-free-books-api1.p.rapidapi.com - This sets the RapidAPI host header required by the Gutenberg API
-
Set name to
Add second setHeader processor: Add another setHeader processor
-
Set name to
x-rapidapi-key - Keep expression type as Simple
-
Set expression to
{{gutenberg.api.key}} -
Add your API key in the
application.propertiesfile in your workspace - This sets your API key using a property placeholder for security
-
Set name to
Add toD processor: Add a toD (dynamic to) processor
-
Set the uri to:
Content from project-gutenberg-free-books-api1.p.rapidapi.com is not included.https://project-gutenberg-free-books-api1.p.rapidapi.com/books/${header.id}?bridgeEndpoint=true - This makes a dynamic HTTP call to the Gutenberg API using the book ID from the path parameter
-
Set the uri to:
Update setBody processor: Modify the setBody processor
- Change expression type to JSONPath
-
Set expression to
$.results[0].summary - This extracts the book summary from the JSON response
Update log processor: Modify the log processor
-
Set message to
Book summary: ${body} - This logs the book summary for debugging and verification
-
Set message to

6.2.2. Testing in Kaoto
6.2.2.1. Running the Integration
Before running your integration, you need to configure Kaoto’s run settings. Follow these steps carefully:
Step 1: Open VS Code Settings
Open VS Code Settings:
-
macOS: Press
Cmd + ,or go to Code > Preferences > Settings -
Windows/Linux: Press
Ctrl + ,or go to File > Preferences > Settings
-
macOS: Press
Click on the Workspace tab at the top of the settings window (not "User").
- This ensures settings only apply to this project.
-
Creates a
.vscode/settings.jsonfile in your project folder.
Step 2: Configure Kaoto Run Settings
-
In the search bar, type
kaototo filter Kaoto-related settings. Find and configure Kaoto: Run Arguments and Kaoto: Run Folder:
-
Add:
--management-port=8080 This sets a separate port for JBang management to avoid conflicts

-
Add:

Why Workspace-Level Settings Matter
Always configure Kaoto run settings at the workspace level (not globally):
- Global settings problem: Apply to all VS Code projects, meaning you can only run one integration at a time across all your projects
-
Workspace settings solution: Each project has its own isolated configuration in
.vscode/settings.json - Benefit: Run multiple integrations simultaneously in different workspaces without conflicts
- How to verify: Check that you clicked the "Workspace" tab in settings, not "User"
Step 3: Reload and Run
Reload VS Code: Press
Cmd/Ctrl + Shift + P, type "Reload Window", and press Enter.- This ensures VS Code picks up the new settings
Run the integration: In Kaoto, click the Run button in the folder.
-
Kaoto will start your integration using
JBang. You should see output in the terminal showing the integration starting up.
-
Kaoto will start your integration using
6.2.2.2. Testing through the Endpoint
Open a terminal and run:
curl http://localhost:8080/books/1342/fun-extract
- You should receive a JSON response with the book summary for "Pride and Prejudice" (book ID 1342).
6.2.2.3. Trying different books
Test with other Project Gutenberg book IDs:
Frankenstein
curl http://localhost:8080/books/84/fun-extract
The Adventures of Sherlock Holmes
curl http://localhost:8080/books/1661/fun-extract
6.3. Code-First Approach
Use Kaoto’s REST Import Wizard to generate endpoints and build routes visually!
The Code-first approach uses Kaoto’s REST Import Wizard to import OpenAPI specifications and automatically generate REST endpoints with route stubs. Unlike the API-first approach (which links the spec at runtime), the wizard creates explicit endpoint definitions in your route file. Once generated, the OpenAPI file is no longer needed - all endpoints are defined in your route file. You then implement the route logic visually using Kaoto’s component catalog and design view.
6.3.1. Importing OpenAPI specification with Kaoto
6.3.1.1. Configuring the REST Import Wizard
In the Kaoto extension, click in Import next to OpenAPI and it will open the REST Import Wizard.

- In the Kaoto Import Wizard, select Upload file as the source.
-
Click Choose file and select the
book-summary-api.openapi.yamlfile you downloaded in the previous section. The wizard will parse the file and show all discovered operations.

-
You should see the
GET /books/{id}/fun-extractoperation listed. Configure the following options (both should be checked):
- Create REST DSL operations - Generates REST endpoint definitions
Create routes with direct endpoints - Generates route stubs for each operation

Choose the folder to save the information and then give a name to the route.

6.3.1.2. Reviewing generated structure in Kaoto
After importing, Kaoto generates and displays in the Design view:
- REST DSL definition - Complete endpoint with parameters and responses
- Direct route stub - A placeholder route ready for implementation
The generated structure looks like this:

Your route file now contains the REST endpoint definition, and the direct route stub.
6.3.2. Implementing the route visually in Kaoto
Now you’ll implement the logic by reusing the route from the API-first approach and adding OpenAI integration.
This section assumes you’ve completed the API-First Approach documentation example. If not, complete that first or refer to it for the Gutenberg API integration steps.
6.3.2.1. Copying route from API-first implementation
-
Open the route file from the API-first documentation example (e.g.,
book-api.camel.yaml) -
In Kaoto’s Design view, locate the
route-getBookFunExtractroute Right-click on the route (not on individual steps) and select Copy

6.3.2.2. Pasting route into Code-first route
- Switch back to your code-first route file
-
In the Design view, find the
route-getBookFunExtractroute Right-click on the Design canvas itself (not on the setBody step) and select Paste. This pastes the complete route from the API-first route.

6.3.2.3. Drag and drop steps to reorder
-
In the Design view, locate the
removeHeadersstep -
Click and drag the
removeHeadersstep -
Drop it directly after the
directcomponent (at the beginning of the route) - Do the same with the other components.
The new route structure after drag and drop:

6.3.2.4. Deleting placeholder and extra steps
-
Delete the placeholder
setBodystep at the end (the one with "Operation getBookFunExtract not yet implemented") -
Delete any remaining copied
directcomponent
Your route now has the complete Gutenberg API integration in the correct order.
6.3.2.5. Adding OpenAI integration from catalog
Now add the AI-powered fun extract generation:
-
Hover over the arrow after the
setBodystep (the one that extracts$.results[0].summary) - Click the + button that appears
-
In the catalog search, type
openai - Select OpenAI component
Configure in Kaoto’s form:
Property Value Operation
chat-completion
Api Key
OLLAMA-LOCAL-KEY
Base Url
Content from localhost is not included.http://localhost:11434/v1
Model
granite4:tiny-h
System Message
Summarize this text into a couple of short sentences and give it a funny twist
This sends the book summary to your local
Ollamainstance running theGranite 4model for AI-powered fun extracts.Note- For more details on configuring OpenAI in Kaoto, refer to the Quickstart guide.
-
The OpenAI component is now inserted between
setBodyandlog, completing your route.
Complete Route
Your final route should look like this:

6.3.3. Testing in Kaoto
6.3.3.1. Running the Integration
-
Make sure
Ollamais running with the Granite 4 model - In Kaoto’s toolbar, click the Run button. Make sure your application.properties and the new route are in the same folder.
- Kaoto will start your integration using JBang
- Watch the Design view to see your routes activate
6.3.3.2. Testing through the endpoint
Open a terminal and run:
curl http://localhost:8080/books/1342/fun-extract
You should receive an AI-generated fun extract of "Pride and Prejudice" (book ID 1342).
6.3.3.3. Trying different books
Frankenstein
curl http://localhost:8080/books/84/fun-extract
The Adventures of Sherlock Holmes
curl http://localhost:8080/books/1661/fun-extract
Each request will return a unique AI-generated fun extract!
6.4. Extending with REST Editor
Use Kaoto’s REST Editor to visually add and manage REST endpoints from scratch!
Kaoto’s REST Editor provides a visual tree-based interface for creating and managing REST endpoints from scratch in your Camel integrations. Unlike the code-first approach (which generates endpoints from OpenAPI) or API-first (which links a spec at runtime), the REST Editor lets you manually create, configure, and manage individual endpoints through a visual interface without any OpenAPI specification. This approach is ideal for building REST APIs from scratch, extending existing REST APIs, and maintaining your API structure over time.
This example extends the REST API from the Code-First Approach. You can either:
- Continue from your existing route file, or
- Copy the final route from that document.
6.4.1. Opening Kaoto’s REST editor
This can be done in two ways:
6.4.1.1. Opening route file in Kaoto
-
In VS Code, open the route file from Part 2 (e.g.,
rest-api.camel.yaml) - Kaoto will automatically open, showing the Canvas view
6.4.1.2. Accessing the REST Editor
- In the Kaoto toolbar, click the REST DSL button
Kaoto’s REST Editor will open, displaying your REST structure in a tree view

You should see in the tree:
- Your REST service
-
The existing
GET /books/{id}/fun-extractendpoint - The associated direct route
6.4.2. Adding a new endpoint using Kaoto’s REST editor
Now, use Kaoto’s REST Editor to add a new endpoint for searching popular books.
6.4.2.1. Adding the GET Operation
Since the new endpoint shares the same base path (/books), we’ll add it to the existing REST block.
When to Create a New REST Block
Create a new REST block (using Actions Add REST at the top level) when you need:
-
A different base path (e.g.,
/authorsinstead of/books) - To organize endpoints by domain or feature area
For this example, both endpoints use /books/* paths, so we add the operation to the existing REST block.
- In the REST block in the tree, click Actions
- Select Add Operation
In Kaoto’s modal dialog, configure:
Property Value HTTP Method
GETPath
/books/popularOperation ID
listBooksClick Add to create the operation in the tree.

6.4.2.2. Configuring the operation in Kaoto’s form
With the new operation selected in the tree, configure its properties using Kaoto’s form:
| Property | Value |
|---|---|
| Produces |
|
| Description | Lists popular books from Project Gutenberg |

6.4.2.3. Adding response messages using the form
Scroll down in Kaoto’s configuration form and add response messages:
- Click + next to Response Message
Configure the first response in the form:
- Code: 200
- Message: Books retrieved successfully
- Content Type: application/json
- Add a new response again
Configure the error response:
- Code: 500
- Message: Server error during processing
Current state of the route file:
- rest:
    id: rest-1775038763756
    get:
      - id: getBookFunExtract
        path: /books/{id}/fun-extract
        routeId: route-getBookFunExtract
        to: direct:getBookFunExtract
        description: Fetches a book from Project Gutenberg and generates an AI extract
          using OpenAI
        produces: application/json
        param:
          - name: id
            type: path
            required: true
            description: Project Gutenberg book ID (e.g., 11 for Alice's Adventures in
              Wonderland)
            dataType: integer
        responseMessage:
          - code: "200"
            message: Book fun extract generated successfully
            contentType: application/json
          - code: "404"
            message: Book not found in Project Gutenberg
          - code: "500"
            message: Server error during processing
      - id: listBooks
        path: /books/popular
        to:
          uri: direct
          parameters:
            name: direct-listBooks
        produces: application/json
        description: Lists popular books from Project Gutenberg
        responseMessage:
          - message: Server error during processing
            code: "500"
          - message: Books retrieved successfully
            code: "200"
            contentType: application/json
- route:
    id: route-getBookFunExtract
    from:
      uri: direct:getBookFunExtract
      id: direct-from-getBookFunExtract
      steps:
        - removeHeaders:
            id: removeHeaders-4268-1881
            pattern: CamelHttp*
        - setHeader:
            id: setHeader-3265-3267
            name: x-rapidapi-host
            constant:
              expression: project-gutenberg-free-books-api1.p.rapidapi.com
        - setHeader:
            id: setHeader-2139-3021
            simple:
              expression: "{{gutenberg.api.key}}"
            name: x-rapidapi-key
        - toD:
            id: toD-4177-4046
            uri: https://project-gutenberg-free-books-api1.p.rapidapi.com/books/${header.id}?bridgeEndpoint=true
            parameters: {}
        - setBody:
            id: setBody-2130-2169
            jsonpath:
              expression: $.results[0].summary
        - to:
            id: to-3162
            uri: openai
            parameters:
              operation: chat-completion
              apiKey: OLLAMA-LOCAL-KEY
              baseUrl: http://localhost:11434/v1
              model: granite4:tiny-h
              systemMessage: Summarize this text into a couple of short sentences and give it
                a funny twist
        - log:
            message: '"Book summary: ${body}"'
6.4.2.4. Creating the direct route
- Next to Endpoint Name in Kaoto’s form, you’ll see a Create Route button
- Click Create Route
Kaoto will generate a new direct route stub for
direct:listBooksand show it in the Canvas
6.4.3. Implementing the popular books route in Kaoto
Now, implement the logic using Kaoto’s Canvas view.
6.4.3.2. Reusing steps from the existing route
Since both routes call the same RapidAPI service, you can duplicate the common steps from the existing route:
-
Navigate to the
route-getBookFunExtractroute in Canvas -
Select the
removeHeadersstep Right-click over the component and select Duplicate

-
Drag the duplicated step to the
route-listBooksroute and drop it after thedirectcomponent -
Repeat for both
setHeadersteps (x-rapidapi-hostandx-rapidapi-key)
This approach saves time by reusing the exact configuration from the working route.
6.4.3.3. Adding HTTP call from Catalog
- Click Add step in the Canvas
-
Search for
toin the catalog (nottoD- we don’t need dynamic URI here) - Select To
-
Configure: URI =
Content from project-gutenberg-free-books-api1.p.rapidapi.com is not included.https://project-gutenberg-free-books-api1.p.rapidapi.com/books?bridgeEndpoint=true
This calls the Gutenberg API to get a list of popular books.
6.4.3.4. Extracting book information
- Click Add step in the Canvas
-
Search for
setBodyin the catalog - Select Set Body
Configure:
-
Expression Type:
JSONPath -
Expression:
$.results[*].['title', 'authors']
-
Expression Type:
This extracts just the title and authors from each book in the response.
6.4.3.5. Formatting as Pretty JSON
- Click Add step in the Canvas
-
Search for
marshalin the catalog - Select Marshal
- Select JSON as the data format
-
Enable Pretty Print:
true
This formats the response as readable JSON.
6.4.3.6. Adding Log
- Click Add step in the Canvas
-
Search for
login the catalog - Select Logger
-
Configure: Message =
Books list: ${body}Complete Route
Your final route file should now have one REST block with two operations and two routes:

6.4.4. Testing the new endpoint
6.4.4.1. Running the Integration
-
Ensure your
application.propertiesfile has your RapidAPI key - In Kaoto, click the Run: folder button in the folder
-
Kaoto will start your integration using
JBang
6.4.4.2. Testing the popular books endpoint
curl http://localhost:8080/books/popular
You should receive a JSON array with popular books, showing their titles and authors:
[
  {
    "title": "Frankenstein; or, the modern prometheus",
    "authors": [
      {
        "id": 3761,
        "name": "Shelley, Mary Wollstonecraft"
      }
    ]
  },
  {
    "title": "The City of God, Volume I",
    "authors": [
      {
        "id": 18428,
        "name": "Augustine, Saint, Bishop of Hippo"
      },
      {
        "id": 1101993,
        "name": "Augustine, of Hippo, Saint"
      }
    ]
  },
  {
    "title": "Wuthering Heights",
    "authors": [
      {
        "id": 151,
        "name": "Brontë, Emily"
      }
    ]
  }
  // ... more books
]Chapter 7. Beans
Beans allows you to define custom Java object instances that can be referenced and reused across your Apache Camel routes — such as a database connection pool, a custom processor, or a third-party client. If you completed the Quickstart, you can extend that integration by adding beans to it.
A bean has a name (its identifier within the integration), a type (the fully qualified Java class name), and optional configuration such as properties, constructor arguments, or a factory method. Once defined, a bean can be referenced from any step in your routes.
7.1. Overview of Beans in Kaoto
Using beans in your Camel integrations provides several key advantages:
- Reusability — Define once, reference multiple times across different routes without duplicating configuration
- Centralized configuration — Manage connection details, credentials, and settings in one place for easier maintenance
- Type safety — Leverage Java’s type system with fully qualified class names for compile-time validation
- Separation of concerns — Keep infrastructure configuration separate from business logic in your routes
- Testability — Mock or replace beans easily during testing without modifying route definitions
- Performance — Share expensive resources like connection pools across multiple routes efficiently
7.1.1. Common use cases
-
Data sources — database connection pools (e.g.,
PGSimpleDataSource,HikariDataSource) -
HTTP clients — pre-configured
RESTorHTTPclients with base URLs and authentication -
Custom processors — Java classes implementing Camel’s
Processorinterface for custom logic -
Caches — in-memory or distributed cache instances (e.g.,
Caffeine,Redis) -
Serializers / Marshallers — Jackson
ObjectMapperorJAXBcontext beans - Business logic beans — Custom Java classes containing business logic invoked via the Bean component or Bean EIP
7.1.2. Bean Component and Bean EIP
Beans can also execute custom business logic in your routes:
- Bean EIP — The standard way to invoke bean methods as processing steps within a route. Use this for most scenarios where you need to execute business logic mid-route.
-
Bean Component — Invokes beans using URI syntax (
uri: bean:beanName?method=methodName). Use this when you need to dynamically construct the URI from runtime values such as headers or variables.
Both allow you to define business logic in Java classes and reference them as beans, keeping routes clean and logic reusable.
Kaoto offers two approaches for working with beans, covered in the scenarios below.
Configuration Best Practice: The examples in this guide use Camel’s Content from camel.apache.org is not included.property placeholder syntax like {{db.password}} for sensitive values. These properties are resolved at runtime from an application.properties file in your project. For example:
db.password=your_actual_password
For production deployments, use secret managers (e.g., Kubernetes Secrets) or platform-specific secret injection mechanisms.
7.2. Scenario 1: Defining a bean first, then referencing it in a route step
This scenario demonstrates creating a PostgreSQL datasource bean for a book database, connecting it to a route, and running the complete integration.
Prerequisites
A running PostgreSQL instance with a database named bookstore and database credentials ready.
CREATE DATABASE bookstore;

\c bookstore

CREATE TABLE books (
    id SERIAL PRIMARY KEY,
    title VARCHAR(255) NOT NULL,
    author VARCHAR(255) NOT NULL,
    isbn VARCHAR(13),
    published_year INTEGER,
    created_at TIMESTAMP DEFAULT CURRENT_TIMESTAMP
);7.2.1. Creating the bean in the Beans Editor
-
Open a Camel integration file in Kaoto (or create a new one named
book-database.camel.yaml). Click the Beans tab at the top of the Kaoto editor to open the Beans Editor.

Click Add new Beans at the top of the bean list.

In the Details form at the right, fill bean name and Java type:
-
name →
bookDataSource type →
org.postgresql.ds.PGSimpleDataSource
-
name →
Lower in the Details form, add the connection details under properties. Click Add a new property button:

Fill properties name and value as following:
Key Value serverNamelocalhostdatabaseNamebookstoreuserpostgrespassword{{db.password}}portNumber5432
This adds
beansblock- beans: - name: bookDataSource type: org.postgresql.ds.PGSimpleDataSource properties: serverName: localhost databaseName: bookstore user: postgres password: '{{db.password}}' portNumber: 5432
7.2.2. Creating a route using the bean
Create a route that uses this datasource bean to insert book records:
- Click the Design tab to return to the canvas
Kaoto creates a default timer-to-log route. Configure the Timer component:
-
Timer Name →
bookInsertTimer -
Period →
10000(runs every 10 seconds)
-
Timer Name →
Insert an SQL component between Timer and Log:
-
Query →
INSERT INTO books (title, author, isbn, published_year) VALUES ('Camel Integration Patterns', 'John Smith', '978-0321200686', 2003) -
Data Source → Select
#bookDataSourcefrom the dropdown
-
Query →
Update the Log step message:
-
Message →
Book inserted successfully: ${body}
-
Message →
The generated structure looks like this:

7.2.3. Running the integration
-
Ensure PostgreSQL is running and the
bookstoredatabase exists Click the Run button in the toolbar of the Kaoto editor to start the integration.

The integration will start and begin inserting book records every 10 seconds.

7.2.4. Expected Output
When the integration runs successfully, you should see output similar to:
INFO [main] Apache Camel 4.18.1 (book-database) started in 156ms INFO [bookInsertTimer] Book inserted successfully: 1 INFO [bookInsertTimer] Book inserted successfully: 1
7.2.5. Verifying the Data
Connect to your PostgreSQL database and query the books table:
SELECT * FROM books ORDER BY created_at DESC LIMIT 5;
You should see the newly inserted book records:
| id | title | author | isbn | published_year | created_at |
|---|---|---|---|---|---|
| 2 | Camel Integration Patterns | John Smith | 978-0321200686 | 2003 | 2026-04-03 14:59:57.165154 |
| 1 | Camel Integration Patterns | John Smith | 978-0321200686 | 2003 | 2026-04-03 14:59:47.221565 |
7.2.6. Complete YAML Integration
Here’s the complete working integration combining the bean definition and route:
- beans:
    - name: bookDataSource
      type: org.postgresql.ds.PGSimpleDataSource
      properties:
        serverName: localhost
        databaseName: bookstore
        user: postgres
        password: '{{db.password}}'
        portNumber: 5432
- route:
id: route-book-insert
from:
uri: timer
parameters:
timerName: bookInsertTimer
period: "10000"
steps:
- to:
uri: sql
parameters:
query: INSERT INTO books (title, author, isbn, published_year) VALUES ('Camel Integration Patterns', 'John Smith', '978-0321200686', 2003)
dataSource: "#bookDataSource"
- log:
message: "Book inserted successfully: ${body}"
This bean-based database infrastructure can later be referenced by REST endpoints for a complete book management API (e.g., GET /books, POST /books, GET /books/{id}). The datasource bean provides a reusable, centrally configured database connection that multiple routes and REST endpoints can share.
7.3. Scenario 2: Starting from the step, creating the bean inline
This scenario demonstrates creating a bean directly from a component’s configuration panel, useful while building a route and when you need a new bean. Use the same book insertion example, but create the bean inline while configuring the SQL component.
7.3.1. Adding an SQL step to your route
- Open a Camel integration file in Kaoto and click the Design tab at the top of the Kaoto editor.
- Kaoto creates a default timer-to-log route. Insert an SQL component between Timer and Log.
In the SQL step configuration, you’ll need to specify:
-
Query —
INSERT INTO books (title, author, isbn, published_year) VALUES ('Camel Integration Patterns', 'John Smith', '978-0321200686', 2003). - Data Source — Reference to a datasource bean.
-
Query —
Locate the Data Source field and click it.

7.3.2. Creating the bean from the Data Source field
- In the dropdown, click Create new bean image::13-create-new-bean-option.png[]
A modal dialog opens — fill in:
-
name →
bookstoreDataSource type →
org.postgresql.ds.PGSimpleDataSource
-
name →
Add the connection details under properties:
Key Value serverNamelocalhostdatabaseNamebookstoreuserpostgrespassword{{db.password}}portNumber5432
Click Create

The bean is added to the beans list and the Data Source field is automatically set to reference it — in a single action.

-
This adds
beansblock
- beans:
    - name: bookstoreDataSource
      type: org.postgresql.ds.PGSimpleDataSource
      properties:
        serverName: localhost
        databaseName: bookstore
        user: postgres
        password: '{{db.password}}'
portNumber: 54327.4. Editing a Bean
Click the Beans tab at the top of the Kaoto editor.
In the Beans list at the left, click the row for the bean you want to edit — it shows all fields of the Bean at right.

Modify the values as needed; changes are applied immediately.

To add a property, fill in a new key-value pair in the properties section. To remove a property, click the remove icon next to it.


7.5. Deleting a Bean
- Click the Beans tab at the top of the Kaoto editor.
Click the Delete button (trash icon) on the right side of the bean row.

Deleting a bean that is still referenced by a route step leaves a dangling reference. Update or remove the affected step configurations before deleting the bean.