UI Customization Guide
Abstract
Chapter 1. Introduction
Learn how to customize the user interfaces.
Red Hat build of Keycloak includes user interfaces (UIs) for the login page, Admin Console, and Account Console. It also has a "welcome" screen used for the first administrator of the Admin Console.
You can customize, extend, and modify these UIs to accommodate many use cases on your production systems. At a minimum, you will need to change the logos and colors to match your corporate identity.
The default themes are fully supported. However, customized themes are not supported.
This guide provides all the information needed to customize the Red Hat build of Keycloak UIs for your needs.
Chapter 2. Working with themes
Understand how to create and configure themes.
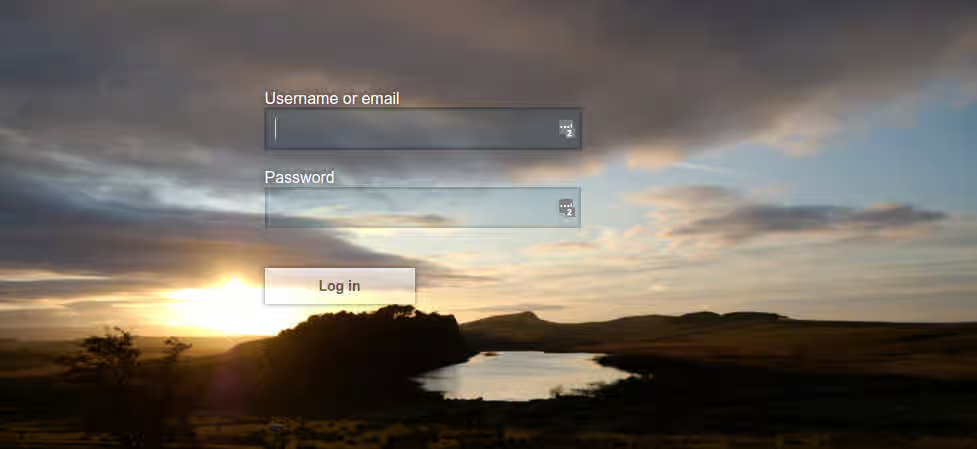
Red Hat build of Keycloak provides theme support for web pages and emails. This allows customizing the look and feel of end-user facing pages so they can be integrated with your applications.
Figure 2.1. Login page with sunrise example theme
2.1. Theme types
A theme can provide one or more types to customize different aspects of Red Hat build of Keycloak. The types available are:
- Account - Account Console
- Admin - Admin Console
- Email - Emails
- Login - Login forms
- Welcome - Welcome page
2.2. Configuring a theme
All theme types, except welcome, are configured through the Admin Console.
Procedure
- Log into the Admin Console.
- Select your realm from the drop-down box in the top left corner.
- Click Realm Settings from the menu.
Click the Themes tab.
NoteTo set the theme for the
masterAdmin Console you need to set the Admin Console theme for themasterrealm.- To see the changes to the Admin Console refresh the page.
-
Change the welcome theme by using the
spi-theme—welcome-themeoption. For example:
bin/kc.[sh|bat] start --spi-theme--welcome-theme=custom-theme
2.3. Default themes
Red Hat build of Keycloak comes bundled with default themes in the JAR file keycloak-themes-26.6.3.redhat-00001.jar inside the server distribution. The server’s root themes directory does not contain any themes by default, but it contains a README file with some additional details about the default themes. To simplify upgrading, do not edit the bundled themes directly. Instead create your own theme that extends one of the bundled themes.
2.4. Creating a theme
A theme consists of:
- HTML templates (Content from freemarker.apache.org is not included.Freemarker Templates)
- Images
- Message bundles
- Stylesheets
- Scripts
- Theme properties
Unless you plan to replace every single page you should extend another theme. Most likely you will want to extend some existing theme. Alternatively, if you intend to provide your own implementation of the admin or account console, consider extending the base theme. The base theme consists of a message bundle and therefore such implementation needs to start from scratch, including implementation of the main index.ftl Freemarker template, but it can leverage existing translations from the message bundle.
When extending a theme you can override individual resources (templates, stylesheets, etc.). If you decide to override HTML templates bear in mind that you may need to update your custom template when upgrading to a new release.
While creating a theme it’s a good idea to disable caching as this makes it possible to edit theme resources directly from the themes directory without restarting Red Hat build of Keycloak.
Procedure
Run Keycloak with the following options:
bin/kc.[sh|bat] start --spi-theme--static-max-age=-1 --spi-theme--cache-themes=false --spi-theme--cache-templates=false
Create a directory in the
themesdirectory.The name of the directory becomes the name of the theme. For example to create a theme called
mythemecreate the directorythemes/mytheme.Inside the theme directory, create a directory for each of the types your theme is going to provide.
For example, to add the login type to the
mythemetheme, create the directorythemes/mytheme/login.For each type create a file
theme.propertieswhich allows setting some configuration for the theme.For example, to configure the theme
themes/mytheme/loginto extend thebasetheme and import some common resources, create the filethemes/mytheme/login/theme.propertieswith following contents:parent=base import=common/keycloak
You have now created a theme with support for the login type.
- Log into the Admin Console to check out your new theme
- Select your realm
- Click Realm Settings from the menu.
- Click on the Themes tab.
- For Login Theme select mytheme and click Save.
Open the login page for the realm.
You can do this either by logging in through your application or by opening the Account Console (
/realms/{realm-name}/account).-
To see the effect of changing the parent theme, set
parent=keycloakintheme.propertiesand refresh the login page.
Be sure to re-enable caching in production as it will significantly impact performance.
If you want to manually delete the content of the themes cache, you can do so by deleting the data/tmp/kc-gzip-cache directory of the server distribution. It can be useful for instance if you redeployed custom providers or custom themes without disabling themes caching in the previous server executions.
2.4.1. Theme properties
Theme properties are set in the file <THEME TYPE>/theme.properties in the theme directory.
- parent - Parent theme to extend
- import - Import resources from another theme
-
abstract - Boolean that, when present and
true, marks the theme is only used as base for other extensions and is not displayed to be selected in the admin console on the realm themes page. Examples of this are thebasethemes described on this guide. -
common - Override the common resource path. The default value is
common/keycloakwhen not specified. This value would be used as value of suffix of${url.resourcesCommonPath}and${url.resourcesCommonUrl}, which are used typically in freemarker templates.${url.resourcesCommonPath}returns only the path, while${url.resourcesCommonUrl}returns the full URL including scheme and host, which is required for email templates. - styles - Space-separated list of styles to include
- locales - Comma-separated list of supported locales
- contentHashPattern - Regex pattern of a file path in the theme where files have a content hash as part of their file name. A content hash is usually an abbreviated hash of the file’s contents. The hash will change when the contents of the file have changed, and is usually created using the bundling process of the JavaScript application bundling.
There are a list of properties that can be used to change the css class used for certain element types. For a list of these properties look at the theme.properties file in the corresponding type of the keycloak theme (themes/keycloak/<THEME TYPE>/theme.properties).
You can also add your own custom properties and use them from custom templates.
When doing so, you can substitute system properties or environment variables by using these formats:
-
${some.system.property}- for system properties -
${env.ENV_VAR}- for environment variables.
A default value can also be provided in case the system property or the environment variable is not found with ${foo\:defaultValue}.
If no default value is provided and there’s no corresponding system property or environment variable, then nothing is replaced and you end up with the format in your template.
Here’s an example of what is possible:
javaVersion=${java.version}

unixHome=${env.HOME:Unix home not found}
windowsHome=${env.HOMEPATH:Windows home not found}2.4.2. Add a stylesheet to a theme
You can add one or more stylesheets to a theme.
Procedure
-
Create a file in the
<THEME TYPE>/resources/cssdirectory of your theme. Add this file to the
stylesproperty intheme.properties.For example, to add
styles.cssto themytheme, createthemes/mytheme/login/resources/css/styles.csswith the following content:.login-pf body { background: DimGrey none; }Edit
themes/mytheme/login/theme.propertiesand add:styles=css/styles.css
To see the changes, open the login page for your realm.
You will notice that the only styles being applied are those from your custom stylesheet.
To include the styles from the parent theme, load the styles from that theme. Edit
themes/mytheme/login/theme.propertiesand changestylesto:styles=css/login.css css/styles.css
NoteTo override styles from the parent stylesheets, ensure that your stylesheet is listed last.
2.4.3. Adding a script to a theme
You can add one or more scripts to a theme.
Procedure
-
Create a file in the
<THEME TYPE>/resources/jsdirectory of your theme. Add the file to the
scriptsproperty intheme.properties.For example, to add
script.jsto themytheme, createthemes/mytheme/login/resources/js/script.jswith the following content:alert('Hello');Then edit
themes/mytheme/login/theme.propertiesand add:scripts=js/script.js
2.4.4. Adding an image to a theme
To make images available to the theme add them to the <THEME TYPE>/resources/img directory of your theme. These can be used from within stylesheets or directly in HTML templates.
For example to add an image to the mytheme copy an image to themes/mytheme/login/resources/img/image.jpg.
You can then use this image from within a custom stylesheet with:
body {
    background-image: url('../img/image.jpg');
    background-size: cover;
}Or to use directly in HTML templates add the following to a custom HTML template:
<img src="${url.resourcesPath}/img/image.jpg" alt="My image description">2.4.6. Adding an image to an email theme
To make images available to the theme add them to the <THEME TYPE>/email/resources/img directory of your theme. These can be used from within directly in HTML templates.
For example to add an image to the mytheme copy an image to themes/mytheme/email/resources/img/logo.jpg.
To use directly in HTML templates add the following to a custom HTML template:
<img src="${url.resourcesUrl}/img/image.jpg" alt="My image description">
To reference images from common theme resources in email templates, use url.resourcesCommonUrl which provides the full URL (including scheme and host) required by email clients:
<img src="${url.resourcesCommonUrl}/img/logo.png" alt="My logo">
Email clients require absolute URLs for images since they cannot resolve relative paths. Use url.resourcesCommonUrl or url.resourcesUrl instead of their Path counterparts (url.resourcesCommonPath, url.resourcesPath) in email templates.
2.4.7. Adding custom Identity Providers icons
Red Hat build of Keycloak supports adding icons for custom Identity providers, which are displayed on the login screen.
Procedure
-
Define icon classes in your login
theme.propertiesfile (for example,themes/mytheme/login/theme.properties) with key patternkcLogoIdP-<alias>. For an Identity Provider with an alias
myProvider, you may add a line totheme.propertiesfile of your custom theme. For example:kcLogoIdP-myProvider = fa fa-lock
All icons are available on the official website of PatternFly4. Icons for social providers are already defined in base login theme properties (themes/keycloak/login/theme.properties), where you can inspire yourself.
2.4.8. Creating a custom HTML template
Red Hat build of Keycloak uses Content from freemarker.apache.org is not included.Apache Freemarker templates to generate HTML and render pages.
Although it is possible to create custom templates to change completely how pages are rendered, the recommendation is to leverage the built-in templates as much as possible. The reasons are:
- During upgrades, you might be forced to update your custom templates to get the latest updates from newer versions
- Configuring CSS styles to your themes allows you to adapt the UI to match your UI design standards and guidelines.
- User Profile allows you to support custom user attributes and configure how they are rendered.
In most cases, you won’t need to change templates to adapt Red Hat build of Keycloak to your needs, but you can override individual templates in your own theme by creating <THEME TYPE>/<TEMPLATE>.ftl. Admin and account console use a single template index.ftl for rendering the application.
For a list of templates in other theme types look at the theme/base/<THEME_TYPE> directory in the JAR file at $KEYCLOAK_HOME/lib/lib/main/org.keycloak.keycloak-themes-<VERSION>.jar.
Procedure
- Copy the template from the base theme to your own theme.
Apply the modifications you need.
For example, to create a custom login form for the
mythemetheme, copythemes/base/login/login.ftltothemes/mytheme/loginand open it in an editor.After the first line (
<#import ...>), add<h1>HELLO WORLD!</h1>as shown here:<#import "template.ftl" as layout> <h1>HELLO WORLD!</h1> ...
- Back up the modified template. When upgrading to a new version of Red Hat build of Keycloak you may need to update your custom templates to apply changes to the original template if applicable.
Additional resources
- See the Content from freemarker.apache.org is not included.FreeMarker Manual for details on how to edit templates.
2.4.9. Emails
To edit the subject and contents for emails, for example password recovery email, add a message bundle to the email type of your theme. There are three messages for each email. One for the subject, one for the plain text body and one for the html body.
To see all emails available take a look at themes/base/email/messages/messages_en.properties.
For example to change the password recovery email for the mytheme theme create themes/mytheme/email/messages/messages_en.properties with the following content:
passwordResetSubject=My password recovery
passwordResetBody=Reset password link: {0}
passwordResetBodyHtml=<a href="{0}">Reset password</a>2.5. Deploying themes
Themes can be deployed to Red Hat build of Keycloak by copying the theme directory to themes or it can be deployed as an archive. During development you can copy the theme to the themes directory, but in production you may want to consider using an archive. An archive makes it simpler to have a versioned copy of the theme, especially when you have multiple instances of Red Hat build of Keycloak for example with clustering.
Themes contain FreeMarker templates that the server renders at runtime, so a malicious template can run code as the Red Hat build of Keycloak process. Install themes only from trusted sources, and restrict write access to the themes directory and to theme JARs under providers/ to trusted operators.
Procedure
- To deploy a theme as an archive, create a JAR archive with the theme resources.
Add a file
META-INF/keycloak-themes.jsonto the archive that lists the available themes in the archive as well as what types each theme provides.For example for the
mythemetheme createmytheme.jarwith the contents:- META-INF/keycloak-themes.json
- theme/mytheme/login/theme.properties
- theme/mytheme/login/login.ftl
- theme/mytheme/login/resources/css/styles.css
- theme/mytheme/login/resources/img/image.png
- theme/mytheme/login/messages/messages_en.properties
theme/mytheme/email/messages/messages_en.properties
The contents of
META-INF/keycloak-themes.jsonin this case would be:{ "themes": [{ "name" : "mytheme", "types": [ "login", "email" ] }] }A single archive can contain multiple themes and each theme can support one or more types.
To deploy the archive to Red Hat build of Keycloak, add it to the providers/ directory of Red Hat build of Keycloak and restart the server if it is already running.
2.6. Dark Mode
Dark mode is a feature that changes the color scheme to a dark background with lighter text. For example, themes based on PatternFly, such as Keycloak’s admin console and account console, support dark mode. But for some themes, dark mode doesn’t work well for various reasons. So Keycloak allows you to disable dark mode from the admin console.
Procedure to disable dark mode
- Log into the Admin Console.
- Select your realm.
- Click Realm Settings from the menu.
- Click on the Themes tab.
- Unselect Dark mode and click Save.
If enabled, the dark variant of the theme will be applied based on user preference through an operating system setting (e.g. light or dark mode) or a user agent setting. If disabled, only the light variant will be used. This setting only applies to themes that support dark and light variants. On themes that do not support this feature it will have no effect.
2.7. Additional resources for Themes
- For more inspiration, see Default Themes bundled inside Red Hat build of Keycloak.
-
Content from github.com is not included.Red Hat build of Keycloak Quickstarts Repository - Directory
extensionof the quickstarts repository contains some theme examples, which can be also used as an inspiration.
2.8. Theme SPIs
The following sections show how to achieve finer grained control over your themes.
2.8.1. Theme selector
By default the theme configured for the realm is used, with the exception of clients being able to override the login theme. This behavior can be changed through the Theme Selector SPI.
This could be used to select different themes for desktop and mobile devices by looking at the user agent header, for example.
To create a custom theme selector you need to implement ThemeSelectorProviderFactory and ThemeSelectorProvider.
2.8.2. Theme resources
When implementing custom providers there may often be a need to add additional templates, resources and messages bundles.
The easiest way to load additional theme resources is to create a JAR with templates in theme-resources/templates resources in theme-resources/resources and messages bundles in theme-resources/messages.
If you want a more flexible way to load templates and resources that can be achieved through the ThemeResourceSPI. By implementing ThemeResourceProviderFactory and ThemeResourceProvider you can decide exactly how to load templates and resources.
2.8.3. Locale selector
By default, the locale is selected using the DefaultLocaleSelectorProvider which implements the LocaleSelectorProvider interface. English is the default language when internationalization is disabled.
With internationalization enabled, the locale is resolved according to the logic described in the Content from www.keycloak.org is not included.Server Administration documentation.
This behavior can be changed through the LocaleSelectorSPI by implementing the LocaleSelectorProvider and LocaleSelectorProviderFactory.
The LocaleSelectorProvider interface has a single method, resolveLocale, which must return a locale given a RealmModel and a nullable UserModel. The actual request is available from the KeycloakSession#getContext method.
Custom implementations can extend the DefaultLocaleSelectorProvider in order to reuse parts of the default behavior. For example to ignore the Accept-Language request header, a custom implementation could extend the default provider, override it’s getAcceptLanguageHeaderLocale, and return a null value. As a result the locale selection will fall back on the realm’s default language.
2.8.4. Additional resources for Locale selector
- For more details on creating and deploying a custom provider, see Content from www.keycloak.org is not included.Service Provider Interfaces.
Chapter 3. Localization
Learn how to localize strings in the UIs.
Red Hat build of Keycloak supports localized text throughout all user interfaces.
Prerequisites
-
You enable internationalization for a realm in the
Realm settingssection of the Admin Console. See Enabling internationalization.
3.1. Localizing messages in a theme
Text in the templates is loaded from message bundles. When a theme extends another theme, the child theme inherits all messages from the parent’s message bundle. You can override individual messages by adding <THEME TYPE>/messages/messages_en.properties to your theme.
For example, to replace Username on the login form with Your Username for the mytheme, create the file themes/mytheme/login/messages/messages_en.properties with the following content:
usernameOrEmail=Your Username
Within a message, values like {0} and {1} are replaced with arguments when the message is used. For example {0} in Log in to {0} is replaced with the name of the realm.
Texts of these message bundles can be overwritten by realm-specific values, which are manageable by the UI and API.
Each theme can have a locale specific description in the message key theme.<theme-name>.<type>.description. For example, use the key theme.keycloak.v3.account.description to provide a description for the keycloak.v3 theme for the Account Console. As usual, the English message will be the fallback for all other languages.
3.2. Adding a language to a theme
Procedure
-
Create the file
<THEME TYPE>/messages/messages_<LOCALE>.propertiesin the directory of your theme. The<LOCALE>follows the conventions of Content from docs.oracle.com is not included.ResourceBunndle#getBundle. Add this file to the
localesproperty in<THEME TYPE>/theme.properties. For a language to be available to users in a realm, the login, account, and email theme types must support the language, so you need to add your language for those theme types.For example, to add Norwegian translations to the
mythemetheme, create the filethemes/mytheme/login/messages/messages_no.propertieswith the following content:usernameOrEmail=Brukernavn password=Passord
If you omit a translation for messages, those messages appear in English.
Edit
themes/mytheme/login/theme.propertiesand add:locales=en,no
-
Make the same changes to the
accountandemailtheme types. To make these changes, createthemes/mytheme/account/messages/messages_no.propertiesandthemes/mytheme/email/messages/messages_no.properties. If you leave these files empty, English messages appear. -
Copy
themes/mytheme/login/theme.propertiestothemes/mytheme/account/theme.propertiesandthemes/mytheme/email/theme.properties. Add a translation for the language selector by adding a message to the English translation. Add the following to
themes/mytheme/account/messages/messages_en.propertiesandthemes/mytheme/login/messages/messages_en.properties:locale_no=Norsk
By default, message properties files should be encoded using UTF-8. Red Hat build of Keycloak falls back to ISO-8859-1 handling if it cannot read the contents as UTF-8. Unicode characters can be escaped as described in Java’s documentation for Content from docs.oracle.com is not included.PropertyResourceBundle.
To simplify migration to the new language codes zh-Hant and zh-Hans, the classloader and folder based themes pick up for the old language codes zh-TW and zh-CN also the files messages_zh_Hant.properties and messages_zh_Hant.properties. Entries in messages_zh_Hant.properties take precedence over entries in messages_zh_TW.properties, and entries in messages_zh_Hans.properties take precedence over entries in messages_zh_CN.properties.
Additional resources
- For details on how the current locale is selected, see Locale Selector.
3.3. Overriding localized text for an entire realm
You also have the option to declare translations that take effect for an entire realm. You specify key/value pairs in the realm settings. Any key specified in this way overrides the key/value pairs deployed with a theme.
In most cases, using realm overrides is not the recommended way to achieve localization in Red Hat build of Keycloak. Consider carefully if you want every theme in your realm to use a key/value pair declared as a realm override.
Procedure to add a realm override
- Log into the Admin Console.
- Select your realm.
- Click Realm Settings from the menu.
- Click on the Localization tab.
- Click on the Realm overrides subtab.
- Select a language from the option list.
- Click Add translation.
- Create a key/value pair from the modal dialog.
Notice another subtab called Effective message bundles. This subtab provides a tool to query key/value pairs for a combination of theme, language, and theme type. You can use this tool to test and make sure your realm overrides took effect.
Chapter 4. Using Avatars
Use avatars in the Admin console and Account console.
Both the admin and account consoles allow use of an avatar to personalize the user experience. Red Hat build of Keycloak supports avatars using the oidc standard picture claim.
This picture claim should have a URI as its value. The URI should point to the avatar meant to be displayed in the masthead section of the admin console or account console.
4.1. Setting a picture attribute from the admin console
The simplest way to allow users to specify the avatar URI is to add a picture attribute in User profile. Just go to the admin console and navigate to the Realm Settings → User profile tab.
Here is an example setup of the picture attribute:
Figure 4.1. User profile picture attribute setup in admin console

4.2. Avatar success
Here is the result in account console once the URI is saved for the picture attribute:
Figure 4.2. Avatar shown in account console

4.3. Important warning
Allowing users to specify their own URI could lead to security concerns. An avatar can contain malware. So ensure that images come from a trusted source. One practical approach is to make sure that the picture has a regular expression validator to restrict the URI.
Figure 4.3. RegExp validator for User profile picture attribute

Chapter 5. Customizing the Welcome Theme
Learn how to customize the welcome theme.
The welcome theme is the web page that is served when you request the default page from the Red Hat build of Keycloak server. For instance, if your server is deployed on your local machine at port 8080, Content from localhost is not included.http://localhost:8080 serves the welcome theme.
By default, the welcome theme is only used during the initial setup to create the first admin user. Once an initial admin exists, navigating to the welcome page redirects to the Admin Console. However, this behavior can be changed and the welcome theme can be completely customized or replaced.
Since the welcome theme is not associated with a realm, it cannot be selected in the admin console like other themes.
To change the welcome theme, create and deploy a new welcome theme as described in Working with themes. Then, start the Red Hat build of Keycloak server using the spi-theme—welcome-theme option.
bin/kc.[sh|bat] start --spi-theme--welcome-theme=custom-theme