Customizing Anaconda
Changing the installer appearance and creating custom add-ons on Red Hat Enterprise Linux
Abstract
Chapter 1. Introduction to Anaconda customization
The Red Hat Enterprise Linux and Fedora installation program, Anaconda, brings many improvements in its most recent versions. One of these improvements is enhanced customizability. Now write add-ons to extend the base installer functionality, and change the appearance of the graphical user interface.
Customization is available for the following components:
- Boot menu - pre-configured options, color scheme and background
- Appearance of the graphical interface - logo, backgrounds, product name
- Installer functionality - add-ons which can enhance the installer by adding new Kickstart commands and new screens in the graphical and textual user interfaces
Procedures described in this book are written for Red Hat Enterprise Linux 10 or a similar systems. On other systems, the tools and applications used (such as xorrisofs for creating custom ISO images) may be different, and procedures may need to be adjusted.
- Support Statement
- Red Hat supports only customizing the Red Hat Enterprise Linux installation media and images by using Red Hat Enterprise Linux Image Builder. Alternatively, you can use Kickstart to deploy consistent systems in your infrastructure.
Chapter 2. Performing the pre-customization tasks
You can customize the Red Hat Enterprise Linux installation media by downloading the Red Hat Enterprise Linux 10 boot images from the Red Hat Customer Portal. Once downloaded, extract their contents and rebuild the boot image with specific modifications to support tailored deployment needs.
2.1. Working with ISO images
Customizing the installer requires working with the distribution ISO: extract the image to modify its contents, then build a new boot image that includes those changes. For example, add-ons, product.img, or other Anaconda customizations. This workflow covers:
- Extracting a Red Hat Enterprise Linux ISO to a working directory.
- Creating a new boot image that contains the customizations.
2.2. Downloading RHEL boot images
Before you begin to customize the installer, download the Red Hat-provided boot images. You can obtain Red Hat Enterprise Linux 10 boot media from the Red Hat Customer Portal after logging in to your account.
- Your account must have sufficient entitlements to download Red Hat Enterprise Linux 10 images.
-
You must download either the
Binary DVDorBoot ISOimage. - You cannot customize the installer by using the other available downloads, such as the KVM Guest Image or Supplementary DVD.
2.3. Extracting Red Hat Enterprise Linux boot images
You can extract the contents of a boot image to a working directory and modify the contents to create a new boot image. You can find the boot images on the Red Hat Customer Portal.
Procedure
-
Ensure that the directory
/mnt/isoexists and nothing is currently mounted there. Mount the downloaded image.
# mount -t iso9660 -o loop path/to/image.iso /mnt/isoWhere path/to/image.iso is the path to the downloaded boot image.
Create a working directory where you want to place the contents of the ISO image.
$ mkdir /tmp/ISOCopy all contents of the mounted image to your new working directory. Ensure that you use the
-poption to preserve file and directory permissions and ownership.#cp -pRf /mnt/iso /tmp/ISOUnmount the image.
#umount /mnt/iso
Additional resources
Chapter 4. Branding and chroming the graphical user interface
The customization of Anaconda user interface might include the customization of graphical elements and the customization of product name.
The user interface customization involves the following high-level tasks:
- Complete the prerequisites.
- Create custom branding material (if you plan to customize the graphical elements).
- Customize the graphical elements (if you plan to customize them).
- Customize the product name (if you plan to customize it).
- Create a product.img file.
Create a custom Boot image.
NoteTo create the custom branding material, first refer to the default graphical element files type and dimensions. You can accordingly create the custom material. Details about default graphical elements are available in the sample files that are provided in the
/usr/share/anaconda/pixmaps/directory in the installer runtime file system.
4.1. Prerequisites
- You have downloaded and extracted the ISO image.
- You have created your own branding material.
4.2. Customizing graphical elements
To customize the graphical elements, modify or replace the customisable elements by using the custom branded material and update the container files. This helps in customizing the graphical elements of the installer.
The customisable graphical elements of the installer are stored in the /usr/share/anaconda/pixmaps/ directory in the installer runtime file system. This directory contains the following customisable files:
pixmaps
├─ anaconda-password-show-off.svg
├─ anaconda-password-show-on.svg
├─ right-arrow-icon.png
├─ sidebar-bg.png
├─ sidebar-logo.png
└─ topbar-bg.png
Additionally, /usr/share/anaconda/ contains a base CSS stylesheet named anaconda-gtk.css, which determines the file names and parameters of the main UI elements. They include the logo and the backgrounds for the sidebar and top bar. Product-specific stylesheet customizations are located in a separate file (/usr/share/anaconda/pixmaps/redhat.css) and override the defaults from the anaconda-gtk.css file. Use a product-specific file for CSS customizations as it only overrides the particular elements of the stylesheet as needed.
The product-specific redhat.css file has the following content that can be customized as per your requirement (for the full stylesheet specifications, see content of the anaconda-gtk.css file):
/* theme colors/images */

@define-color product_bg_color @redhat;

/* logo and sidebar classes */

.logo-sidebar {
   background-image: url('/usr/share/anaconda/pixmaps/sidebar-bg.png');
   background-color: @product_bg_color;
   background-repeat: no-repeat;
}

/* Add a logo to the sidebar */

.logo {
   background-image: url('/usr/share/anaconda/pixmaps/sidebar-logo.png');
   background-position: 50% 20px;
   background-repeat: no-repeat;
   background-color: transparent;
}

/* This is a placeholder to be filled by a product-specific logo. */

.product-logo {
   background-image: none;
   background-color: transparent;
}

AnacondaSpokeWindow #nav-box {
   background-color: @product_bg_color;
   background-image: url('/usr/share/anaconda/pixmaps/topbar-bg.png');
   background-repeat: no-repeat;
   color: white;
}
The most important part of the CSS file is the way in which it handles scaling based on resolution. The PNG image backgrounds do not scale, they are always displayed in their true dimensions. Instead, the backgrounds have a transparent background, and the stylesheet defines a matching background color on the @define-color line. Therefore, the background images "fade" into the background color, which means that the backgrounds work on all resolutions without a need for image scaling.
You could also change the background-repeat parameters to tile the background, or, if you are confident that every system you will be installing on has the same display resolution, you can use background images which fill the entire bar.
You can customize any of the files listed earlier. Once you do so, follow the instructions in Creating a product.img File to create your own product.img with custom graphics, and then Creating Custom Boot Images to create a new bootable ISO image with your changes included.
4.3. Customizing the product name
You can customize the product name by creating a custom .buildstamp file. This helps to add a custom name to the installer.
Procedure
Create a new
.buildstampfile with the following content:[Main] Product=My Distribution Version=10 BugURL=https://bugzilla.redhat.com/ IsFinal=True
Change My Distribution to the name that you want to display in the installer.
-
After you create the custom
.buildstampfile, follow Creating a product.img file section to create a newproduct.imgfile containing your customizations, and the Creating custom boot images section to create a new bootable ISO file with your changes included.
4.4. Configuring the default configuration files
You can write the Anaconda configuration files in the .ini file format. The Anaconda configuration file consists of sections, options and comments. Each section is defined by a section header, the comments starting with a # character and the key = value pairs to define the options.
The resulting configuration file is processed with the configparser Python configuration file parser.
The default configuration file, located at /etc/anaconda/anaconda.conf, contains sections and options that are supported. The file provides a full default configuration of the installer. You can create custom configuration files in /etc/anaconda/conf.d/ directory.
The following configuration file describes the default configuration:
# Anaconda configuration file.

[Anaconda]
# Run Anaconda in the debugging mode.
debug = False

# List of Anaconda DBus modules that can be activated.
# Supported patterns: MODULE.PREFIX., MODULE.NAME activatable_modules = org.fedoraproject.Anaconda.Modules.
    org.fedoraproject.Anaconda.Addons.*

# List of Anaconda DBus modules that are not allowed to run.
# Supported patterns: MODULE.PREFIX., MODULE.NAME forbidden_modules = # List of Anaconda DBus modules that can fail to run. # The installation won't be aborted because of them. # Supported patterns: MODULE.PREFIX., MODULE.NAME
optional_modules =
    org.fedoraproject.Anaconda.Modules.Subscription
    org.fedoraproject.Anaconda.Addons.*


[Installation System]
# Type of the installation system.
# FIXME: This is a temporary solution.
type = UNKNOWN

# Should the installer show a warning about enabled SMT?
can_detect_enabled_smt = False


[Installation Target]
# Type of the installation target.
type = HARDWARE

# A path to the physical root of the target.
physical_root = /mnt/sysimage

# A path to the system root of the target.
system_root = /mnt/sysroot

# Should we install the network configuration?
can_configure_network = True

# Should we copy input kickstart to target system?
can_copy_input_kickstart = True

# Should we save kickstart equivalent to installation settings to the new system?
can_save_output_kickstart = True

# Should we save logs from the installation to the new system?
can_save_installation_logs = True


[Network]
# Network device to be activated on boot if none was configured so.
# Valid values:
#
#   NONE                   No device
#   DEFAULT_ROUTE_DEVICE   A default route device
#   FIRST_WIRED_WITH_LINK  The first wired device with link
#
default_on_boot = NONE


[Payload]
# Default package environment.
default_environment =

# List of ignored packages.
ignored_packages =

# Names of repositories that provide latest updates.
updates_repositories =

# Names of repositories disabled by default.
# Supported patterns: REPO-NAME, PREFIX*, SUFFIX, *INFIX
disabled_repositories =
    source
    debuginfo
    updates-testing
    updates-testing-modular

# List of .treeinfo variant types to enable.
# Valid items:
#
#   addon
#   optional
#   variant
#
enabled_repositories_from_treeinfo = addon optional variant

# Enable installation from the closest mirror.
enable_closest_mirror = True

# Default installation source.
# Valid values:
#
#    CLOSEST_MIRROR  Use closest public repository mirror.
#    CDN             Use Content Delivery Network (CDN).
#
default_source = CLOSEST_MIRROR

# Enable ssl verification for all HTTP connection
verify_ssl = True

# GPG keys to import to RPM database by default.
# Specify paths on the installed system, each on a line.
# Substitutions for $releasever and $basearch happen automatically.
default_rpm_gpg_keys =

[Security]
# Enable SELinux usage in the installed system.
# Valid values:
#
#  -1  The value is not set.
#   0  SELinux is disabled.
#   1  SELinux is enabled.
#
selinux = -1


[Bootloader]
# Type of the bootloader.
# Supported values:
#
#   DEFAULT   Choose the type by platform.
#   EXTLINUX  Use extlinux as the bootloader.
#   SDBOOT    Use systemd-boot as the bootloader.
#
type = DEFAULT

# Name of the EFI directory.
efi_dir = default

# Hide the GRUB menu.
menu_auto_hide = False

# Are non-iBFT iSCSI disks allowed?
nonibft_iscsi_boot = False

# Arguments preserved from the installation system.
preserved_arguments =
    cio_ignore zfcp.allow_lun_scan
    speakup_synth apic noapic apm ide noht acpi video
    pci nodmraid nompath nomodeset noiswmd fips selinux
    biosdevname ipv6.disable net.ifnames net.ifnames.prefix
    nosmt vga


[Storage]
# Enable iBFT usage during the installation.
ibft = True

# Tell multipathd to use user friendly names when naming devices during the installation.
multipath_friendly_names = True

# Create GPT discoverable partition type IDs, if possible
gpt_discoverable_partitions = True

# Do you want to allow imperfect devices (for example, degraded mdraid array devices)?
allow_imperfect_devices = False

# Btrfs compression algorithm and level. For example, zstd:1.
btrfs_compression =

# Default disk label type.
# Valid values:
#
#    gpt  Prefer creation of GPT disk labels.
#    mbr  Prefer creation of MBR disk labels.
#
#    If not specified, use whatever Blivet uses by default.
#
disk_label_type =

# Default file system type. Use whatever Blivet uses by default.
file_system_type =

# Default partitioning.
# Specify a mount point and its attributes on each line.
#
# Valid attributes:
#
#   size <SIZE>    The size of the mount point.
#   min <MIN_SIZE> The size will grow from MIN_SIZE to MAX_SIZE.
#   max <MAX_SIZE> The max size is unlimited by default.
#   free <SIZE>    The required available space.
#   btrfs          The mount point will be created only for the Btrfs scheme
#
default_partitioning =
    /     (min 1 GiB, max 70 GiB)
    /home (min 500 MiB, free 50 GiB)

# Default partitioning scheme.
# Valid values:
#
#   PLAIN      Create standard partitions.
#   BTRFS      Use the Btrfs scheme.
#   LVM        Use the LVM scheme.
#   LVM_THINP  Use LVM Thin Provisioning.
#
default_scheme = LVM

# Default version of LUKS.
# Valid values:
#
#   luks1  Use version 1 by default.
#   luks2  Use version 2 by default.
#
luks_version = luks2


[Storage Constraints]

# Minimal size of the total memory.
min_ram = 320 MiB

# Minimal size of the available memory for LUKS2.
luks2_min_ram = 128 MiB

# Should we recommend to specify a swap partition?
swap_is_recommended = False

# Recommended minimal sizes of partitions.
# Specify a mount point and a size on each line.
min_partition_sizes =
    /      250 MiB
    /usr   250 MiB
    /tmp   50  MiB
    /var   384 MiB
    /home  100 MiB
    /boot  512 MiB

# Required minimal sizes of partitions.
# Specify a mount point and a size on each line.
req_partition_sizes =

# Allowed device types of the / partition if any.
# Valid values:
#
#   LVM        Allow LVM.
#   MD         Allow RAID.
#   PARTITION  Allow standard partitions.
#   BTRFS      Allow Btrfs.
#   DISK       Allow disks.
#   LVM_THINP  Allow LVM Thin Provisioning.
#
root_device_types =

# Mount points that must be on a linux file system.
# Specify a list of mount points.
must_be_on_linuxfs = / /var /tmp /usr /home /usr/share /usr/lib

# Paths that must be directories on the / file system.
# Specify a list of paths.
must_be_on_root = /bin /dev /sbin /etc /lib /root /mnt lost+found /proc

# Paths that must NOT be directories on the / file system.
# Specify a list of paths.
must_not_be_on_root =

# Mount points that are recommended to be reformatted.
#
# It will be recommended to create a new file system on a mount point
# that has an allowed prefix, but doesn't have a blocked one.
# Specify lists of mount points.
reformat_allowlist = /boot /var /tmp /usr
reformat_blocklist = /home /usr/local /opt /var/www


[User Interface]
# The path to a custom stylesheet.
custom_stylesheet =

# A list of spokes to hide in UI.
# FIXME: Use other identification then names of the spokes.
hidden_spokes =

# Should the UI allow to change the configured root account?
can_change_root = False

# Should the UI allow to change the configured user accounts?
can_change_users = False

# Define the default password policies.
# Specify a policy name and its attributes on each line.
#
# Valid attributes:
#
#   quality <NUMBER>  The minimum quality score (see libpwquality).
#   length <NUMBER>   The minimum length of the password.
#   empty             Allow an empty password.
#   strict            Require the minimum quality.
#
password_policies =
    root (quality 1, length 6)
    user (quality 1, length 6, empty)
    luks (quality 1, length 6)

# Should kernel options be shown in the software selection spoke?
show_kernel_options = True

[License]
# A path to EULA (if any)
#
# If the given distribution has an EULA & feels the need to
# tell the user about it fill in this variable by a path
# pointing to a file with the EULA on the installed system.
#
# This is currently used just to show the path to the file to
# the user at the end of the installation.
eula =


[Timezone]
# URL for geolocation data provider.
# This is used for automatic language and timezone detection.
#
# Known valid providers:
#
#   https://geoip.fedoraproject.org/city
#   https://api.hostip.info/get_json.php
#
# If left empty, geolocation does not run.
#
geolocation_provider = https://geoip.fedoraproject.org/city

[Localization]
# Should geolocation be used when setting the language ?
#
use_geolocation = True
Content of files in the conf.d directory overrides defaults from anaconda.conf. The files are named in a <priority>-<config-description>.conf form, for example 100-my-distribution.conf. The file with the highest priority is applied last, overriding all configuration files applied earlier.
Here is an example of a customization configuration file content:
# Anaconda configuration file for My Distribution

[Profile]
 Define the profile.
profile_id = my_distribution

[Profile Detection]
 Match os-release values.
os_id = my_distribution

[Network]
default_on_boot = NONE

[Storage]
file_system_type = xfs
default_partitioning =
	/     (min 2 GiB, max 50 GiB)
	/home (min 20 GiB, free 10 GiB)
	/test (size 256 MiB)
	swap

[Storage Constraints]
swap_is_recommended = True

[User Interface]
custom_stylesheet = /usr/share/anaconda/pixmaps/my_distribution.css
Chapter 5. Developing installer add-ons
Details about Anaconda and its architecture explain its back end and the various plug points necessary for add-ons to function. This information supports the development of custom add-ons tailored to specific requirements.
5.1. Introduction to Anaconda and add-ons
Anaconda is the operating system installer used in Fedora, Red Hat Enterprise Linux, and their derivatives. It is a set of Python modules and scripts together with some additional files like Gtk widgets (written in C), systemd units, and dracut libraries.
Together, they form a tool to configure parameters of the resulting (target) system and then configure this system on a machine. The installation process has four major steps:
- Prepare installation destination (usually disk partitioning)
- Install package and data
- Install and configure boot loader
- Configure newly installed system
By using Anaconda, you can install Fedora, Red Hat Enterprise Linux, and their derivatives in the following three ways:
Using graphical user interface (GUI):
This is the most common installation method. By using this interface, you can install the system interactively with little or no configuration required before starting the installation. This method covers all common use cases, including configuring complicated partitioning layouts.
The graphical interface supports remote access over Remote Desktop Protocol (RDP), so you can use the GUI even on systems with no graphics cards or attached monitor.
Using text user interface (TUI):
The TUI works similar to a monochrome line printer, which allows it to work on serial consoles that do not support cursor movement, colors and other advanced features. The text mode is limited and allows you to customize only the most common options, such as network settings, language options or installation (package) source; advanced features such as manual partitioning are not available in this interface.
Using Kickstart file:
A Kickstart file is a plain text file with shell-like syntax that can contain data to drive the installation process. A Kickstart file allows you to partially or completely automate the installation. A set of commands that configures all required areas is necessary to completely automate the installation. If one or more commands are missed, the installation requires interaction.
Apart from automation of the installer itself, Kickstart files can contain custom scripts that are run at specific moments during the installation process.
5.2. Anaconda architecture overview
Anaconda is a set of Python modules and scripts. It also uses several external packages and libraries.
The major components of this toolset include the following packages:
-
pykickstart- parses and validates the Kickstart files. Also, provides data structure that stores values that drive the installation. -
dnf- the package manager that installs packages and resolves dependencies -
blivet- handles all activities related to storage management -
pyanaconda- contains the user interface and modules for Anaconda, such as keyboard and timezone selection, network configuration, and user creation. Also provides various utilities to perform system-oriented functions -
python-meh- contains an exception handler that gathers and stores additional system information in case of a crash and passes this information to thelibreportlibrary, which itself is a part of the ABRT Project. -
dasbus- communicates between theD-Buslibrary with modules of anaconda and with external components -
python-simpleline- text UI framework library to manage user interaction in the Anaconda text mode -
gtk- the Gnome toolkit library for creating and managing GUI
Apart from the division into packages previously mentioned, Anaconda is internally divided into the user interface and a set of modules that run as separate processes and communicate by using the D-Bus library. These modules are:
-
Boss- manages the internal module discovery, lifecycle, and coordination -
Localization- manages locales -
Network- handles network -
Payloads- handles data for installation in different formats, such asrpm,ostree,tarand other installation formats. Payloads manage the sources of data for installation; sources can vary in format such as CD-ROM, HDD, NFS, URLs, and other sources -
Security- manages security related aspects -
Services- handles services -
Storage- manages storage by usingblivet -
Subscription- handles thesubscription-managertool and Red Hat Lightspeed. -
Timezone- deals with time, date, zones, and time synchronization. -
Users- creates users and groups.
Each module declares which parts of Kickstart it handles, and has methods to apply the configuration from Kickstart to the installation environment and to the installed system.
The Python code portion of Anaconda (pyanaconda) starts as a "main" process that owns the user interface. Any Kickstart data you provide are parsed by using the pykickstart module and the Boss module is started, it discovers all other modules, and starts them. The main process then sends Kickstart data to the modules according to their declared capabilities. Modules process the data, apply the configuration to the installation environment, and the UI validates if all required choices have been made. If not, you must supply the data in an interactive installation mode. Once all required choices have been made, the installation can start; the modules write data to the installed system.
Additional resources
5.3. Anaconda user interface
The Anaconda user interface (UI) has a non-linear structure, also known as hub and spoke model.
The advantages of Anaconda hub and spoke model are:
- Flexibility to follow the installer screens.
- Flexibility to retain the default settings.
- Provides an overview of the configured values.
- Supports extensibility. You can add hubs without the need to reorder anything and can resolve some complex ordering dependencies.
- Supports installation in graphical and text mode.
The following diagram shows the installer layout and the possible interactions between hubs and spokes (screens):
Figure 5.1. Hub and spoke model
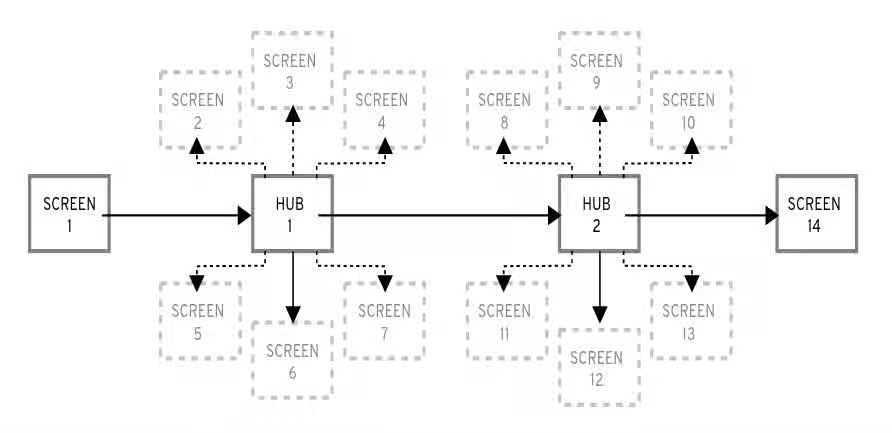
In the diagram, screens 2-13 are called normal spokes, and screens 1 and 14 are standalone spokes. Standalone spokes are the screens that can be used before or after the standalone spoke or hub. For example, the Welcome screen at the beginning of the installation that prompts you to choose your language for the rest of the installation.
-
The
Installation Summaryis the only hub in Anaconda. It shows a summary of configured options before the installation begins
Each spoke has the following predefined properties that reflect the hub.
-
ready- states whether or not you can visit a spoke. For example, when the installer is configuring a package source, the spoke is colored in gray, and you cannot access it until the configuration is complete. -
completed- marks whether or not the spoke is complete (all required values are set). -
mandatory- determines whether you must visit the spoke before continuing the installation; for example, you must visit theInstallation Destinationspoke, even if you want to use automatic disk partitioning -
status- provides a short summary of values configured within the spoke (displayed under the spoke name in the hub)
To make the user interface clearer, spokes are grouped together into categories. For example, the Localization category groups together spokes for keyboard layout selection, language support and time zone settings.
Each spoke contains UI controls that display and allow modification of values from one or more modules. This behavior also applies to spokes provided by add-ons. During a Kickstart installation, some spokes may remain hidden while still processing their data automatically without requiring them to be opened.
5.4. Communication across Anaconda threads
Some actions that you need to perform during the installation process may take a long time. For example, scanning disks for existing partitions or downloading package metadata. To prevent you from waiting and remaining responsive, Anaconda runs these actions in separate threads.
The Gtk toolkit does not support element changes from multiple threads. The main event loop of Gtk runs in the main thread of the Anaconda process. Therefore, all actions pertaining to the GUI must be performed in the main thread. To do so, use GLib.idle_add, which is not always easy. Several helper functions and decorators that are defined in the pyanaconda.ui.gui.utils module might add to the difficulty.
The @gtk_action_wait and @gtk_action_nowait decorators change the decorated function or method in such a way that when this function or method is called, it is automatically queued into Gtk’s main loop that runs in the main thread. The return value is either returned to the caller or dropped, respectively.
In a spoke and hub communication, a spoke announces when it is ready and is not blocked. The hubQ message queue handles this function, and periodically checks the main event loop. When a spoke becomes accessible, it sends a message to the queue announcing the change and that it should no longer be blocked.
The same applies in a situation where a spoke needs to refresh its status or complete a flag. The Configuration and Progress hub has a different queue called progressQ which serves as a medium to transfer installation progress updates.
These mechanisms are also used for the text-based interface. In the text mode, there is no main loop, but the keyboard input takes most of the time.
5.5. Anaconda modules and D-Bus library
Modules in Anaconda run as independent processes. To communicate with these processes by using their D-Bus API, use the dasbus library.
Calls to methods through the D-Bus API are asynchronous, but with the dasbus library you can convert them to synchronous method calls in Python. You can also write either of the following programs:
- program with asynchronous calls and return handlers
- A program with synchronous calls that makes the caller wait until the call is complete.
Additionally, Anaconda uses task objects running in modules. Tasks have a D-Bus API and methods that are automatically processed in additional threads. To successfully run the tasks, use the sync_run_task and async_run_task helper functions.
Additional resources
5.6. The Hello World addon example
Anaconda developers publish an example add-on called "Hello World", available on Content from github.com is not included.GitHub. The descriptions in further sections are reproduced in this document.
5.7. Anaconda add-on structure
An Anaconda add-on is a Python package that contains a directory with an init.py and other source directories (subpackages). Because by using Python, you can import each package name only once, specify a unique name for the package top-level directory.
You can use an arbitrary name, because add-ons are loaded regardless of their name. The only requirement is that they must be placed in a specific directory.
The suggested naming convention for add-ons is similar to Java packages or D-Bus service names.
To make the directory name a unique identifier for a Python package, prefix the add-on name with the reversed domain name of your organization, by using underscores (_) instead of dots. For example, com_example_hello_world.
Ensure that you create an init.py file in each directory. Directories missing this file are considered as invalid Python packages.
When writing an add-on, ensure the following:
-
Support for each interface (graphical interface and text interface) is available in a separate subpackage and these subpackages are named
guifor the graphical interface andtuifor the text-based interface. -
The
guiandtuipackages contain aspokessubpackage. [1] - Modules contained in the packages have an arbitrary name.
-
The
gui/andtui/directories contain Python modules with any name. - There is a service that performs the actual work of the addon. This service can be written in Python or any other language.
- The service implements support for D-Bus and Kickstart.
- The addon contains files that enable automatic startup of the service.
Following is a sample directory structure for an add-on which supports every interface (Kickstart, GUI and TUI):
com_example_hello_world
├─ gui
│  ├─ init.py
│  └─ spokes
│     └─ init.py
└─ tui
   ├─ init.py
   └─ spokes
   └─ init.py
Each package must contain at least one module with an arbitrary name defining the classes that are inherited from one or more classes defined in the API.
For all add-ons, follow Python’s PEP 8 and PEP 257 guidelines for docstring conventions. There is no consensus on the format of the actual content of docstrings in Anaconda. The only requirement is that they are human-readable. If you plan to use auto-generated documentation for your add-on, docstrings follow the guidelines for the toolkit that you use to accomplish this.
You can include a category subpackage if an add-on needs to define a new category, but this is not recommended.
Additional resources
5.8. Anaconda services and configuration files
Anaconda services and configuration files are included in data/ directory. These files are required to start the add-ons service and to configure D-Bus.
Following are some examples of Anaconda Hello World add-on:
Example 5.1. Example of addon-name.conf:
<!DOCTYPE busconfig PUBLIC
"-//freedesktop//DTD D-BUS Bus Configuration 1.0//EN"
"http://www.freedesktop.org/standards/dbus/1.0/busconfig.dtd">
<busconfig>
       <policy user="root">
               <allow own="org.fedoraproject.Anaconda.Addons.HelloWorld"/>
               <allow send_destination="org.fedoraproject.Anaconda.Addons.HelloWorld"/>
       </policy>
       <policy context="default">
               <deny own="org.fedoraproject.Anaconda.Addons.HelloWorld"/>
               <allow send_destination="org.fedoraproject.Anaconda.Addons.HelloWorld"/>
       </policy>
</busconfig>
This file must be placed in the /usr/share/anaconda/dbus/confs/ directory in the installation environment. The string org.fedoraproject.Anaconda.Addons.HelloWorld must correspond to the location of add-on’s service on D-Bus.
Example 5.2. Example of addon-name.service:
[D-BUS Service]
# Start the org.fedoraproject.Anaconda.Addons.HelloWorld service.
# Runs org_fedora_hello_world/service/main.py
Name=org.fedoraproject.Anaconda.Addons.HelloWorld
Exec=/usr/libexec/anaconda/start-module org_fedora_hello_world.service
User=root
This file must be placed in the /usr/share/anaconda/dbus/services/ directory in the installation environment. The string org.fedoraproject.Anaconda.Addons.HelloWorld must correspond to the location of addon’s service on D-Bus. The value on the line starting with Exec= must be a valid command that starts the service in the installation environment.
5.9. GUI Add-on basic features
Similarly to Kickstart support in add-ons, GUI support requires that every part of the add-on contains at least one module with a definition of a class inherited from a particular class defined by the API.
For the graphical add-on support, the only class to add is the NormalSpoke class, defined in pyanaconda.ui.gui.spokes, as a class for the normal spoke type of screen. See Anaconda user interface.
To implement a new class inherited from NormalSpoke, you must define the following class attributes that the API requires:
-
builderObjects- lists all top-level objects from the spoke’s.gladefile that should be exposed to the spoke with their children objects (recursively). In case everything should be exposed to the spoke, the list should be empty. -
mainWidgetName- contains the id of the main window widget (Add Link) as defined in the.gladefile. -
uiFile- contains the name of the.gladefile. -
category- contains the class of the category the spoke belongs to. -
icon- contains the identifier of the icon that will be used for the spoke on the hub. -
title- defines the title that will be used for the spoke on the hub.
5.10. Adding support for the Add-on graphical user interface (GUI)
You can add support to the graphical user interface (GUI) of your add-on by defining a class inherited from the NormalSpoke class.
-
Define Attributes Required for the
NormalspokeClass -
Define the
initandinitializeMethods -
Define the
refresh,apply, andexecuteMethods -
Define the
statusand theready,completedandmandatoryProperties
Prerequisites
- Your add-on includes support for Kickstart. See Anaconda add-on structure.
-
Install the
anaconda-widgetsandanaconda-widgets-develpackages, which contain Gtk widgets specific forAnaconda, such asSpokeWindow.
Procedure
Create the following modules with all required definitions to add support for the Add-on graphical user interface (GUI), according to the following examples.
# will never be translated
_ = lambda x: x
N_ = lambda x: x

# the path to addons is in sys.path so we can import things from org_fedora_hello_world
from org_fedora_hello_world.gui.categories.hello_world import HelloWorldCategory
from pyanaconda.ui.gui.spokes import NormalSpoke

# export only the spoke, no helper functions, classes or constants
all = ["HelloWorldSpoke"]

class HelloWorldSpoke(FirstbootSpokeMixIn, NormalSpoke):
    """
    Class for the Hello world spoke. This spoke will be in the Hello world
    category and thus on the Summary hub. It is a very simple example of a unit
    for the Anaconda's graphical user interface. Since it is also inherited form
    the FirstbootSpokeMixIn, it will also appear in the Initial Setup (successor
    of the Firstboot tool).

    :see: pyanaconda.ui.common.UIObject
    :see: pyanaconda.ui.common.Spoke
    :see: pyanaconda.ui.gui.GUIObject
    :see: pyanaconda.ui.common.FirstbootSpokeMixIn
    :see: pyanaconda.ui.gui.spokes.NormalSpoke

    """

    # class attributes defined by API #

    # list all top-level objects from the .glade file that should be exposed
    # to the spoke or leave empty to extract everything
    builderObjects = ["helloWorldSpokeWindow", "buttonImage"]

    # the name of the main window widget
    mainWidgetName = "helloWorldSpokeWindow"

    # name of the .glade file in the same directory as this source
    uiFile = "hello_world.glade"

    # category this spoke belongs to
    category = HelloWorldCategory

    # spoke icon (will be displayed on the hub)
    # preferred are the -symbolic icons as these are used in Anaconda's spokes
    icon = "face-cool-symbolic"

    # title of the spoke (will be displayed on the hub)
    title = N_("_HELLO WORLD")
The
__all__attribute exports thespokeclass, followed by the first lines of its definition including definitions of attributes previously mentioned in GUI Add-on basic features. These attribute values are referencing widgets defined in thecom_example_hello_world/gui/spokes/hello.gladefile. Two other notable attributes are present:-
category, which has its value imported from theHelloWorldCategoryclass from thecom_example_hello_world.gui.categoriesmodule. TheHelloWorldCategorythat the path to add-ons is insys.pathso that values can be imported from thecom_example_hello_worldpackage. Thecategoryattribute is part of theN_ functionname, which marks the string for translation; but returns the non-translated version of the string, as the translation happens in a later stage. title, which contains one underscore in its definition. Thetitleattribute underscore marks the beginning of the title itself and makes the spoke reachable by using theAlt+Hkeyboard shortcut.What usually follows the header of the class definition and the class
attributesdefinitions is the constructor that initializes an instance of the class. In case of the Anaconda graphical interface objects, there are two methods initializing a new instance: the__init__method and theinitializemethod.The reason behind two such functions is that the GUI objects may be created in memory at one time and fully initialized at a different time, as the
spokeinitialization could be time consuming. Therefore, the__init__method should only call the parent’s__init__method and, for example, initialize non-GUI attributes. On the other hand, theinitializemethod that is called when the installer’s graphical user interface initializes should finish the full initialization of the spoke.In the
Hello World add-onexample, define these two methods as follows. Note the number and description of the arguments passed to the__init__method. For example:def __init__(self, data, storage, payload): """ :see: pyanaconda.ui.common.Spoke.init :param data: data object passed to every spoke to load/store data from/to it :type data: pykickstart.base.BaseHandler :param storage: object storing storage-related information (disks, partitioning, boot loader, etc.) :type storage: blivet.Blivet :param payload: object storing packaging-related information :type payload: pyanaconda.packaging.Payload """ NormalSpoke.init(self, data, storage, payload) self._hello_world_module = HELLO_WORLD.get_proxy() def initialize(self): """ The initialize method that is called after the instance is created. The difference between init and this method is that this may take a long time and thus could be called in a separate thread. :see: pyanaconda.ui.common.UIObject.initialize """ NormalSpoke.initialize(self) self._entry = self.builder.get_object("textLines") self._reverse = self.builder.get_object("reverseCheckButton")
The data parameter passed to the
__init__method is the in-memory tree-like representation of the Kickstart file where all data is stored. In one of the ancestors'__init__methods it is stored in theself.dataattribute, which allows all other methods in the class to read and modify the structure.NoteThe
storage objectis no longer usable as of RHEL10. If your add-on needs to interact with storage configuration, use theStorage DBusmodule.Because the HelloWorldData class has already been defined in The Hello World addon example, there already is a subtree in self.data for this add-on. Its root, an instance of the class, is available as
self.data.addons.com_example_hello_world.Another action that an ancestor’s
__init__does is initializing an instance of the GtkBuilder with thespoke’s .gladefile and storing it asself.builder. Theinitializemethod uses this to get theGtkTextEntryused to show and modify the text from the Kickstart file’s %addon section.The
__init__andinitializemethods are both important when the spoke is created. However, the main role of the spoke is to be visited by a user who wants to change or review the spoke’s values it shows and sets. To enable this, three other methods are available:-
refresh- called when the spoke is about to be visited; this method refreshes the state of the spoke, mainly its UI elements, to ensure that the displayed data matches internal data structures and, with that, to ensure that current values stored in the self.data structure are displayed. -
apply- called when the spoke is left and used to store values from UI elements back into theself.datastructure. execute- called when users leave the spoke and used to perform any runtime changes based on the new state of the spoke.These functions are implemented in the sample Hello World add-on in the following way:
def refresh(self): """ The refresh method that is called every time the spoke is displayed. It should update the UI elements according to the contents of internal data structures. :see: pyanaconda.ui.common.UIObject.refresh """ lines = self._hello_world_module.Lines self._entry.get_buffer().set_text("".join(lines)) reverse = self._hello_world_module.Reverse self._reverse.set_active(reverse) def apply(self): """ The apply method that is called when user leaves the spoke. It should update the D-Bus service with values set in the GUI elements. """ buf = self._entry.get_buffer() text = buf.get_text(buf.get_start_iter(), buf.get_end_iter(), True) lines = text.splitlines(True) self._hello_world_module.SetLines(lines) self._hello_world_module.SetReverse(self._reverse.get_active()) def execute(self): """ The execute method that is called when the spoke is exited. It is supposed to do all changes to the runtime environment according to the values set in the GUI elements. """ # nothing to do here passYou can use several additional methods to control the spoke’s state:
-
ready- determines whether the spoke is ready to be visited; if the value is "False", thespokeis not accessible, for example, thePackage Selectionspoke before a package source is configured. -
completed- determines if the spoke has been completed. mandatory- determines if the spoke is mandatory or not, for example, theInstallation Destinationspoke, which must always be visited, even if you want to use automatic partitioning.All of these attributes need to be dynamically determined based on the current state of the installation process. Here is a sample implementation of these methods in the Hello World add-on, which requires a certain value to be set in the text attribute of the
HelloWorldDataclass:@property def ready(self): """ Theready propertyreports whether the spoke is ready, that is, can be visited or not. The spoke is made (in)sensitive based on the returned value of the ready property. :rtype: bool """ # this spoke is always ready return True @property def mandatory(self): """ The mandatory property that tells whether the spoke is mandatory to be completed to continue in the installation process. :rtype: bool """ # this is an optional spoke that is not mandatory to be completed return FalseAfter these properties are defined, the spoke can control its accessibility and completeness, but it cannot provide a summary of the values configured within - you must visit the spoke to see how it is configured. For this reason, an additional property called
statusexists. This property contains a single line of text with a short summary of configured values, which can then be displayed in the hub under the spoke title.The status property is defined in the
Hello Worldexample add-on as follows:@property def status(self): """ The status property that is a brief string describing the state of the spoke. It should describe whether all values are set and if possible also the values themselves. The returned value will appear on the hub beneath the spoke's title. :rtype: str """ lines = self._hello_world_module.Lines if not lines: return _("No text added") elif self._hello_world_module.Reverse: return _("Text set with {} lines to reverse").format(len(lines)) else: return _("Text set with {} lines").format(len(lines))After defining all properties described in the examples, the add-on has full support for showing a graphical user interface (GUI) as well as Kickstart.
NoteThe example demonstrated here is very simple and does not contain any controls; knowledge of Python Gtk programming is required to develop a functional, interactive spoke in the GUI.
One notable restriction is that each spoke must have its own main window - an instance of the
SpokeWindowwidget. This widget, along with other widgets specific to Anaconda, is found in theanaconda-widgetspackage. You can find other files required for development of add-ons with GUI support, such asGladedefinitions, in theanaconda-widgets-develpackage.Once your graphical interface support module contains all necessary methods you can continue with the following section to add support for the text-based user interface.
5.11. Add-on GUI advanced features
The pyanaconda package contains several helper and utility functions, as well as constructs which may be used by hubs and spokes. Most of them are located in the pyanaconda.ui.gui.utils package.
The sample Hello World add-on demonstrates usage of the englightbox content manager which Anaconda also uses. This content manager can put a window into a lightbox to increase its visibility and focus it to prevent users interacting with the underlying window. To demonstrate this function, the sample add-on contains a button which opens a new dialog window; the dialog itself is a special HelloWorldDialog inheriting from the GUIObject class, which is defined in pyanaconda.ui.gui.init.
The dialog class defines the run method that runs and destroys an internal Gtk dialog accessible through the self.window attribute, which is populated by using a mainWidgetName class attribute with the same meaning. Therefore, the code defining the dialog is very simple, as demonstrated in the following example:
Example 5.3. Defining a enlightbox dialog
        # every GUIObject gets ksdata in init
        dialog = HelloWorldDialog(self.data)

        # show dialog above the lightbox
        with self.main_window.enlightbox(dialog.window):
            dialog.run()
The Defining an englightbox Dialog example code creates an instance of the dialog and then uses the enlightbox context manager to run the dialog within a lightbox. The context manager has a reference to the window of the spoke and only needs the dialog’s window to instantiate the lightbox for the dialog.
5.12. TUI Add-on basic features
Anaconda also supports a text-based interface (TUI). This interface is more limited in its capabilities, but on some systems it might be the only choice for an interactive installation.
To add support for the text interface into your add-on, create a new set of subpackages under the tui directory as described in Anaconda add-on structure.
The text mode support in the installer is based on the simpleline library, which only allows very simple user interaction. The text mode interface:
- Does not support cursor movement - instead, it acts like a line printer.
- Does not support any visual enhancements, such as using different colors or fonts, for example.
Internally, the simpleline toolkit has three main classes: App, UIScreen and Widget. Widgets are units containing information to be printed on the screen. They are placed on UIScreens that are switched by a single instance of the App class. On top of the basic elements, hubs, spokes and dialogs all contain various widgets in a way similar to the graphical interface.
The most important classes for an add-on are NormalTUISpoke and various other classes defined in the pyanaconda.ui.tui.spokes package. All those classes are based on the TUIObject class, which itself is an equivalent of the GUIObject class. Each TUI spoke is a Python class inheriting from the NormalTUISpoke class, overriding special arguments and methods defined by the API. Because the text interface is simpler than the GUI, there are only two such arguments:
-
title- determines the title of the spoke, similar to the title argument in the GUI. -
category- determines the category of the spoke as a string; the category name is not displayed anywhere, it is only used for grouping.
The TUI handles categories differently than the GUI. Assign a pre-existing category to your new spoke. Creating a new category would require patching Anaconda, and brings little benefit.
Each spoke is also expected to override several methods, namely init, initialize, refresh, apply, execute, input, prompt, and properties (ready, completed, mandatory, and status).
5.13. Defining a simple TUI Spoke
You can implement a simple Text User Interface (TUI) spoke by defining a class inherited from the NormalTUISpoke class.
Prerequisites
- You have created a new set of subpackages under the tui directory as described in Anaconda add-on structure.
Procedure
Create modules with all required definitions to add support for the add-on text user interface (TUI), according to the following examples:
class HelloWorldSpoke(NormalTUISpoke): # category this spoke belongs to category = HelloWorldCategory def init(self, *args, kwargs): """ Create the representation of the spoke. :see: simpleline.render.screen.UIScreen """ super().init(*args, kwargs) self.title = N_("Hello World") self._hello_world_module = HELLO_WORLD.get_proxy() self._container = None self._reverse = False self._lines = "" def initialize(self): """ The initialize method that is called after the instance is created. The difference between init and this method is that this may take a long time and thus could be called in a separate thread. :see: pyanaconda.ui.common.UIObject.initialize """ # nothing to do here super().initialize() def setup(self, args=None): """ The setup method that is called right before the spoke is entered. It should update its state according to the contents of DBus modules. :see: simpleline.render.screen.UIScreen.setup """ super().setup(args) self._reverse = self._hello_world_module.Reverse self._lines = self._hello_world_module.Lines return True def refresh(self, args=None): """ The refresh method that is called every time the spoke is displayed. It should generate the UI elements according to its state. :see: pyanaconda.ui.common.UIObject.refresh :see: simpleline.render.screen.UIScreen.refresh """ super().refresh(args) self._container = ListColumnContainer( columns=1 ) self._container.add( CheckboxWidget( title="Reverse", completed=self._reverse ), callback=self._change_reverse ) self._container.add( EntryWidget( title="Hello world text", value="".join(self._lines) ), callback=self._change_lines ) self.window.add_with_separator(self._container) def _change_reverse(self, data): """ Callback when user wants to switch checkbox. Flip state of the "reverse" parameter which is boolean. """ self._reverse = not self._reverse def _change_lines(self, data): """ Callback when user wants to input new lines. Show a dialog and save the provided lines. """ dialog = Dialog("Lines") result = dialog.run() self._lines = result.splitlines(True) def input(self, args, key): """ The input method that is called by the main loop on user's input. * If the input should not be handled here, return it. * If the input is invalid, return InputState.DISCARDED. * If the input is handled and the current screen should be refreshed, return InputState.PROCESSED_AND_REDRAW. * If the input is handled and the current screen should be closed, return InputState.PROCESSED_AND_CLOSE. :see: simpleline.render.screen.UIScreen.input """ if self._container.process_user_input(key): return InputState.PROCESSED_AND_REDRAW if key.lower() == Prompt.CONTINUE: self.apply() self.execute() return InputState.PROCESSED_AND_CLOSE return super().input(args, key) def apply(self): """ The apply method is not called automatically for TUI. It should be called in input() if required. It should update the contents of internal data structures with values set in the spoke. """ self._hello_world_module.SetReverse(self._reverse) self._hello_world_module.SetLines(self._lines) def execute(self): """ The execute method is not called automatically for TUI. It should be called in input() if required. It is supposed to do all changes to the runtime environment according to the values set in the spoke. """ # nothing to do here passFor more details and latest code, see the Content from github.com is not included.Hello World Anaconda Addon - GitHub Repository.
NoteIt is not necessary to override the
initmethod if it only calls the ancestor’sinit, but the comments in the example describe the arguments passed to constructors of spoke classes in an understandable way.In the preceding example:
-
The
setupmethod configures a default value for the internal attribute of the spoke on every entry, which is then displayed by therefreshmethod, updated by theinputmethod and used by theapplymethod to update internal data structures. -
The
executemethod has the same purpose as the equivalent method in the GUI; in this case, the method has no effect. -
The
inputmethod is specific to the text interface; there are no equivalents in Kickstart or GUI. Theinputmethods are responsible for user interaction. -
The
inputmethod processes the entered string and takes action depending on its type and value. The preceding example asks for any value and then stores it as an internal attribute (key). In more complex add-ons, you typically need to perform some non-trivial actions, such as parse letters as actions, convert numbers into integers, show additional screens or toggle boolean values. The
returnvalue of the input class must be either theInputStateenum or theinputstring itself, in case this input should be processed by a different screen. In contrast to the graphical mode, theapplyandexecutemethods are not called automatically when leaving the spoke; they must be called explicitly from the input method. The same applies to closing (hiding) the spoke’s screen: it must be called explicitly from theclosemethod.To show another screen, for example if you need additional information that was entered in a different spoke, you can instantiate another
TUIObjectand useScreenHandler.push_screen_modal()to show it.Due to restrictions of the text-based interface, TUI spokes tend to have a very similar structure, that consists of a list of checkboxes or entries that should be checked or unchecked and populated by the user.
5.14. Using NormalTUISpoke to define a text interface spoke
The Defining a Simple TUI Spoke example showed a way to implement a TUI spoke where its methods handle printing and processing the available and provided data.
However, there is a different way to accomplish this by using the NormalTUISpoke class from the pyanaconda.ui.tui.spokes package. By inheriting this class, you can implement a typical TUI spoke by only specifying fields and attributes that should be set in it. The following example demonstrates this:
Prerequisites
-
You have added a new set of subpackages under the
TUIdirectory, as described in Anaconda add-on structure.
Procedure
Create modules with all required definitions to add support for the Add-on text user interface (TUI), according to the following examples.
class HelloWorldEditSpoke(NormalTUISpoke): """Example class demonstrating usage of editing in TUI""" category = HelloWorldCategory def init(self, data, storage, payload): """ :see: simpleline.render.screen.UIScreen :param data: data object passed to every spoke to load/store data from/to it :type data: pykickstart.base.BaseHandler :param storage: object storing storage-related information (disks, partitioning, boot loader, etc.) :type storage: blivet.Blivet :param payload: object storing packaging-related information :type payload: pyanaconda.packaging.Payload """ super().init(self, *args, **kwargs) self.title = N_("Hello World Edit") self._container = None # values for user to set self._checked = False self._unconditional_input = "" self._conditional_input = "" def refresh(self, args=None): """ The refresh method that is called every time the spoke is displayed. It should update the UI elements according to the contents of self.data. :see: pyanaconda.ui.common.UIObject.refresh :see: simpleline.render.screen.UIScreen.refresh :param args: optional argument that may be used when the screen is scheduled :type args: anything """ super().refresh(args) self._container = ListColumnContainer(columns=1) # add ListColumnContainer to window (main window container) # this will automatically add numbering and will call callbacks when required self.window.add(self._container) self._container.add(CheckboxWidget(title="Simple checkbox", completed=self._checked), callback=self._checkbox_called) self._container.add(EntryWidget(title="Unconditional text input", value=self._unconditional_input), callback=self._get_unconditional_input) # show conditional input only if the checkbox is checked if self._checked: self._container.add(EntryWidget(title="Conditional password input", value="Password set" if self._conditional_input else ""), callback=self._get_conditional_input) self.window.add_with_separator(self._container) def _checkbox_called(self, data): # pylint: disable=unused-argument """Callback when user wants to switch checkbox. :param data: can be passed when adding callback in container (not used here) :type data: anything """ self._checked = not self._checked def _get_unconditional_input(self, data): # pylint: disable=unused-argument """Callback when the user wants to set unconditional input. :param data: can be passed when adding callback in container (not used here) :type data: anything """ dialog = Dialog( "Unconditional input", conditions=[self._check_user_input] ) self._unconditional_input = dialog.run() def _get_conditional_input(self, data): # pylint: disable=unused-argument """Callback when the user wants to set conditional input. :param data: can be passed when adding callback in container (not used here) :type data: anything """ dialog = PasswordDialog( "Unconditional password input", policy_name=PASSWORD_POLICY_ROOT ) self._conditional_input = dialog.run() def _check_user_input(self, user_input, report_func): """Check if the user has written a valid value. :param user_input: user input for validation :type user_input: str :param report_func: function for reporting errors on user input :type report_func: func with one param """ if re.match(r'^\w+$', user_input): return True else: report_func("You must set at least one word") return False def input(self, args, key): """ The input method that is called by the main loop on user's input. :param args: optional argument that may be used when the screen is scheduled :type args: anything :param key: user's input :type key: unicode :return: if the input should not be handled here, return it, otherwise return InputState.PROCESSED or InputState.DISCARDED if the input was processed successfully or not respectively :rtype: enum InputState """ if self._container.process_user_input(key): return InputState.PROCESSED_AND_REDRAW else: return super().input(args, key) @property def completed(self): # completed if user entered something non-empty to the Conditioned input return bool(self._conditional_input) @property def status(self): return "Hidden input %s" % ("entered" if self._conditional_input else "not entered") def apply(self): # nothing needed here, values are set in the self.args tree passFor more details and latest code, see the Content from github.com is not included.Hello World NormalTUISpoke - GitHub Repository.
5.15. Deploying and testing an Anaconda add-on
You can deploy and test your own Anaconda add-on into the installation environment. To do so, follow the steps:
Prerequisites
- You created an Add-on.
-
You have access to your
D-Busfiles. -
You have installed the
loraxpackage.
Procedure
-
Create a directory
DIRat the place of your preference. -
Add the
Add-onpython files intoDIR/usr/share/anaconda/addons/. -
Copy your
D-Busservice file intoDIR/usr/share/anaconda/dbus/services/. -
Copy your
D-Busservice configuration file to/usr/share/anaconda/dbus/confs/. Create the updates image.
Access the
DIRdirectory:cd DIRLocate the updates image.
find . | cpio -c -o | pigz -9cv > DIR/updates.img
Use the mkksiso utility to include the
updatesimage into the ISO boot image:sudo mkksiso -u updates.img boot.iso new_boot.isoBoot the resulting new_boot.iso.
It automatically applies the embedded updates image with the addon, resulting in your addon being used during installation.
For specific instructions on unpacking an existing boot image, creating a
product.imgfile and repackaging the image, see Extracting Red Hat Enterprise Linux boot images.
Chapter 6. Completing post customization tasks
To complete the customizations made, perform the following tasks:
- Create a product.img image file (applies only for graphical customizations).
- Create a custom boot image.
This section provides information about how to create a product.img image file and to create a custom boot image.
6.1. Creating a product.img file
A product.img image file is an archive containing new installer files that replace the existing ones at runtime.
During a system boot, Anaconda loads the product.img file from the images/ directory on the boot media. It then uses the files that are present in this directory to replace identically named files in the installer’s file system. The replaced files customize the installer, for example by replacing default images with custom ones.
The product.img image must contain a directory structure identical to the installer. For more information about the installer directory structure, see the following table:
Table 6.1. Installer directory structure and custom contents
| Type of custom content | File system location |
|---|---|
| Pixmaps (logo, sidebar, top bar, and so on.) |
|
| GUI stylesheet |
|
| Anaconda add-ons |
|
| Profile configuration files |
|
| Custom configuration files |
|
| Anaconda DBus service conf files |
|
| Anaconda DBus service files |
|
Procedure
Navigate to a working directory such as
/tmp, and create a subdirectory namedproduct/:$cd /tmpCreate a subdirectory product/
$mkdir product/Create a directory structure identical to the location of the file you want to replace. For example, if you want to test an add-on that is present in the
/usr/share/anaconda/addonsdirectory on the installation system, create the same structure in your working directory:$mkdir -p product/usr/share/anaconda/addonsNoteTo view the installer’s runtime filesystem, boot the installation and switch to virtual console 1 (Ctrl+Alt+F1) and then switch to the second tmux window (Ctrl+b+2). A shell prompt that can be used to browse a file system opens.
Place your customized files (in this example, custom add-on for Anaconda) into the newly created directory:
$ cp -r ~/path/to/custom/addon/ product/usr/share/anaconda/addons/- Repeat steps 3 and 4 (create a directory structure and place the custom files into it) for every file you want to add to the installer.
Create a
.buildstampfile in the root of the directory. The.buildstampfile describes the system version, the product and several other parameters. The following is an example of a.buildstampfile from Red Hat Enterprise Linux 8.4:[Main] Product=Red Hat Enterprise Linux Version=8.4 BugURL=https://bugzilla.redhat.com/ IsFinal=True UUID=202007011344.x86_64 [Compose] Lorax=28.14.49-1
The
IsFinalparameter specifies whether the image is for a release (GA) version of the product (True), or a pre-release such as Alpha, Beta, or an internal milestone (False).Navigate to the
product/directory, and create theproduct.imgarchive:$cd product$find . | cpio -c -o | gzip -9cv > ../product.imgThis creates a
product.imgfile one level above theproduct/directory.Move the
product.imgfile to theimages/directory of the extracted ISO image.The
product.imgfile is now created and the customizations that you want to make are placed in the respective directories.NoteInstead of adding the
product.imgfile on the boot media, you can place this file into a different location and use theinst.updates=boot option at the boot menu to load it. In that case, the image file can have any name, and it can be placed in any location (USB flash drive, hard disk, HTTP, FTP or NFS server), as long as this location is reachable from the installation system.
6.2. Creating custom boot images
After you customize the boot images and the GUI layout, create a new image that includes the changes you made. This helps you to test the changes you made in the installation environment.
Procedure
-
Ensure that all of your changes are included in the working directory. For example, if you are testing an add-on, ensure that you place the
product.imgin theimages/directory. -
Ensure that your current working directory is the top-level directory of the extracted ISO image, for example,
/tmp/ISO/iso/. Install the following packages:
isomd5sum,xorriso,lorax:# dnf install isomd5sum xorriso loraxCreate an EFI boot image by using
mkefiboot:# mkefiboot --label=ANACONDA /tmp/ISO/iso/EFI/BOOT/ /tmp/ISO/iso/images/efiboot.imgCreate a new ISO image by using the
xorrisofs:# xorrisofs -o ../NEWISO.iso -R -J -V RHEL-10-0-BaseOS-x86_64 --grub2-mbr /usr/lib/grub/i386-pc/boot_hybrid.img -partition_offset 16 -appended_part_as_gpt -append_partition 2 C12A7328-F81F-11D2-BA4B-00A0C93EC93B /tmp/ISO/iso/images/efiboot.img -iso_mbr_part_type EBD0A0A2-B9E5-4433-87C0-68B6B72699C7 -c boot.cat --boot-catalog-hide -b images/eltorito.img -no-emul-boot -boot-load-size 4 -boot-info-table --grub2-boot-info -eltorito-alt-boot -e --interval:appended_partition_2:all:: -no-emul-boot -graft-points .discinfo=/tmp/ISO/iso/.discinfo images/install.img=/tmp/ISO/iso/images/install.img images/pxeboot=/tmp/ISO/iso/images/pxeboot boot/grub2=/tmp/ISO/iso/boot/grub2 boot/grub2/i386-pc=/usr/lib/grub/i386-pc images/eltorito.img=/tmp/ISO/iso/images/eltorito.img EFI/BOOT=/tmp/ISO/iso/EFI/BOOT
In the preceding example:
Ensure the value for the
-Voption matches the image’s boot loader configuration, if you are using theLABEL=directive for options that require a location to load a file on the same disk. If your boot loader configuration (boot/grub2/grub.cfgfor BIOS andEFI/BOOT/grub.cfgfor UEFI) uses theinst.stage2=LABEL=disk_labelstanza to load the second stage of the installer from the same disk, then the disk labels must match.ImportantIn boot loader configuration files, replace all spaces in disk labels with
\x20. For example, if you create an ISO image with aRHEL 10.0label, boot loader configuration should useRHEL\x2010.0.-
Replace the value of the
-ooption (-o ../NEWISO.iso) with the file name of your new image. The value in the example creates theNEWISO.isofile in the directory above the current one. For more information about this command, see thexorrisofs(1)man page on your system.
Implant an MD5 checksum into the image. Note that without an MD5 checksum, the image verification check might fail (the
rd.live.checkoption in the boot loader configuration) and the installation can hang.#implantisomd5 ../NEWISO.isoIn the preceding example, replace ../NEWISO.iso with the file name and the location of the ISO image that you have created in the previous step.
You can now write the new ISO image to physical media or a network server to boot it on physical hardware, or you can use it to start installing a virtual machine.
Additional resources