Managing replication in Identity Management
Preparing and verifying replication environments
Abstract
Providing feedback on Red Hat documentation
We are committed to providing high-quality documentation and value your feedback. To help us improve, you can submit suggestions or report errors through the Red Hat Jira tracking system.
Procedure
Log in to the Content from redhat.atlassian.net is not included.Jira website.
If you do not have an account, select the option to create one.
- Click Create in the top navigation bar.
- Enter a descriptive title in the Summary field.
- Enter your suggestion for improvement in the Description field. Include links to the relevant parts of the documentation.
- Click Create at the bottom of the window.
Chapter 1. Managing replication topology
To ensure continuous service availability and data consistency across your IdM domain, configure replication agreements between servers so that data automatically synchronizes, preventing service interruptions when individual servers fail.
When you create a replica, Identity Management (IdM) creates a replication agreement between the initial server and the replica. The data that is replicated is then stored in topology suffixes and when two replicas have a replication agreement between their suffixes, the suffixes form a topology segment. This chapter describes how to actively manage replication between servers in an IdM domain.
1.1. Additional resources
1.2. Replication agreements between IdM replicas
Learn how IdM creates bilateral replication agreements between servers to synchronize identity and certificate data, ensuring data redundancy and preventing service disruptions across your domain.
When an administrator creates a replica based on an existing server, Identity Management (IdM) creates a replication agreement between the initial server and the replica. The replication agreement ensures that the data and configuration is continuously replicated between the two servers.
IdM uses multiple read/write replica replication. In this configuration, all replicas joined in a replication agreement receive and provide updates, and are therefore considered suppliers and consumers. Replication agreements are always bilateral.
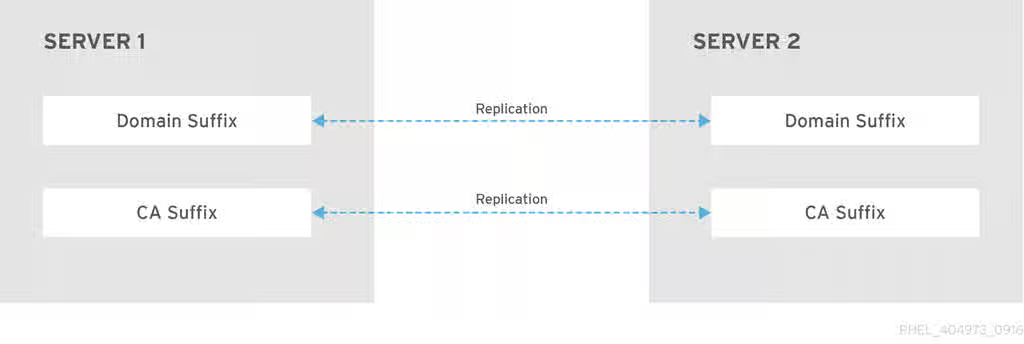
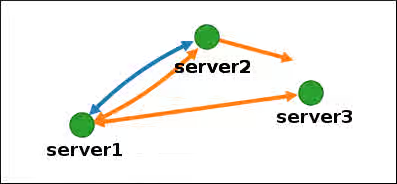
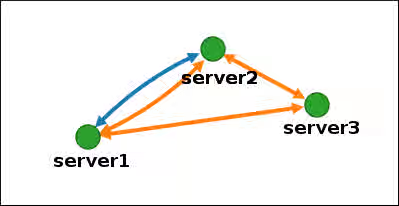
Figure 1.1. Server and replica agreements

IdM uses two types of replication agreements:
- Domain replication agreements replicate the identity information.
- Certificate replication agreements replicate the certificate information.
Both replication channels are independent. Two servers can have one or both types of replication agreements configured between them. For example, when server A and server B have only domain replication agreement configured, only identity information is replicated between them, not the certificate information.
1.3. Topology suffixes
Learn how IdM organizes replicated data into domain and certificate authority suffixes to enable targeted replication between servers, ensuring efficient data synchronization for different types of directory information.
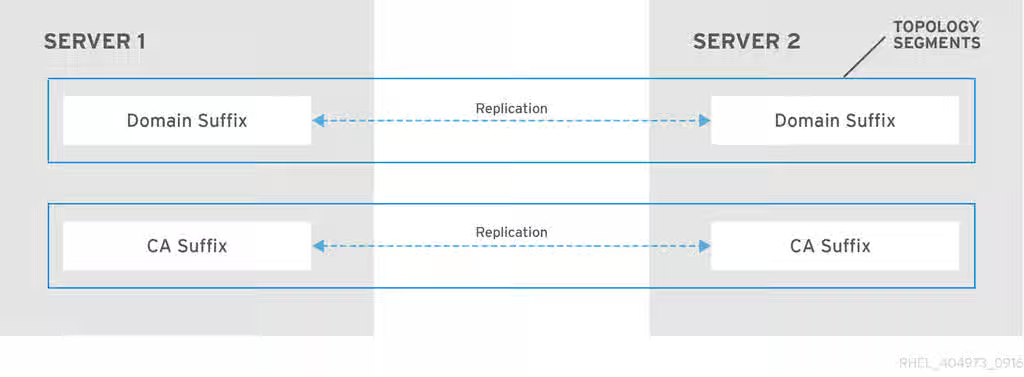
Topology suffixes store the data that is replicated. IdM supports two types of topology suffixes: domain and ca. Each suffix represents a separate server, a separate replication topology.
When a replication agreement is configured, it joins two topology suffixes of the same type on two different servers.
- The
domainsuffix: dc=example,dc=com The
domainsuffix contains all domain-related data.When two replicas have a replication agreement between their
domainsuffixes, they share directory data, such as users, groups, and policies.- The
casuffix: o=ipaca The
casuffix contains data for the Certificate System component. It is only present on servers with a certificate authority (CA) installed.When two replicas have a replication agreement between their
casuffixes, they share certificate data.
Figure 1.2. Topology suffixes
An initial topology replication agreement is set up between two servers by the ipa-replica-install script when installing a new replica.
1.4. Topology segments
Understand how topology segments represent bidirectional replication agreements between two IdM servers, ensuring data flows in both directions to maintain synchronization across your infrastructure.
When two replicas have a replication agreement between their suffixes, the suffixes form a topology segment. Each topology segment consists of a left node and a right node. The nodes represent the servers joined in the replication agreement.
Topology segments in IdM are always bidirectional. Each segment represents two replication agreements: from server A to server B, and from server B to server A. The data is therefore replicated in both directions.
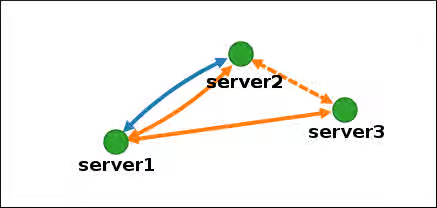
Figure 1.3. Topology segments
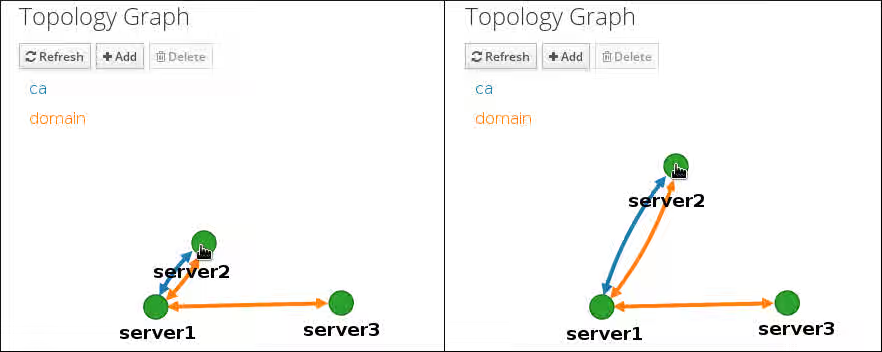
1.5. Viewing and modifying the visual representation of the replication topology using the WebUI
Visualize your replication topology through an interactive graph to identify potential issues like single points of failure and ensure your servers maintain proper connectivity for data redundancy.
Using the Web UI, you can view, manipulate, and transform the representation of the replication topology. The topology graph in the web UI shows the relationships between the servers in the domain. You can move individual topology nodes by using drag-and-drop.
The examples below illustrate different types of topology graphs.
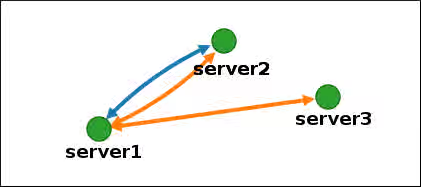
Servers joined in a domain replication agreement are connected by an orange arrow. Servers joined in a CA replication agreement are connected by a blue arrow.
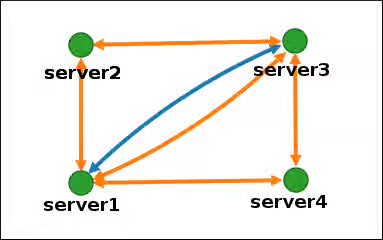
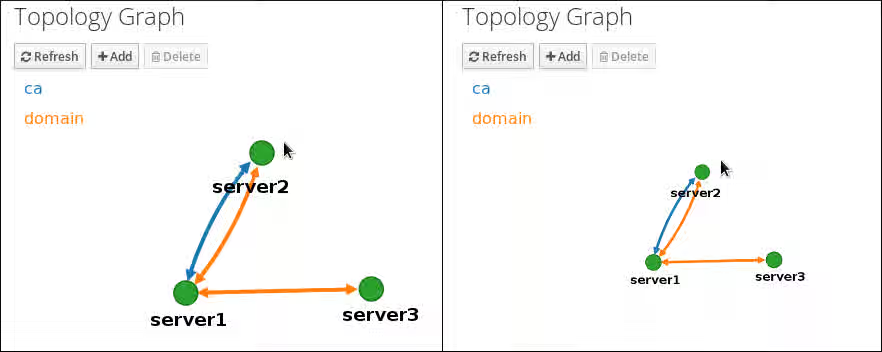
- Topology graph example: recommended topology
- The recommended topology example below shows one of the possible recommended topologies for four servers: each server is connected to at least two other servers, and more than one server is a CA server.
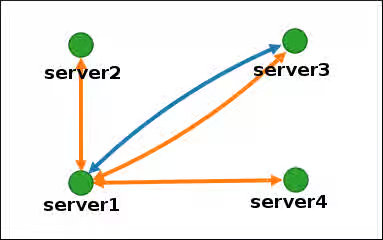
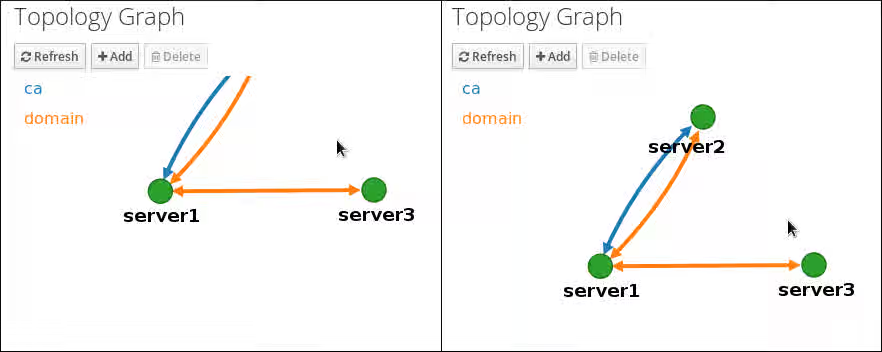
- Topology graph example: discouraged topology
In the discouraged topology example below,
server1is a single point of failure. All the other servers have replication agreements with this server, but not with any of the other servers. Therefore, ifserver1fails, all the other servers will become isolated.Avoid creating topologies like this.
Prerequisites
- You are logged in as an IdM administrator.
Procedure
- Select → → .
Make changes to the topology:
You can move the topology graph nodes by using drag-and-drop:
You can zoom in and zoom out the topology graph using the mouse wheel:
You can move the canvas of the topology graph by holding the left mouse button:
- If you make any changes to the topology that are not immediately reflected in the graph, click .
1.6. Viewing topology suffixes using the CLI
In a replication agreement, topology suffixes store the data that is replicated. Use the CLI to display the topology suffixes in your IdM deployment to ensure proper configuration of domain and certificate data synchronization.
Procedure
Enter the
ipa topologysuffix-findcommand to display a list of topology suffixes:$ ipa topologysuffix-find --------------------------- 2 topology suffixes matched --------------------------- Suffix name: ca Managed LDAP suffix DN: o=ipaca Suffix name: domain Managed LDAP suffix DN: dc=example,dc=com ---------------------------- Number of entries returned 2 ----------------------------
Additional resources
1.7. Viewing topology segments using the CLI
In a replication agreement, when two replicas have a replication agreement between their suffixes, the suffixes form a topology segments. Use the CLI to list topology segments to verify proper connectivity and understand which servers are sharing data, helping you maintain a resilient topology.
Procedure
Enter the
ipa topologysegment-findcommand to show the current topology segments configured for the domain or CA suffixes. For example, for the domain suffix:$ ipa topologysegment-find Suffix name: domain ----------------- 1 segment matched ----------------- Segment name: server1.example.com-to-server2.example.com Left node: server1.example.com Right node: server2.example.com Connectivity: both ---------------------------- Number of entries returned 1 ----------------------------
In this example, domain-related data is only replicated between two servers:
server1.example.comandserver2.example.com.Optional: To display details for a particular segment only, enter the
ipa topologysegment-showcommand:$ ipa topologysegment-show Suffix name: domain Segment name: server1.example.com-to-server2.example.com Segment name: server1.example.com-to-server2.example.com Left node: server1.example.com Right node: server2.example.com Connectivity: both
Additional resources
1.8. Setting up replication between two servers using the Web UI
Create replication agreements between specific IdM servers through the web interface to expand your domain topology, ensuring new servers automatically receive existing user and configuration data for consistent service delivery.
Using the Identity Management (IdM) Web UI, you can select two servers and create a new replication agreement between them.
Prerequisites
- You are logged in as an IdM administrator.
Procedure
In the topology graph, hover your mouse over one of the server nodes.
Domain or CA options

-
Click on the
domainor thecapart of the circle depending on what type of topology segment you want to create. A new arrow representing the new replication agreement appears under your mouse pointer. Move your mouse to the other server node, and click on it.
Creating a new segment
In the
Add topology segmentwindow, click to confirm the properties of the new segment.The new topology segment between the two servers joins them in a replication agreement. The topology graph now shows the updated replication topology:
New segment created
1.9. Stopping replication between two servers using the Web UI
Remove a replication agreement between two servers through the Identity Management (IdM) Web UI when reconfiguring your topology or decommissioning a server. The removal of the replication agreement stops data synchronization.
Prerequisites
- You are logged in as an IdM administrator.
Procedure
Click on an arrow representing the replication agreement you want to remove. This highlights the arrow.
Topology segment highlighted
- Click .
In the
Confirmationwindow, click .IdM removes the topology segment between the two servers, which deletes their replication agreement. The topology graph now shows the updated replication topology:
Topology segment deleted
1.10. Setting up replication between two servers using the CLI
Create replication agreements between specific IdM servers through the CLI to expand your domain topology, ensuring new servers automatically receive existing user and configuration data for consistent service delivery.
Use the ipa topologysegment-add command to create a new replication agreement between two replicas.
Prerequisites
- You have the IdM administrator credentials.
Procedure
Create a topology segment for the two servers. When prompted, provide:
-
The required topology suffix:
domainorca - The left node and the right node, representing the two servers
Optional: A custom name for the segment
For example:
$ ipa topologysegment-add
Suffix name: domain
Left node: server1.example.com
Right node: server2.example.com
Segment name [server1.example.com-to-server2.example.com]: new_segment
---------------------------
Added segment "new_segment"
---------------------------
  Segment name: new_segment
  Left node: server1.example.com
  Right node: server2.example.com
  Connectivity: both
Adding the new segment joins the servers in a replication agreement.
-
The required topology suffix:
Verification
Verify that the new segment is configured:
$ ipa topologysegment-show
Suffix name: domain
Segment name: new_segment
  Segment name: new_segment
  Left node: server1.example.com
  Right node: server2.example.com
  Connectivity: both
1.11. Stopping replication between two servers using the CLI
Remove a replication agreement between two servers when reconfiguring your topology or decommissioning a server. Stop data synchronization by using the ipa topology segment-del command.
Prerequisites
- You have the IdM administrator credentials.
Procedure
Optional: If you do not know the name of the specific replication segment that you want to remove, display all segments available. Use the
ipa topologysegment-findcommand. When prompted, provide the required topology suffix:domainorca. For example:$ ipa topologysegment-find Suffix name: domain ------------------ 8 segments matched ------------------ Segment name: new_segment Left node: server1.example.com Right node: server2.example.com Connectivity: both ... ---------------------------- Number of entries returned 8 ----------------------------
Locate the required segment in the output.
Remove the topology segment joining the two servers:
$ ipa topologysegment-del
Suffix name: domain
Segment name: new_segment
-----------------------------
Deleted segment "new_segment"
-----------------------------
Deleting the segment removes the replication agreement.
Verification
Verify that the segment is no longer listed:
$ ipa topologysegment-find
Suffix name: domain
------------------
7 segments matched
------------------
  Segment name: server2.example.com-to-server3.example.com
  Left node: server2.example.com
  Right node: server3.example.com
  Connectivity: both

...

----------------------------
Number of entries returned 7
----------------------------
1.12. Removing server from topology using the Web UI
Remove a server from the IdM topology through the Identity Management IdM Web UI when decommissioning infrastructure, while ensuring remaining servers maintain replication connectivity. This action does not uninstall the server components from the host.
Prerequisites
- You are logged in as an IdM administrator.
- The server you want to remove is not the only server connecting other servers with the rest of the topology; this would cause the other servers to become isolated, which is not allowed.
- The server you want to remove is not your last CA or DNS server.
Removing a server is an irreversible action. If you remove a server, the only way to introduce it back into the topology is to install a new replica on the machine.
Procedure
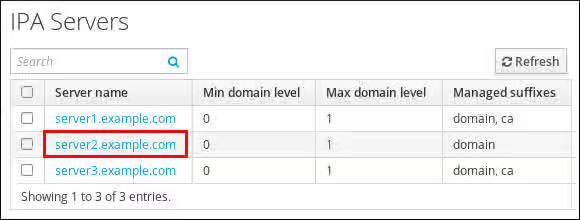
- Select → → .
Click on the name of the server you want to delete.
Selecting a server
- Click .
Additional resources
1.13. Removing server from topology using the CLI
Remove a server from the IdM topology through the Identity Management IdM CLI when decommissioning infrastructure, while ensuring remaining servers maintain replication connectivity. This action does not uninstall the server components from the host.
Prerequisites
- You have the IdM administrator credentials.
- The server you want to remove is not the only server connecting other servers with the rest of the topology; this would cause the other servers to become isolated, which is not allowed.
- The server you want to remove is not your last CA or DNS server.
Removing a server is an irreversible action. If you remove a server, the only way to introduce it back into the topology is to install a new replica on the machine.
Procedure
On
server2.example.com, run theipa server-delcommand to removeserver1.example.com. The command removes all topology segments pointing to the server:[user@server2 ~]$ ipa server-del Server name: server1.example.com Removing server1.example.com from replication topology, please wait... ---------------------------------------------------------- Deleted IPA server "server1.example.com" ----------------------------------------------------------
Optional: On
server1.example.com, run theipa server-install --uninstallcommand to uninstall the server components from the machine.[root@server1 ~]# ipa server-install --uninstall
1.14. Removing obsolete RUV records
Clean obsolete replica update vector (RUV) records from remaining servers when a replica was removed without properly deleting its replication agreements, restoring normal replication behavior.
If you remove a server from the IdM topology without properly removing its replication agreements, obsolete replica update vector (RUV) records will remain on one or more remaining servers in the topology. This can happen, for example, due to automation. These servers will then expect to receive updates from the now removed server. In this case, you need to clean the obsolete RUV records from the remaining servers.
Prerequisites
- You have the IdM administrator credentials.
- You know which replicas are corrupted or have been improperly removed.
Procedure
List the details about RUVs using the
ipa-replica-manage list-ruvcommand. The command displays the replica IDs:$ ipa-replica-manage list-ruv server1.example.com:389: 6 server2.example.com:389: 5 server3.example.com:389: 4 server4.example.com:389: 12
ImportantThe
ipa-replica-manage list-ruvcommand lists ALL replicas in the topology, not only the malfunctioning or improperly removed ones.Remove obsolete RUVs associated with a specified replica using the
ipa-replica-manage clean-ruvcommand. Repeat the command for every replica ID with obsolete RUVs. For example, if you knowserver1.example.comandserver2.example.comare the malfunctioning or improperly removed replicas:ipa-replica-manage clean-ruv 6 ipa-replica-manage clean-ruv 5
WarningProceed with extreme caution when using
ipa-replica-manage clean-ruv. Running the command against a valid replica ID will corrupt all the data associated with that replica in the replication database.If this happens, re-initialize the replica from another replica using
$ ipa-replica-manage re-initialize --from server1.example.com.
Verification
-
Run
ipa-replica-manage list-ruvagain. If the command no longer displays any corrupt RUVs, the records have been successfully cleaned. If the command still displays corrupt RUVs, clear them manually using this task:
dn: cn=clean replica_ID, cn=cleanallruv, cn=tasks, cn=config
objectclass: extensibleObject
replica-base-dn: dc=example,dc=com
replica-id: replica_ID
replica-force-cleaning: no
cn: clean replica_ID
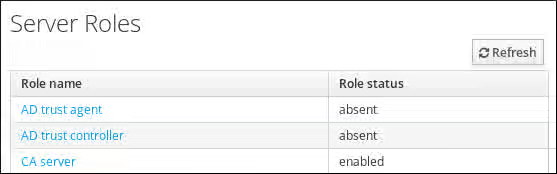
1.15. Viewing available server roles in the IdM topology using the IdM Web UI
Use the Identity Management (IdM) Web UI to identify which IdM servers perform CA, DNS, or Key Recovery Authority (KRA) server roles. Verify that services are properly distributed across your topology.
Procedure
For a complete list of the supported server roles, see → → .
Note-
Role status
absentmeans that no server in the topology is performing the role. -
Role status
enabledmeans that one or more servers in the topology are performing the role.
Server roles in the web UI
-
Role status
1.16. Viewing available server roles in the IdM topology using the IdM CLI
Use the Identity Management (IdM) CLI to identify which IdM servers perform CA, DNS, or Key Recovery Authority (KRA) server roles. Verify that services are properly distributed across your topology.
Procedure
To display all CA servers in the topology and the current CA renewal server:
$ ipa config-show
  ...
  IPA masters: server1.example.com, server2.example.com, server3.example.com
  IPA CA servers: server1.example.com, server2.example.com
  IPA CA renewal master: server1.example.com
Alternatively, to display a list of roles enabled on a particular server, for example server.example.com:
$ ipa server-show
Server name: server.example.com
  ...
  Enabled server roles: CA server, DNS server, KRA server
Alternatively, use the
ipa server-find --servrolecommand to search for all servers with a particular server role enabled. For example, to search for all CA servers:$ ipa server-find --servrole "CA server" --------------------- 2 IPA servers matched --------------------- Server name: server1.example.com ... Server name: server2.example.com ... ---------------------------- Number of entries returned 2 ----------------------------
1.17. Promoting a replica to a CA renewal server and CRL publisher server
Transfer the CA renewal server or CRL publisher role to another IdM CA server to redistribute certificate management responsibilities or prepare for server maintenance.
If your IdM deployment uses an embedded certificate authority (CA), one of the Identity Management (IdM) CA servers acts as the CA renewal server, a server that manages the renewal of CA subsystem certificates. One of the IdM CA servers also acts as the IdM CRL publisher server, a server that generates certificate revocation lists.
By default, the CA renewal server and CRL publisher server roles are installed on the first server on which the system administrator installed the CA role using the ipa-server-install or ipa-ca-install command. You can, however, transfer either of the two roles to any other IdM server on which the CA role is enabled.
Prerequisites
- You have the IdM administrator credentials.
Chapter 2. Using Ansible to manage the replication topology in IdM
Automate the management of IdM server replication using Ansible playbooks to maintain redundant server configurations, enabling quick recovery from server failures and ensuring uninterrupted domain services for your organization.
When you create a replica, Identity Management (IdM) creates a replication agreement between the initial server and the replica. The data that is replicated is then stored in topology suffixes and when two replicas have a replication agreement between their suffixes, the suffixes form a topology segment.
This topic describes how to use Ansible to manage replication between servers in an IdM domain actively, for example:
- How to configure other servers to keep providing services to the domain in case one server fails.
- How to recover the lost server by creating a new replica based on one of the remaining servers.
2.1. Using Ansible to ensure a replication agreement exists in IdM
Automate server-to-server data sharing to maintain redundancy and prevent service disruptions.
Data stored on an Identity Management (IdM) server is replicated based on replication agreements: when two servers have a replication agreement configured, they share their data. Replication agreements are always bilateral: the data is replicated from the first replica to the other one as well as from the other replica to the first one.
Follow this procedure to use an Ansible playbook to ensure that a replication agreement of the domain type exists between server.idm.example.com and replica.idm.example.com.
Prerequisites
- Ensure that you understand the recommendations for designing your IdM topology listed in Guidelines for connecting IdM replicas in a topology.
You have configured your Ansible control node to meet the following requirements:
- You are using Ansible version 2.15 or later.
-
You have installed the
ansible-freeipapackage. - The example assumes that in the ~/MyPlaybooks/ directory, you have created an Ansible inventory file with the fully-qualified domain name (FQDN) of the IdM server.
-
The example assumes that the secret.yml Ansible vault stores your
ipaadmin_passwordand that you have access to a file that stores the password protecting the secret.yml file.
-
The target node, that is the node on which the
freeipa.ansible_freeipamodule is executed, is part of the IdM domain as an IdM client, server or replica.
Procedure
Navigate to your ~/MyPlaybooks/ directory:
$ cd ~/MyPlaybooks/Copy the
add-topologysegment.ymlAnsible playbook file provided by theansible-freeipapackage:$ cp /usr/share/ansible/collections/ansible_collections/freeipa/ansible_freeipa/playbooks/topology/add-topologysegment.yml add-topologysegment-copy.yml-
Open the
add-topologysegment-copy.ymlfile for editing. Adapt the file by setting the following variables in the
ipatopologysegmenttask section:-
Indicate that the value of the
ipaadmin_passwordvariable is defined in the secret.yml Ansible vault file. -
Set the
suffixvariable to eitherdomainorca, depending on what type of segment you want to add. -
Set the
leftvariable to the name of the IdM server that you want to be the left node of the replication agreement. -
Set the
rightvariable to the name of the IdM server that you want to be the right node of the replication agreement. -
Ensure that the
statevariable is set topresent.
This is the modified Ansible playbook file for the current example:
--- - name: Playbook to handle topologysegment hosts: ipaserver vars_files: - /home/user_name/MyPlaybooks/secret.yml tasks: - name: Add topology segment ipatopologysegment: ipaadmin_password: "{{ ipaadmin_password }}" suffix: domain left: server.idm.example.com right: replica.idm.example.com state: present-
Indicate that the value of the
Save the file.
For details about variables and example playbooks in the FreeIPA Ansible collection, see the
/usr/share/ansible/collections/ansible_collections/freeipa/ansible_freeipa/README-topology.mdfile and the/usr/share/ansible/collections/ansible_collections/freeipa/ansible_freeipa/playbooks/topologydirectory on the control node.Run the Ansible playbook. Specify the playbook file, the file storing the password protecting the secret.yml file, and the inventory file:
$ ansible-playbook --vault-password-file=password_file -v -i inventory add-topologysegment-copy.yml
Additional resources
2.2. Using Ansible to ensure replication agreements exist between multiple IdM replicas
Automate the verification and establishment of data-sharing connections across your server infrastructure to maintain high availability.
Data stored on an Identity Management (IdM) server is replicated based on replication agreements: when two servers have a replication agreement configured, they share their data. Replication agreements are always bilateral: the data is replicated from the first replica to the other one as well as from the other replica to the first one.
Follow this procedure to ensure replication agreements exist between multiple pairs of replicas in IdM.
Prerequisites
- Ensure that you understand the recommendations for designing your IdM topology listed in Connecting the replicas in a topology.
You have configured your Ansible control node to meet the following requirements:
- You are using Ansible version 2.15 or later.
-
You have installed the
ansible-freeipapackage. - The example assumes that in the ~/MyPlaybooks/ directory, you have created an Ansible inventory file with the fully-qualified domain name (FQDN) of the IdM server.
-
The example assumes that the secret.yml Ansible vault stores your
ipaadmin_passwordand that you have access to a file that stores the password protecting the secret.yml file.
-
The target node, that is the node on which the
freeipa.ansible_freeipamodule is executed, is part of the IdM domain as an IdM client, server or replica.
Procedure
Navigate to your ~/MyPlaybooks/ directory:
$ cd ~/MyPlaybooks/Copy the
add-topologysegments.ymlAnsible playbook file provided by theansible-freeipapackage:$ cp /usr/share/ansible/collections/ansible_collections/freeipa/ansible_freeipa/playbooks/topology/add-topologysegments.yml add-topologysegments-copy.yml-
Open the
add-topologysegments-copy.ymlfile for editing. Adapt the file by setting the following variables in the
varssection:-
Indicate that the value of the
ipaadmin_passwordvariable is defined in the secret.yml Ansible vault file. For every topology segment, add a line in the
ipatopology_segmentssection and set the following variables:-
Set the
suffixvariable to eitherdomainorca, depending on what type of segment you want to add. -
Set the
leftvariable to the name of the IdM server that you want to be the left node of the replication agreement. -
Set the
rightvariable to the name of the IdM server that you want to be the right node of the replication agreement.
-
Set the
-
Indicate that the value of the
In the
taskssection of theadd-topologysegments-copy.ymlfile, ensure that thestatevariable is set topresent.This is the modified Ansible playbook file for the current example:
--- - name: Add topology segments hosts: ipaserver gather_facts: false vars: ipaadmin_password: "{{ ipaadmin_password }}" ipatopology_segments: - {suffix: domain, left: replica1.idm.example.com , right: replica2.idm.example.com } - {suffix: domain, left: replica2.idm.example.com , right: replica3.idm.example.com } - {suffix: domain, left: replica3.idm.example.com , right: replica4.idm.example.com } - {suffix: domain+ca, left: replica4.idm.example.com , right: replica1.idm.example.com } vars_files: - /home/user_name/MyPlaybooks/secret.yml tasks: - name: Add topology segment freeipa.ansible_freeipa.ipatopologysegment: ipaadmin_password: "{{ ipaadmin_password }}" suffix: "{{ item.suffix }}" name: "{{ item.name | default(omit) }}" left: "{{ item.left }}" right: "{{ item.right }}" state: present loop: "{{ ipatopology_segments | default([]) }}"Save the file.
For details about variables and example playbooks in the FreeIPA Ansible collection, see the
/usr/share/ansible/collections/ansible_collections/freeipa/ansible_freeipa/README-topology.mdfile and the/usr/share/ansible/collections/ansible_collections/freeipa/ansible_freeipa/playbooks/topologydirectory on the control node.Run the Ansible playbook. Specify the playbook file, the file storing the password protecting the secret.yml file, and the inventory file:
$ ansible-playbook --vault-password-file=password_file -v -i inventory add-topologysegments-copy.yml
Additional resources
2.3. Using Ansible to check if a replication agreement exists between two replicas
Verify that replication agreements exist between multiple pairs of replicas in IdM, maintaining high availability. In contrast to Using Ansible to ensure a replication agreement exists in IdM, this procedure does not modify the existing configuration.
Data stored on an Identity Management (IdM) server is replicated based on replication agreements: when two servers have a replication agreement configured, they share their data. Replication agreements are always bilateral: the data is replicated from the first replica to the other one as well as from the other replica to the first one.
Prerequisites
- Ensure that you understand the recommendations for designing your IdM topology listed in Connecting the replicas in a topology.
You have configured your Ansible control node to meet the following requirements:
- You are using Ansible version 2.15 or later.
-
You have installed the
ansible-freeipapackage. - The example assumes that in the ~/MyPlaybooks/ directory, you have created an Ansible inventory file with the fully-qualified domain name (FQDN) of the IdM server.
-
The example assumes that the secret.yml Ansible vault stores your
ipaadmin_passwordand that you have access to a file that stores the password protecting the secret.yml file.
-
The target node, that is the node on which the
freeipa.ansible_freeipamodule is executed, is part of the IdM domain as an IdM client, server or replica.
Procedure
Navigate to your ~/MyPlaybooks/ directory:
$ cd ~/MyPlaybooks/Copy the
check-topologysegments.ymlAnsible playbook file provided by theansible-freeipapackage:$ cp /usr/share/ansible/collections/ansible_collections/freeipa/ansible_freeipa/playbooks/topology/check-topologysegments.yml check-topologysegments-copy.yml-
Open the
check-topologysegments-copy.ymlfile for editing. Adapt the file by setting the following variables in the
varssection:-
Indicate that the value of the
ipaadmin_passwordvariable is defined in the secret.yml Ansible vault file. For every topology segment, add a line in the
ipatopology_segmentssection and set the following variables:-
Set the
suffixvariable to eitherdomainorca, depending on the type of segment you are adding. -
Set the
leftvariable to the name of the IdM server that you want to be the left node of the replication agreement. -
Set the
rightvariable to the name of the IdM server that you want to be the right node of the replication agreement.
-
Set the
-
Indicate that the value of the
In the
taskssection of thecheck-topologysegments-copy.ymlfile, ensure that thestatevariable is set topresent.This is the modified Ansible playbook file for the current example:
--- - name: Add topology segments hosts: ipaserver gather_facts: false vars: ipaadmin_password: "{{ ipaadmin_password }}" ipatopology_segments: - {suffix: domain, left: replica1.idm.example.com, right: replica2.idm.example.com } - {suffix: domain, left: replica2.idm.example.com , right: replica3.idm.example.com } - {suffix: domain, left: replica3.idm.example.com , right: replica4.idm.example.com } - {suffix: domain+ca, left: replica4.idm.example.com , right: replica1.idm.example.com } vars_files: - /home/user_name/MyPlaybooks/secret.yml tasks: - name: Check topology segment freeipa.ansible_freeipa.ipatopologysegment: ipaadmin_password: "{{ ipaadmin_password }}" suffix: "{{ item.suffix }}" name: "{{ item.name | default(omit) }}" left: "{{ item.left }}" right: "{{ item.right }}" state: checked loop: "{{ ipatopology_segments | default([]) }}"Save the file.
For details about variables and example playbooks in the FreeIPA Ansible collection, see the
/usr/share/ansible/collections/ansible_collections/freeipa/ansible_freeipa/README-topology.mdfile and the/usr/share/ansible/collections/ansible_collections/freeipa/ansible_freeipa/playbooks/topologydirectory on the control node.Run the Ansible playbook. Specify the playbook file, the file storing the password protecting the secret.yml file, and the inventory file:
$ ansible-playbook --vault-password-file=password_file -v -i inventory check-topologysegments-copy.yml
Additional resources
2.4. Using Ansible to verify that a topology suffix exists in IdM
Confirm that required topology suffixes exist in your IdM deployment using Ansible to validate your replication infrastructure before configuring new agreements.
In the context of replication agreements in Identity Management (IdM), topology suffixes store the data that is replicated. IdM supports two types of topology suffixes: domain and ca. Each suffix represents a separate back end, a separate replication topology. When a replication agreement is configured, it joins two topology suffixes of the same type on two different servers.
The domain suffix contains all domain-related data, such as data about users, groups, and policies. The ca suffix contains data for the Certificate System component. It is only present on servers with a certificate authority (CA) installed.
The example describes how to ensure that the domain suffix exists in IdM.
Prerequisites
You have configured your Ansible control node to meet the following requirements:
- You are using Ansible version 2.15 or later.
-
You have installed the
ansible-freeipapackage. - The example assumes that in the ~/MyPlaybooks/ directory, you have created an Ansible inventory file with the fully-qualified domain name (FQDN) of the IdM server.
-
The example assumes that the secret.yml Ansible vault stores your
ipaadmin_passwordand that you have access to a file that stores the password protecting the secret.yml file.
-
The target node, that is the node on which the
freeipa.ansible_freeipamodule is executed, is part of the IdM domain as an IdM client, server or replica.
Procedure
Navigate to your ~/MyPlaybooks/ directory:
$ cd ~/MyPlaybooks/Copy the
verify-topologysuffix.ymlAnsible playbook file provided by theansible-freeipapackage:$ cp /usr/share/ansible/collections/ansible_collections/freeipa/ansible_freeipa/playbooks/topology/ verify-topologysuffix.yml verify-topologysuffix-copy.yml-
Open the
verify-topologysuffix-copy.ymlAnsible playbook file for editing. Adapt the file by setting the following variables in the
freeipa.ansible_freeipa.ipatopologysuffixsection:-
Indicate that the value of the
ipaadmin_passwordvariable is defined in the secret.yml Ansible vault file. -
Set the
suffixvariable todomain. If you are verifying the presence of thecasuffix, set the variable toca. -
Ensure that the
statevariable is set toverified. No other option is possible.
This is the modified Ansible playbook file for the current example:
--- - name: Playbook to handle topologysuffix hosts: ipaserver vars_files: - /home/user_name/MyPlaybooks/secret.yml tasks: - name: Verify topology suffix freeipa.ansible_freeipa.ipatopologysuffix: ipaadmin_password: "{{ ipaadmin_password }}" suffix: domain state: verified-
Indicate that the value of the
Save the file.
For details about variables and example playbooks in the FreeIPA Ansible collection, see the
/usr/share/ansible/collections/ansible_collections/freeipa/ansible_freeipa/README-topology.mdfile and the/usr/share/ansible/collections/ansible_collections/freeipa/ansible_freeipa/playbooks/topologydirectory on the control node.Run the Ansible playbook. Specify the playbook file, the file storing the password protecting the secret.yml file, and the inventory file:
$ ansible-playbook --vault-password-file=password_file -v -i inventory verify-topologysuffix-copy.yml
Additional resources
2.5. Using Ansible to reinitialize an IdM replica
Restore corrupted or outdated replica databases to ensure consistent data across your IdM infrastructure.
If a replica has been offline for a long period of time or its database has been corrupted, you can reinitialize it. Reinitialization refreshes the replica with an updated set of data. Reinitialization can, for example, be used if an authoritative restore from backup is required.
In contrast to replication updates, during which replicas only send changed entries to each other, reinitialization refreshes the whole database.
The local host on which you run the command is the reinitialized replica. To specify the replica from which the data is obtained, use the direction option.
Follow this procedure to use an Ansible playbook to reinitialize the domain data on replica.idm.example.com from server.idm.example.com.
Prerequisites
You have configured your Ansible control node to meet the following requirements:
- You are using Ansible version 2.15 or later.
-
You have installed the
ansible-freeipapackage. - The example assumes that in the ~/MyPlaybooks/ directory, you have created an Ansible inventory file with the fully-qualified domain name (FQDN) of the IdM server.
-
The example assumes that the secret.yml Ansible vault stores your
ipaadmin_passwordand that you have access to a file that stores the password protecting the secret.yml file.
-
The target node, that is the node on which the
freeipa.ansible_freeipamodule is executed, is part of the IdM domain as an IdM client, server or replica.
Procedure
Navigate to your ~/MyPlaybooks/ directory:
$ cd ~/MyPlaybooks/Copy the
reinitialize-topologysegment.ymlAnsible playbook file provided by theansible-freeipapackage:$ cp /usr/share/ansible/collections/ansible_collections/freeipa/ansible_freeipa/playbooks/topology/reinitialize-topologysegment.yml reinitialize-topologysegment-copy.yml-
Open the
reinitialize-topologysegment-copy.ymlfile for editing. Adapt the file by setting the following variables in the
freeipa.ansible_freeipa.ipatopologysegmentsection:-
Indicate that the value of the
ipaadmin_passwordvariable is defined in the secret.yml Ansible vault file. -
Set the
suffixvariable todomain. If you are reinitializing thecadata, set the variable toca. -
Set the
leftvariable to the left node of the replication agreement. -
Set the
rightvariable to the right node of the replication agreement. -
Set the
directionvariable to the direction of the reinitializing data. Theleft-to-rightdirection means that data flows from the left node to the right node. Ensure that the
statevariable is set toreinitialized.This is the modified Ansible playbook file for the current example:
---
- name: Playbook to handle topologysegment
  hosts: ipaserver

  vars_files:
  - /home/user_name/MyPlaybooks/secret.yml
  tasks:
  - name: Reinitialize topology segment
    freeipa.ansible_freeipa.ipatopologysegment:
      ipaadmin_password: "{{ ipaadmin_password }}"
      suffix: domain
      left: server.idm.example.com
      right: replica.idm.example.com
      direction: left-to-right
      state: reinitialized
-
Indicate that the value of the
Save the file.
For details about variables and example playbooks in the FreeIPA Ansible collection, see the
/usr/share/ansible/collections/ansible_collections/freeipa/ansible_freeipa/README-topology.mdfile and the/usr/share/ansible/collections/ansible_collections/freeipa/ansible_freeipa/playbooks/topologydirectory on the control node.Run the Ansible playbook. Specify the playbook file, the file storing the password protecting the secret.yml file, and the inventory file:
$ ansible-playbook --vault-password-file=password_file -v -i inventory reinitialize-topologysegment-copy.yml
Additional resources
2.6. Using Ansible to ensure a replication agreement is absent in IdM
Remove unwanted replication agreements between IdM servers using Ansible when restructuring your topology or stopping data synchronization between specific replicas.
Data stored on an Identity Management (IdM) server is replicated based on replication agreements: when two servers have a replication agreement configured, they share their data. Replication agreements are always bilateral: the data is replicated from the first replica to the other one as well as from the other replica to the first one.
The example describes how to ensure a replication agreement of the domain type does not exist between the replica01.idm.example.com and replica02.idm.example.com IdM servers.
Prerequisites
- You understand the recommendations for designing your IdM topology listed in Connecting the replicas in a topology.
You have configured your Ansible control node to meet the following requirements:
- You are using Ansible version 2.15 or later.
-
You have installed the
ansible-freeipapackage. - The example assumes that in the ~/MyPlaybooks/ directory, you have created an Ansible inventory file with the fully-qualified domain name (FQDN) of the IdM server.
-
The example assumes that the secret.yml Ansible vault stores your
ipaadmin_passwordand that you have access to a file that stores the password protecting the secret.yml file.
-
The target node, that is the node on which the
freeipa.ansible_freeipamodule is executed, is part of the IdM domain as an IdM client, server or replica.
Procedure
Navigate to your ~/MyPlaybooks/ directory:
$ cd ~/MyPlaybooks/Copy the
delete-topologysegment.ymlAnsible playbook file provided by theansible-freeipapackage:$ cp /usr/share/ansible/collections/ansible_collections/freeipa/ansible_freeipa/playbooks/topology/delete-topologysegment.yml delete-topologysegment-copy.yml-
Open the
delete-topologysegment-copy.ymlfile for editing. Adapt the file by setting the following variables in the
ipatopologysegmenttask section:-
Indicate that the value of the
ipaadmin_passwordvariable is defined in the secret.yml Ansible vault file. -
Set the
suffixvariable todomain. Alternatively, if you are ensuring that thecadata are not replicated between the left and right nodes, set the variable toca. -
Set the
leftvariable to the name of the IdM server that is the left node of the replication agreement. -
Set the
rightvariable to the name of the IdM server that is the right node of the replication agreement. -
Ensure that the
statevariable is set toabsent.
This is the modified Ansible playbook file for the current example:
--- - name: Playbook to handle topologysegment hosts: ipaserver vars_files: - /home/user_name/MyPlaybooks/secret.yml tasks: - name: Delete topology segment ipatopologysegment: ipaadmin_password: "{{ ipaadmin_password }}" suffix: domain left: replica01.idm.example.com right: replica02.idm.example.com: state: absent-
Indicate that the value of the
Save the file.
For details about variables and example playbooks in the FreeIPA Ansible collection, see the
/usr/share/ansible/collections/ansible_collections/freeipa/ansible_freeipa/README-topology.mdfile and the/usr/share/ansible/collections/ansible_collections/freeipa/ansible_freeipa/playbooks/topologydirectory on the control node.Run the Ansible playbook. Specify the playbook file, the file storing the password protecting the secret.yml file, and the inventory file:
$ ansible-playbook --vault-password-file=password_file -v -i inventory delete-topologysegment-copy.yml
Additional resources
2.7. Additional resources
Chapter 3. Checking IdM replication by using Healthcheck
Run Healthcheck tests on your IdM replication topology to identify configuration issues early, preventing data inconsistencies and service disruptions that could affect user authentication and access to domain resources.
You can test Identity Management (IdM) replication by using the Healthcheck tool.
3.1. The IdM replication and topology Healthcheck tests
Use built-in Healthcheck tests to verify your IdM replication topology meets connectivity and agreement requirements, preventing isolated servers and replication conflicts that could compromise data integrity.
The Identity Management (IdM) Healthcheck tool includes tests of the IdM topology configuration. The tests search for replication conflict issues.
You can find the IPATopologyDomainCheck and ReplicationConflictCheck tests under the ipahealthcheck.ipa.topology and ipahealthcheck.ds.replication sources of the output of the ipa-healthcheck --list-sources command.
- IPATopologyDomainCheck
Tests the following configuration:
- No IdM server is disconnected from the topology.
- The IdM servers do not have more than the recommended number of replication agreements.
If the test succeeds, the test returns the configured domains. Otherwise, specific connection errors are reported.
NoteThe test runs the
ipa topologysuffix-verifycommand for thedomainsuffix. It also runs the command for thecasuffix if the IdM Certificate Authority server role is configured on this server.- ReplicationConflictCheck
-
Searches for entries in LDAP matching
(&(!(objectclass=nstombstone))(nsds5ReplConflict=*)).
3.2. Screening replication by using Healthcheck
Execute focused assessments to identify replication problems before they cause production outages.
You can run a standalone manual test to check the replication and topology configuration of your Identity Management (IdM) server by using the Healthcheck tool.
Prerequisites
-
You have
rootprivileges.
Procedure
To run the replication test, enter:
# ipa-healthcheck --source=ipahealthcheck.ds.replication --source=ipahealthcheck.ipa.topologyThe
--source=ipahealthcheck.ds.replicationand--source=ipahealthcheck.ipa.topologyoptions ensure that IdM Healthcheck only performs the replication conflict and topology tests.Four different results are possible:
SUCCESS— the test passed successfully.{ "source": "ipahealthcheck.ipa.topology", "check": "IPATopologyDomainCheck", "result": "SUCCESS", "kw": { "suffix": "domain" } }-
WARNING— the test passed but there might be a problem. ERROR— the test failed.{ "source": "ipahealthcheck.ipa.topology", "check": "IPATopologyDomainCheck", "result": "ERROR", "uuid": d6ce3332-92da-423d-9818-e79f49ed321f "when": 20191007115449Z "duration": 0.005943 "kw": { "msg": "topologysuffix-verify domain failed, server2 is not connected (server2_139664377356472 in MainThread)" } }-
CRITICAL— the test failed and it affects the IdM server functionality.
NoteRun these tests on all IdM servers when trying to check for issues.
Additional resources