Knative CLI
Overview of CLI commands for Knative Functions, Serving, and Eventing
Abstract
Chapter 1. Knative Serving CLI commands
1.1. kn service commands
You can use the following commands to create and manage Knative services.
1.1.1. Creating serverless applications by using the Knative CLI
Using the Knative (kn) CLI to create serverless applications provides a more streamlined and intuitive user interface over modifying YAML files directly. You can use the kn service create command to create a basic serverless application.
Prerequisites
- You have installed OpenShift Serverless Operator and Knative Serving on your cluster.
-
You have installed the Knative (
kn) CLI. - You have created a project or have access to a project with the appropriate roles and permissions to create applications and other workloads in OpenShift Container Platform.
Procedure
Create a Knative service:
$ kn service create <service_name> --image <image> --tag <tag_value>
Where:
-
--imageis the URI of the image for the application. --tagis an optional flag that you can use to add a tag to the initial revision that Knative creates with the service.You get an output similar to the following example command:
$ kn service create showcase \ --image quay.io/openshift-knative/showcaseYou get an output similar to the following example:
Creating service 'showcase' in namespace 'default':

  0.271s The Route is still working to reflect the latest desired specification.
  0.580s Configuration "showcase" is waiting for a Revision to become ready.
  3.857s ...
  3.861s Ingress has not yet been reconciled.
  4.270s Ready to serve.

Service 'showcase' created with latest revision 'showcase-00001' and URL:
http://showcase-default.apps-crc.testing
-
1.1.2. Updating serverless applications by using the Knative CLI
You can use the kn service update command for interactive sessions on the command line as you build up a service incrementally. In contrast to the kn service apply command, when using the kn service update command you only have to specify the changes that you want to update, rather than the full configuration for the Knative service.
Procedure
Update a service by adding a new environment variable by running the command:
$ kn service update <service_name> --env <key>=<value>
Update a service by adding a new port by running the command:
$ kn service update <service_name> --port 80
Update a service by adding new request and limit parameters by running the command:
$ kn service update <service_name> --request cpu=500m --limit memory=1024Mi --limit cpu=1000m
Assign the
latesttag to a revision by running the command:$ kn service update <service_name> --tag <revision_name>=latest
Update a tag from
testingtostagingfor the latestREADYrevision of a service by running the command:$ kn service update <service_name> --untag testing --tag @latest=staging
Add the
testtag to a revision that receives 10% of traffic, and send the rest of the traffic to the latestREADYrevision of a service:$ kn service update <service_name> --tag <revision_name>=test --traffic test=10,@latest=90
1.1.3. Applying service declarations
Use the kn service apply command to declaratively configure a Knative service. If the service does not exist, the command creates it. If it exists, the command updates the service with the specified options.
The kn service apply command works well in shell scripts or CI pipelines. In these environments, users often specify the complete service state in a single command. When you use kn service apply, give the full configuration for the Knative service. The kn service update command only requires the options that you want to change.
Procedure
Create a service by running the command:
$ kn service apply <service_name> --image <image>
Add an environment variable to a service by running the command:
$ kn service apply <service_name> --image <image> --env <key>=<value>
Read the service declaration from a JSON or YAML file by running the command:
$ kn service apply <service_name> -f <filename>
1.1.4. Describing serverless applications by using the Knative CLI
You can describe a Knative service by using the kn service describe command.
Procedure
Describe a service by running the command:
$ kn service describe --verbose <service_name>
The
--verboseflag is optional and provides a more detailed description. The following examples show the difference between regular and verbose output:You get an output similar to the following example:
Name: showcase Namespace: default Age: 2m URL: http://showcase-default.apps.ocp.example.com Revisions: 100% @latest (showcase-00001) [1] (2m) Image: quay.io/openshift-knative/showcase (pinned to aaea76) Conditions: OK TYPE AGE REASON ++ Ready 1m ++ ConfigurationsReady 1m ++ RoutesReady 1mYou get an output similar to the following example:
Name: showcase Namespace: default Annotations: serving.knative.dev/creator=system:admin serving.knative.dev/lastModifier=system:admin Age: 3m URL: http://showcase-default.apps.ocp.example.com Cluster: http://showcase.default.svc.cluster.local Revisions: 100% @latest (showcase-00001) [1] (3m) Image: quay.io/openshift-knative/showcase (pinned to aaea76) Env: GREET=Bonjour Conditions: OK TYPE AGE REASON ++ Ready 3m ++ ConfigurationsReady 3m ++ RoutesReady 3mDescribe a service in YAML format by running the command:
$ kn service describe <service_name> -o yaml
Describe a service in JSON format by running the command:
$ kn service describe <service_name> -o json
Print the service URL only by running the command:
$ kn service describe <service_name> -o url
1.2. kn service commands in offline mode
Overview of kn service commands in offline mode for managing service configurations without cluster deployment.
1.2.1. About the Knative CLI offline mode
When you run kn service commands, the changes immediately propagate to the cluster or you can run kn service commands in offline mode. When you create a service in offline mode, the command does not change the cluster and creates the service descriptor file on your local machine.
The offline mode of the Knative CLI is a Technology Preview feature only. Technology Preview features are not supported with Red Hat production service level agreements (SLAs) and might not be functionally complete. Red Hat does not recommend using them in production. These features provide early access to upcoming product features, enabling customers to test functionality and provide feedback during the development process.
For more information about the support scope of Red Hat Technology Preview features, see Technology Preview Features Support Scope.
After you create the descriptor file, you can manually change it and track it in a version control system. You can also propagate changes to the cluster by running kn service create -f, kn service apply -f, or oc apply -f on the descriptor file.
The offline mode has several uses:
- You can manually change the descriptor file before using it to make changes on the cluster.
- You can track the service descriptor file locally in a version control system. You can then reuse the descriptor file in other environments, such as continuous integration (CI) pipelines, development environments, or demos.
- You can examine the descriptor files to learn about Knative services. You can also see how different arguments passed to the kn command influence the resulting service.
Offline mode has several advantages. It is fast and does not require a connection to the cluster. However, offline mode lacks server-side validation. For example, you cannot verify that the service name is unique or that the cluster can pull the specified image.
1.2.2. Creating a service using offline mode
You can run kn service commands in offline mode so the command does not change the cluster and instead creates a service descriptor file on your local machine. After you create the descriptor file, you can change it before propagating changes to the cluster.
The offline mode of the Knative CLI is a Technology Preview feature only. Technology Preview features are not supported with Red Hat production service level agreements (SLAs) and might not be functionally complete. Red Hat does not recommend using them in production. These features provide early access to upcoming product features, enabling customers to test functionality and provide feedback during the development process.
For more information about the support scope of Red Hat Technology Preview features, see Technology Preview Features Support Scope.
Prerequisites
- You have installed OpenShift Serverless Operator and Knative Serving on your cluster.
-
You have installed the Knative (
kn) CLI.
Procedure
In offline mode, create a local Knative service descriptor file:
$ kn service create showcase \ --image quay.io/openshift-knative/showcase \ --target ./ \ --namespace testYou get an output similar to the following example:
Service 'showcase' created in namespace 'test'.
The
--target ./flag enables offline mode and specifies./as the directory for storing the new directory tree.If you do not specify an existing directory but use a filename, such as
--target my-service.yaml, the command does not create a directory tree. Instead, the command creates the service descriptor filemy-service.yamlin the current directory.The filename can have the
.yaml,.yml, or.jsonextension. Choosing.jsoncreates the service descriptor file in the JSON format.The
--namespace testoption places the new service in thetestnamespace.If you do not use
--namespaceand you log in to an OpenShift Container Platform cluster, the command creates the descriptor file in the current namespace. If you do not log in to a cluster, the command creates the descriptor file in the default namespace.
Examine the created directory structure:
$ tree ./
You get an output similar to the following example:
./ └── test └── ksvc └── showcase.yaml 2 directories, 1 file-
The
./directory specified with--targetnow has atest/directory named after the specified namespace. -
The
test/directory has theksvcdirectory, named after the resource type. -
The
ksvcdirectory has the descriptor fileshowcase.yaml, named according to the specified service name.
-
The
Examine the generated service descriptor file:
$ cat test/ksvc/showcase.yaml
You get an output similar to the following example:
apiVersion: serving.knative.dev/v1 kind: Service metadata: creationTimestamp: null name: showcase namespace: test spec: template: metadata: annotations: client.knative.dev/user-image: quay.io/openshift-knative/showcase creationTimestamp: null spec: containers: - image: quay.io/openshift-knative/showcase name: "" resources: {} status: {}List information about the new service:
$ kn service describe showcase --target ./ --namespace test
You get an output similar to the following example:
Name:       showcase
Namespace:  test
Age:
URL:

Revisions:

Conditions:
  OK TYPE    AGE REASON
The
--target ./option specifies the root directory for the directory structure containing namespace subdirectories.You can also directly specify a YAML or JSON filename with the
--targetoption. The accepted file extensions are.yaml,.yml, and.json.The
--namespaceoption specifies the namespace, which communicates toknthe subdirectory that has the necessary service descriptor file.If you do not use
--namespaceand you log in to an OpenShift Container Platform cluster,knsearches for the service in the subdirectory that matches the current namespace. Otherwise,knsearches in thedefault/subdirectory.
Use the service descriptor file to create the service on the cluster:
$ kn service create -f test/ksvc/showcase.yaml
You get an output similar to the following example:
Creating service 'showcase' in namespace 'test':

  0.058s The Route is still working to reflect the latest desired specification.
  0.098s ...
  0.168s Configuration "showcase" is waiting for a Revision to become ready.
 23.377s ...
 23.419s Ingress has not yet been reconciled.
 23.534s Waiting for load balancer to be ready
 23.723s Ready to serve.

Service 'showcase' created to latest revision 'showcase-00001' is available at URL:
http://showcase-test.apps.example.com
1.3. kn container commands
You can use the following commands to create and manage many containers in a Knative service spec.
1.3.1. Knative client multi-container support
You can use the kn container add command to print the YAML container specification to standard output. Use this command for multi-container use cases and combine it with other kn flags to create definitions.
The kn container add command accepts all container-related flags that the kn service create command supports. You can also chain the kn container add command by using UNIX pipes (|) to create many container definitions.
Example commands
You can add a container from an image and print it to standard output:
$ kn container add <container_name> --image <image_uri>
You get an output similar to the following example command:
$ kn container add sidecar --image docker.io/example/sidecar
You get an output similar to the following example:
containers: - image: docker.io/example/sidecar name: sidecar resources: {}You can chain two
kn container addcommands together, and then pass them to akn service createcommand to create a Knative service with two containers:$ kn container add <first_container_name> --image <image_uri> | \ kn container add <second_container_name> --image <image_uri> | \ kn service create <service_name> --image <image_uri> --extra-containers -
--extra-containers -specifies a special case whereknreads the pipe input instead of a YAML file.You get an output similar to the following example command:
$ kn container add sidecar --image docker.io/example/sidecar:first | \
kn container add second --image docker.io/example/sidecar:second | \
kn service create my-service --image docker.io/example/my-app:latest --extra-containers -
The
--extra-containersflag can also accept a path to a YAML file:$ kn service create <service_name> --image <image_uri> --extra-containers <filename>
You get an output similar to the following example command:
$ kn service create my-service --image docker.io/example/my-app:latest --extra-containers my-extra-containers.yaml
1.4. kn domain commands
You can use the following commands to create and manage domain mappings.
1.4.1. Creating a custom domain mapping by using the Knative CLI
You can use Knative CLI to map custom domains to Knative services or routes and assign branded or user-friendly URLs to your applications. Use your own domain names instead of the default cluster-generated URLs.
Prerequisites
- You have installed the OpenShift Serverless Operator and Knative Serving on your cluster.
- You have created a Knative service or route, and control a custom domain that you want to map to that CR.
- Your custom domain must point to the DNS of the OpenShift Container Platform cluster.
-
You have installed the Knative (
kn) CLI. - You have created a project or have access to a project with the appropriate roles and permissions to create applications and other workloads in OpenShift Container Platform.
Procedure
Map a domain to a CR in the current namespace:
$ kn domain create <domain_mapping_name> --ref <target_name>
You get an output similar to the following example command:
$ kn domain create example.com --ref showcase
The
--refflag specifies an Addressable target CR for domain mapping.If you do not give a prefix when using the
--refflag, the system treats the target as a Knative service in the current namespace.Map a domain to a Knative service in a specified namespace:
$ kn domain create <domain_mapping_name> --ref <ksvc:service_name:service_namespace>
You get an output similar to the following example command:
$ kn domain create example.com --ref ksvc:showcase:example-namespace
Map a domain to a Knative route:
$ kn domain create <domain_mapping_name> --ref <kroute:route_name>
You get an output similar to the following example command:
$ kn domain create example.com --ref kroute:example-route
1.4.2. Managing custom domain mappings by using the Knative CLI
After you have created a DomainMapping custom resource (CR), you can list existing CRs, view information about an existing CR, update CRs, or delete CRs by using the Knative (kn) CLI.
Prerequisites
- You have installed the OpenShift Serverless Operator and Knative Serving on your cluster.
-
You have created at least one
DomainMappingCR. -
You have installed the Knative (
kn) CLI tool. - You have created a project or have access to a project with the appropriate roles and permissions to create applications and other workloads in OpenShift Container Platform.
Procedure
List existing
DomainMappingCRs:$ kn domain list -n <domain_mapping_namespace>
View details of an existing
DomainMappingCR:$ kn domain describe <domain_mapping_name>
Update a
DomainMappingCR to point to a new target:$ kn domain update --ref <target>
Delete a
DomainMappingCR:$ kn domain delete <domain_mapping_name>
Chapter 2. Configuring the Knative CLI
You can customize your Knative (kn) CLI setup by creating a config.yaml configuration file. You can give this configuration by using the --config flag, otherwise the CLI picks up the configuration from a default location.
The default configuration location conforms to the Cross-Desktop Group (XDG) Base Directory Specification, and is different for UNIX systems and Windows systems.
2.1. Knative CLI configuration file locations and structure
Default configuration file locations for the Knative (kn) CLI across different operating systems and an overview of the configuration file structure and key fields.
For UNIX systems:
-
If the
XDG_CONFIG_HOMEenvironment variable is set, the default configuration location that the Knative (kn) CLI looks for is$XDG_CONFIG_HOME/kn. -
If the
XDG_CONFIG_HOMEenvironment variable is not set, the Knative (kn) CLI looks for the configuration in the home directory of the user at$HOME/.config/kn/config.yaml.
For Windows systems, the default Knative (kn) CLI configuration location is %APPDATA%\kn.
You get an output similar to the following example:
plugins:
  path-lookup: true
  directory: ~/.config/kn/plugins
eventing:
  sink-mappings:
  - prefix: svc
    group: core
    version: v1
resource: servicesplugins.path-lookup-
Specifies whether the Knative (
kn) CLI should look for plugins in thePATHenvironment variable. This is a boolean configuration option. The default value isfalse. plugins.directory-
Specifies the directory where the Knative (
kn) CLI looks for plugins. The default path depends on the operating system, as described earlier. This can be any directory that is visible to the user. eventing.sink-mappings-
The
sink-mappingsspec defines the Kubernetes addressable resource that is used when you use the--sinkflag with a Knative (kn) CLI command. sink-mappings.prefix-
The prefix you want to use to describe your sink.
svcfor a service,channel, andbrokerare predefined prefixes for the Knative (kn) CLI. sink-mappings.group- The API group of the Kubernetes resource.
sink-mappings.version- The version of the Kubernetes resource.
sink-mappings.resource-
The plural name of the Kubernetes resource type. For example,
servicesorbrokers.
2.2. Additional resources
Chapter 3. Knative CLI plugins
The Knative (kn) CLI supports plugins. You can use plugins to extend your kn installation with custom commands and other shared commands that are not part of the core distribution. You use Knative (kn) CLI plugins in the same way as the main kn functionality. Currently, Red Hat supports the kn-source-kafka plugin and the kn-event plugin.
3.1. Building events by using the kn-event plugin
You can use the builder-like interface of the kn event build command to build an event. You can then send that event at a later time or use it in another context.
Prerequisites
-
You have installed the Knative (
kn) CLI.
Procedure
Build an event:
$ kn event build --field <field_name>=<value> --type <type_name> --id <id> --output <format>
where:
-
The
--fieldflag adds data to the event as a field-value pair. You can use it many times. -
Use the
--typeflag to specify a string that designates the event type. -
The
--idflag specifies the ID of the event. You can use the
jsonoryamlarguments with the--outputflag to change the output format of the event.All of these flags are optional.
Run the following command to build an event:
$ kn event build -o yaml
The following example shows the event in YAML format:
data: {} datacontenttype: application/json id: 81a402a2-9c29-4c27-b8ed-246a253c9e58 source: kn-event/v0.4.0 specversion: "1.0" time: "2021-10-15T10:42:57.713226203Z" type: dev.knative.cli.plugin.event.genericRun the following command to build a sample transaction event:
$ kn event build \ --field operation.type=local-wire-transfer \ --field operation.amount=2345.40 \ --field operation.from=87656231 \ --field operation.to=2344121 \ --field automated=true \ --field signature='FGzCPLvYWdEgsdpb3qXkaVp7Da0=' \ --type org.example.bank.bar \ --id $(head -c 10 < /dev/urandom | base64 -w 0) \ --output jsonThe following example shows the event in JSON format:
{
  "specversion": "1.0",
  "id": "RjtL8UH66X+UJg==",
  "source": "kn-event/v0.4.0",
  "type": "org.example.bank.bar",
  "datacontenttype": "application/json",
  "time": "2021-10-15T10:43:23.113187943Z",
  "data": {
    "automated": true,
    "operation": {
      "amount": "2345.40",
      "from": 87656231,
      "to": 2344121,
      "type": "local-wire-transfer"
    },
    "signature": "FGzCPLvYWdEgsdpb3qXkaVp7Da0="
  }
}
-
The
3.2. Sending events by using the kn-event plugin
You can use the kn event send command to send an event. The events can be sent either to publicly available addresses or to addressable resources inside a cluster, such as Kubernetes services, and Knative services, brokers, and channels. The command uses the same builder-like interface as the kn event build command.
Prerequisites
-
You have installed the Knative (
kn) CLI.
Procedure
Send an event:
$ kn event send \
  --field <field_name>=<value> \
  --type <type_name> \
  --id <id> \
  --to <url_or_cluster_resource> \
  --namespace <namespace>
where:
-
The
--fieldflag adds data to the event as a field-value pair. You can use it multiple times. -
The
--typeflag specifies a string that designates the type of the event. -
The
--idflag specifies the ID of the event. -
The
--toflag specifies the destination of the event. The
--namespaceflag specifies the namespace. If omitted, the namespace is taken from the current context.All of these flags are optional, except for the destination specification.
-
The
You can use the following destination formats for the --to flag:
-
--to broker:<broker>: Specifies a broker -
--to channel:<channel>: Specifies a channel -
--to ksvc:<service>or--to <service>: Specifies a Knative service in the current namespace -
--to ksvc:<service>:<namespace>: Specifies a Knative service in another namespace -
--to svc:<service>:<namespace>: Specifies a Kubernetes service in another namespace -
--to special.eventing.dev/v1alpha1/channels:<channel>: SpecifiesGroupVersionResourceofv1alpha1channel -
--to https://example.receiver.uri: Specifies an HTTP URL
If you do not give a prefix, the destination defaults to a Knative service in the current namespace.
Sending an event to a URL
$ kn event send \
    --field player.id=6354aa60-ddb1-452e-8c13-24893667de20 \
    --field player.game=2345 \
    --field points=456 \
    --type org.example.gaming.foo \
--to http://ce-api.foo.example.com/Sending and event to an in-cluster resource
$ kn event send \
    --type org.example.kn.ping \
    --id $(uuidgen) \
    --field event.type=test \
    --field event.data=98765 \
--to ksvc:event-displayChapter 4. Knative Eventing CLI commands
4.1. kn source commands
You can use the following commands to list, create, and manage Knative event sources.
4.1.1. Listing available event source types by using the Knative CLI
You can list event source types that you can create and use on your cluster by using the kn source list-types CLI command.
Prerequisites
- You have installed the OpenShift Serverless Operator and Knative Eventing on the cluster.
-
You have installed the Knative (
kn) CLI.
Procedure
List the available event source types in the terminal:
$ kn source list-types
You get an output similar to the following example:
TYPE              NAME                                            DESCRIPTION
ApiServerSource   apiserversources.sources.knative.dev            Watch and send Kubernetes API events to a sink
PingSource        pingsources.sources.knative.dev                 Periodically send ping events to a sink
SinkBinding       sinkbindings.sources.knative.dev                Binding for connecting a PodSpecable to a sink
Optional: On OpenShift Container Platform, you can also list the available event source types in YAML format:
$ kn source list-types -o yaml
4.1.2. Knative CLI sink flag
When you create an event source by using the Knative (kn) CLI, you can specify a sink where events are sent to from that resource by using the --sink flag. The sink can be any addressable or callable resource that can receive incoming events from other resources.
The following example creates a sink binding that uses a service, http://event-display.svc.cluster.local, as the sink:
You get an output similar to the following example:
$ kn source binding create bind-heartbeat \
  --namespace sinkbinding-example \
  --subject "Job:batch/v1:app=heartbeat-cron" \
  --sink http://event-display.svc.cluster.local \
  --ce-override "sink=bound"
svc in http://event-display.svc.cluster.local determines that the sink is a Knative service. Other default sink prefixes include channel, and broker.
4.1.3. Creating and managing container sources by using the Knative CLI
You can use the kn source container commands to create and manage container sources by using the Knative (kn) CLI. Using the Knative CLI to create event sources provides a more streamlined and intuitive user interface than modifying YAML files directly.
Procedure
Create a container source by running the folloing command:
$ kn source container create <container_source_name> --image <image_uri> --sink <sink>
Delete a container source by running the folloing command:
$ kn source container delete <container_source_name>
Describe a container source by running the folloing command:
$ kn source container describe <container_source_name>
List existing container sources by running the folloing command:
$ kn source container list
List existing container sources in YAML format by running the folloing command:
$ kn source container list -o yaml
Update a container source by running the folloing command:
This command updates the image URI for an existing container source:
$ kn source container update <container_source_name> --image <image_uri>
4.1.4. Creating an API server source by using the Knative CLI
You can use the kn source apiserver create command to create an API server source by using the kn CLI. Using the kn CLI to create an API server source provides a more streamlined and intuitive user interface than modifying YAML files directly.
Prerequisites
- You have installed the OpenShift Serverless Operator and Knative Eventing on the cluster.
- You have created a project or have access to a project with the appropriate roles and permissions to create applications and other workloads in OpenShift Container Platform.
-
You have installed the OpenShift CLI (
oc). -
You have installed the Knative (
kn) CLI.
If you want to re-use an existing service account, you can modify your existing ServiceAccount resource to include the required permissions instead of creating a new resource.
Create a service account, role, and role binding for the event source as a YAML file:
apiVersion: v1
kind: ServiceAccount
metadata:
  name: events-sa
  namespace: default 1

---
apiVersion: rbac.authorization.k8s.io/v1
kind: Role
metadata:
  name: event-watcher
  namespace: default 2
rules:
  - apiGroups:
      - ""
    resources:
      - events
    verbs:
      - get
      - list
      - watch

---
apiVersion: rbac.authorization.k8s.io/v1
kind: RoleBinding
metadata:
  name: k8s-ra-event-watcher
  namespace: default 3
roleRef:
  apiGroup: rbac.authorization.k8s.io
  kind: Role
  name: event-watcher
subjects:
  - kind: ServiceAccount
    name: events-sa
    namespace: default 4
Apply the YAML file:
$ oc apply -f <filename>
Create an API server source that has an event sink. In the following example, the sink is a broker:
$ kn source apiserver create <event_source_name> --sink broker:<broker_name> --resource "event:v1" --service-account <service_account_name> --mode Resource
To verify the API server source setup, create a Knative service that dumps incoming messages to its log.
$ kn service create event-display --image quay.io/openshift-knative/showcase
If you used a broker as an event sink, create a trigger to filter events from the
defaultbroker to the service:$ kn trigger create <trigger_name> --sink ksvc:event-display
Create events by launching a pod in the default namespace:
$ oc create deployment event-origin --image quay.io/openshift-knative/showcase
Check that the controller maps correctly by inspecting the output from the following command:
$ kn source apiserver describe <source_name>
You get an output similar to the following example:
Name:                mysource
Namespace:           default
Annotations:         sources.knative.dev/creator=developer, sources.knative.dev/lastModifier=developer
Age:                 3m
ServiceAccountName:  events-sa
Mode:                Resource
Sink:
  Name:       default
  Namespace:  default
  Kind:       Broker (eventing.knative.dev/v1)
Resources:
  Kind:        event (v1)
  Controller:  false
Conditions:
  OK TYPE                     AGE REASON
  ++ Ready                     3m
  ++ Deployed                  3m
  ++ SinkProvided              3m
  ++ SufficientPermissions     3m
  ++ EventTypesProvided        3m
Verification
To verify that Kubernetes sends events to Knative, examine the event-display logs or use a web browser to view the events.
To view the events in a web browser, open the link returned by the following command:
$ kn service describe event-display -o url
The following example shows the browser page:
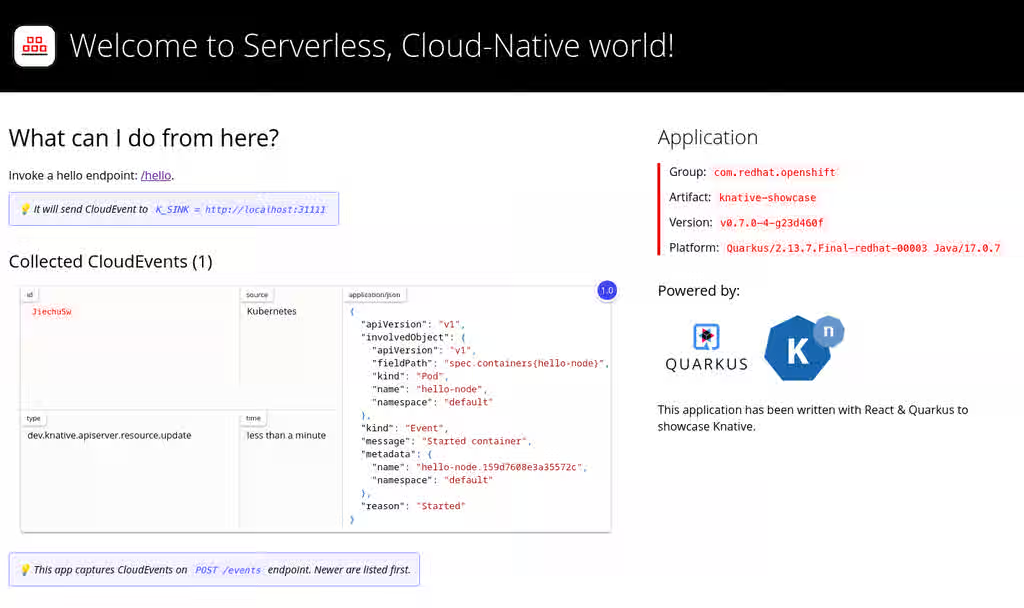
You can also see the logs in the terminal, view the event-display logs for the pods by running the following command:
$ oc logs $(oc get pod -o name | grep event-display) -c user-container
You get an output similar to the following example:
☁️ cloudevents.Event Validation: valid Context Attributes, specversion: 1.0 type: dev.knative.apiserver.resource.update datacontenttype: application/json ... Data, { "apiVersion": "v1", "involvedObject": { "apiVersion": "v1", "fieldPath": "spec.containers{event-origin}", "kind": "Pod", "name": "event-origin", "namespace": "default", ..... }, "kind": "Event", "message": "Started container", "metadata": { "name": "event-origin.159d7608e3a3572c", "namespace": "default", .... }, "reason": "Started", ... }Delete the trigger:
$ kn trigger delete <trigger_name>
Delete the event source:
$ kn source apiserver delete <source_name>
Delete the service account, cluster role, and cluster binding:
$ oc delete -f authentication.yaml
4.1.5. Creating a ping source by using the Knative CLI
You can use the kn source ping create command to create a ping source by using the Knative (kn) CLI. Using the Knative CLI to create event sources provides a more streamlined and intuitive user interface than modifying YAML files directly.
Prerequisites
- You have installed the OpenShift Serverless Operator, Knative Serving and Knative Eventing on the cluster.
-
You have installed the Knative (
kn) CLI. - You have created a project or have access to a project with the appropriate roles and permissions to create applications and other workloads in OpenShift Container Platform.
-
Optional: If you want to use the verification steps for this procedure, install the OpenShift CLI (
oc).
Procedure
To verify that the ping source is working, create a simple Knative service that dumps incoming messages to the service logs:
$ kn service create event-display \ --image quay.io/openshift-knative/showcaseFor each set of ping events that you want to request, create a ping source in the same namespace as the event consumer:
$ kn source ping create test-ping-source \ --schedule "*/2 * * * *" \ --data '{"message": "Hello world!"}' \ --sink ksvc:event-displayCheck that the controller is mapped correctly by entering the following command and inspecting the output:
$ kn source ping describe test-ping-source
You get an output similar to the following example:
Name:         test-ping-source
Namespace:    default
Annotations:  sources.knative.dev/creator=developer, sources.knative.dev/lastModifier=developer
Age:          15s
Schedule:     */2 * * * *
Data:         {"message": "Hello world!"}

Sink:
  Name:       event-display
  Namespace:  default
  Resource:   Service (serving.knative.dev/v1)

Conditions:
  OK TYPE                 AGE REASON
  ++ Ready                 8s
  ++ Deployed              8s
  ++ SinkProvided         15s
  ++ ValidSchedule        15s
  ++ EventTypeProvided    15s
  ++ ResourcesCorrect     15s
Verification
You can verify that the Kubernetes events reached the Knative event sink by checking the logs of the sink pod.
By default, Knative services cancel pods if they do not receive traffic within 60 seconds. The example in this guide creates a ping source that sends a message every 2 minutes, so each message is displayed in a newly created pod.
Watch for new pods created:
$ watch oc get pods
Cancel watching the pods using Ctrl+C, then check the logs of the created pod:
$ oc logs $(oc get pod -o name | grep event-display) -c user-container
Example output
☁️  cloudevents.Event
Validation: valid
Context Attributes,
  specversion: 1.0
  type: dev.knative.sources.ping
  source: /apis/v1/namespaces/default/pingsources/test-ping-source
  id: 99e4f4f6-08ff-4bff-acf1-47f61ded68c9
  time: 2020-04-07T16:16:00.000601161Z
  datacontenttype: application/json
Data,
  {
    "message": "Hello world!"
  }
4.1.6. Deleting a ping source
You can delete an existing ping source by using the Knative (kn) CLI command.
Prerequisites
-
You have installed the Knative (
kn) CLI. - You have access to a cluster with the required permissions.
- The ping source exists in your namespace.
Procedure
Delete the ping source by running the following command:
$ kn delete pingsources.sources.knative.dev <ping_source_name>
Verification
Verify that the ping source no longer exists by running the following command:
$ kn get pingsources.sources.knative.dev
- Confirm that the deleted ping source is not listed in the output.
4.1.7. Creating an Apache Kafka event source by using the Knative CLI
You can use the kn source kafka create command to create a Kafka source by using the Knative (kn) CLI. Using the Knative CLI to create event sources provides a more streamlined and intuitive user interface than modifying YAML files directly.
Prerequisites
-
You have installed the OpenShift Serverless Operator, Knative Eventing, Knative Serving, and the
KnativeKafkacustom resource (CR) on your cluster. - You have created a project or have access to a project with the appropriate roles and permissions to create applications and other workloads in OpenShift Container Platform.
- You have access to a Red Hat AMQ Streams (Kafka) cluster that produces the Kafka messages you want to import.
-
You have installed the Knative (
kn) CLI. -
Optional: You have installed the OpenShift CLI (
oc) if you want to use the verification steps in this procedure.
Procedure
To verify that the Kafka event source is working, create a Knative service that dumps incoming events into the service logs:
$ kn service create event-display \ --image quay.io/openshift-knative/showcaseCreate a
KafkaSourceCR:$ kn source kafka create <kafka_source_name> \ --servers <cluster_kafka_bootstrap>.kafka.svc:9092 \ --topics <topic_name> --consumergroup my-consumer-group \ --sink event-displayNoteReplace the placeholder values in this command with values for your source name, bootstrap servers, and topics.
The
--servers,--topics, and--consumergroupoptions specify the connection parameters to the Kafka cluster. The--consumergroupoption is optional.Optional: View details about the
KafkaSourceCR you created:$ kn source kafka describe <kafka_source_name>
You get an output similar to the following example:
Name:              example-kafka-source
Namespace:         kafka
Age:               1h
BootstrapServers:  example-cluster-kafka-bootstrap.kafka.svc:9092
Topics:            example-topic
ConsumerGroup:     example-consumer-group

Sink:
  Name:       event-display
  Namespace:  default
  Resource:   Service (serving.knative.dev/v1)

Conditions:
  OK TYPE            AGE REASON
  ++ Ready            1h
  ++ Deployed         1h
  ++ SinkProvided     1h
Verification
Trigger the Kafka instance to send a message to the topic:
$ oc -n kafka run kafka-producer \ -ti --image=quay.io/strimzi/kafka:latest-kafka-2.7.0 --rm=true \ --restart=Never -- bin/kafka-console-producer.sh \ --broker-list <cluster_kafka_bootstrap>:9092 --topic my-topicEnter the message in the prompt. This command assumes that:
-
The Kafka cluster is now installed in the
kafkanamespace. -
The
KafkaSourceobject is now configured to use themy-topictopic.
-
The Kafka cluster is now installed in the
Verify that the message arrived by viewing the logs:
$ oc logs $(oc get pod -o name | grep event-display) -c user-container
You get an output similar to the following example:
☁️  cloudevents.Event
Validation: valid
Context Attributes,
  specversion: 1.0
  type: dev.knative.kafka.event
  source: /apis/v1/namespaces/default/kafkasources/example-kafka-source#example-topic
  subject: partition:46#0
  id: partition:46/offset:0
  time: 2021-03-10T11:21:49.4Z
Extensions,
  traceparent: 00-161ff3815727d8755848ec01c866d1cd-7ff3916c44334678-00
Data,
  Hello!
Chapter 5. Knative Functions CLI commands
5.1. kn functions commands
You can use the following commands to list, create, and manage Knative functions.
5.1.1. Creating a function by using the Knative CLI
You can specify the path, runtime, template, and image registry for a function as flags on the command line, or use the -c flag to start the interactive experience in the terminal.
Prerequisites
- You have installed the OpenShift Serverless Operator and Knative Serving on the cluster.
-
You have installed the Knative (
kn) CLI.
Procedure
Create a function project:
$ kn func create -r <repository> -l <runtime> -t <template> <path>
-
Accepted runtime values include
quarkus,node,typescript,go,python,springboot, andrust. Accepted template values include
httpandcloudevents.You get an output similar to the following example:
$ kn func create -l typescript -t cloudevents examplefunc
You get an output similar to the following example:
Created typescript function in /home/user/demo/examplefunc
-
Accepted runtime values include
Specify a repository that has a custom template.
You get an output similar to the following example:
$ $ kn func create -r <templates_repository> -l node -t hello-world examplefunc
Replace <templates_repository> with the repository that has the function templates.
You get an output similar to the following example:
Created node function in /home/user/demo/examplefunc
5.1.2. Running a function locally
You can run a function locally by using the kn func run command in the current directory or by specifying a directory with the --path flag.
If you run the function for the first time, or if you change the project files, the kn func run command builds the function before running it.
You can run a function in the current directory by using the following command:
$ kn func run
You can run a function in a specific directory by specifying the path with the --path flag:
$ kn func run --path=<directory_path>
You can also force a rebuild of an existing image before running the function, even if there have been no changes to the project files, by using the --build flag:
You can run a function and trigger a build by using the --build flag:
$ kn func run --build
If you set the build flag as false, this disables building of the image, and runs the function by using the previously built image:
You can run a function without building it by using the --build=false flag:
$ kn func run --build=false
You can use the help command to learn more about kn func run command options:
$ kn func help run
5.1.3. Building a function
Before you can run a function, you must build the function project. When you run the kn func run command, the system builds the function automatically. However, you can use the kn func build command to build a function without running it, which can be useful for advanced users or debugging scenarios.
You can run the kn func build command to create an OCI container image that you can run locally on your computer or on an OpenShift Container Platform cluster. This command uses the function project name and the image registry name to construct a fully qualified image name for your function.
5.1.3.1. Image container types
By default, kn func build creates a container image by using Red Hat Source-to-Image (S2I) technology.
You can build a function by using Red Hat Source-to-Image (S2I):
$ kn func build
5.1.3.2. Image registry types
By default, the system stores function images in the OpenShift Container Registry.
You can build a function by using the OpenShift Container Registry:
$ kn func build
You get an output similar to the following example:
Building function image
Function image has been built, image: registry.redhat.io/example/example-function:latest
You can override using OpenShift Container Registry as the default image registry by using the --registry flag:
$ kn func build --registry quay.io/username
You get an output similar to the following example:
Building function image
Function image has been built, image: quay.io/username/example-function:latest
5.1.3.3. Push flag
You can add the --push flag to a kn func build command to automatically push the function image after it is successfully built:
$ kn func build --push
5.1.3.4. Help command
You can use the help command to learn more about kn func build command options:
$ kn func help build
5.1.4. Deploying a function
You can deploy a function to your cluster as a Knative service by using the kn func deploy command. If you have already deployed the function, the command pushes a new container image to a container image registry and updates the Knative service.
Prerequisites
- You have installed the OpenShift Serverless Operator and Knative Serving on the cluster.
-
You have installed the Knative (
kn) CLI. - You have created a project or have access to a project with the appropriate roles and permissions to create applications and other workloads in OpenShift Container Platform.
- You must have already created and initialized the function that you want to deploy.
Procedure
Deploy a function by running the following command:
$ kn func deploy [-n <namespace> -p <path> -i <image>]
You get an output similar to the following example:
Function deployed at: http://func.example.com
-
If you do not specify a
namespace, the command deploys the function in the current namespace. -
The command deploys the function from the current directory unless you specify a
path. - The command derives the Knative service name from the project name. You cannot change the service name by using this command.
-
If you do not specify a
You can create a serverless function with a Git repository URL by using Import from Git or Create Serverless Function in the +Add view.
5.1.5. Listing existing functions
You can list existing functions by running kn func list command. To list functions that you deployed as Knative services, run kn service list command.
Procedure
List existing functions by running the following command:
$ kn func list [-n <namespace> -p <path>]
You get an output similar to the following example:
NAME           NAMESPACE  RUNTIME  URL                                                                                      READY
example-function  default    node     http://example-function.default.apps.ci-ln-g9f36hb-d5d6b.origin-ci-int-aws.dev.rhcloud.com  True
List functions deployed as Knative services by running the following command:
$ kn service list -n <namespace>
You get an output similar to the following example:
NAME            URL                                                                                       LATEST                AGE   CONDITIONS   READY   REASON
example-function   http://example-function.default.apps.ci-ln-g9f36hb-d5d6b.origin-ci-int-aws.dev.rhcloud.com   example-function-gzl4c   16m   3 OK / 3     True
5.1.6. Describing a function
The kn func info command prints information about a deployed function, such as the function name, image, namespace, Knative service information, route information, and event subscriptions.
Procedure
Describe a function by running the following command:
$ kn func info [-f <format> -n <namespace> -p <path>]
You can run the following example command to display information about a function:
$ kn func info -p function/example-function
You get an output similar to the following example:
Function name:
  example-function
Function is built in image:
  docker.io/user/example-function:latest
Function is deployed as Knative Service:
  example-function
Function is deployed in namespace:
  default
Routes:
  http://example-function.default.apps.ci-ln-g9f36hb-d5d6b.origin-ci-int-aws.dev.rhcloud.com
5.1.7. Invoking a deployed function with a test event
You can use the kn func invoke CLI command to send a test request to invoke a function either locally or on your OpenShift Container Platform cluster. You can use this command to test that a function is working and able to receive events correctly. Invoking a function locally is useful for a quick test during function development. Invoking a function on the cluster is useful for testing that is closer to the production environment.
Prerequisites
- You have installed the OpenShift Serverless Operator and Knative Serving on the cluster.
-
You have installed the Knative (
kn) CLI. - You have created a project or have access to a project with the appropriate roles and permissions to create applications and other workloads in OpenShift Container Platform.
- You must have already deployed the function that you want to call.
Procedure
Start a function by running the following command:
$ kn func invoke
-
The
kn func invokecommand only works when there is either a local container image currently running, or when there is a function deployed in the cluster. -
The
kn func invokecommand executes on the local directory by default, and assumes that this directory is a function project.
-
The
5.1.7.1. kn func invoke optional parameters
You can specify optional parameters for the request by using the following kn func invoke CLI command flags.
| Flags | Description |
|---|---|
|
|
Specifies the target instance of the invoked function, for example, |
|
|
Specifies the format of the message, for example, |
|
| Specifies a unique string identifier for the request. |
|
| Specifies the namespace on the cluster. |
|
|
Specifies sender name for the request. This corresponds to the CloudEvent |
|
|
Specifies the type of request, for example, |
|
|
Specifies content for the request. For CloudEvent requests, this is the CloudEvent |
|
| Specifies path to a local file containing data to be sent. |
|
| Specifies the MIME content type for the request. |
|
| Specifies path to the project directory. |
|
| Enables prompting to interactively confirm all options. |
|
| Enables printing verbose output. |
|
|
Prints information on usage of |
5.1.7.1.1. Main parameters
The following parameters define the main properties of the kn func invoke command:
- Event target (
-t,--target) -
The target instance of the invoked function. Accepts the
localvalue for a locally deployed function, theremotevalue for a remotely deployed function, or a URL for a function deployed to an arbitrary endpoint. If a target is not specified, it defaults tolocal. - Event message format (
-f,--format) -
The message format for the event, such as
httporcloudevent. This defaults to the format of the template that was used when creating the function. - Event type (
--type) -
The type of event that is sent. You can find information about the
typeparameter that is set in the documentation for each event producer. For example, the API server source might set thetypeparameter of produced events asdev.knative.apiserver.resource.update. - Event source (
--source) -
The unique event source that produced the event. This might be a URI for the event source, for example
Content from 10.96.0.1 is not included.https://10.96.0.1/, or the name of the event source. - Event ID (
--id) - A random, unique ID that is created by the event producer.
- Event data (
--data) Allows you to specify a
datavalue for the event sent by thekn func invokecommand. For example, you can specify a--datavalue such as"Hello World"so that the event contains this data string. By default, no data is included in the events created bykn func invoke.NoteFunctions that have been deployed to a cluster can respond to events from an existing event source that provides values for properties such as
sourceandtype. These events often have adatavalue in JSON format, which captures the domain specific context of the event. By using the CLI flags noted in this document, developers can simulate those events for local testing.You can also send event data by using the
--fileflag to provide a local file containing data for the event. In this case, specify the content type by using--content-type.- Data content type (
--content-type) -
If you are using the
--dataflag to add data for events, you can use the--content-typeflag to specify what type of data is carried by the event. In the previous example, the data is plain text, so you might specifykn func invoke --data "Hello world!" --content-type "text/plain".
5.1.7.1.2. Example commands
This is the general invocation of the kn func invoke command:
$ kn func invoke --type <event_type> --source <event_source> --data <event_data> --content-type <content_type> --id <event_ID> --format <format> --namespace <namespace>
For example, to send a "Hello world!" event, you can run:
$ kn func invoke --type ping --source example-ping --data "Hello world!" --content-type "text/plain" --id example-ID --format http --namespace my-ns
5.1.7.1.2.1. Specifying the file with data
To specify the file on disk that contains the event data, use the --file and --content-type flags:
$ kn func invoke --file <path> --content-type <content-type>
For example, to send JSON data stored in the test.json file, use this command:
$ kn func invoke --file ./test.json --content-type application/json
5.1.7.1.2.2. Specifying the function project
You can specify a path to the function project by using the --path flag:
$ kn func invoke --path <path_to_function>
For example, to use the function project located in the ./example/example-function directory, use this command:
$ kn func invoke --path ./example/example-function
5.1.7.1.2.3. Specifying where the target function is deployed
By default, kn func invoke targets the local deployment of the function:
$ kn func invoke
To use a different deployment, use the --target flag:
$ kn func invoke --target <target>
For example, to use the function deployed on the cluster, use the --target remote flag:
$ kn func invoke --target remote
To use the function deployed at an arbitrary URL, use the --target <URL> flag:
$ kn func invoke --target "https://my-event-broker.example.com"
You can explicitly target the local deployment. In this case, if the function is not running locally, the command fails:
$ kn func invoke --target local
5.1.8. Deleting a function
You can delete a function by using the kn func delete command. This is useful when a function is no longer required, and can help to save resources on your cluster.
Procedure
Delete a function by running the following command:
$ kn func delete [<function_name> -n <namespace> -p <path>]
-
If you do not specify the name or path of the function to delete, the system searches the current directory for a
func.yamlfile and uses it to decide which function to delete. -
If the namespace is not specified, it defaults to the
namespacevalue in thefunc.yamlfile.
-
If you do not specify the name or path of the function to delete, the system searches the current directory for a