How to Create a Red Hat Enterprise Linux Virtual Machine in Microsoft Azure Using an On-Demand Marketplace Image
This knowledge article provides step-by-step guidance for creating a Red Hat Enterprise Linux (RHEL) Virtual Machine (VM) using the On-Demand image from the Microsoft Azure Marketplace. This article also includes basic instructions for monitoring the new Azure RHEL VM using Red Hat CloudForms.
Note: If you want to migrate existing subscriptions and provision RHEL VMs for Microsoft Azure using the Azure cross-platform CLI, refer to Creating a Red Hat Enterprise Linux Image and Provisioning it to Microsoft Azure. The Azure cross-platform CLI provides extensive management capabilities for RHEL VMs in Azure.
Before You Begin
- You need a Content from azure.microsoft.com is not included.Microsoft Azure Account to complete the procedure.
- The Content from azure.microsoft.com is not included.Microsoft Azure portal user interface (UI) undergoes constant user experience improvement. The steps and examples in this article are based on the portal UI at the time of writing.
- If you want to manage your new VM from outside the Microsoft Azure portal, refer to Set Up your Azure Administration Server. This procedure guides you through setting up a Red Hat Enterprise Linux (RHEL) machine to serve as an Azure Administration Server. It also provides steps for installing the Azure cross-platform command line interface (CLI).
- If you want to monitor your VM using Red Hat CloudForms, you need to install (or have access to) a Red Hat CloudForms appliance. Microsoft Azure must be set up as a cloud provider. Refer to the product documentation for This content is not included.Red Hat CloudForms.
Create the VM in the Microsoft Azure Portal
-
Launch the Content from azure.microsoft.com is not included.Microsoft Azure portal.
-
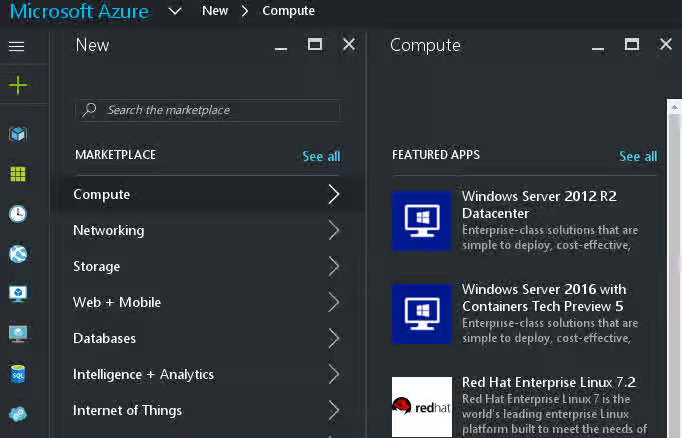
Select New and then Compute from the portal navigation panel.
-
Select (or search for) the Red Hat Enterprise Linux Azure Marketplace image version you want to use. (Red Hat Enterprise Linux 7.2 is used for this procedure.)
-
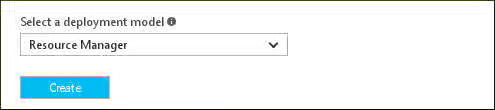
Select the Resource Manager deployment model. Refer to Content from azure.microsoft.com is not included.Resource Manager Deployment Model for more information.
Configure the VM and Network Settings
Basics Panel
-
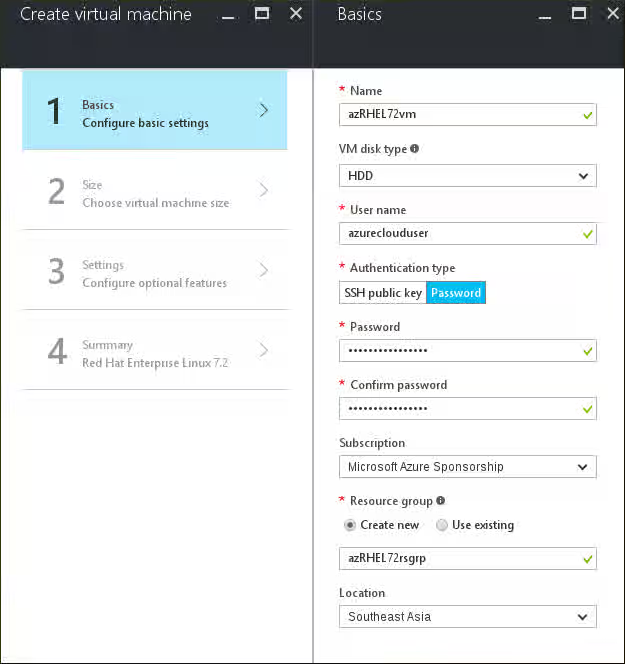
Enter a descriptive Name for your VM. Refer to Content from azure.microsoft.com is not included.Infrastructure Naming Guidelines for more information.
-
Select a VM disk type.
For high-capacity VMs running data-intensive tasks, select a solid state drive (SSD). This is Azure Premium Storage. For Standard Storage, select a hard disk drive (HDD). Refer to Content from azure.microsoft.com is not included.Azure Premium Storage for more information.
-
Enter a User name for the VM administrator.
Important: Do not use root as the user name. By default, the root user account is disabled for On-Demand Linux images in the Azure Marketplace. VM administrators can use
sudofor commands requiring root access. Refer to Content from azure.microsoft.com is not included.Using root privileges for more information. -
Select your Authentication type.
SSH public key: Generate an SSH public key using
ssh-keygenor some other method, and enter the key in the space provided. Refer to Content from azure.microsoft.com is not included.Creating SSH keys for more information.Password: Enter a valid password.
-
Your default Subscription should display. Change this if you want the new VM created under a different Microsoft subscription.
-
If you have existing VMs, you may have a Resource group where you want this VM to be located. If so, select your resource group from the list provided. If you do not have a preferred resource group, enter a resource group name and it will be created for you.
-
Select a Location (region) to create your VM in. Generally, you should pick the region that is closest to you and your VM users. Refer to Content from azure.microsoft.com is not included.Products available by region for additional information about available products in the region.
-
Click OK.
Size Panel
Select a VM with the appropriate capacity for your computing requirements. Refer to Content from azure.microsoft.com is not included.Pricing Details for costs associated with your selection.

Settings Panel: Storage and Network Settings
There are several settings you can choose for the VM. Many of these will default to your storage account and resource group settings. You can modify other settings as applicable.
-
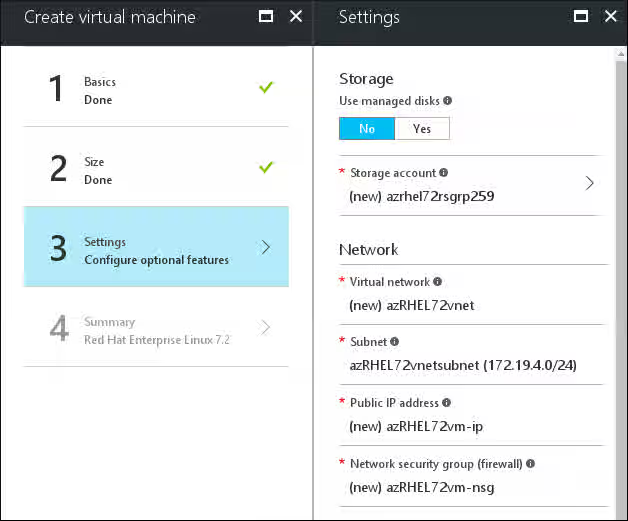
Under Use managed disks, select No to manage your own storage account or Yes to use Azure Managed Disks. For more information about this service, refer to Content from docs.microsoft.com is not included.Azure Managed Disks Overview. Skip to Step 3 if you will use Azure Managed Disks.
-
Verify the Storage account name. If your VM needs to be attached to a new or a different storage account, select that here.
-
Select or create a new Virtual network (vnet) for the new VM.
- You can use the default name and address space.
- Create the Subnet name. You can maintain the default subnet address range.
Note: You can modify any of these settings as necessary for your environment.
-
A Public IP address is automatically generated for the VM.
You can change the name of the Public IP address by clicking on the address and expanding the options for this setting. Unless you have a specific need, leave the Public IP address set to dynamic (default).
-
A Network security group (firewall) is automatically generated for the new VM. Click on the security group to see the options for this setting.
The Network security group (nsg) settings generated are basic security settings created for all generated Azure VMs. You can set up additional inbound and outbound rules here. The default settings allow all inbound traffic and SSH traffic on port 22.
Note: You can set additional detailed security options by selecting Network security groups from the portal navigation panel. Refer to Content from azure.microsoft.com is not included.How to manage NSGs using the Azure portal for more information about network security.
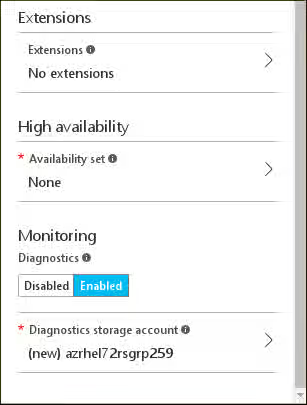
Settings Panel: Extensions, High Availability, and Monitoring
-
If applicable, select Extensions for the VM.
Extensions allow more functionality within the VM, such as using Docker, Chef, and virus protection. Refer to Content from azure.microsoft.com is not included.About virtual machine extensions and features for more information.
-
If applicable, select an Availability Set for the VM.
You can group two or more VMs in an Availability Set. This ensures that you meet service level agreement (SLA) goals by having redundant VMs; one VM is always available and running when the other VM is offline. Refer to Content from azure.microsoft.com is not included.Manage the availability of virtual machines for more information.
-
Enable or disable Monitoring for the VM. The default for this setting is Enabled. A Diagnostics storage account is automatically created when this setting is enabled.
-
Click OK. Your selections are validated. When passed, the summary screen shows all the settings you configured for the VM.

-
Verify the information and click OK to start deploying the VM. You should see it being created on your dashboard.
Once the VM is created you can configure a couple of additional VM settings.
Configure Additional VM Settings
-
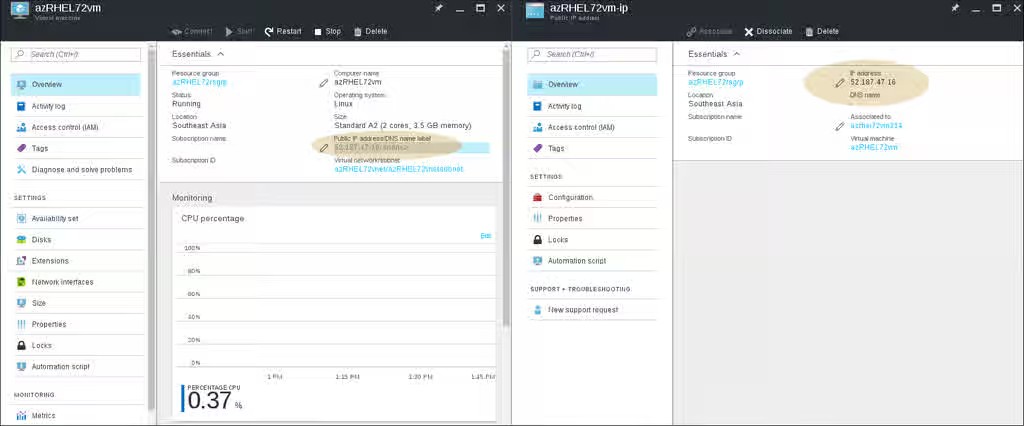
Open the properties for the new VM.
-
Click on the Public IP address/DNS name label (highlighted) to open the VM IP details screen. Note the IP address in the IP overview section (highlighted). You only see an IP address here if the VM is running. Before continuing, make sure you see an IP address in this location.
-
Start a terminal session and access the VM using SSH. If the VM is running, you will be prompted for a username and password.
$ ssh azureclouduser@52.187.47.16 azureclouduser@52.187.47.16's password: Last login: Thu Sep 29 18:00:33 2016 [azureclouduser@azRHEL72vm ~]$ ls -alt total 20 drwx------. 4 azureclouduser azureclouduser 4096 Sep 29 18:00 . -rw-------. 1 azureclouduser azureclouduser 5 Sep 29 18:00 .bash_history drwxrwxr-x. 3 azureclouduser azureclouduser 17 Sep 29 18:00 .config drwxrwxr-x. 3 azureclouduser azureclouduser 17 Sep 29 18:00 .cache drwxr-xr-x. 3 root root 27 Sep 27 20:11 .. -rw-r--r--. 1 azureclouduser azureclouduser 18 Jul 12 15:17 .bash_logout -rw-r--r--. 1 azureclouduser azureclouduser 193 Jul 12 15:17 .bash_profile -rw-r--r--. 1 azureclouduser azureclouduser 231 Jul 12 15:17 .bashrc [azureclouduser@azRHEL72vm ~]$ pwd /home/azureclouduser [azureclouduser@azRHEL72vm ~]$ -
Exit the terminal session.
Configure Additional Network Settings
-
Open the Microsoft Azure port IP details screen again (shown in the previous section). Click Configuration under Settings.

-
Make the following changes:
-
The default idle timeout is 4 minutes. Changing this to a longer timeout will ensure that idle connections are not dropped after 4 minutes.
-
Create a DNS name label so there is a permanent address to use for the VM. The dynamic IP address will change, but the VM can always be accessed using the DNS name.
-
-
Click Save.
-
Start a terminal session and access the VM using SSH. Use the DNS name label instead of the IP address. At the prompt, enter
cat /etc/redhat-releaseto see the version of the software being used.$ ssh azureclouduser@azrhel72vm.southeastasia.cloudapp.azure.com azureclouduser@azrhel72vm.southeastasia.cloudapp.azure.com's password: Last login: Thu Sep 29 18:23:56 2016 from [azureclouduser@azRHEL72vm ~]$ cat /etc/redhat-release Red Hat Enterprise Linux Server release 7.2 (Maipo) [azureclouduser@azRHEL72vm ~]$ -
Exit the terminal session.
Your new Azure VM is up and running. You can now connect to the VM and perform any server tasks you need to perform.
Review VM Resources
Note: The following is applicable only if you are managing your own storage account. If you are using Azure Managed Disks, storage account information is not available to view. You can export disks to use as templates for future VMs.
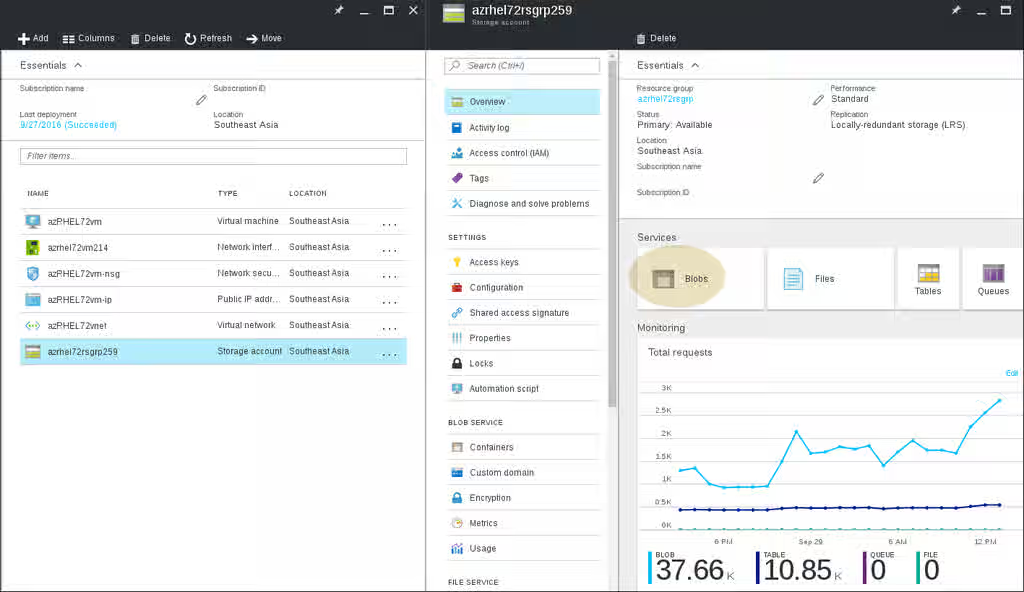
View all the resources that were created during this procedure.
-
Select Resource Groups from the portal navigation panel.
-
Select your Resource Group from the list. Note the VM resources created during the procedure.
-
Click the Storage Account Name. You can select and view the details for the VM you created from this screen.
-
Click Blobs to open the Blobs service panel.
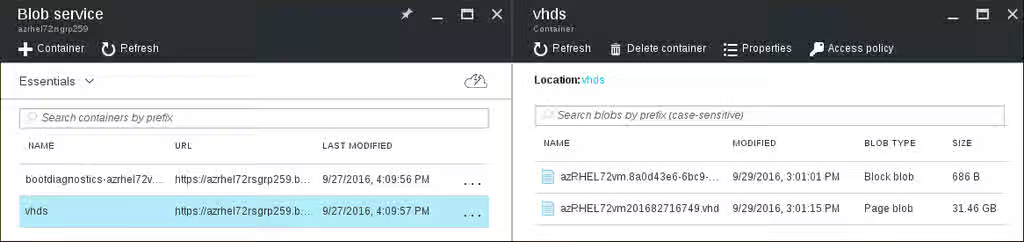
-
Click on the Page blob. Note that you can download this
vhdfile to use as a template for future VMs. Refer to Content from azure.microsoft.com is not included.How to use blobs for more information.
You can manage this VM in the Microsoft Azure portal using the control panel or the Content from docs.microsoft.com is not included.Azure Cloud Shell. You can also use the Azure CLI to manage the VM from your RHEL Azure Administration Server. The example below shows a simple Azure CLI command to list VMs in a specific resource group.
$ az vm list -g testrsgrp003
Name          ResourceGroup    Location
------------  ---------------  --------------
byosrhel74vm  testsgrp003      southcentralus
Refer to the Azure CLI Common Command Reference for additional Azure CLI commands.