How to provision a Red Hat Enterprise Linux virtual machine for Microsoft Azure
Before you start
Important: This article is superseded by This content is not included.Deploying Red Hat Enterprise Linux 8 on public cloud platforms and Deploying Red Hat Enterprise Linux 7 on public cloud platforms. The RHEL KVM Guest Image is intended to be used with Red Hat Virtualization and Red Hat OpenStack.
Refer to Composing a customized RHEL system image for details on how to create a RHEL 8 VM.
Refer to the Image Builder Guide for details on how to create a RHEL 7 VM.
Note: cloud-init version 18.2 (or later) is supported for RHEL 7.6 in Azure. We are in the process of updating our documentation for the Red Hat Cloud Access program.
This knowledge article provides step-by-step guidance for provisioning a Red Hat Enterprise Linux (RHEL) image and virtual machine (VM) for Microsoft Azure. If you have created VMs for Microsoft Azure using other Linux distributions, or if you are only looking for required packages and drivers, you can choose to view specific topics.
Note: If you want to create a RHEL VM using the Azure Marketplace On-Demand image in the Microsoft Azure portal, refer to Creating a Red Hat Enterprise Linux VM using the Microsoft Azure Marketplace Image.
About Azure Management utility versions
The procedure in this article steps you through how to use version 2.0 of the Azure command-line interface (Azure CLI 2.0) to provision a RHEL VM for Microsoft Azure. Azure CLI 2.0 is a Python-based utility that supports Azure Resource Manager (ARM) mode only. For more information about Azure CLI 2.0, refer to Content from github.com is not included.Motivation and Frequently Asked Questions.
Azure Service Management (ASM) mode (sometimes referred to as Azure Classic) may also be used to provision a RHEL VM for Microsoft Azure. Azure CLI 2.0 does not support the older ASM mode. If you need to provision a RHEL VM using ASM mode, use version 1.0 of the Azure cross-platform CLI (Xplat-CLI). Refer to How to Use the Azure Xplat-CLI to provision a Red Hat Enterprise Linux Virtual Machine for Microsoft Azure.
Get accounts with Red Hat and Microsoft Azure
Note: Go to Enroll in the Red Hat Cloud Access Program if you already have accounts with Red Hat and Microsoft Azure.
You need a Content from azure.microsoft.com is not included.Microsoft Azure Account and a Red Hat Customer Portal Account to complete the procedure. Create these accounts if you do not already have them. Once these accounts are active, enroll in the Red Hat Cloud Access program so you can migrate your Red Hat subscriptions to Microsoft Azure.
Enroll in the Red Hat Cloud Access program
Note: Go to Set Up your Azure Administration Server if you have already enrolled in the Red Hat Cloud Access program.
You must be enrolled in the Red Hat Cloud Access program and have unused Red Hat Enterprise Linux (RHEL) subscriptions. See Red Hat Cloud Access program to enroll in this program.
During enrollment, you identify the types and quantity of Red Hat images to register in Microsoft Azure. Once you have enrolled and verified that you have unused subscriptions, you can migrate these subscriptions to Microsoft Azure.
After enrollment, set up your Azure Administration Server.
Set up your Azure Administration Server
Your Azure Administration Server should be a Red Hat Enterprise Linux 7 Server or Workstation that you can use to manage resources in Microsoft Azure. You need to use sudo or root account access for this procedure.
Important: Your Azure Administration Server must not be a Microsoft Azure VM.
Required Administration Server packages
The following packages are necessary to set up your Azure Administration Server. Some of these packages are already installed as part of your RHEL operating system configuration. Others are installed during this procedure. You can use yum info <package> to see if a specific package is installed.
| Package | Repository | Description |
|---|---|---|
| libvirt | rhel-7-server-rpms | Open source API, daemon, and management tool for managing platform virtualization |
| virt-manager | rhel-7-server-rpms | A command line and Gnome desktop virtual machine manager used to create and manage KVM virtual machines |
| libguestfs | rhel-7-server-rpms | A library for accessing and modifying virtual machine file systems |
| libguestfs-tools | rhel-7-server-rpms | System administration tools for virtual machines; includes the guestfish utility |
Install the Azure CLI
Complete the steps below to install the Azure CLI.
Note: Replace the command yum with dnf if you are using Fedora.
-
Import the Microsoft repository key.
$ sudo rpm --import https://packages.microsoft.com/keys/microsoft.asc
-
Create a local Azure CLI repository entry.
$ sudo sh -c 'echo -e "[azure-cli]\nname=Azure CLI\nbaseurl=https://packages.microsoft.com/yumrepos/azure-cli\nenabled=1\ngpgcheck=1\ngpgkey=https://packages.microsoft.com/keys/microsoft.asc" > /etc/yum.repos.d/azure-cli.repo'
-
Update the
yumpackage index.$ yum check-update
-
Install the Azure CLI.
$ sudo yum install azure-cli
-
Run the Azure CLI.
$ az
Create a RHEL VM Image for Microsoft Azure
Once your environment is set up and the Azure CLI is installed, complete the applicable procedure below.
Refer to This content is not included.Deploying Red Hat Enterprise Linux 8 on public cloud platforms for information on how to create a base image from a KVM Guest image or ISO image in RHEL 8.
- Create the RHEL VM from a RHEL KVM Guest Image
- Create the RHEL VM from a RHEL 7.x ISO Image
- Create the RHEL VM from a RHEL 6.x ISO Image
Note: If you want to create a Kickstart configuration file or modify an existing Kickstart configuration file for Microsoft Azure, use the instructions at How to use the Red Hat Kickstart Generator to create a Microsoft Azure Virtual Machine.
Create the RHEL VM from a RHEL KVM Guest Image
Red Hat and the open source community optimized this image for virtualization. Once you have the image configured, you can use this image as a template for creating subsequent VMs in Microsoft Azure. Note the following configuration settings before you create the RHEL VM.
Note: Microsoft Azure supports RHEL 6.7 (and later) and RHEL 7.1 (and later) KVM Guest Images.
VM configuration settings
Microsoft Azure VMs must have the following configuration settings. Some of these settings are enabled during the initial VM creation. Other settings are set when provisioning the VM image for Microsoft Azure. Keep these settings in mind as you move through the procedure and refer back to them if you need to.
| Option | Recommendation |
|---|---|
| ssh | ssh must be enabled to provide remote access to your Azure VMs. |
| dhcp | The primary virtual adapter should be configured for dhcp (IPv4 only). |
| Network Manager | This service should be disabled on RHEL 6.x images. |
| Swap Space | Do not create a dedicated swap file or swap partition. Swap space may be configured in the Windows Azure Linux Agent. |
| NIC | Choose virtio device for the primary virtual network adapter. |
| encryption | Encrypting Red Hat Enterprise Linux on Azure |
Download the KVM Guest Image
-
Download the latest This content is not included.KVM Guest Image.
Note: We recommend using the latest minor version of each major version of RHEL. Even though we support RHEL 6.7, we prefer you use the latest RHEL 6 minor release. Likewise, even though RHEL 7.1 is supported, you should use the latest RHEL 7 minor release. RHEL 7.0 is not supported in Microsoft Azure.
-
Move the image to
/var/lib/libvirt/images.
Create the RHEL VM
-
Start virt-manager:
virt-manager is a virtual machine manager used to create and manage your VMs. It is available to run from the command line and from the Gnome desktop. Enter
virt-managerat a terminal prompt or select Virtual Machine Manager from the Gnome GUI.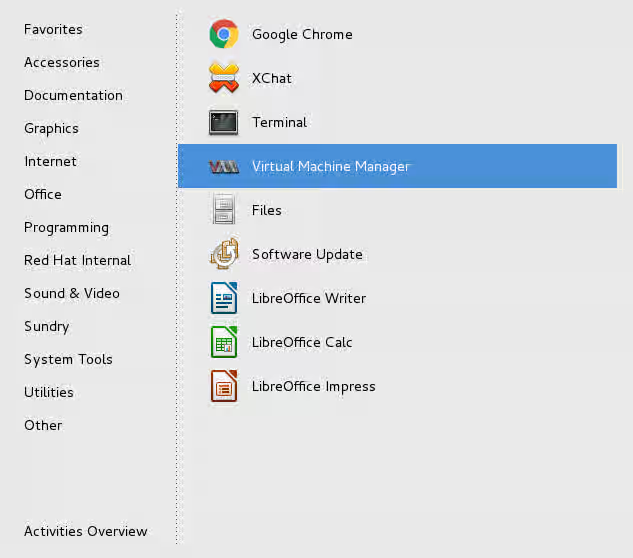
-
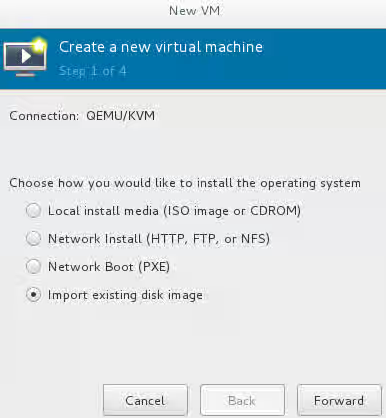
Create a new VM and select Import existing disk image.
-
Select the
qcow2KVM Guest Image from the/imagesdirectory. (Choose OS type Linux and the appropriate RHEL version in the subsequent dialog box.)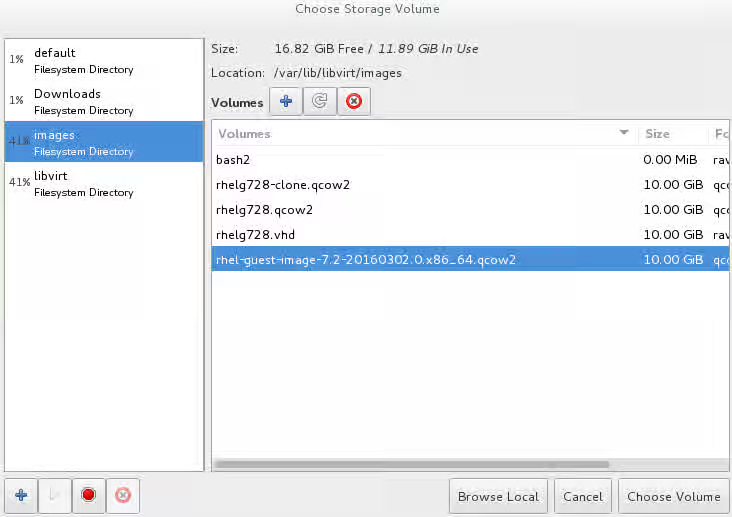
-
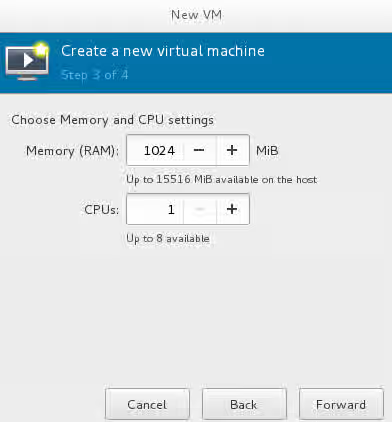
Select the capacity (RAM and CPUs) you want set for your VM.
- Review the settings. Select the Customize configuration before install check box.
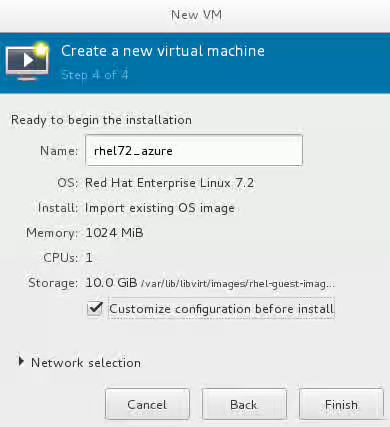
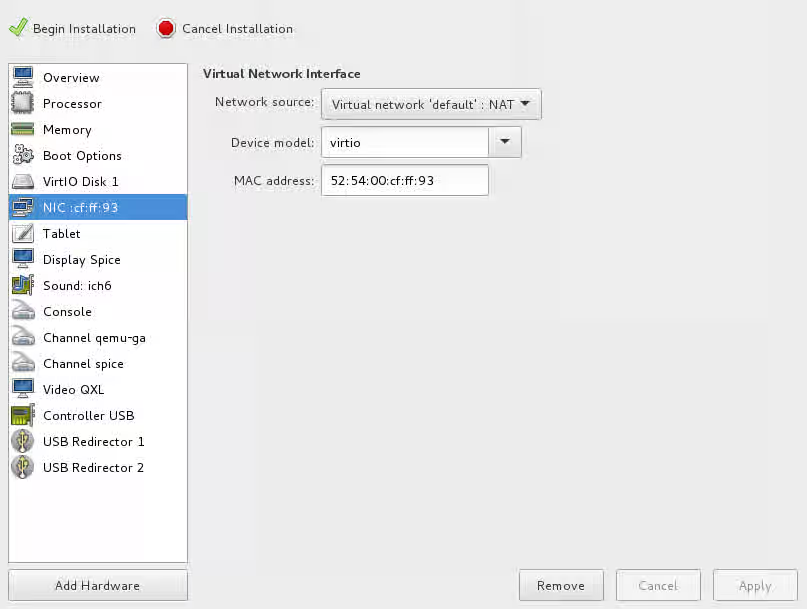
- On the custom configuration dialog box, make sure that virtio is set as the NIC Device model.
-
Click Begin Installation.
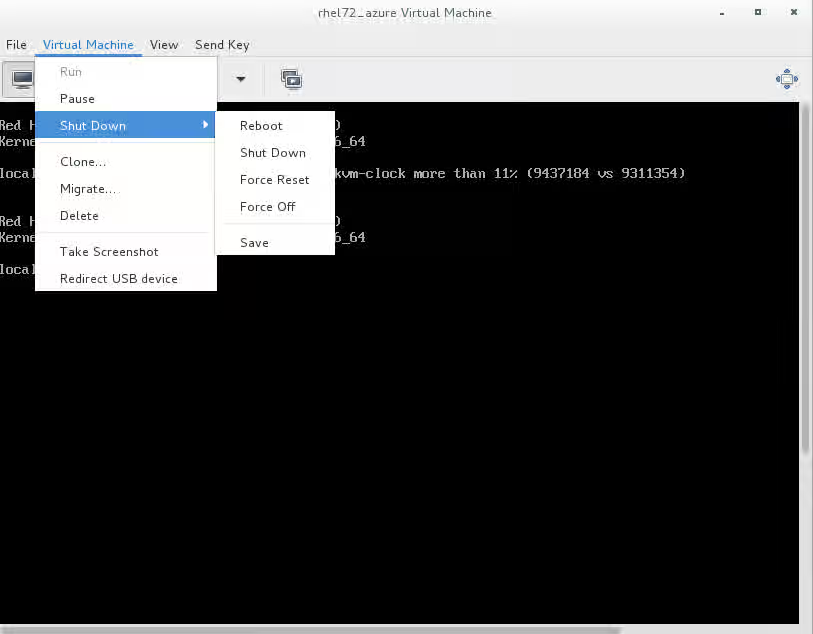
Once installation begins, the VM console appears and boots to a login prompt. (You may have to press Enter a couple of times to get the prompt to show up.)
-
Once the login prompt appears, shut down the VM.
-
Set up root access to the VM. From your Azure Administration Server, use
virt-customizeto generate a root password for the VM.# virt-customize -a <guest-image-path> --root-password password:<PASSWORD>
Example:
# virt-customize -a /var/lib/libvirt/images/rhel-guest-image-6.9-120.x86_64.qcow2 --root-password password:redhat!
[   0.0] Examining the guest ...
[ 103.0] Setting a random seed
[ 103.0] Setting passwords
[ 112.0] Finishing off
-
Verify root access by starting the RHEL VM and logging in as
root. -
Once you are logged in using the root account, go to Configure and Convert the Image.
Create the RHEL VM from a RHEL 7.x ISO image
Complete the following steps to create a RHEL VM from a RHEL 7.x ISO image. Once you have the image configured, you can use this image as a template for creating subsequent VMs in Microsoft Azure. Note the following configuration settings before you create the RHEL VM.
Note: We recommend using the latest minor version of each major version of RHEL. Even though we support RHEL 7.1, you should use the latest RHEL 7 minor release. RHEL 7.0 is not supported in Microsoft Azure.
VM configuration settings
Azure VMs must have the following configuration settings. Some of these settings are enabled during the initial VM creation. Other settings are set when provisioning the VM image for Microsoft Azure. Keep these settings in mind as you move through the procedure and refer back to them if you need to.
| Option | Recommendation |
|---|---|
| ssh | ssh must be enabled to provide remote access to your Azure VMs. |
| dhcp | The primary virtual adapter should be configured for dhcp (IPv4 only). |
| Swap Space | Do not create a dedicated swap file or swap partition. Swap space may be configured in the Windows Azure Linux Agent. |
| NIC | Choose virtio device for the primary virtual network adapter. |
| encryption | Encrypting Red Hat Enterprise Linux on Azure |
Create the RHEL VM
-
Download the latest This content is not included.Red Hat Enterprise Linux 7.x Binary DVD image.
-
Move the ISO image to
/var/lib/libvirt/images/. -
Start virt-manager.
virt-manager is a virtual machine manager used to create and manage your VMs. It is available to run from the command line and from the Gnome desktop. Enter
virt-managerat a terminal prompt or select Virtual Machine Manager from the Gnome GUI.
-
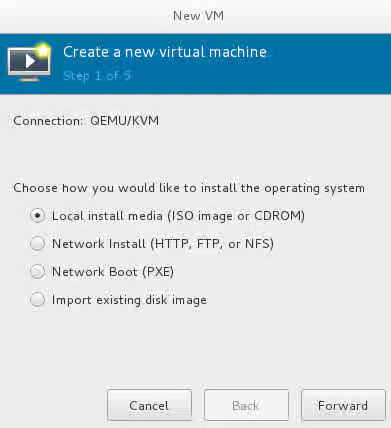
Create a new VM and select Local install media (ISO image or CDROM).
-
Select your ISO image from the
/imagesdirectory. Select the remaining options provided below.- Change the default Memory (RAM) and CPUs to the capacity settings you want for your VM image.
- Review the settings and select Customize configuration before install check box.
- Select virtio for the NIC Device model on the final configuration dialog box.
-
Click Begin Installation.
-
Select Install Red Hat Enterprise Linux. Once installation begins, the Installation Summary screen will appear.
-
On the Installation Summary screen, select Installation Destination.
-
On the Installation Destination screen, check I will configure partitioning. under Other Storage Options, and then click Done.
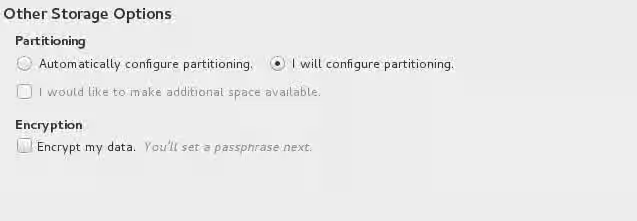
Note: Do not select Encryption. Red Hat and Microsoft do not currently support disk encryption for Bring Your Own Subscription VMs.
-
On the Manual Partitioning screen, click Click here to create them automatically.

-
Highlight swap and click the minus symbol to remove the swap partition from the file system.

-
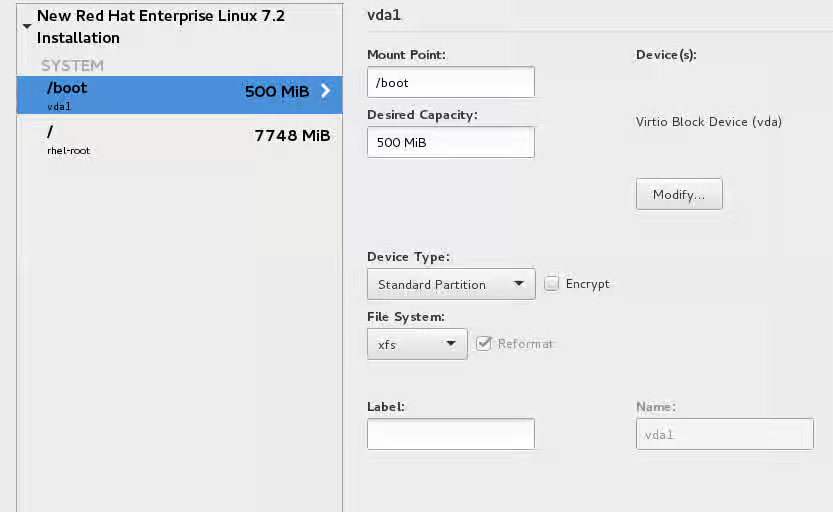
Select the boot partition and set the following options.
- Device Type: Standard Partition
- File System: ext3 or ext4 (xfs can be used for RHEL 7.x.)
- Do not check the Encrypt option. Red Hat and Microsoft do not currently support disk encryption for Bring Your Own Subscription VMs.
-
Select the root partition and set the following options.
- Device Type: Standard Partition
- File System: ext3 or ext 4 (xfs can be used for RHEL 7.x.)
- Do not check the Encrypt option. Red Hat and Microsoft do not currently support disk encryption for Bring Your Own Subscription VMs.
-
Click Update Settings and then Done. (You may need to click Done again to continue.)
-
Accept the changes.
-
On the Installation Summary screen, select Network & Host Name.
- Switch Ethernet (eth0) to On.
- Set the Host name.
-
Click Begin Installation.
-
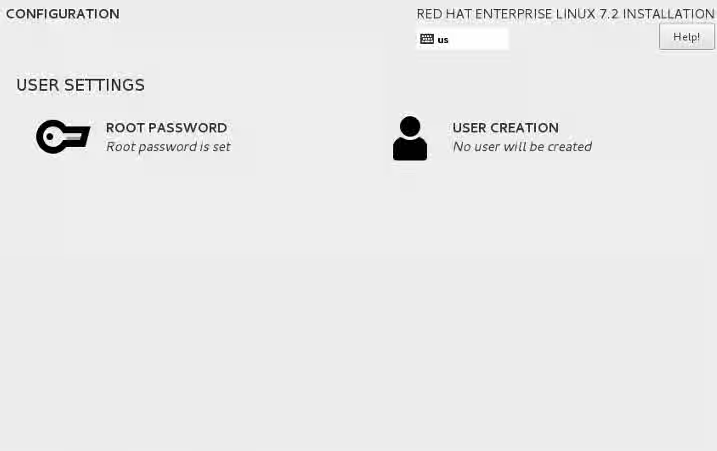
While the installer is running, create a root password under User Settings and any other user accounts you need.
-
When the installation is complete, reboot the VM and log in to the root account. Once you are logged in, go to Configure and Convert the Image.
Create the RHEL VM from a RHEL 6.x ISO image
Complete the following steps to create a RHEL VM from a RHEL 6.x ISO image. Once you have the image configured, you can use this image as a template for creating subsequent VMs in Microsoft Azure. Note the following configuration settings before you create the RHEL VM.
Note: We recommend using the latest minor version of each major version of RHEL. Even though we support RHEL 6.7, you should use the latest RHEL 6 minor release. Earlier RHEL 6 versions are not supported in Microsoft Azure.
VM configuration settings
Azure VMs must have the following configuration settings. Some of these settings are enabled during the initial VM creation. Other settings are set when provisioning the VM image for Microsoft Azure. Keep these settings in mind as you move through the procedure and refer back to them if you need to.
| Option | Recommendation |
|---|---|
| dhcp | The primary virtual adapter should be configured for dhcp (IPv4 only). |
| Network Manager | This service should be disabled (if present). |
| Swap Space | Do not create a dedicated swap file or swap partition. Swap space may be configured in the Windows Azure Linux Agent. |
| NIC | Choose virtio device for the primary virtual network adapter. |
| encryption | Encrypting Red Hat Enterprise Linux on Azure |
Create the RHEL VM
-
Download the This content is not included.Red Hat Enterprise Linux 6.x Binary DVD image.
-
Move the ISO image to
/var/lib/libvirt/images/. -
Start virt-manager.
virt-manager is a virtual machine manager used to create and manage your VMs. It is available to run from the command line and from the Gnome desktop. Enter
virt-managerat a terminal prompt or select Virtual Machine Manager from the Gnome GUI.
-
Create a new VM and select Local install media (ISO image or CDROM).
-
Select your ISO image from the
/imagesdirectory and select the remaining options provided below.- Change the default Memory (RAM) and CPUs to the capacity settings you want for your VM image.
- Review the settings and select Customize configuration before install check box.
- Select virtio for the NIC Device model on the final configuration dialog box.
-
Click Begin Installation.
-
Select Install Red Hat Enterprise Linux.
-
Complete or skip the media test and set the location.
-
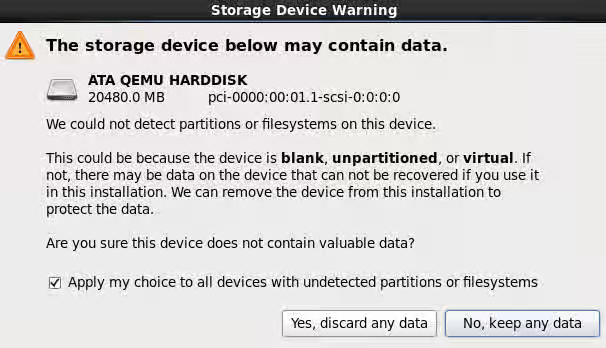
Select Basic Storage Devices.

-
Because this is a new VM, click Yes, discard any data.
-
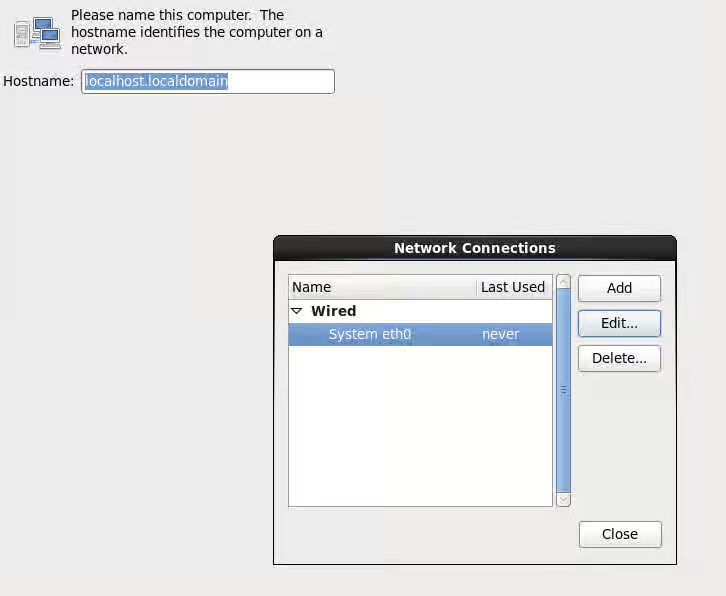
Set the Hostname and click Configure Network. Verify that System eth0 is present.
-
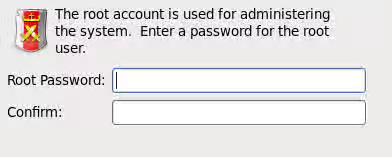
Select your time zone and set the root account password.
-
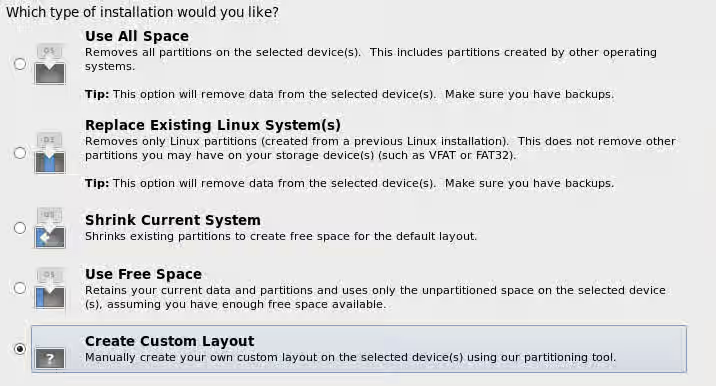
Select Create Custom Layout from the installation screen.
-
Click Create and select Standard Partition.

-
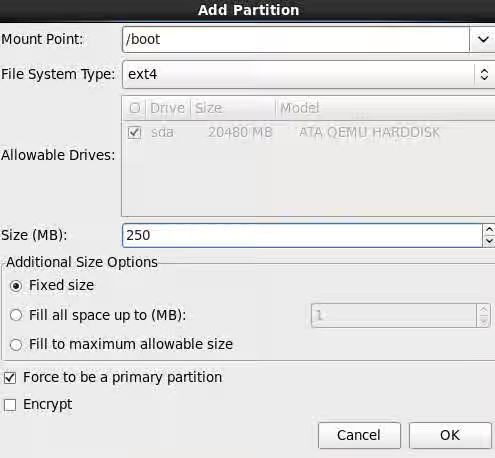
Add the boot partition with the following characteristics and click OK.
- Mount Point: /boot
- File System Type: ext4
- Size (MB): 250 (Note that a 250 MB boot partition is sufficient for most users.)
- Fixed size
- Check the option Force to be primary partition.
- Do not check the Encrypt option. Red Hat and Microsoft do not currently support disk encryption for Bring Your Own Subscription VMs.
-
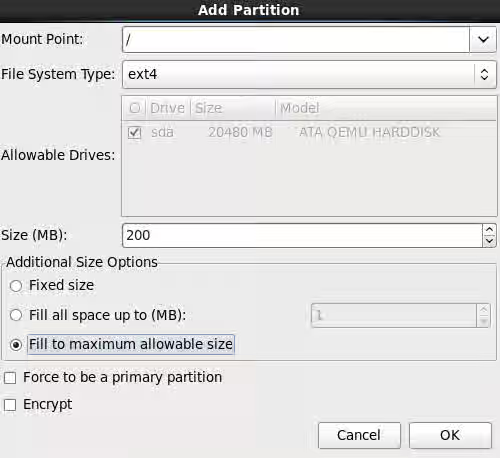
Create another Standard Partition for root with the following characteristics and click OK.
- Mount Point: /
- File System Type: ext4
- Select Fill to maximum allowable size.
- Do not check the Encrypt option. Red Hat and Microsoft do not currently support disk encryption for Bring Your Own Subscription VMs.
-
Click Next.
- The installer displays a swap partition warning. Click Yes to continue.
- The installer displays a format warning. Click Format.
-
Click Write changes to disk.
-
Keep (click through) the default selections on the remaining installation screens, unless you have known package and configuration requirements. All of the options on these installation screens are configurable later if needed.
-
When the installation is complete, reboot the VM and log in to the root account. Once you are logged in, go to Configure and Convert the Image.
Configure and convert the image
Complete the procedures in the following sections to finalize the image configuration.
Install Hyper-V device drivers on the RHEL VM (if needed)
Microsoft provides network and storage device drivers as part of their Linux Integration Services for Hyper-V package. Hyper-V device drivers may need to be installed on the RHEL VM prior to importing it to Microsoft Azure. Use the lsinitrd | grep hv command to verify that the drivers are installed. If they are not installed, complete the following steps to manually configure the Hyper-V device drivers.
Note the spaces before and after the quotes, for example, add_drivers+=" hv_vmbus ". This ensures that unique drivers are loaded in the event that other Hyper-V drivers already exist in the environment.
-
On the RHEL VM, add the driver parameters to the
/etc/dracut.conffile.add_drivers+=" hv_vmbus " add_drivers+=" hv_netvsc " add_drivers+=" hv_storvsc " -
Regenerate the
intramfsimage.dracut -f -v --regenerate-all -
Verify the configuration changes.
lsinitrd | grep hv
You should see a list of Hyper-V drivers similar to the following drivers.

Important: At this point, you should clone the RHEL VM. Shut down the VM, right-click on the VM in Virtual Machine Manager, and select Clone. Follow the prompts to clone the VM. This VM can be used as a backup copy of the RHEL VM if you need to start over.
Configure the RHEL VM image
The RHEL VM requires further configuration changes to serve as your gold RHEL VM image in Microsoft Azure. Complete the following steps to make these changes.
-
Power on the RHEL VM.
-
Stop the
cloud-initservice (if present).RHEL 7.x:
systemctl stop cloud-initRHEL 6.x:
/etc/init.d/cloud-init stop -
Remove the
cloud-initsoftware.yum remove cloud-init -
Edit the
/etc/ssh/sshd_configfile and enable password authentication.PasswordAuthentication yes -
RHEL 6.x Only: Disable Network Manager (if it is installed).
service NetworkManager stop chkconfig NetworkManager off -
Set a generic host name.
RHEL 7.x: Use the
hostnamecommand to add the string <localhost.localdomain> to the/etc/hostnamefile.hostnamectl set-hostname localhost.localdomainRHEL 6.x: Edit
/etc/sysconfig/networkand add the following lines.NETWORKING=yes HOSTNAME=localhost.localdomain -
Edit
/etc/sysconfig/network-scripts/ifcfg-eth0so it matches the following list of configuration details.DEVICE="eth0" BOOTPROTO="dhcp" ONBOOT="yes" TYPE="Ethernet" USERCTL="no" PEERDNS="yes" IPV6INIT="no" -
Remove any persistent network device rules.
rm -f /etc/udev/rules.d/70-persistent-net.rules rm -f /etc/udev/rules.d/75-persistent-net-generator.rules -
Set the network service to start automatically.
chkconfig network on -
Set
sshto start automatically.RHEL 7.x:
  systemctl enable sshd
systemctl is-enabled sshd
RHEL 6.x:
chkconfig sshd on chkconfig --list sshd -
Modify the kernel boot parameters.
RHEL 7.x:
a. Add crashkernel=256M to the start of the
GRUB_CMDLINE_LINUXline in the/etc/default/grubfile. If crashkernel=auto is present, change it to crashkernel=256M.b. Add the following options to the end of the
GRUB_CMDLINE_LINUXline.earlyprintk=ttyS0 console=ttyS0 rootdelay=300c. Remove the following options, if they are present.
rhgb quiet
RHEL 6.x:
a. Add crashkernel=256M to the start of the kernel line in
/boot/grub/grub.conf. If crashkernel=auto is present, change it to crashkernel=256M.b. Add the following options to the end of the kernel line.
earlyprintk=ttyS0 console=ttyS0 rootdelay=300 numa=offc. Remove the following options, if they are present.
rhgb quiet -
RHEL 7.x Only: Regenerate the
grub.cfgfile.grub2-mkconfig -o /boot/grub2/grub.cfg -
Register the VM. You need to supply your Red Hat authentication details.
subscription-manager register --auto-attach
-
Enable the RHEL extras repository.
RHEL 7.x:
subscription-manager repos --enable rhel-7-server-extras-rpmsRHEL 6.x:
subscription-manager repos --enable rhel-6-server-extras-rpms -
Run
yum clean allto clean up any old packages and headers.yum clean all -
Install the Windows Azure Linux Agent (WALinuxAgent).
RHEL 7.x:
  yum -y install WALinuxAgent
systemctl enable waagent.service
RHEL 6.x:
yum -y install WALinuxAgent chkconfig waagent on chkconfig --list waagent -
Edit the following lines in the
/etc/waagent.conffile to configure swap space for provisioned VMs. Set swap space for whatever is appropriate for your provisioned VMs.Provisioning.DeleteRootPassword=n ResourceDisk.Filesystem=ext4 ResourceDisk.EnableSwap=y ResourceDisk.SwapSizeMB=2048 -
Unregister the VM using Red Hat Subscription Manager.
subscription-manager unregister -
Take a snapshot of the VM.
From the VM menu:
a. Select View.
b. Select Snapshots.
c. Click the plus symbol and create the snapshot.
-
Prepare the VM for Microsoft Azure provisioning by cleaning up the existing provisioning details; Azure will reprovision the VM in Azure. This command generates warnings, which is expected.
waagent -force -deprovision
-
Clean the shell history and shut down the VM.
export HISTSIZE=0
poweroff
Convert the RHEL VM image to VHD
All Azure VM images must be in fixed VHD format. The image must be aligned on a 1 MB boundary before it is converted to VHD. This section describes how to convert the image from qcow2 to a fixed VHD format and align the image if necessary. Once you have converted the image, it can be uploaded to Microsoft Azure.
Convert to raw format and run the image size verification script
-
Convert the image from qcow2 to raw format.
$ qemu-img convert -f qcow2 -O raw <image-xxx>.qcow2 <image-xxx>.raw
-
Create a shell script using the contents below.
#!/bin/bash
MB=$((1024 * 1024))
size=$(qemu-img info -f raw --output json "$1" | gawk 'match($0, /"virtual-size": ([0-9]+),/, val) {print val[1]}')
rounded_size=$((($size/$MB + 1) * $MB))
if [ $(($size % $MB)) -eq  0 ]
then
 echo "Your image is already aligned. You do not need to resize."
 exit 1
fi
echo "rounded size = $rounded_size"
export rounded_size
-
Run the script. The name
align.shis used in the example.$ sh align.sh <image-xxx>.raw
If the message "Your image is already aligned. You do not need to resize." is displayed, go to Step 4 below and convert the raw file to VHD.
If a value is displayed, your image is not aligned. Go to Align the image and convert it to fixed VHD format. Use the value displayed to resize the image.
-
Use the command below to convert the file to fixed VHD format. The additional option
force_sizemust be added when using Fedora 22 or later.RHEL server or workstation (using qemu-img version 1.5.3):
$ qemu-img convert -f raw -o subformat=fixed -O vpc <image-xxx>.raw <image.xxx>.vhdFedora 22 or later (using qemu-img version 2.6 or later):
$ qemu-img convert -f raw -o subformat=fixed,force_size -O vpc <image-xxx>.raw <image.xxx>.vhdOnce converted, the VHD file is ready for upload to Microsoft Azure.
Align the Image and Convert it to Fixed VHD Format
Complete this procedure only if the raw file is not aligned.
-
Resize the raw file using the rounded value displayed when you ran the verification script.
$ qemu-img resize -f raw <image-xxx>.raw <rounded-value>
-
Convert the raw image file to VHD format.
RHEL server or workstation (using qemu-img version 1.5.3):
$ qemu-img convert -f raw -o subformat=fixed -O vpc <image-xxx>.raw <image.xxx>.vhdFedora 22 or later (using qemu-img version 2.6 or later):
$ qemu-img convert -f raw -o subformat=fixed,force_size -O vpc <image-xxx>.raw <image.xxx>.vhdOnce converted, the VHD file is ready for upload to Microsoft Azure.
Provision the VM in Microsoft Azure
Complete the procedures in the following sections to upload the vhd file, create an Azure gold image, and provision a managed-disk RHEL VM in Microsoft Azure.
About gold custom images and managed-disk VMs: The following steps are used to create new resources in Microsoft Azure, which include a storage account and container. This is where you upload your vhd file. Once uploaded, you use this image to create a gold custom image. The gold custom image may then be used to create multiple managed-disk VMs. We recommend using managed disks when you create VMs from the gold image. This allows Microsoft Azure to handle storage in the background, simplifying support and scalability. For additional information, see the Content from docs.microsoft.com is not included.Azure Managed Disks Overview. Note that even though the referenced article discusses disk encryption, Red Hat and Microsoft do not currently support disk encryption for Bring Your Own Subscription VMs.
Log in to Microsoft Azure
Enter az login to authenticate your Azure administration server and log in.
az login
Example:
[clouduser@localhost]$ az login
To sign in, use a web browser to open the page https://aka.ms/devicelogin and enter the code FDMSCMETZ to authenticate.
  [
    {
      "cloudName": "AzureCloud",
      "id": "",
      "isDefault": true,
      "name": "",
      "state": "Enabled",
      "tenantId": "",
      "user": {
        "name": "",
        "type": "user"
      }
    }
  ]
Export a storage account key
Important: The following steps are only for users who have an existing storage account in Microsoft Azure. If you need to create new Azure resources, go to Set up new resources in Microsoft Azure.
Complete the steps below to get your storage account key and export it to Microsoft Azure.
-
Get the storage account connection string.
az storage account show-connection-string -n <storage-account-name> -g <resource-group>
Example:
[clouduser@localhost]$ az storage account show-connection-string -n azrhelclistact -g azrhelclirsgrp
{
  "connectionString": "DefaultEndpointsProtocol=https;EndpointSuffix=core.windows.net;AccountName=azrhelclistact;AccountKey=NreGk...=="
}
-
Export the connection string. Copy the connection string and paste it into the following command. This string connects your system to the storage account.
export AZURE_STORAGE_CONNECTION_STRING="<storage-connection-string>"
Example:
[clouduser@localhost]$ export AZURE_STORAGE_CONNECTION_STRING="DefaultEndpointsProtocol=https;EndpointSuffix=core.windows.net;AccountName=azrhelclistact;AccountKey=NreGk...=="
-
Once you have exported the storage connection string, go to Upload the VHD and Create a Gold Azure Custom Image.
Set up new resources in Microsoft Azure
Complete the following steps to create new resources in Microsoft Azure.
-
Create a resource group in an Azure region.
az group create --name <resource-group> --location <azure-region>
Example:
[clouduser@localhost]$ az group create --name azrhelclirsgrp --location southcentralus
{
  "id": "/subscriptions//resourceGroups/azrhelclirsgrp",
  "location": "southcentralus",
  "managedBy": null,
  "name": "azrhelclirsgrp",
  "properties": {
    "provisioningState": "Succeeded"
  },
  "tags": null
}
-
Create a storage account. Refer to Storage SKU types for SKU type descriptions.
az storage account create -l <azure-region> -n <storage-account-name> -g <resource-group> --sku <sku_type>
Example:
[clouduser@localhost]$ az storage account create -l southcentralus -n azrhelclistact -g azrhelclirsgrp --sku Standard_LRS
{
  "accessTier": null,
  "creationTime": "2017-04-05T19:10:29.855470+00:00",
  "customDomain": null,
  "encryption": null,
  "id": "/subscriptions//resourceGroups/azrhelclirsgrp/providers/Microsoft.Storage/storageAccounts/azrhelclistact",
  "kind": "Storage",
  "lastGeoFailoverTime": null,
  "location": "southcentralus",
  "name": "azrhelclistact",
  "primaryEndpoints": {
    "blob": "https://azrhelclistact.blob.core.windows.net/",
    "file": "https://azrhelclistact.file.core.windows.net/",
    "queue": "https://azrhelclistact.queue.core.windows.net/",
    "table": "https://azrhelclistact.table.core.windows.net/"
},
"primaryLocation": "southcentralus",
"provisioningState": "Succeeded",
"resourceGroup": "azrhelclirsgrp",
"secondaryEndpoints": null,
"secondaryLocation": null,
"sku": {
  "name": "Standard_LRS",
  "tier": "Standard"
},
"statusOfPrimary": "available",
"statusOfSecondary": null,
"tags": {},
  "type": "Microsoft.Storage/storageAccounts"
}
-
Get the storage account connection string.
az storage account show-connection-string -n <storage-account-name> -g <resource-group>
Example:
[clouduser@localhost]$ az storage account show-connection-string -n azrhelclistact -g azrhelclirsgrp
{
  "connectionString": "DefaultEndpointsProtocol=https;EndpointSuffix=core.windows.net;AccountName=azrhelclistact;AccountKey=NreGk...=="
}
-
Export the connection string. Copy the connection string and paste it into the following command. This string connects your system to the storage account.
export AZURE_STORAGE_CONNECTION_STRING="<storage-connection-string>"
Example:
[clouduser@localhost]$ export AZURE_STORAGE_CONNECTION_STRING="DefaultEndpointsProtocol=https;EndpointSuffix=core.windows.net;AccountName=azrhelclistact;AccountKey=NreGk...=="
-
Create the storage container.
$ az storage container create -n <container-name>
Example:
[clouduser@localhost]$ az storage container create -n azrhelclistcont
{
  "created": true
}
-
Create a virtual network.
az network vnet create -g <resource group> --name <vnet-name> --subnet-name <subnet-name>
Example:
[clouduser@localhost]$ az network vnet create --resource-group azrhelclirsgrp --name azrhelclivnet1 --subnet-name azrhelclisubnet1
{
  "newVNet": {
    "addressSpace": {
      "addressPrefixes": [
      "10.0.0.0/16"
      ]
  },
  "dhcpOptions": {
    "dnsServers": []
  },
  "etag": "W/\"\"",
  "id": "/subscriptions//resourceGroups/azrhelclirsgrp/providers/Microsoft.Network/virtualNetworks/azrhelclivnet1",
  "location": "southcentralus",
  "name": "azrhelclivnet1",
  "provisioningState": "Succeeded",
  "resourceGroup": "azrhelclirsgrp",
  "resourceGuid": "0f25efee-e2a6-4abe-a4e9-817061ee1e79",
  "subnets": [
    {
      "addressPrefix": "10.0.0.0/24",
      "etag": "W/\"\"",
      "id": "/subscriptions//resourceGroups/azrhelclirsgrp/providers/Microsoft.Network/virtualNetworks/azrhelclivnet1/subnets/azrhelclisubnet1",
      "ipConfigurations": null,
      "name": "azrhelclisubnet1",
      "networkSecurityGroup": null,
      "provisioningState": "Succeeded",
      "resourceGroup": "azrhelclirsgrp",
      "resourceNavigationLinks": null,
      "routeTable": null
    }
  ],
  "tags": {},
  "type": "Microsoft.Network/virtualNetworks",
  "virtualNetworkPeerings": null
  }
}
Upload the VHD and create a gold Azure custom image
Complete the following steps to upload the VHD file to your container and create a gold Azure custom image.
Note: The exported storage connection string does not persist after a system reboot. If any of commands in the following steps fail, export the storage connection string again. (See Steps 3 and 4 in the previous section.)
-
Upload the
vhdfile to the storage container. It may take several minutes.Note: Enter
az storage container listto get the list of storage containers.az storage blob upload --account-name <storage-account-name> --container-name <container-name> --type page --file <path-to-vhd> --name <image-name>.vhd
Example:
[clouduser@localhost]$ az storage blob upload --account-name azrhelclistact --container-name azrhelclistcont --type page --file rhel-image-7.3.vhd --name rhel-image-7.3.vhd
Percent complete: %100.0
-
Get the URL for the uploaded
vhdfile. You will need to use this URL in the following step.az storage blob url -c <container-name> -n <image-name>.vhd
Example:
[clouduser@localhost]$ az storage blob url -c azrhelclistcont -n rhel-image-7.3.vhd
"https://azrhelclistact.blob.core.windows.net/azrhelclistcont/rhel-image-7.3.vhd"
-
Optional: Create a new resource group for your gold Azure custom image. This keeps your gold image separate from any non-permanent resources you create. Your new resource group must be created in the same region where you uploaded your
vhdfile.az group create --name <NEW-resource-group> --location <SAME-azure-region>
-
Create the gold Azure custom image. If you created a new resource group for your gold Azure custom image, use this resource group name in the command, as shown in the example.
Note: The command may return the error "Only blobs formatted as VHDs can be imported." This error means that the qcow2 or raw image was not aligned to the nearest 1MB boundary before it was converted to VHD. See Convert the RHEL VM image to VHD.
az image create -n <gold-image-name> -g <resource-group> -l <azure-region> --source <URL> --os-type linux
Example:
az image create -n rhel73 -g azrhelclirsgrp2 -l southcentralus --source https://azrhelclistact.blob.core.windows.net/azrhelclistcont/rhel-image-7.3.vhd --os-type linux
Create the VM and log in
-
Create the VM. The example below provides the minimum command options to create a managed-disk VM from the gold Azure custom image. Refer to Content from docs.microsoft.com is not included.az vm create for additional options.
Note: The option
--generate-ssh-keyscreates a private/public key pair. The private and public key files are created in~/.sshon your local machine. The public key is added to the authorized_keys file on the VM for the user specified by the--admin-usernameoption.az vm create -g <resource-group> -l <azure-region> -n <vm-name> --vnet-name <vnet-name> --subnet <subnet-name> --size Standard_A2 --os-disk-name <simple-name> --admin-username <administrator-name> --generate-ssh-keys --image <path-to-image>
Example:
    [clouduser@localhost]$ az vm create -g azrhelclirsgrp2 -l southcentralus -n rhel-azure-vm-1 --vnet-name azrhelclivnet1 --subnet azrhelclisubnet1  --size Standard_A2 --os-disk-name vm-1-osdisk --admin-username clouduser --generate-ssh-keys --image rhel73

    {
      "fqdns": "",
      "id": "/subscriptions//resourceGroups/azrhelclirsgrp/providers/Microsoft.Compute/virtualMachines/rhel-azure-vm-1",
      "location": "southcentralus",
      "macAddress": "",
      "powerState": "VM running",
      "privateIpAddress": "10.0.0.4",
      "publicIpAddress": "<public-IP-address>",
      "resourceGroup": "azrhelclirsgrp2"
Note the public IP address. You will need this to log in to the VM in the next step.
-
Start an SSH session and log in to the VM.
ssh -i <path-to-ssh-key> <admin-username@public-IP-address>
Example:
    [clouduser@localhost]$ ssh  -i /home/clouduser/.ssh/id_rsa clouduser@<public-IP-address>.
    The authenticity of host ',<public-IP-address>' can't be established.
    Are you sure you want to continue connecting (yes/no)? yes
    Warning: Permanently added '<public-IP-address>' (ECDSA) to the list of known hosts.

    [clouduser@rhel-azure-vm-1 ~]$
If you see a user prompt, you have successfully deployed your Azure RHEL VM.
You can now go to the Microsoft Azure portal and check the audit logs and properties of your resources. You can manage your VMs directly in the Microsoft Azure portal. If you are managing multiple VMs, you should use the Azure CLI. The Azure CLI provides a powerful interface to your resources in Microsoft Azure. Enter az --help in the CLI or see the Content from docs.microsoft.com is not included.Azure CLI Command Reference to learn more about the commands you use to manage your VMs in Microsoft Azure.
Using other authentication methods
While recommended for increased security, the use of the Azure-generated public key file in the example above is not a requirement. The following examples show two other methods for SSH authentication.
Example 1: These command options provision a new VM without generating a public key file. They allow SSH authentication using a password.
az vm create -g <resource-group> -l <azure-region> -n <vm-name> --vnet-name <vnet-name> --subnet <subnet-name> --size Standard_A2 --os-disk-name <simple-name> --authentication-type password --admin-username <administrator-name> --admin-password <ssh-password> --image <path-to-image>
SSH authentication command: ssh <admin-username@public-ip-address>
Example 2: These command options provision a new Azure VM that you can use the SSH protocol to access using an existing public key file.
az vm create -g <resource-group> -l <azure-region> -n <vm-name> --vnet-name <vnet-name> --subnet <subnet-name> --size Standard_A2 --os-disk-name <simple-name> --admin-username <administrator-name> --ssh-dest-key-path <path-to-existing-ssh-key> --image <path-to-image>
SSH authentication command: ssh -i <path-to-existing-ssh-key> <admin-username@public-ip-address>
References
Storage SKU types
Storage SKU types are described in the table below.
| SKU Type | Description |
|---|---|
| Standard_LRS | Locally Redundant Storage: Synchronous copies of data created within a single data center |
| Standard_GRS | Geographically Redundant Storage: Same as Standard_LRS with additional asynchronous copies stored in a secondary data center in a separate geographical location |
| Standard_RAGRS | Read-Access Geographically Redundant Storage: Same as Standard_GRS with additional read access to the secondary data center |
| Standard_ZRS | Zone Redundant Storage: For block blobs only; stores three copies of data across multiple data centers within the region or across regions |
| Premium_LRS | Premium Locally Redundant Storage: Same as Standard_LRS, but uses Premium Storage disks |
Revision history
The following table provides the date and a short description of major revisions to this article.
| Revision Published | Revision Description |
|---|---|
| 09 Feb 2018 | Modified the Convert the RHEL VM Image to VHD to simplify the conversion procedure. |
| 23 Aug 2018 | Modified the Convert the RHEL VM Image to VHD to correct issue with conversion. |
| 08 Jan 2019 | Added additional information about disk encryption limitations. |