Administrative Procedures for RHEL High Availability Clusters - Configuring RHV-M REST API Power Fencing for RHEL 7, 8 RHV Virtual Machine Cluster Members
Contents
Overview
Applicable Environments
- Red Hat Enterprise Linux (RHEL) 7 or 8 with the High Availability Add-On
- Using Red Hat Virtualization (RHV) 4.x virtual machines running RHEL 7 as High Availability cluster members
Situations Where This Procedure May Be Useful
- A RHEL High Availability cluster is being created from RHV virtual machines, and STONITH configuration needs to be completed
- Power fencing of VM cluster nodes via the RHV-M REST API is preferred instead of or in addition to another method like
sbd
What This Procedure Accomplishes
This procedure will result in the cluster having control over the power on/off state of cluster members, and once configured the cluster will use that control to reboot or power off a member if it becomes unresponsive or experiences some other cluster failure.
Procedure: Configuring RHV-M Power Fencing for RHV VMs
Task: Decide how the user account should be configured
A RHV admin or user account's password will need to be provided to the cluster to use for managing the power state of RHV VMs in this cluster. Consider the security practices and needs of your organization when determining how this user account should be set up - then create the user. Consult your RHV administrators for help if needed.
This RHV user will need to have permissions that grant it - at a minimum - the ability to reboot the VMs in this cluster, power them off, and run them. We will assign these permissions in the next step if it is not already done through your organization's standard practices. If those permissions are not already decided for you by your organization's security practices, then consider what RHV Role should be assigned to this user account.
Different organizations manage their permissions differently, so the RHV role to assign to achieve these actions may vary for your environment. When using typical RHV user-administration practices, UserVmManager is an appropriate role to assign to a user for these VMs to ensure that account can perform basic administration tasks and power management, but not grant too many other privileges. If unsure which role to assign to the user, consider UserVmManager.
Task for some organizations: Assign permission to user account for the relevant VMs
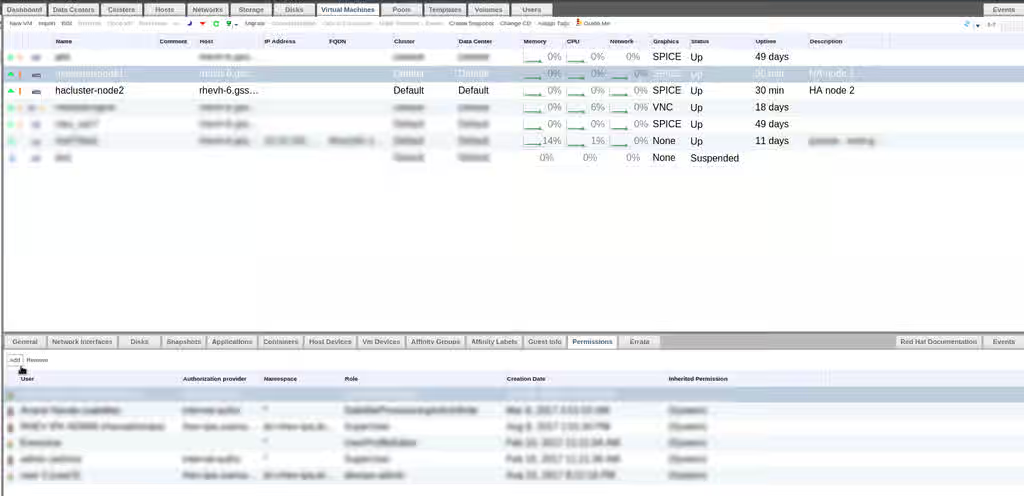
If the user account that was chosen needs to be granted permission for the VMs that will serve in this cluster, then log in to the RHV-M Web Administration portal with an admin user that can assign permissions for these VMs.
In the left-side menu, choose either System or the individual Data Center that the cluster-member VM resides in. In the Virtual Machine tab, select the VM to configure.
In the menu on the lower half of the page, choose the Permissions tab, and click Add.
In the new window, search for the user account that will be used, and select it. In the Role to Assign drop-down, choose the appropriate role. In this example we are setting UserVmManager.
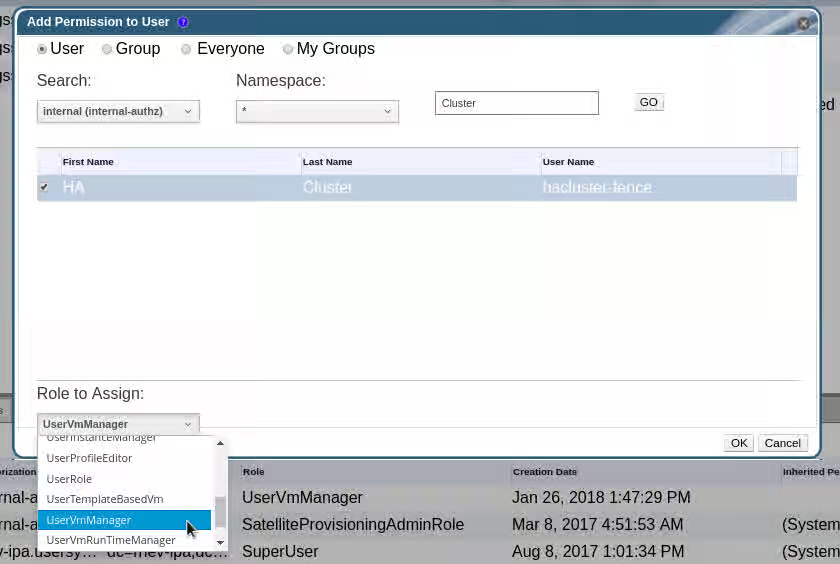
Repeat this step for each VM that will serve in this cluster.
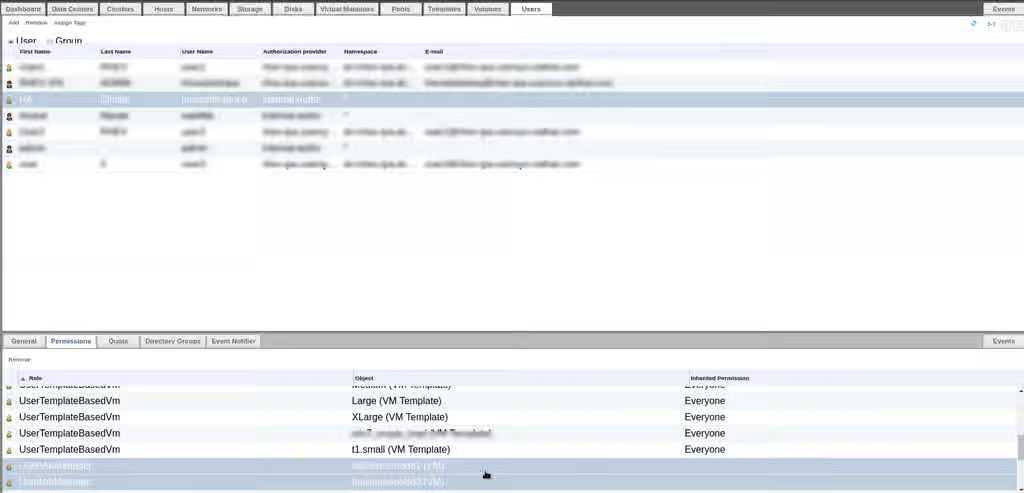
Now to confirm, if we go back up to the Users tab in the upper-half System or Data Center menu, we can select that user and review its Roles to verify that UserVmManager is set for each of our cluster member VMs.
Task: Collect information needed for STONITH configuration
Gather the following information about the environment that we will need to set up fencing:
NOTE: The <STRING> in parentheses for each entry is how we will refer to this field in an upcoming step.
- The hostname or IP of the RHV-M host (
<RHV-M ADDR>) - The user account name that has the needed permission for these VMs (
<USER>) - That user's password (
<PASSWORD>) - The name of the VM as defined in RHV - what you see in the
Namecolumn of the RHV-M System or Data Center menu (<VM>) - Each node in the cluster's nodename, as shown in
pcs statusor/etc/corosync/corosync.conf(<NODENAME>)
Task: Test fence_rhevm agent from VMs
Before we configure RHV-VM power fencing for VMs in this cluster, we should first test the agent manually to make sure the user account and credentials are ready.
Log in to each RHV VM in the cluster using ssh or the console, and test the fence_rhevm command from the command line. This step needs the fence-agents-rhevm package installed.
# fence_rhevm -a <RHV-M ADDR> \
     -l '<USER>' \
     -p '<PASSWORD>'
     -z -o list \
     --login-timeout=30 \
     --power-timeout=30 \
     --shell-timeout=30
For example:
# fence_rhevm -a rhvm.example.com \
     -l 'hacluster-fence@example.com' \
     -p 'GoRedHat' \
     -z -o list \
     --login-timeout=30 \
     --power-timeout=30 \
     --shell-timeout=30
hanode1,
hanode2,
hanode3,
Review the output to determine if the list it prints includes the names of all VMs in this cluster (<VM>). If so, record these names exactly as they are listed (without a comma).
NOTES:
- Use single quotes ('') around the login (
-l) and password (-p) to avoid issues with special characters being interpreted by the shell - RHV login accounts usually have an
@domainsuffix, such asuser@example.comoruser@internal. Check with your RHV administrator if unsure. - Try running without the timeout settings and see if the command still succeeds. If so, then these may not be needed in the final configuration. If the command fails with these removed, then some adjustment to timeouts will be needed in the final configuration - so consider running the command again with different timeout values until a combination is found that suits your environment.
Repeat the process on all VMs in the cluster.
Optional Task: Troubleshooting if the list command did not work
Try the following:
- Add
-vto the command to get verbose output, and follow-up on any error message received - If the error provided references an invalid certificate, then your RHV-M deployment may use a certificate that is not recognized on these VMs. Either import the CA Certificate for your RHV-M's certificate, or use
--ssl-insecureon thefence_rhevmcommand to skip certificate verification. - Attempt to log in to the RHV-M interface using the account credentials being used in this command, and see if they work. If not, look further into the user account's configuration and see if it is valid.
Task: Create the STONITH device in the cluster
Once fence_rhevm has been tested successfully throughout the cluster, create a STONITH device in the configuration. This will use the same attribute values that were used in the earlier command, but specified in slightly different syntax.
# pcs stonith create rhv-m fence_rhevm \
     ipaddr=<RHV-M ADDR> \
     login='<USER>' \
     passwd='<PASSWORD>' \
     ssl=1 \
     [ssl_insecure=1] \
     pcmk_host_map="<NODENAME>:<VM>;<NODENAME>:<VM>[...]" \
     [power_timeout=<seconds>] \
     [shell_timeout=<seconds>] \
     [login_timeout=<seconds>]
For example:
# pcs stonith create rhv-m fence_rhevm \
     ipaddr=rhvm.example.com \
     login='hacluster-fence@example.com' \
     passwd='GoRedHat' \
     ssl=1 \
     pcmk_host_map="node1.example.com:hanode1;node2.example.com:hanode2;node3.example.com:hanode3"
Or with additional settings that may have been identified as necessary during testing:
# pcs stonith create rhv-m fence_rhevm \
     ipaddr=rhvm.example.com \
     login='hacluster-fence@example.com' \
     passwd='GoRedHat' \
     ssl=1 \
     ssl_insecure=1 \
     pcmk_host_map="node1.example.com:hanode1;node2.example.com:hanode2;node3.example.com:hanode3" \
     power_timeout=30 shell_timeout=30 login_timeout=30
Task: Verify that the STONITH device is in a Started state
[root@rhvvm-hanode1 ~]# pcs status
Cluster name: rhv-cluster
Stack: corosync
Current DC: rhvvm-hanode2.example.com (version 1.1.16-12.el7_4.7-94ff4df) - partition with quorum
Last updated: Fri Jan 26 15:11:10 2018
Last change: Fri Jan 26 15:11:05 2018 by root via cibadmin on rhvvm-hanode1.example.com

2 nodes configured
1 resource configured

Online: [ rhvvm-hanode1.example.com rhvvm-hanode2.example.com ]

Full list of resources:

 rhv-m  (stonith:fence_rhevm):  Started rhvvm-hanode1.example.com
Check /var/log/messages or /var/log/cluster/corosync.log for clues if the device did not start. Review the configuration and make sure it matches with settings used in the earlier manual tests.
Contact Red Hat Support for assistance if needed.