Red Hat OpenShift Virtualization disaster recovery guide
1. Disaster recovery solutions
To ensure that your environment can recover after a site outage, OpenShift Virtualization supports two types of disaster recovery solutions: Metro-DR and Regional-DR. Both solutions support a primary and secondary site, and each solution requires a different replication mechanism.
Metro-DR
The Metro-DR solution uses synchronous replication. It writes to storage at both the primary and secondary sites so that the data is always synchronized between sites. Because the storage provider is responsible for ensuring that the synchronization succeeds, the environment must meet the throughput and latency requirements of the storage provider. For more information, see [Metro-DR Overview](#metro-dr).
Regional-DR
The Regional-DR solution uses asynchronous replication. The data in the primary site is synchronized with the secondary site on a regular basis. The Recovery Point Objective (RPO) of this solution depends on the synchronization schedule. For example, data can be synchronized at five minute intervals.For this type of replication, you can have a higher latency connection between the primary and secondary sites. For more information, see [Regional-DR Overview](#regional-dr).
1.1 Application failover
The application is managed by OpenShift GitOps and the failover is orchestrated by Red Hat Advanced Cluster Management, which runs on the hub cluster.
Red Hat Advanced Cluster Management manages both the primary and secondary cluster including the applications deployed on those clusters. The passive cluster only contains volumes that are replicated from the active cluster. The applications are not deployed on the passive cluster while the active cluster is available.
2. Metro-DR
2.1 Overview
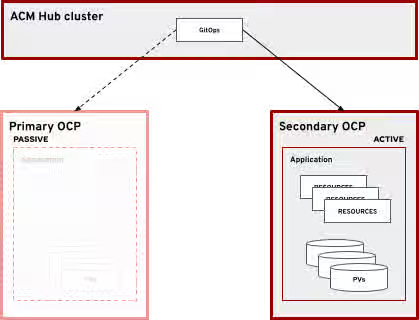
A typical Metro-DR active-passive setup features three clusters: a hub cluster, a primary cluster, and a secondary cluster. The primary cluster is the active cluster. The secondary cluster is normally passive, but it becomes active if the primary cluster is unavailable. Metro-DR also features a stretched storage provider that is visible in both the primary and secondary clusters. The storage provider is responsible for synchronizing volumes between the primary and secondary clusters.
Figure 1 illustrates an active-passive configuration where Red Hat Advanced Cluster Management manages a ClusterSet that contains both the active and passive clusters. The storage provider synchronizes the volumes between the primary and secondary cluster.
Figure 1. Active-passive configuration, primary cluster active, synchronous replication
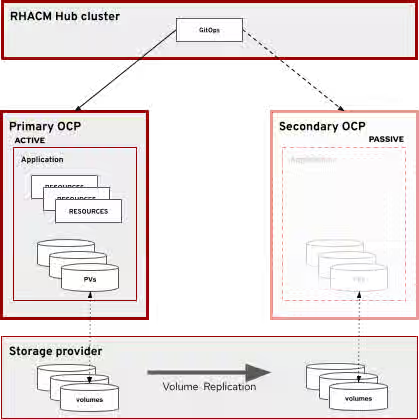
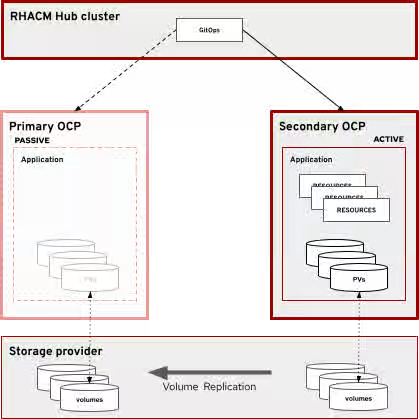
Figure 2 shows the state after a failover to the passive cluster. Failover is achieved when the following is true:
- The application is deployed to the passive cluster.
- Volume replication is no longer happening or is reversed between the primary and secondary clusters. This depends on if volumes of the primary cluster are accessible by the storage provider for replication.
- Any proxy or DNS that pointed to the primary cluster now points to the secondary cluster.
Failover to secondary cluster
Openshift Data Foundation can be configured as a Metro-DR storage provider.
2.2 Network considerations
Metro-DR requires support from the storage provider and a low latency and high throughput connection between the primary and secondary sites. The network latency should be as low as possible to reduce latency when writing to the volume.
The hub cluster must communicate with both primary and secondary sites to deploy the application. However, the connection between the hub cluster and the primary and secondary sites can be low latency and high throughput.
2.3 Recovery objectives
Recovery Point Objective (RPO)
Because writes are not considered complete until they are acknowledged at the primary and secondary sites, there is a guarantee that if the primary site becomes unavailable, the secondary site contains the exact same data. Because of this guarantee, the Recovery Point Objective (RPO) for the Metro-DR solution is 0 (no data loss).
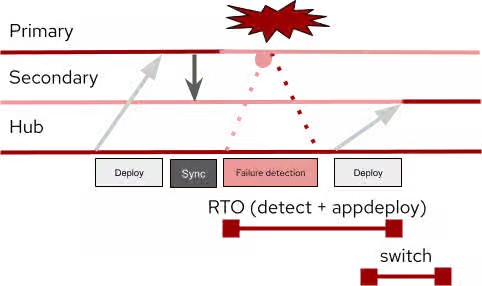
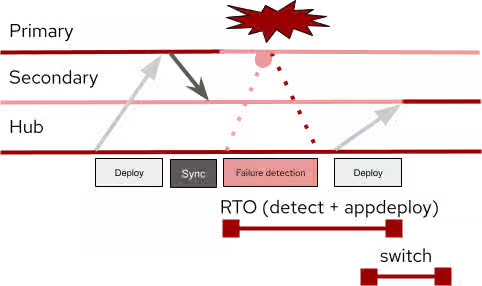
Recovery Time Objective (RTO)
Detecting that the primary site is unavailable takes a period of time (detect). After it is detected, it takes an additional period of time for Openshift GitOps to deploy the application to the secondary site (appdeploy). Additionally, any DNS records or proxies must be switched to the secondary site (switch). Recovery Time Objective (RTO) for this type of solution is detect + appdeploy + switch. There is potential for reducing this time by completing appdeploy and switching in parallel, since there is no dependency between appdeploy and switching
Figure 3 shows the recovery flow from original deployment to failover deployment:
Figure 3. Application deployment and recovery flow
3. Regional-DR
3.1 Overview
A typical regional-DR active-passive setup features three clusters: a hub cluster, a primary cluster, and a secondary cluster. The primary cluster is the active cluster and the secondary cluster is normally passive. If the primary cluster is unavailable, the application is deployed onto the secondary cluster and the secondary cluster becomes active.
Figure 4 shows an active-passive configuration where Red Hat Advanced Cluster Management manages a ClusterSet that contains both clusters.
Figure 4. Active-Passive configuration, primary cluster active, asynchronous replication
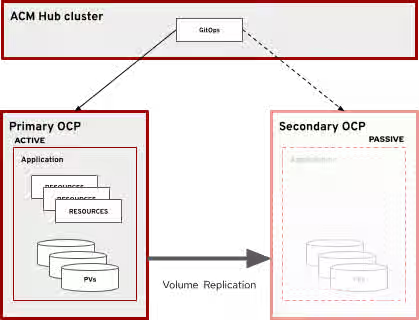
Figure 5 illustrates the state after a failover to the passive cluster. Failover is achieved when the following is true:
- The application is deployed to the passive cluster.
- Volume replication is no longer happening between the active and passive clusters.
- Any proxy or DNS that pointed to the primary cluster now points to the secondary cluster.
Figure 5. Failover to secondary cluster
3.2 Network considerations
Regional-DR does not require a low latency network connection, in contrast to Metro-DR. However, the network must be fast enough to synchronize the volumes within the specified period.
Because synchronization happens within the cluster, the active cluster must be able to communicate with the passive cluster. The hub cluster must communicate with both primary and secondary sites in order to deploy the application.
3.3 Recovery Objectives
Recovery Point Objective (RPO)
Because volumes are synchronized on a schedule and each volume can be scheduled at different intervals, the Recovery Point Objective (RPO) is variable depending on the volume. Some volumes are not as critical to synchronize at high frequency, while others are critical and should be synchronized frequently.
NOTE: If the primary site becomes unavailable right before the synchronization completes, that synchronization is considered invalid. The previous synchronization is used when bringing the secondary site online.
You can calculate the maximum RPO for each volume by adding the synchronization interval length to the amount of time it takes the volume to completely synchronize.For example:
- Volume A is synchronized every 1 minute and takes about 45 seconds to completely synchronize.
- The maximum RPO for Volume A is 1 minute and 45 seconds.
- Volume B is synchronized every 5 minutes and takes 2 minutes and 15 seconds to completely synchronize.
- The maximum RPO for Volume B is 7 minutes and 15 seconds.
Recovery Time Objective (RTO)
Detecting that the primary site is unavailable takes a period of time (detect). After it is detected, it takes an additional period of time for Openshift GitOps to deploy the application to the secondary site (appdeploy). Additionally, any DNS records or proxies must be switched to the secondary site (switch). The Recovery Time Objective (RTO) for Regional-DR is detect + appdeploy + switch. There is potential for reducing this time by completing appdeploy and switching in parallel, since there is no dependency between appdeploy and switching.
Figure 6 shows the recovery flow from original deployment to failover deployment:
Figure 6. Application deployment and recovery flow
4. Disaster recovery procedure
4.1 Prerequisites
Before initiating a failover procedure in an emergency, ensure that these checks have been completed:
- On a regular basis, test the failover procedure to ensure that the application runs properly on both the active and passive cluster.
- Ensure that the volume replication has fully stopped. If you use VolSync, complete this task by removing the replication destination resources on the passive cluster.
- Ensure that the last volume sync is up to date and successful. If you use VolSync, both the replication source and replication destination have timestamps for the last successful sync.
NOTE: When u asynchronous replication, there is a period of time between synchronizations when data can be lost if the active cluster becomes unavailable.
4.2. Failover to passive cluster
When the active cluster becomes unavailable due to a disaster or maintenance, the passive cluster must become the active cluster. Before you deploy the application to the passive cluster, ensure that the volume replication is stopped. Then the application can be deployed on the passive cluster by using Red Hat Advanced Cluster Management. Finally, switch over any proxy or DNS to the passive cluster to make it the active cluster.
4.3 Failback to primary cluster
After the primary cluster is operational again, it returns to being the active cluster. The procedure for failing back to the primary cluster is the same as the procedure for failing over to the secondary cluster. It is important to note that if the secondary cluster was running for any length of time, it will likely have data that must be synchronized with the primary cluster.
This can be accomplished by reversing the flow of data in the volume synchronization. Refer to your storage vendor on how to achieve this. In the example below, VolSync is used for volume synchronization. During normal synchronization, the ReplicationSource is in the primary cluster, and the ReplicationDestination is in the secondary cluster. When failing back to the primary cluster. The ReplicationSource will be in the secondary cluster and the ReplicationDestination in the primary cluster.
Once fully synchronized, break the synchronization and fail back using the same method as failing over, but with the primary and secondary clusters reversed.
4.4 Red Hat Advanced Cluster Management configuration
Clusters can be imported into Red Hat Advanced Cluster Management clusters as a ManagedCluster resource. One or more managed clusters can be grouped into a ManagedClusterSet resource by adding the following label selector to the ManagedCluster:
cluster.open-cluster-management.io/clusterset
See ManagedClusterSets for more information about creating and managing ManagedClusterSets.
Applications are created using an ApplicationSet, which is then placed on a cluster using Placement and PlacementRules. If both the active and passive cluster are in a ManagedClusterSet, you use a label selector to selectively deploy the application on the correct cluster. When executing a failover of the application to the other cluster, adjusting the label selector to match the passive cluster causes OpenShift GitOps to deploy the application to the passive cluster. For example, the following ApplicationSet resource is deployed on the primary cluster and uses the Placement named elasticsearch-demo-app-placement:
apiVersion: argoproj.io/v1alpha1
kind: ApplicationSet
metadata:
  name: elasticsearch-demo-app
  namespace: openshift-gitops
spec:
  generators:
  - clusterDecisionResource:
  	configMapRef: acm-placement
  	labelSelector:
    	matchLabels:
      	cluster.open-cluster-management.io/placement: elasticsearch-demo-app-placement
  	requeueAfterSeconds: 30
  template:
	metadata:
  	labels:
    	velero.io/exclude-from-backup: "true"
  	name: elasticsearch-demo-app-{{name}}
	spec:
  	destination:
    	namespace: elasticsearch-demo-app
    	server: '{{server}}'
  	project: default
  	source:
    	path: app/overlays/primary ←
    	repoURL: https://github.com/awels/elasticsearch-acm
    	targetRevision: main
  	syncPolicy:
    	automated:
      	prune: true
      	selfHeal: true
    	syncOptions:
    	- CreateNamespace=true
    	- PruneLast=true
The elasticsearch-demo-app-placement value refers to the following Placement resource:
apiVersion: cluster.open-cluster-management.io/v1beta1
kind: Placement
metadata:
  name: elasticsearch-demo-app-placement
  namespace: openshift-gitops
spec:
  clusterSets:
  - elasticsearch-demo
  predicates:
  - requiredClusterSelector:
  	labelSelector:
    	matchExpressions:
    	- key: cluster-role
      	operator: In
      	values:
      	- primary
If the passive cluster has the same configuration as the active cluster, there is no need to have a separate ApplicationSet resource. However, if the secondary cluster has a different configuration, it does require its own ApplicationSet resource. The following example shows an ApplicationSet for the secondary cluster. It uses a different path that points to a different overlay:
apiVersion: argoproj.io/v1alpha1
kind: ApplicationSet
metadata:
  name: elasticsearch-demo-app-secondary
  namespace: openshift-gitops
spec:
  generators:
  - clusterDecisionResource:
  	configMapRef: acm-placement
  	labelSelector:
    	matchLabels:
      	cluster.open-cluster-management.io/placement: elasticsearch-demo-app-secondary-placement
  	requeueAfterSeconds: 30
  template:
	metadata:
  	labels:
    	velero.io/exclude-from-backup: "true"
  	name: elasticsearch-demo-app-secondary-{{name}}
	spec:
  	destination:
    	namespace: elasticsearch-demo-app
    	server: '{{server}}'
  	project: default
  	source:
    	path: app/overlays/secondary ←
    	repoURL: https://github.com/awels/elasticsearch-acm
    	targetRevision: main
  	syncPolicy:
    	automated:
      	prune: true
      	selfHeal: true
    	syncOptions:
    	- CreateNamespace=true
    	- PruneLast=true
Note the only difference between the primary ApplicationSet and secondary is the name, the placement label match, and the path. The placement for this ApplicationSet looks like this:
apiVersion: cluster.open-cluster-management.io/v1beta1
kind: Placement
metadata:
  name: elasticsearch-demo-app-secondary-placement
  namespace: openshift-gitops
spec:
  clusterSets:
  - elasticsearch-demo
  predicates:
  - requiredClusterSelector:
  	labelSelector:
    	matchExpressions:
    	- key: cluster-role
      	operator: In
      	values:
      	- invalid
NOTE: The labelSelector for the cluster-role key points to the value invalid. This means that the selector does not match either cluster. In this example, the application will not be deployed to any cluster.
4.5 Failover with Kustomize
Applications defined with Kustomize have a Content from github.com is not included.base definition that contains the generic application definition. They also have Content from github.com is not included.overlays specific to each cluster. Each overlay is represented in Red Hat Advanced Cluster Management as its own ApplicationSet.
As shown in the previous examples, each ApplicationSet has a placement rule that uses a cluster label to determine which cluster the application is deployed on. Modify the Placement label selector of the secondary placement to match the label given to the secondary cluster. Replace invalid with secondary in the Placement resource above.
After verifying that the storage replication is disabled, enable the passive ApplicationSet on the secondary cluster by running the following patch command:
$ oc patch placement elasticsearch-demo-app-secondary-placement -n openshift-gitops -p '{"spec":{"predicates":[{"requiredClusterSelector": {"labelSelector":{"matchExpressions":[{"values": ["secondary"], "key": "cluster-role", "operator": "In"}]}}}]}}' --type=merge
After about 30 seconds, GitOps registers the new placement and starts deploying the application to the secondary cluster.
At any time you can remove the application from the primary cluster by running the following patch command:
$ oc patch placement elasticsearch-demo-app-placement -n openshift-gitops -p '{"spec":{"predicates":[{"requiredClusterSelector": {"labelSelector":{"matchExpressions":[{"values": ["invalid"], "key": "cluster-role", "operator": "In"}]}}}]}}' --type=merge
NOTE: The patch command replaces the value of the cluster-role with the value invalid, indicating to GitOps that the application should not be deployed on any cluster.
If GitOps can still communicate with the primary site, this command removes the application from the primary site, making it inactive.
NOTE: If the primary and secondary site have the same configuration and use a single ApplicationSet, patching the Placement associated with that ApplicationSet has the same effect: it removes the application from the primary site and deploys it on the secondary site.
After the application is deployed on the secondary site, switch over any proxies/DNS to point to the secondary site.
5. Example composite application with VMs and containers
5.1 Overview
The following example demonstrates that VMs can co-exist with containers in the same application. In this case, the application is Elasticsearch. The Elasticsearch cluster consists of one or more virtual machines while Kibana and the coordination process run inside containers. The virtual machines have associated storage that index the data processed by Elasticsearch. Kibana, Elasticsearch, and coordination are exposed to the outside world by using routes.
The following diagram (Figure 7) shows three VMs in the Elasticsearch cluster. For simplicity, the remaining examples in this document have one VM.
Figure 7. Elasticsearch application in OpenShift developer view
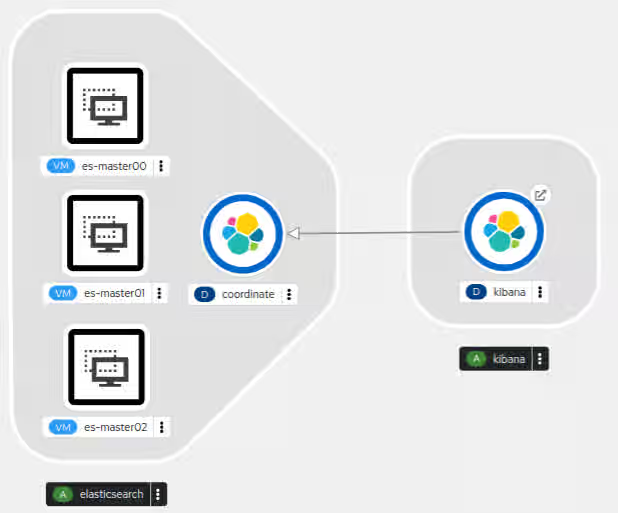
TIP: To visualize a cluster with more VMs, you can duplicate the configuration in the example, giving different names to the additional VMs. Because each VM uses two disks, the volume replication also must replicate two disks for each extra VM.
5.2 Elasticsearch cluster virtual machines
Content from quay.io is not included.Elasticsearch containers exist, but they might not always be up to date. Virtual machines can make it easier to install a preferred version and maintain greater control over the application. Each virtual machine needs a boot disk and a data disk that contains the Elasticsearch data after it has been processed. The data disk needs to be sufficiently large to contain all the data being processed. The example application also exposes a route to the VM cockpit web management console, which can aid in managing the virtual machines.
You can find the VirtualMachine manifest for the example application in the Content from github.com is not included.example repository.
5.3 Kibana container
Kibana allows you to visualize the contents of the Elasticsearch environment. The Kibana container runs a web server that can be used to interact with Elasticsearch. An internal service and route make the web service available outside of the cluster.
5.4 GitOps considerations
In order to manage applications with Red Hat OpenShift GitOps, the application definitions must be defined in a Content from github.com is not included.Git repository. OpenShift GitOps allows you to define your application in Git by using Kustomize or a Helm Chart. Red Hat Advanced Cluster Management can then associate the Git repository with an ApplicationSet. Deploying an application to different clusters requires a different configuration for each cluster. In particular, Secret and ConfigMap objects must be carefully managed to comply with security policies. Red Hat Advanced Cluster Management allows different ApplicationSets for different clusters using the same Git repository. Kustomize overlays can be used to define different configurations within the same Git repository.
5.5 Network considerations
The hub cluster must be able to communicate with both clusters in the ClusterSet, and volume synchronization must be possible between the active cluster and the passive cluster. Volumes can be synchronized at the storage layer or via the network by using a tool such as VolSync, which is described later in this guide. If the rate of change on the volumes is high, it is recommended to use a secondary network specifically for volume synchronization.
Ensure that any routes defined in the application are properly mapped in both the active cluster and the passive cluster. OpenShift GitOps allows you to define Kustomize rules that modify cluster specific information, like routes and IP addresses.
5.6. Storage considerations
Storage in OpenShift uses either volumeMode: Filesystem or volumeMode: Block. Most container-based applications are compatible with filesystem volumes, but virtual machines work better with block volumes. If you are planning a new deployment, be sure to select a storage provider that offers the volume mode and access mode combinations that your workload requires. If the storage backend provides volume replication capabilities, be sure to follow the vendor's recommendations when planning a multi-cluster OpenShift deployment.
If the provider does not include volume replication, you can install additional applications such as VolSync to provide asynchronous replication over the network. Note that the network requirements will increase when using volume replication over the network.
6. Using OpenShift GitOps with OpenShift Virtualization in DR scenarios
6.1 GitOps overview
You can use OpenShift GitOps to make the process of configuring clusters for application deployment more consistent and reproducible. OpenShift GitOps continuously synchronizes an application defined in an ApplicationSet with clusters that are part of the matching ClusterSet and have matching Placement and PlacementRules.
As of this writing, OpenShift GitOps does not have a way to protect specific resources from deletion when an application is removed from a cluster. However, in a disaster recovery scenario, it is important to retain volumes when an application is removed from one cluster and deployed on another cluster. This is critical when volumes are synchronized from the active cluster to the passive cluster, and it also applies to volumes associated with traditional container workloads.
6.2 About OpenShift Virtualization resources
Virtual machines in OpenShift Virtualization are defined using a VirtualMachine specification. To specify how to transfer a disk into the cluster, OpenShift Virtualization has a DataVolume resource. DataVolumes define the mechanism to use to provision a disk image.
A VirtualMachine resource has a concept called a DataVolumeTemplate. A DataVolumeTemplate is used to create a DataVolume that is owned by the virtual machine. This way if the virtual machine is removed, there will be a cascading delete of the DataVolume and a cascading delete of the provisioned volume. This is the desired behavior in most non-DR scenarios.
When using DataVolumeTemplates inside of a virtual machine definition, OpenShift GitOps does not create and thus does not manage or sync the DataVolume. However it will own the virtual machine definition and thus when the virtual machine is removed the associated disk volume will also be removed automatically due to the cascading delete of the DataVolume and disk volume.
6.3 How can I protect volumes from being deleted in a DR scenario?
To prevent the automatic removal of the volumes, run a post sync hook that goes through all the disk volumes and removes the owner reference. This way when the virtual machines are removed the disks will remain in the cluster. And because the DataVolumes are not created by OpenShift GitOps, it will not try to recreate them during each sync. It is possible to create a post-sync hook that only runs once instead of after every sync.
6.4 OpenShift GitOps behavior in different versions of OpenShift Virtualization
6.4.1 OpenShift 4.13 and 4.12
After a DataVolume finishes provisioning the virtual machine disk, it no longer plays a role in the virtual machine lifecycle and will be garbage collected by OpenShift Virtualization. Unfortunately this garbage collection creates a problem with OpenShift GitOps because if the DataVolume is defined in the application definition, OpenShift GitOps will continuously try to recreate the DataVolume, causing the application to be out of sync in OpenShift GitOps.
To avoid this issue, one can use DataVolumeTemplates when defining Virtual Machines. When OpenShift Virtualization garbage collects the DataVolume, it automatically associates the virtual machine disk volume with the virtual machine, so the automatic removal of the volume still happens when the virtual machine is removed. But the DataVolume is no longer managed by OpenShift GitOps.
6.4.2 OpenShift 4.14
In OpenShift 4.14 Virtual machine disks can also be imported by using Kubernetes Populators. All the common mechanisms are available in OpenShift Virtualization and fully integrated with DataVolumes. To avoid any issues with DataVolumes in combination with OpenShift GitOps, it is recommended to use standard PersistentVolumeClaims in combination with the appropriate populator. This way there is no need to manage the DataVolume life cycle in Openshift GitOps.
Conclusion
Openshift allows disaster recovery for both Metro-DR and Regional-DR with a mixed workload of both Virtual Machines and containers as demonstrated by the example composite application. Metro-DR has an RPO of 0 but comes with a requirement of a low latency connection to synchronize the volumes through the storage provider. Regional-DR can have a higher latency connection, but comes with an RPO that is dependent on the frequency of volume synchronization.
The RTO is dependent on on 3 factors:
- Time to detect. The time it takes to detect the disaster, this can be either automated or detected by humans
- Time to deploy the applications. Once the disaster is detected, the applications take time to deploy to the secondary and become active.
- Time to switch DNS/Proxies. It takes some time to direct traffic to the new active site.
Glossary
- Primary cluster. Refers to a cluster in one physical location. During normal operation this is the active cluster.
- Secondary cluster. Refers to a cluster in another physical location. Becomes active during a disaster recovery event.
- Hub cluster. Refers to the Red Hat Advanced Cluster Management cluster.
- Active cluster. Refers to the cluster that is actively processing requests.
- Passive cluster. Refers to the cluster that is not processing requests.
- OpenShift Virtualization
- OpenShift
VirtualMachine(CRD). Declaratively specify and manage the life cycle of a virtual machine in OpenShift. DataVolume(CRD). Declaratively specify how to populate a kubernetesPersistentVolumewith a virtual machine disk.- Owner Reference. Specify an ownership relation between two Kubernetes resources.
- OpenShift
- Red Hat Advanced Cluster Management for Kubernetes (RHACM)
ManagedCluster(CRD). A cluster being managed by Red Hat Advanced Cluster Management. Can be grouped into ManagedClusterSets.ApplicationSet(CRD). Defines the source and synchronization policies for an application managed by OpenShift GitOps.Placement/PlacementRule(CRD). Defines where anApplicationSetset is deployed based on the specified rules.
Appendix A. Volsync
“VolSync is a Kubernetes operator that performs asynchronous replication of persistent volumes within, or across, clusters.”
VolSync is an ideal synchronization mechanism for storage that does not have its own replication across clusters for an asynchronous DR scenario. Just set up a Content from volsync.readthedocs.io is not included.ReplicationSource and a Content from volsync.readthedocs.io is not included.ReplicationDestination and VolSync will automatically synchronize the volume on the specified schedule.
VolSync supports various different ‘movers’ which are responsible for replicating the data between the source and destination. Because virtual machines work best when using block volumes we have to use a mover that is compatible with block volumes. VolSync 0.7 and below only works with file system volumes. VolSync 0.8 and newer works with block volumes as well. The rsync mover uses rsync to synchronize the contents of the file system volumes.
For the rest of this document, it is assumed the rsync mover is used for the examples. In particular VolSync 0.8 or newer.
To deploy a modified version of VolSync that supports block volumes, create an ApplicationSet in Red Hat Advanced Cluster Management using the same example application repository but with a different path. For example:
apiVersion: argoproj.io/v1alpha1
kind: ApplicationSet
metadata:
  name: volsync-deployment
  namespace: openshift-gitops
spec:
  template:
	spec:
  	source:
    	path: volsync/default
    	repoURL: https://github.com/demo/elasticsearch-acm
    	targetRevision: main
When creating a Placement for the ApplicationSet make sure to deploy it to both the active and passive cluster. For this example each cluster has a cluster-role label of primary and secondary:
apiVersion: cluster.open-cluster-management.io/v1beta1
kind: Placement
metadata:
  name: volsync-deployment-placement
  namespace: openshift-gitops
spec:
  clusterSets:
  - elasticsearch-demo
  predicates:
  - requiredClusterSelector:
  	labelSelector:
    	matchExpressions:
    	- key: cluster-role
      	operator: In
      	values:
      	- secondary
      	- primary
Once deployed, VolSync is available on both active and passive clusters and the replication source and target can be configured.
Replication Source
A replication source makes a clone or a snapshot of the source volume, and then attempts to connect to the destination to copy the data to the destination. There are many options available for a [ReplicationSource](https://volsync.readthedocs.io/en/latest/usage/rsync-tls/mysql-migration.html#create-the-replicationsource). In the following example the replication is triggered every 5 minutes and connects to the destination cluster using the IP address of a load balancer configured in the destination cluster. It uses the snapshot copy method, meaning that it takes a snapshot of the volume, and then synchronizes the contents of that snapshot with the destination. The name of the volume snapshot class is also specified in the spec.
To ensure that the connection is with the right replication destination a common [TLS secret](https://volsync.readthedocs.io/en/latest/usage/rsync-tls/mysql-migration.html#create-a-key-to-secure-the-replication) is used.
This example replicates the master-00 volume from the example application to the target cluster through a load balancer on IP address 192.168.1.37 every 5 minutes:
apiVersion: volsync.backube/v1alpha1
kind: ReplicationSource
metadata:
  name: es-mastart00
  namespace: elasticsearch-demo-app
spec:
  sourcePVC: es-master00
  trigger:
	# Replicate every 5 minutes
	schedule: "*/5 * * * *"
  rsyncTLS:
	keySecret: tls-key-secret
	address: <address>
	copyMethod: Snapshot
	volumeSnapshotClassName: snapshot-class-name
The status of the ReplicationSource contains a field indicating the last successful sync, and another field indicating how long the synchronization took. The ReplicationDestination also contains these fields. One can use them to determine how current the replicated data is before doing a failover.
The example repository has an example Content from github.com is not included.directory that can be imported into Red Hat Advanced Cluster Management as an Application, and managed by OpenShift GitOps for deploying the ReplicationSource into the primary cluster.
NOTE: When making a snapshot or clone of a volume, volsync does not quiesce the process running in the container, this may result in inconsistent snapshots or volumes
Replication Destination
A replication destination takes incoming data from a replication source and writes it to the specified `PersistentVolumeClaim`. This can be an existing `PersistentVolumeClaim`, or you can specify the required information for creating one. If the `PersistentVolumeClaim` doesn’t exist, it is created, and the initial sync will take some time because the entire volume has to be replicated.
There are various options available for a Content from volsync.readthedocs.io is not included.ReplicationDestination. The following example uses a pre-existing PersistentVolumeClaim with a LoadBalancer service type. This will create an appropriate service that is exposed using that load balancer. The IP address associated with the load balancer should be used in the matching ReplicationSource. If you use submariner which is included with Red Hat Advanced Cluster Management it is possible to use a ClusterIP service instead of a load balancer.
The ReplicationDestination will create a Pod that will remain active until a ReplicationSource connects to it. Once the synchronization is completed the destination Pod will exit and a new Pod will be created:
apiVersion: volsync.backube/v1alpha1
kind: ReplicationDestination
metadata:
  name: es-master00
  namespace: elasticsearch-demo-app
spec:
  rsyncTLS:
	sshKeys: tls-key-secret
	destinationPVC: es-master00
	serviceType: LoadBalancer
	copyMethod: Snapshot
	volumeSnapshotClassName: snapshot-class-name
The example repository has an example Content from github.com is not included.directory that can be imported into Red Hat Advanced Cluster Management as an Application, and managed by OpenShift GitOps for deploying the ReplicationDestination into the secondary cluster.
Failover with VolSync
Before failing over to the secondary site, ensure that replication is stopped by removing the ReplicationDestination on the secondary site. Once the ReplicationDestination is removed, we are certain there won’t be any replication from the primary site while the secondary site is the active site. Besides the ApplicationSet on the hub cluster, the Placement will look like this when replication is still active:
apiVersion: cluster.open-cluster-management.io/v1beta1
kind: Placement
metadata:
  name: elasticsearch-demo-app-target-placement
  namespace: openshift-gitops
spec:
  clusterSets:
  - elasticsearch-demo
  predicates:
  - requiredClusterSelector:
  	labelSelector:
    	matchExpressions:
    	- key: cluster-role
      	operator: In
      	values:
      	- secondary
To remove the ApplicationSet from the secondary cluster, change the label selector to something that doesn’t match the cluster-role label on the secondary cluster. In the following example secondary is replaced with invalid to ensure the label selector does not match any ClusterRole:
oc patch placement elasticsearch-demo-app-target-placement -n openshift-gitops -p '{"spec":{"predicates":[{"requiredClusterSelector": {"labelSelector":{"matchExpressions":[{"values": ["invalid"], "key": "cluster-role", "operator": "In"}]}}}]}}' --type=merge
After a few seconds, OpenShift GitOps will remove the ReplicationDestination from the secondary cluster. Do this for all ReplicationDestinations on the secondary cluster. Once completed the secondary cluster is ready to deploy the application, while using the existing volumes.