OpenShift-based Appliance Builder User Guide
The openshift-appliance utility enables self-contained OpenShift Container Platform cluster installations, meaning that it does not rely on internet connectivity or external registries. It is a container-based utility that builds a disk image that includes the This content is not included.Agent-based Installer. The disk image can then be used to install multiple OpenShift Container Platform clusters.
Warning: The OpenShift Appliance builder is a Technology Preview feature only. Technology Preview features are not supported with Red Hat production service level agreements (SLAs) and might not be functionally complete. Red Hat does not recommend using them in production. These features provide early access to upcoming product features, enabling customers to test functionality and provide feedback during the development process.
For more information about the support scope of Red Hat Technology Preview features, see Technology Preview Features Support Scope.
Downloading the OpenShift-based Appliance builder
The OpenShift-based Appliance builder is available for download at: This content is not included.This content is not included.https://catalog.redhat.com/software/containers/assisted/agent-preinstall-image-builder-rhel9/65a55174031d94dbea7f2e00
High level overview
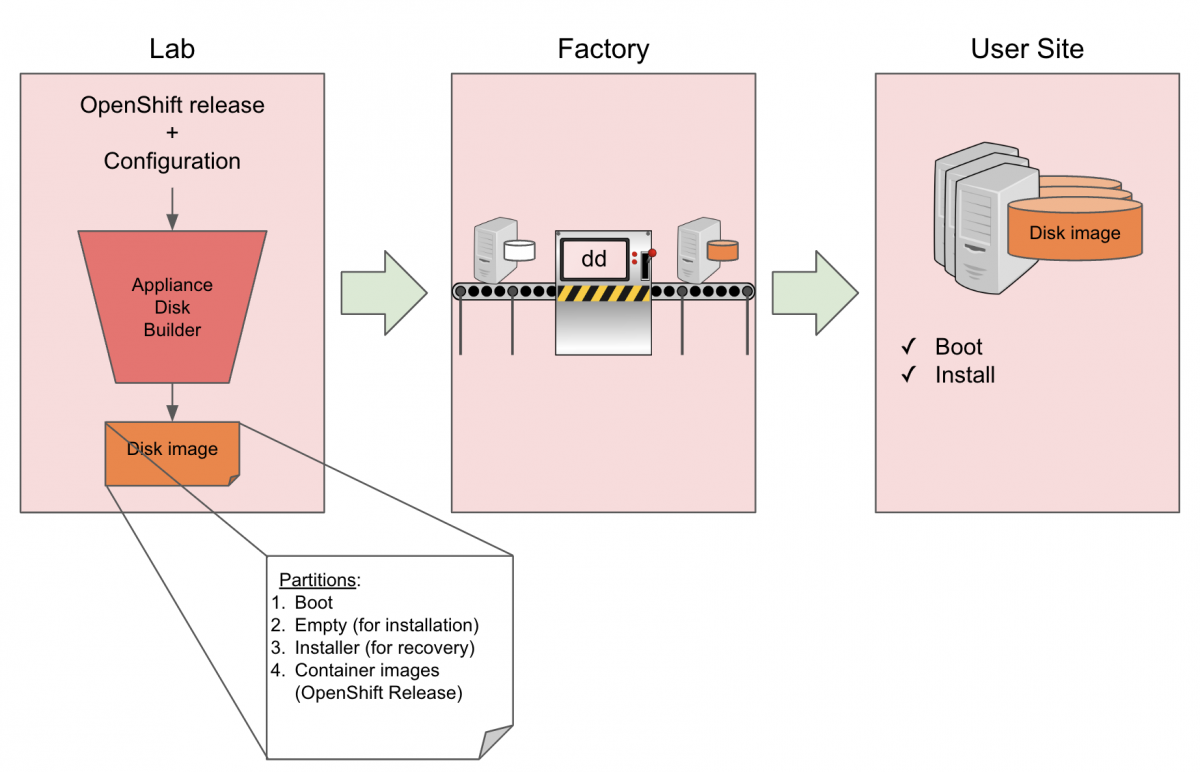
Lab
This is where openshift-appliance is used to create a raw sparse disk image.
- Raw: So it can be copied as-is to multiple servers.
- Sparse: To minimize the physical size of the image.
The end result is a generic disk image with a partition layout as follows:
Name       Type        VFS      Label       Size  Parent
/dev/sda2  filesystem  vfat     EFI-SYSTEM  127M  -
/dev/sda3  filesystem  ext4     boot        350M  -
/dev/sda4  filesystem  xfs      root        180G  -
/dev/sda5  filesystem  ext4     agentboot   1.2G  -
/dev/sda6  filesystem  iso9660  agentdata   18G   -
The two additional partitions:
agentboot: The Agent-based Installer ISO.- Allows a first boot.
- Used as a recovery/re-install partition (with an added GRUB menu entry).
agentdata:The OCP release images payload.
Note that sizes may change, depending on the configured diskSizeGB and the selected OpenShift version configured in appliance-config.yaml (described below).
Factory
This is where the disk image is written to the disk using tools such as dd. Since the image is generic, the same image can be used on multiple servers for multiple clusters, assuming they have the same disk size.
User site
This is where the cluster will be deployed. The user boots the machine and mounts the configuration ISO (cluster configuration). The OpenShift installation will run until completion.
Building the Disk Image - Lab
Creating and configuring manifest files
- Set the Environment by running the following commands.
Warning: Use absolute directory paths.
$ export APPLIANCE_IMAGE="catalog.redhat.com/software/containers/assisted/agent-preinstall-image-builder-rhel9/65a55174031d94dbea7f2e00"
$ export APPLIANCE_ASSETS="/home/test/appliance_assets"
- Get the
openshift-appliancecontainer image by running the following command:
$ podman pull $APPLIANCE_IMAGE
- Generate a template of the appliance config by running the following command:
$ podman run --rm -it --pull newer -v $APPLIANCE_ASSETS:/assets:Z $APPLIANCE_IMAGE generate-config
Result:
INFO Generated config file in assets directory: appliance-config.yaml
This generates the appliance-config.yaml file required for running openshift-appliance.
- Configure the
appliance-config.yamlfile. Initially, the template will include comments about each option and will look like the following example:
#
# Note: This is a sample ApplianceConfig file showing
# which fields are available to aid you in creating your
# own appliance-config.yaml file.
#
apiVersion: v1beta1
kind: ApplianceConfig
ocpRelease:
  # OCP release version in major.minor or major.minor.patch format
  # (in case of major.minor - latest patch version will be used)
  # If the specified version is not yet available, the latest supported version will be used.
  version: ocp-release-version
  # OCP release update channel: stable|fast|eus|candidate
  # Default: stable
  # [Optional]
  channel: ocp-release-channel
  # OCP release CPU architecture: x86_64|aarch64|ppc64le
  # Default: x86_64
  # [Optional]
  cpuArchitecture: cpu-architecture
# Virtual size of the appliance disk image.
# If specified, should be at least 150GiB.
# If not specified, the disk image should be resized when
# cloning to a device (e.g. using virt-resize tool).
# [Optional]
diskSizeGB: disk-size
# PullSecret required for mirroring the OCP release payload
pullSecret: pull-secret
# Public SSH key for accessing the appliance during the bootstrap phase
# [Optional]
sshKey: ssh-key
# Password of user 'core' for connecting from console
# [Optional]
userCorePass: user-core-pass
# Local image registry details (used when building the appliance)
# [Optional]
imageRegistry:
  # The URI for the image
  # Default: docker.io/library/registry:2
  # Alternative: quay.io/libpod/registry:2.8
  # [Optional]
  uri: uri
  # The image registry container TCP port to bind. A valid port number is between 1024 and 65535.
  # Default: 5005
  # [Optional]
  port: port
# Enable all default CatalogSources (on openshift-marketplace namespace).
# Should be disabled for disconnected environments.
# Default: false
# [Optional]
enableDefaultSources: enable-default-sources
# Stop the local registry post cluster installation.
# Note that additional images and operators won't be available when stopped.
# Default: false
# [Optional]
stopLocalRegistry: stop-local-registry
# Create PinnedImageSets for both the master and worker MCPs.
# The PinnedImageSets will include all the images included in the appliance disk image.
# Requires openshift version 4.20 or above.
# Default: false
# [Optional]
createPinnedImageSets: create-pinned-image-sets
# Enable FIPS mode for the cluster.
# Note: 'fips' should be enabled also in install-config.yaml.
# Default: false
# [Optional]
enableFips: enable-fips
# Enable the interactive installation flow.
# Should be enabled to provide cluster configuration through the web UI
# (i.e. instead of using a config-image).
# Default: false
# [Optional]
enableInteractiveFlow: enable-interactive-flow
# Rename CatalogSource names generated by oc-mirror to the default naming.
# E.g. 'redhat-operators' instead of 'cs-redhat-operator-index-v4-19'.
# Default: false
# [Optional]
useDefaultSourceNames: use-default-source-names
# Additional images to be included in the appliance disk image.
# [Optional]
additionalImages:
   - name: image-url
# Operators to be included in the appliance disk image.
# See examples in https://github.com/openshift/oc-mirror/blob/main/docs/imageset-config-ref.yaml.
# [Optional]
operators:
  - catalog: catalog-uri
    packages:
      - name: package-name
        channels:
          - name: channel-name
-
Modify the file based on your needs, where:
diskSizeGB: Specifies the actual server disk size. If you have several server specs, you need an appliance image per each spec.ocpRelease.channel: Specifies the OCP release update channel (stable|fast|eus|candidate)pullSecret: Specifies the pull secret. This may be obtained from https://console.redhat.com/openshift/install/pull-secret (requires registration).imageRegistry.uri: Specifies the URI for the image. Change it only if needed, otherwise the default should work.imageRegistry.port: Specifies the image registry container TCP port to bind. Change the port number in case another app uses TCP 5005.
appliance-config.yamlExample:apiVersion: v1beta1 kind: ApplianceConfig ocpRelease: version: 4.14 channel: candidate cpuArchitecture: x86_64 diskSizeGB: 200 pullSecret: '{"auths":{<redacted>}}' sshKey: <redacted> userCorePass: <redacted>Note: Currently only
x86_64CPU architecture is supported.
Optional: Add custom manifests
Any manifest added here will apply to all of the clusters installed using this image.
Note: Find more details and additional examples in OpenShift Container Platform documentation:
- Create the openshift manifests directory by running the following command:
$ mkdir ${APPLIANCE_ASSETS}/openshift
- Add one or more custom manifests under
${APPLIANCE_ASSETS}/openshift.
MachineConfig example:
apiVersion: machineconfiguration.openshift.io/v1
kind: MachineConfig
metadata:
  labels:
    machineconfiguration.openshift.io/role: master
  name: 50-master-custom-file-factory
spec:
  config:
    ignition:
      version: 3.2.0
    storage:
      files:
        - contents:
            source: data:text/plain;charset=utf-8;base64,dGhpcyBjb250ZW50IGNhbWUgZnJvbSBidWlsZGluZyB0aGUgYXBwbGlhbmNlIGltYWdlCg==
          mode: 420
          path: /etc/custom_factory1.txt
          overwrite: true
Optional: Including additional images
Add any additional images that should be included as part of the appliance disk image. These images will be pulled during the oc-mirror procedure that downloads the release images.
The following example includes images for the Apache HTTP server daemon and the OpenShift CLI.
- Specify images in the
additionalImagesarray inappliance-config.yaml:
additionalImages:
  - name: quay.io/fedora/httpd-24
  - name: quay.io/openshift/origin-cli
After installing the cluster, images should be available for pulling using the image digest.
- Fetch the image digests by using skopeo from inside the node:
$ skopeo inspect docker://registry.appliance.com:5000/fedora/httpd-24 | jq .Digest
"sha256:5d98ffbb97ea86633aed7ae2445b9d939e29639a292d3052efb078e72606ba04"
- Pull the images by running the following command:
$ podman pull quay.io/fedora/httpd-24@sha256:5d98ffbb97ea86633aed7ae2445b9d939e29639a292d3052efb078e72606ba04
After installation, the image can be used, for example, to create a new application:
$ oc --kubeconfig auth/kubeconfig new-app --name httpd --image quay.io/fedora/httpd-24@sha256:5d98ffbb97ea86633aed7ae2445b9d939e29639a292d3052efb078e72606ba04 --allow-missing-images
$ oc --kubeconfig auth/kubeconfig get deployment
NAME    READY   UP-TO-DATE   AVAILABLE
httpd   1/1     1            1
Optional: Including and installing Operators
Including Operators in the appliance
Operators packages can be included in the appliance disk image using the operators property in appliance-config.yaml file. The relevant images will be pulled during the oc-mirror procedure, and the appropriate CatalogSources and ImageContentSourcePolicies will be automatically created in the installed cluster.
For example, to include the elasticsearch-operator from the redhat-operators catalog, add the following entry to the appliance-config.yaml file:
operators:
  - catalog: registry.redhat.io/redhat/redhat-operator-index:v4.14
    packages:
      - name: elasticsearch-operator
        channels:
          - name: stable-5.8
For each Operator, ensure the name and channel are correct by listing the available Operators in catalog:
$ oc-mirror list operators --catalog=registry.redhat.io/redhat/redhat-operator-index:v4.14
Installing Operators in the cluster
To automatically install the included Operators during cluster installation, add the relevant custom manifests to ${APPLIANCE_ASSETS}/openshift.
Note: These manifests will deploy the Operators for any cluster installation, meaning that the manifests will be incorporated in the appliance disk image.
For example, the following cluster manifests are used to install the OpenShift Elasticsearch Operator:
openshift/namespace.yaml
apiVersion: v1
kind: Namespace
metadata:
  name: operators
  labels:
    name: operators
openshift/operatorgroup.yaml
apiVersion: operators.coreos.com/v1
kind: OperatorGroup
metadata:
  name: operator-group
  namespace: operators
spec:
  targetNamespaces:
  - operators
openshift/subscription.yaml
apiVersion: operators.coreos.com/v1alpha1
kind: Subscription
metadata:
  name: elasticsearch
  namespace: operators
spec:
  installPlanApproval: Automatic
  name: elasticsearch-operator
  source: cs-redhat-operator-index
  channel: stable
  sourceNamespace: openshift-marketplace
Note: Each file should contain a single object.
Adding the required Custom Resources
If a Custom Resource should be applied post-Operator installation, add the relevant CR to ${APPLIANCE_ASSETS}/openshift/crs.
The CRs will be applied automatically during cluster installation.
Example CR for kubevirt-hyperconverged Operator:
openshift/crs/cnv_cr.yaml
apiVersion: hco.kubevirt.io/v1beta1
kind: HyperConverged
metadata:
  name: kubevirt-hyperconverged
  namespace: "openshift-cnv"
Building the disk image
Before building the disk image, consider the following information:
- Make sure you have enough free disk space.
- The amount of space needed is defined by the configured
diskSizeGBvalue, which is at least 150GiB.
- The amount of space needed is defined by the configured
- Building the image may take several minutes.
- The
--privilegedoption is used because theopenshift-appliancecontainer needs to useguestfishto build the image. - The
--net=hostoption is used because theopenshift-appliancecontainer needs to use the host networking for the image registry container it runs as a part of the build process.
Build the disk image by running the following command:
$ sudo podman run --rm -it --pull newer --privileged --net=host -v $APPLIANCE_ASSETS:/assets:Z $APPLIANCE_IMAGE build
Result
INFO Successfully downloaded CoreOS ISO
INFO Successfully generated recovery CoreOS ISO
INFO Successfully pulled container registry image
INFO Successfully pulled OpenShift 4.14.0-rc.0 release images required for bootstrap
INFO Successfully pulled OpenShift 4.14.0-rc.0 release images required for installation
INFO Successfully generated data ISO
INFO Successfully downloaded appliance base disk image
INFO Successfully extracted appliance base disk image
INFO Successfully generated appliance disk image
INFO Time elapsed: 8m0s
INFO
INFO Appliance disk image was successfully created in assets directory: assets/appliance.raw
INFO
INFO Create configuration ISO using: openshift-install agent create config-image
INFO Download openshift-install from: https://mirror.openshift.com/pub/openshift-v4/x86_64/clients/ocp/4.14.0-rc.0/openshift-install-linux.tar.gz
Rebuilding the disk image
You can rebuild the appliance image, for example, to change diskSizeGB or ocpRelease.
Before rebuilding, use the clean command to remove the temp folder and prepare the assets folder for a rebuild:
$ sudo podman run --rm -it -v $APPLIANCE_ASSETS:/assets:Z $APPLIANCE_IMAGE clean
Note: The clean command keeps the cache folder under assets intact. To clean the entire cache as well, use the --cache flag with the clean command.
Cloning the appliance disk image to a device - Factory
Cloning the disk image for bare metal servers
Cloning the disk image as-is
When diskSizeGB is specified in the appliance-config.yaml file, you can use a tool like dd to clone the disk image.
Example dd command:
$ dd if=appliance.raw of=/dev/sdX bs=1M status=progress
This will clone the appliance disk image onto sdX. To initiate the cluster installation, boot the machine from the sdX device.
Resizing and cloning the disk image
If diskSizeGB is not specified in the appliance-config.yaml file, use virt-resize tool to resize and clone the disk image.
Example commands:
$ export APPLIANCE_IMAGE="catalog.redhat.com/software/containers/assisted/agent-preinstall-image-builder-rhel9/65a55174031d94dbea7f2e00"
$ export APPLIANCE_ASSETS="/home/test/appliance_assets"
$ export TARGET_DEVICE="/dev/sda"
$ sudo podman run --rm -it --privileged --net=host -v $APPLIANCE_ASSETS:/assets --entrypoint virt-resize $APPLIANCE_IMAGE --expand /dev/sda4 /assets/appliance.raw $TARGET_DEVICE --no-sparse
This will resize and clone the disk image onto the specified TARGET_DEVICE. To initiate the cluster installation, boot the machine from the TARGET_DEVICE.
Note: If the target device is empty (zeroed) before cloning, the --no-sparse flag can be removed, which will improve the cloning speed.
Booting from a deployment ISO
As an alternative to manually cloning the disk image, see the Deployment ISO section for instructions to generate an ISO that automates the flow.
Cloning the disk image for virtual machines
To clone the disk image onto a virtual machine, configure the disk to use /path/to/appliance.raw.
Installing the OpenShift Container Platform cluster - User Site
Downloading the openshift-install binary
The image generated onto devices is completely generic. To install the cluster, the installer will need cluster-specific configuration.
In order to generate the configuration image using the openshift-install command, first download the binary from the URL specified in the build output.
For example, the URL for 4.14.0-rc.0 is: Content from mirror.openshift.com is not included.Content from mirror.openshift.com is not included.https://mirror.openshift.com/pub/openshift-v4/x86_64/clients/ocp/4.14.0-rc.0/openshift-install-linux.tar.gz
Generating a Cluster Configuration Image
Creating the configuration YAML files
- Create a configuration directory by running the following commands.
Warning: Use absolute directory paths.
$ export CLUSTER_CONFIG=/home/test/cluster_config
$ mkdir $CLUSTER_CONFIG && cd $CLUSTER_CONFIG
- Configure and place both
install-config.yamlandagent-config.yamlfiles in the directory you created.
You can find examples of these configuration files in the following documentation:
- Preparing to install with the Agent-based installer
- Installing an OpenShift Container Platform cluster with the Agent-based Installer
- Example manifest files
Note:
- For disconnected environments, specify a dummy pull-secret in
install-config.yamlfile, for example'{"auths":{"":{"auth":"dXNlcjpwYXNz"}}}'. - The SSH public key for the
coreuser can be specified in theinstall-config.yamlfile under thesshKeyproperty. It can be used for logging in to the machines post cluster installation.
Example manifest files
Creating an SNO cluster:
agent-config.yaml
apiVersion: v1alpha1
kind: AgentConfig
rendezvousIP: 192.168.122.100
install-config.yaml
apiVersion: v1
metadata:
  name: appliance
baseDomain: appliance.com
controlPlane:
  name: master
  replicas: 1
compute:
- name: worker
  replicas: 0
networking:
  networkType: OVNKubernetes
  machineNetwork:
  - cidr: 192.168.122.0/24
platform:
  none: {}
pullSecret: '{"auths":{"":{"auth":"dXNlcjpwYXNz"}}}'
sshKey: 'ssh-rsa ...'
Creating a multi-node cluster:
agent-config.yaml
apiVersion: v1alpha1
kind: AgentConfig
rendezvousIP: 192.168.122.100
install-config.yaml
apiVersion: v1
metadata:
  name: appliance
baseDomain: appliance.com
controlPlane:
  name: master
  replicas: 3
compute:
- name: worker
  replicas: 2
networking:
  networkType: OVNKubernetes
  machineNetwork:
  - cidr: 192.168.122.0/24
platform:
  baremetal:
    apiVIPs:
    - 192.168.122.200
    ingressVIPs:
    - 192.168.122.201
pullSecret: '{"auths":{"":{"auth":"dXNlcjpwYXNz"}}}'
sshKey: 'ssh-rsa ...'
Optional: Adding custom manifests
- Create the
openshiftmanifests directory by running the following command:
$ mkdir $CLUSTER_CONFIG/openshift
- Add one or more custom manifests under
$CLUSTER_CONFIG/openshift.
Find more details and additional examples in OpenShift documentation:
-
Note: Any manifest added here will apply only to the cluster installed using this config-iso.
Optional: Installing Operators in the cluster
To automatically install Operators during cluster installation, add the relevant custom manifests to $CLUSTER_CONFIG/openshift.
Note: For disconnected environments, the Operators should be included in the appliance image.
Generating the configuration image
When ready, generate the config ISO.
Warning: Creating the config image will delete the install-config.yaml and agent-config.yaml files. Make sure to back them up first.
-
Generate the config ISO by running the following command:
$ ./openshift-install agent create config-image --dir $CLUSTER_CONFIGThe content of
cluster_configdirectory should look like the following example:├── agentconfig.noarch.iso ├── auth │ ├── kubeadmin-password │ └── kubeconfigNote: The config ISO contains only configurations and cannot be used as a bootable ISO.
Mounting the configuration image
Warning: Ensure nodes have sufficient vCPUs and memory, see requirements.
-
Mount the
agentconfig.noarch.isoas a CD-ROM on every node, or attach it using a USB stick. -
Start the machine(s).
Monitoring the installation
You can use the openshift-install command to monitor the bootstrap and installation process.
Monitoring the bootstrap process
-
Monitor the bootstrap process by running the following command:
$ ./openshift-install --dir $CLUSTER_CONFIG agent wait-for bootstrap-completeFor more information, see Waiting for the bootstrap process to complete.
Monitoring the installation process
-
Monitor the installation process by running the following command:
$ ./openshift-install --dir $CLUSTER_CONFIG agent wait-for install-completeFor more information, see Completing installation on user-provisioned infrastructure.
Accessing the installed cluster
You can log in to your cluster as a default system user by exporting the cluster kubeconfig file.
Warning: Ensure the server domain in $CLUSTER_CONFIG/auth/kubeconfig is resolvable.
-
Export the
kubeadmincredentials by running the following command:$ export KUBECONFIG=$CLUSTER_CONFIG/auth/kubeconfig
Confirming that the cluster version is available:
-
Confirm that the cluster version is available by running the following command:
$ oc get clusterverison
Confirming that all cluster components are available:
-
Confirm that cluster components are available by running the following command:
$ oc get clusteroperator
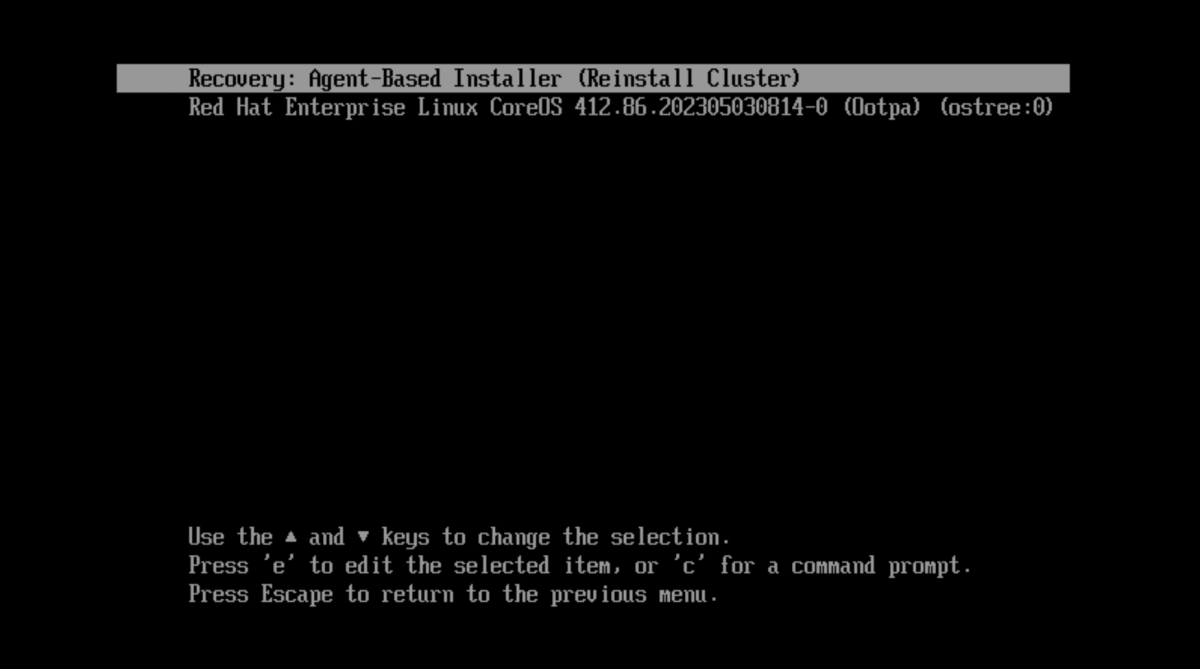
Recovering or reinstalling the cluster
- Reinstall the cluster using the above-mentioned
agentbootpartition by rebooting all the nodes and selecting theRecovery: Agent-Based Installeroption:
Using a deployment ISO
To simplify the deployment process of the appliance disk image (appliance.raw), you can use the deployment ISO. Upon booting a machine with this ISO, the appliance disk image is automatically cloned into the specified target device.
To build the ISO, appliance.raw disk image should be available under the assets directory, meaning that the appliance disk image should be built first.
Warning: The appliance.raw image should be built without specifying diskSizeGB property in the appliance-config.yaml file.
Building the ISO
- Generate the ISO by running the following commands:
$ export APPLIANCE_IMAGE="catalog.redhat.com/software/containers/assisted/agent-preinstall-image-builder-rhel9/65a55174031d94dbea7f2e00"
$ export APPLIANCE_ASSETS="/home/test/appliance_assets"
$ sudo podman run --rm -it --privileged -v $APPLIANCE_ASSETS:/assets:Z $APPLIANCE_IMAGE build iso --target-device /dev/sda
The command supports the following flags:
-target-device string    Target device name to clone the appliance into (default "/dev/sda")
--post-script string      Script file to invoke on completion (should be under assets directory)
--sparse-clone            Use sparse cloning - requires an empty (zeroed) device
--dry-run                 Skip appliance cloning (useful for getting the target device name)
- Verify that there is an
appliance.isofile under theassetsdirectory.
To initiate the deployment, attach or mount the ISO to the machine and boot it. After the deployment is completed, boot from the target device to start cluster installation.
Example operations
Using --post-script
To perform post-deployment operations, create a bash script file under assets directory.
For example, shutting down the machine post deployment:
$ cat $APPLIANCE_ASSETS/post.sh

#!/bin/bash
echo Shutting down the machine...
shutdown -a
$ sudo podman run --rm -it --privileged -v $APPLIANCE_ASSETS:/assets:Z $APPLIANCE_IMAGE build iso --post-script post.sh
Using an Upgrade ISO
In order to upgrade a cluster without an external registry, the Upgrade ISO flow can be used. An upgrade ISO includes the entire release payload of a specific OCP version, which allows upgrading clusters in disconnected environments.
The process for upgrading a cluster is as follows:
- Create an
appliance-config.yamlfile.- Set the requested version under
ocpRelease. - Set
pullSecret.
- Set the requested version under
- Generate an ISO using
build upgrade-isocommand. - Attach the ISO to each node in the cluster.
- To start the upgrade, apply the generated
MachineConfigyaml.
Warning:
This process has the following limitations:
- This process is currently experimental.
- After upgrading a cluster, the ISO should not be detached.
- This is required to allow pulling images post-upgrade (which might be needed, in some scenarios, for images missing from CRI-O containers-storage).
- This will be resolved using Content from github.com is not included.PinnedImageSet in a future version (probably OCP >= 4.19.0).
- Upgrading an old existing cluster is not supported. Only clusters created after the introduction of the
Upgrade ISOfunctionality can be upgraded.
Setting the OCP version for an upgrade
Specify the requested OCP version in appliance-config.yaml.
For example, for upgrading a cluster to the latest stable 4.17:
apiVersion: v1beta1
kind: ApplianceConfig
ocpRelease:
  version: 4.17
  channel: stable
  cpuArchitecture: x86_64
pullSecret: '{"auths":{<redacted>}}'
Building the Upgrade ISO
Use the build upgrade-iso command to generate an Upgrade ISO:
export APPLIANCE_IMAGE="quay.io/edge-infrastructure/openshift-appliance"
export APPLIANCE_ASSETS="/home/test/upgrade_assets"
sudo podman run --rm -it --pull newer --privileged -v $APPLIANCE_ASSETS:/assets:Z $APPLIANCE_IMAGE build upgrade-iso
Note:
- A configuration file named appliance-config.yaml is required in
APPLIANCE_ASSETSdir for building. - Ensure the
APPLIANCE_ASSETSdir is different from the one used for the disk image build.
The result should be the following two files in the APPLIANCE_ASSETS directory:
- An upgrade ISO:
upgrade-x.y.z.iso - A MachineConfig yaml:
upgrade-machine-config-x.y.z.yaml
Upgrading the cluster
Prerequisites:
- Ensure a recent etcd backup is available in order to restore the cluster to a previous state in case the upgrade fails.
- Attach the ISO to each node.
- Apply the MachineConfig to initiate the upgrade.
Note: The upgrade starts after a reboot of the nodes. This can take a few minutes.
Live ISO
As an alternative for building an appliance disk image (appliance.raw), a live ISO can be generated instead. The live ISO flow is useful for use cases in which cloning a disk image to a device is cumbersome or not applicable. Similarly to the disk image flow, generating a config-image is required as well. Note that a recovery grub item is not supported.
Building the live ISO
Use the 'build live-iso' command for generating the ISO:
export APPLIANCE_IMAGE="quay.io/edge-infrastructure/openshift-appliance"
export APPLIANCE_ASSETS="/home/test/appliance_assets"
sudo podman run --rm -it --pull newer --privileged --net=host -v $APPLIANCE_ASSETS:/assets:Z $APPLIANCE_IMAGE build live-iso
The result should be an appliance.iso file under assets directory.
To initiate the deployment:
- Attach the config ISO.
- Attach the generated appliance ISO.
- Boot the machine.
Note:
- The configuration file appliance-config.yaml is required in
APPLIANCE_ASSETSdirectory for building, similar to the disk image flow. - The
diskSizeGBproperty is not required for the live ISO flow. - Ensure the target device is first in the boot order (i.e. the live ISO should be booted only once). Or, if the target device isn't empty, select the live ISO manually during boot.
Warning:
This process has the following limitations:
- A recovery grub item is not available using this flow.
- It is mandatory to keep the ISO attached during cluster installation.