Upgrading Guide
Abstract
Chapter 1. Upgrading Red Hat build of Keycloak
This guide describes how to upgrade Red Hat build of Keycloak from version 26.4.x to version 26.6. Use the following procedures in this order:
- Review the release-specific changes from the previous version of Red Hat build of Keycloak.
- Upgrade the Red Hat build of Keycloak server.
- Upgrade the Red Hat build of Keycloak adapters, if new versions exist.
- Upgrade the Red Hat build of Keycloak admin client if necessary. For details, see Red Hat build of Keycloak admin client.
If you want to upgrade from an earlier version of Red Hat build of Keycloak, such as version 22.x, 24.x, 26.2, or 26.4, review all the changes in each upgrading guide published between your version and 26.6. See these upgrading guides:
Then, you can perform the upgrade procedures described in this guide.
For Red Hat Single Sign-On 7.6 customers, use the Migration Guide instead of this guide.
Chapter 2. Release-specific changes
2.1. Breaking changes for 26.6.3
Breaking changes are identified as those that might require changes for existing users to their configurations or applications. In minor or patch releases, Red Hat build of Keycloak will only introduce breaking changes to fix bugs.
2.1.1. Valid redirect URIs for clients do not accept wildcards for hostname anymore
The wildcard comparison for valid redirect URIs does not affect the hostname anymore. Previously patterns like https://example.com* were accepted and lead to allow unintended domains like https://example.com.other.domain.com. Since this release, the hostname does not accept such type of wildcard and those patterns will be managed as if the wildcard is after the hostname https://example.com/*. The full wildcard for the hostname https://* is still accepted because its interpretation cannot be misunderstood.
Note that OAuth 2.0 recommends exact string matching in the Content from datatracker.ietf.org is not included.Security Best Current Practice and draft for OAuth 2.1 enforces it. Red Hat build of Keycloak recommends to not use any wildcard valid redirect URI for clients. See Unspecific redirect URIs in the Server Administration Guide for more information.
2.1.2. User profile metadata no longer returned on user search
When searching for users using the Admin REST API, the user profile metadata is no longer included for each user in the search results.
This change was made to improve performance of user search operations, as fetching user profile metadata for each user can be resource-intensive. The user profile metadata can still be retrieved when fetching a specific user by their identifier.
2.2. Breaking changes at 26.6.2
Breaking changes are identified as those that might require changes for existing users to their configurations or applications. In minor or patch releases, Red Hat build of Keycloak will only introduce breaking changes to fix bugs.
2.2.1. JavaScript-based policies can now only be deployed if the scripts feature is enabled
In this version, JavaScript-based policies can only be deployed if the scripts feature is enabled.
Until now, JavaScript-based policies were always enabled regardless of the scripts feature flag. However, this behavior was causing confusion as users expected that disabling the scripts feature would also disable JavaScript-based policies. It was also not aligned with how other script-based features work in Red Hat build of Keycloak.
If you have existing JavaScript-based policies, make sure to enable the scripts feature when starting Red Hat build of Keycloak.
2.2.2. Stricter Validation for Client URIs (secure-client-uris)
The 'secure-client-uris' client policy executor has been updated to enforce stricter validation on Client URIs. This aligns with FAPI 2.0 security requirements by mandating TLS (HTTPS) for client endpoints.
HTTPS Enforcement: The following URIs must now use the https scheme. Existing clients configured with http in these fields will fail validation during updates: 'Post logout redirect URIs', 'Logo URL', 'Policy URL', and 'Terms of Service URL'.
Expanded Wildcard Support: The + wildcard character is now allowed in 'Valid post logout redirect URIs' and 'Web origins'. Configuring + defers validation to the client’s standard 'Valid redirect URIs'. Since redirect URIs are already checked for HTTPS, using the wildcard maintains FAPI 2.0 compliance while reducing configuration duplication.
Administrators must ensure that all configured URIs for the fields listed above use https. Clients attempting to update or register with http in these fields will fail validation when using the 'secure-client-uris' executor.
2.2.3. The Identity Provider issuer should be unique for the JWT authorization grant and client assertions
The JWT authorization grant and the client assertion authentication use the issuer claim passed in the assertion to locate the Identity Provider defined in Red Hat build of Keycloak, and that provider validates the claims and signature in the assertion. Since this version, the issuer configuration option must uniquely identify one provider. The grant operation or the assertion client authentication fails if more providers are returned for a single issuer. In the same way, the Identity Providers, when configured to allow the JWT authorization grant or client assertions, are validated to have a unique issuer defined in their configuration. Any update or add operation will fail if the issuer collides with another provider.
If you have identity providers defined with the same issuer and tested the JWT authorization grants or client assertions features, please update the providers accordingly before the upgrade. You can update the issuer or disable the provider to avoid the duplicates.
2.2.4. Endpoints are opened while Keycloak is initializing
Red Hat build of Keycloak now opens its HTTP(S) and Management ports while initialization is still in progress when the health endpoints are enabled. This resolves problems with long-running migrations on platforms like Kubernetes where a migration might otherwise be aborted, leaving the database in a potentially inconsistent state.
If you use a proxy or load balancer, configure an HTTP health check with the path /health/ready to ensure traffic is only routed to the server once it is fully ready.
If this behavior is not desired or an HTTP health check is not possible, start Red Hat build of Keycloak with --server-async-bootstrap=false to revert to the previous behavior where ports are opened only after initialization completes.
2.2.5. The SAML broker and adapter now check the SubjectConfirmationData element for the bearer type
Now Red Hat build of Keycloak, when acting as a SAML Service Provider (SP) in identity brokering or in the adapter, validates the SubjectConfirmationData for the type urn:oasis:names:tc:SAML:2.0:cm:bearer defined in the standard. The elements NotBefore, NotOnOrAfter and Recipient, when present in the assertion, are checked to be in the valid time range and to be the correct destination URI respectively. Previously, similar values were checked for other parts of the SAML response (for example the Conditions element or the destination attribute).
To prepare for the upgrade, verify that the Identity Provider or adapter configurations allow for a sufficient clock skew for the time attributes.
If you see any issue after the upgrade related to this element, please configure the external IdP to set the correct values for the subject confirmation element.
2.2.6. Outgoing HTTP connections do not follow redirects
Since this release, the HTTP connections originated from the Red Hat build of Keycloak server do not follow redirects by default. The HTTP result will be the redirect status (3xx) code, and the Location header will not be automatically fetched. With this change, the server avoids retrieving unwanted redirects that can bypass allowed URLs defined by client policies or other future configurations.
The new option allow-redirects (SPI connections-http-client, provider default) is available to revert to the previous behavior. This option is deprecated and will be removed in a future version.
bin/kc.[sh|bat] start --spi-connections-http-client--default--allow-redirects true
For more details, see Configuring Outgoing HTTP requests.
2.2.7. Client scope evaluation now enforces access to the user when generating tokens
In previous versions of Red Hat build of Keycloak, client scope evaluation allow generating tokens without necessarily having the necessary admin roles or permissions to access the user.
In this release, client scope evaluation now requires at the very least the view-users admin role granted to the realm administrator or any permission that grants the view scope on the user.
2.2.8. Token introspection now validates audience claim
The OAuth2 token introspection endpoint now validates that the authenticated client is present in the token’s audience (aud) claim before allowing introspection.
Previously, any authenticated client could introspect any valid token. Now, the introspection endpoint returns {"active": false} if the authenticated client is not in the token’s audience.
2.2.8.1. Migration
To temporarily restore the previous behavior, enable the backwards compatibility option either server-wide or per-client.
To enable the server-wide configuration option allow-token-introspection-without-audience-check, see OpenID Connect provider configuration.
For the per-client option, navigate to Clients → select the client that performs the introspection → Advanced → OpenID Connect Compatibility Modes → enable Allow token introspection without audience check.
The per-client option is configured on the client that performs the introspection (the authenticated client), not the client that issued the token.
Both server-wide and per-client options are deprecated and will be removed in a future release. They log warnings for each introspection request without audience validation.
Recommended migration path:
- After upgrade: Enable server-wide option temporarily to restore previous behavior
- Identify affected clients: Monitor server logs for warnings about introspection without audience validation
-
Fix each client: Either add audience protocol mapper to include introspecting client in token’s
aud, or enable per-client option - Test and disable: Verify all introspection flows work, then disable server-wide option
For lightweight access tokens, the audience claim may only be present in the introspection response (not in the token itself). The audience check validates the transformed token returned by introspection, ensuring proper validation for both standard and lightweight tokens.
2.2.9. UserInfo endpoint rejects lightweight access tokens
The UserInfo endpoint now rejects lightweight access tokens by default. Lightweight access tokens contain minimal claims and are designed for token introspection.
Previously, lightweight access tokens were accepted by the UserInfo endpoint. Now, the UserInfo endpoint returns a 401 Unauthorized error when called with a lightweight access token.
2.2.9.1. Migration
To temporarily restore the previous behavior, enable the backwards compatibility option either server-wide or per-client. To enable the server-wide configuration option allow-userinfo-with-lightweight-access-token, see OpenID Connect provider configuration.
For the per-client option, navigate to Clients → select the client that issues tokens → Advanced → OpenID Connect Compatibility Modes → enable Allow UserInfo with lightweight access token.
The per-client option is configured on the client that issues the token (the azp claim).
Both server-wide and per-client options are deprecated and will be removed in a future release. They log warnings for each UserInfo request with a lightweight token.
Recommended alternatives to lightweight tokens for UserInfo:
- Use token introspection instead: The token introspection endpoint is designed to work with lightweight tokens and will return the full claims
- Exchange lightweight token for full access token: Use token exchange to convert a lightweight token to a full access token, then call UserInfo with the full token
2.3. Notable changes at 26.6.3
Notable changes may include internal behavior changes that prevent common misconfigurations, bugs that are fixed, or chenges to simplify running Red Hat build of Keycloak. It also lists significant changes to internal APIs.
2.3.1. Maximum length of the token parameters in the OIDC token endpoint
When the OIDC token endpoint request (or OAuth2 token endpoint request) is sent, a new limit exists for the maximum length of the "token" OIDC/OAuth2 parameter. The maximum length of each "normal" parameter is still 4,000 characters as in the previous version. However, the maximum length of the "token" parameter is increased to 20,000 characters. Also, when the limit for the "token" parameter is reached, the parameter will not be ignored, but the request will fail.
A "token" parameter is considered a parameter containing a potentially long value, such as a long JWT or SAML assertion, with unbounded data, such as possibly a large number off roles inside JWT. Therefore, it applies for parameters such as subject_token, which was sent in case of the Token exchange grant.
If you want to increase or lower those numbers, start the server with the option req-token-params-default-max-size for the default maximum length of the OIDC/OAuth2 token parameter. You can instead use something such as req-params-max-size for one specific parameter. For more details, see the login-protocol provider configuration in the All provider configuration chapter.
2.3.2. CORS requests with an invalid Origin are now rejected before endpoint logic runs
Cross-origin requests sent to OIDC endpoints (such as the token, userinfo, token revocation, logout, and PAR endpoints) are now validated against the client’s configured Web Origins before the endpoint reaches its authentication and request-processing logic. Previously, requests carrying an Origin header that did not match any of the client’s allowed Web Origins could be processed up to the point where the response was about to be returned, which could result in inconsistent error responses depending on how far the request progressed.
After this change, such requests are rejected immediately with a CORS failure returning Forbidden (403) HTTP error status. There is no behavior change for same-origin requests (no Origin header) or for cross-origin requests whose Origin is already permitted by the client’s Web Origins configuration.
2.3.3. Extensions must not restart a Keycloak transaction
This change might affect custom Red Hat build of Keycloak extensions.
The implicit transaction handling in Red Hat build of Keycloak previously assumed that a transaction is started once per session, which is usually request-scoped. If it was started a second time, this might have led to an inconsistent state.
Starting with this version, this is now enforced and a session’s transaction can only be started once. This prevents difficult-to-track errors and lost commits. It also ensures that at the start of the transaction, all nested transactions are started if they have not been started earlier.
A transaction is started automatically before the REST endpoint code is invoked, even if the session was created earlier in a filter.
As before, transactions can be nested, which will pause the outer transaction once the nested transaction starts, and will resume the outer transaction once the nested transaction ends.
2.3.4. Validation of client_session_host parameter
The client_session_host parameter is now validated against the client’s registered nodes and management URL.
This parameter is sent by clients during token refresh and is used when the ${application.session.host} placeholder is present in a client’s backchannel logout URL configuration.
It was primarily used by legacy adapters that have been removed.
This improves security by ensuring that only trusted, pre-registered hosts can be used in backchannel logout URLs.
2.4. Notable changes at 26.6.2
2.4.1. Usage of second-class options
In prior releases, the introduction of a first-class option with a default would cause the second-class option (typically spi or quarkus properties) to no longer be used at all.
For example, spi-truststore—file—hostname-verification-policy was marked as deprecated after the introduction of tls-hostname-verifier. However, since tls-hostname-verifier included a default, direct usage of spi-truststore—file—hostname-verification-policy was no longer considered.
To ensure that the further introduction of new first-class options does not immediately break existing configurations, the logic for determining the value of a second-class option will now consider the direct usage of the second-class value ahead of a default, or derived default, from the first-class option.
Please review the server startup to see if there are any warnings about the continued usage of second-class options, and update them accordingly.
2.4.2. New option for transaction timeout
A new option transaction-default-timeout has been introduced to configure the default transaction timeout in Red Hat build of Keycloak.
While using Quarkus properties directly is not the supported way to configure Red Hat build of Keycloak, some users may have used quarkus.transaction-manager.default-transaction-timeout to customize the transaction timeout. If you are using this Quarkus property, the new transaction-default-timeout CLI option, when set, will take precedence and override your configuration when upgrading to this version.
To maintain your desired transaction timeout configuration, migrate to using the transaction-default-timeout CLI option and remove the quarkus.transaction-manager.default-transaction-timeout property from your configuration.
2.4.3. Dev Mode defaults to localhost
When running the server in dev mode on a platform other than Windows Subsystem For Linux, the http-host setting will default to localhost. This ensures your dev instance won’t be accessible from other machines. If you want the previous behavior of binding to all interfaces, then explicitly set http-host to 0.0.0.0.
2.4.4. Graceful shutdown of HTTP stack
Starting with this version, Red Hat build of Keycloak will apply a shutdown delay and a shutdown timeout of one second each to allow a graceful termination.
Users should adjust those values depending on their proxy setup. For more details, see Graceful HTTP shutdown.
2.4.5. X-Forwarded-Prefix Header is now supported
With proxy-headers set to xforwarded, the server can determine the proxy context path from the X-Forwarded-Prefix header.
2.4.6. New brute force locking mechanism
There is a new brute force locking mechanism applied to all brute force modes. It is called Secondary Authentication Failures Lockout. The brute force protector counts secondary authentication failures only (for example OTP), and when the maximum specified number is reached, the account is permanently locked even in temporary locking modes. This prevents attacks on second factor authenticators such as OTP when the attacker has already guessed the password.
This new brute force locking mechanism also changes the original behavior of brute force protection. It is applied only to a subset of authentication mechanisms (passwords, OTP, and recovery codes).
2.4.7. Client secret authentication method
OIDC specification has multiple client authentication methods. Two of them, client_secret_basic and client_secret_post, are implemented in Red Hat build of Keycloak by Client Id and Secret client authenticator. Until now, when the OIDC client registration request was sent with the attribute token_endpoint_auth_method set to client_secret_basic or client_secret_post, Red Hat build of Keycloak allowed the client to authenticate with both client_secret_basic and client_secret_post methods and did not preserve the single method specified in the OIDC client registration request. Now the specified method is respected, so for example when the OIDC client registration is sent with token_endpoint_auth_method set to client_secret_post, then it is required to authenticate the client with the client secret sent as a parameter in the POST request body.
It is still possible to make the OIDC client allow both methods, and clients migrated from previous versions are set by default to allow authentication with both methods.
2.4.8. Zero-downtime patch releases enabled by default
Zero-downtime patch releases are now enabled by default. This feature, previously in preview as rolling-updates:v2, allows you to perform rolling updates when upgrading to a newer patch version within the same major.minor release stream without service downtime.
The rolling-updates:v2 feature flag is no longer required.
When using the Red Hat build of Keycloak Operator, set the update strategy to Auto to benefit from this functionality.
For more details, see Avoiding downtime with rolling updates.
2.4.9. Infinispan 16 upgrade
Red Hat build of Keycloak now uses Infinispan 16.0 for embedded distributed caching. This upgrade brings improved performance, enhanced security, and better support for zero-downtime upgrades in patch releases.
If you are using an external Data Grid server, for example in a multi-cluster setup, you should upgrade to version 16.0 as this is the version Red Hat build of Keycloak was tested with.
When upgrading the external Data Grid, the following changes are necessary:
-
Enable the legacy metrics to ensure that alerts and dashboard still receive the same metrics as before. See External Data Grid metrics and where to add
legacy: trueto the ConfigMap. -
Define
indexing.startupMode=NONEin your Cache configurations. See Deploying Data Grid for examples.
2.4.10. Adjusted default clock-skew for not-before JWT token checks
Previous versions of Red Hat build of Keycloak tested the issued-at timestamp with a clock-skew of zero seconds by default if this value was provided in a token. By default, access tokens issued by Red Hat build of Keycloak used for the admin API or for the user info endpoint do not contain a not-before claim, but customized setups might have it. In a setup with such a claim configured and with clocks that were not fully synchronized, this could lead to rejecting tokens on a node that lagged behind, as it would consider the tokens not valid yet.
Starting with this version, Red Hat build of Keycloak will honor a clock skew of 10 seconds for the issued-at timestamp by default, which is aligned with best practices such as the Content from openid.net is not included.FAPI 2.0 Security Profile.
This applies to all places where no explicit clock skew is configured, except for JWT Client Assertions that have a hardcoded clock skew of 15 seconds. It does not affect any explicitly configured clock skew, for example in identity providers, where an individual clock skew can be configured.
2.4.11. The base themes are now abstract
All the base themes are now tagged as abstract, and they are not listed in the Admin Console to be selected (Realm Settings → Themes tab). They were always intended to be only extended but not used directly. If you use one of them, it will continue working (or not working) in the same way, but cannot be selected using the Admin Console anymore. Please select one of the available default themes or create your own one.
2.4.12. Truststore initialization moved to the server
Red Hat build of Keycloak now automatically discovers and trusts cluster certificate authorities when running on Kubernetes or OpenShift, without relying on the Operator to preconfigure the truststore. Specifically, if present in the container filesystem, the following files are added to the system truststore at runtime:
-
/var/run/secrets/kubernetes.io/serviceaccount/ca.crt(Kubernetes service account CA) -
/var/run/secrets/kubernetes.io/serviceaccount/service-ca.crt(OpenShift service CA)
This behavior is enabled by default and can be controlled with the server option:
-
--truststore-kubernetes-enabled=true|false(default:true)
No changes are required for most deployments. If you previously relied on the Operator to manage these truststore entries, the server now performs the same function directly.
when https-client-auth is set to required or request without an explicit https-trust-store-file, mTLS client certificate validation falls back to the system truststore. With truststore-kubernetes-enabled=true, this means certificates signed by the Kubernetes cluster CA will be accepted as valid client certificates. If this is not desired, either set https-trust-store-file explicitly or disable truststore-kubernetes-enabled.
For more details, see Cluster CA certificates (Kubernetes and OpenShift).
If you are deploying Red Hat build of Keycloak by using the Red Hat build of Keycloak Operator and your deployment relies on trusting the Kubernetes CA, upgrade custom Keycloak images first. This ensures that the Kubernetes CAs remain trusted for the entire duration of the upgrade.
If you cannot upgrade the custom image first or if you are able to simultaneously upgrade the operator with the custom images, consider explicitly configuring the truststore path in the Keycloak Custom Resource before changing the Operator version. This strategy ensures that Pods using older custom images continue to trust the cluster CA during the upgrade procedure:
apiVersion: k8s.keycloak.org/v2alpha1
kind: Keycloak
metadata:
  name: keycloak
spec:
  automountServiceAccountToken: true
  additionalOptions:
    - name: truststore-paths
value: "/var/run/secrets/kubernetes.io/serviceaccount/ca.crt,/var/run/secrets/kubernetes.io/serviceaccount/service-ca.crt"2.4.13. New database indexes on the OFFLINE_CLIENT_SESSION and BROKER_LINK tables
To improve performance, these tables contain new database indexes:
-
The
OFFLINE_CLIENT_SESSIONtable contains these indexes:IDX_OFFLINE_CSS_BY_CLIENT_AND_REALMandIDX_OFFLINE_CSS_BY_USER_SESSION_AND_OFFLINE -
The
BROKER_LINKtable contains thses indexes:IDX_BROKER_LINK_USER_IDandIDX_BROKER_LINK_IDENTITY_PROVIDER
If either table contains more than 300,000 entries, Red Hat build of Keycloak skips the index creation by default during the automatic schema migration and instead logs the SQL statement on the console during migration to be applied manually after Red Hat build of Keycloak’s startup. See Migrating the database for details on how to configure a different limit.
2.4.14. UserSessionProvider API changes
The internal UserSessionProvider interface received new methods for efficient streaming of user sessions, in both speed and memory. The streaming instances are read-only, meaning they will not change. The previous methods have been deprecated. Custom providers should implement these new methods to avoid performance penalties. They should avoid keeping the returned items in memory, for example by binding them to the current transaction, in case the invoker needs to analyze all data.
A similar change was done for the UserSessionPersisterProvider.
2.4.15. Updated HTTP status code for invalid_grant errors in the Resource Owner Password Credentials Grant
Authentication failures resulting in an invalid_grant now correctly return an HTTP 400 status code instead of 401 for the Resource Owner Password Credentials and UMA Permission grants. This change was done to properly follow the OAuth 2.0 Authorization Framework specification.
2.4.16. Sender-constrained tokens are now rejected in Standard Token Exchange
Standard Token Exchange now rejects all sender-constrained tokens (as defined in Content from datatracker.ietf.org is not included.RFC 7800) used as the subject_token parameter. This includes both DPoP-bound tokens and X.509 certificate-bound tokens (mTLS).
This change ensures better security and alignment with the OAuth 2.0 Token Exchange specification. Sender-constrained tokens are bound to specific clients and should not be exchanged across different contexts.
If you attempt to exchange a sender-constrained token, the request will be rejected with an invalid_request error. For more details, see Token Exchange.
2.4.17. Re-indexing required for external Infinispan Server
With the clusterless feature enabled and persistent-user-sessions disabled, a re-index is required due to schema changes. Red Hat build of Keycloak triggers the re-index on startup, but this may delay server startup depending on the number of sessions stored, and/or return incorrect results during the re-index process.
2.4.18. Automatic database connection properties for the MS SQL Server driver
When running with the MS SQL server, Red Hat build of Keycloak needs to ensure consistent and predictable string parameter handling with the database. Starting with this release, and when using the MS SQL Server JDBC driver, Red Hat build of Keycloak sets the sendStringParametersAsUnicode property to false by default. This change prevents the driver from automatically sending string parameters as Unicode unless explicitly required, which can reduce overhead and avoid unexpected performance or query-plan issues in some environments.
You can override this behavior by setting your own value for the sendStringParametersAsUnicode property in the database connection URL or configuration, for example by adding ;sendStringParametersAsUnicode=true to the connection URL.
2.4.19. New CLI options for database TLS configuration and transaction timeout configuration
New CLI options are now available to configure TLS encryption for database connections in a vendor-independent way:
-
db-tls-mode: Sets the TLS mode for the database connection. Valid values aredisabled(default) andverify-server. When set todisabled, Red Hat build of Keycloak does not configure TLS and the driver’s default behavior applies. When set toverify-server, encryption and server identity verification are enabled. -
db-tls-trust-store-file: The path to the truststore file containing the database server certificate or Certificate Authority (CA) certificate. -
db-tls-trust-store-password: The password to access the truststore file. -
db-tls-trust-store-type: The type of the truststore file (for example,JKSorPKCS12).
These options replace the need to configure vendor-specific JDBC properties manually. Red Hat build of Keycloak automatically translates them to the appropriate driver-specific settings.
As an alternative to specifying a truststore file with db-tls-trust-store-file, you can use --truststore-paths to add the certificate to the Java truststore.
For more details, see Secure the database connection.
Also, two new CLI options are now available to control transaction timeout behavior:
-
transaction-default-timeout: Controls the transaction timeout for regular transactions. The default value is 5 minutes, which is the same value used by the current Red Hat build of Keycloak version. -
transaction-setup-timeout: Controls the timeout for transactions used by database schema migration, import, and export commands. The default value is 30 minutes, as these operations may take a while to complete for large datasets.
The provider configuration spi-dblock—jpa—lock-wait-timeout option has been replaced with the CLI option transaction-setup-timeout.
2.4.20. New columns for tracking resource creation and modification timestamps
The USER_ENTITY table now has a new column LAST_MODIFIED_TIMESTAMP, and the KEYCLOAK_GROUP table now has two new columns CREATED_TIMESTAMP and LAST_MODIFIED_TIMESTAMP. These columns track when users and groups were created and last modified.
For existing users and groups created before this upgrade, these columns will be NULL. Newly created or modified resources will have these timestamps populated automatically.
2.4.21. Database character encoding checks during startup
Red Hat build of Keycloak will log a warning if the database is not configured to use UTF-8 encoding. This check applies to all supported databases.
For details on configuring UTF-8 encoding for your database, see Configuring the database.
As part of this change, the database configuration documentation has been updated:
-
For MySQL and MariaDB, the documentation now recommends using
utf8mb4as the character set. The previously documentedutf8mb3(orutf8) character set has been removed from the documentation due to its limitations in storing certain Unicode characters. - Previously recommended JDBC driver settings for Oracle, MySQL, and MariaDB have been removed from the documentation, as current versions of these databases use appropriate default values.
2.4.22. New --db-connect-timeout option for database connection and login timeout
A new CLI option --db-connect-timeout sets the JDBC driver connection timeout and login timeout. It defaults to 10s to improve failover behavior and startup resilience during network issues.
2.4.23. New KCRAW_ prefix for environment variables to preserve literal values
Red Hat build of Keycloak now supports a KCRAW_ prefix for environment variables as an alternative to the standard KC_ prefix. If you are already using the KCRAW_ prefix for another purpose, please migrate to a new key prefix.
For more details, see Preserving literal values with the KCRAW_ prefix.
2.4.24. Usage of virtual threads for embedded caches
Previously virtual threads were used when at least two CPU cores were available. Starting with this version, virtual threads are only used when at least four CPU cores are available. This change should prevent deadlocks due to pinned virtual threads.
2.4.25. Accepting URL paths without a semicolon
Previously Red Hat build of Keycloak accepted HTTP requests with paths containing a semicolon (;). When processing them, it handled them as of RFC 3986 as a separator for matrix parameters, which basically ignored those parts. As this has led to a hard-to-configure URL filtering, for example, in reverse proxies, this is now disabled, and Red Hat build of Keycloak responds with an HTTP 400 response code.
To analyze rejected requests in the server log, enable debug logging for org.keycloak.quarkus.runtime.services.RejectNonNormalizedPathFilter.
To revert to the previous behavior and to accept matrix parameters set the option http-accept-non-normalized-paths to true. With this configuration, enable and review the HTTP access log to identify problematic requests.
2.4.26. More changes for the server-info system information
In version 26.4.0, the server-info endpoint changed to return only the system information for administrators in the admin realm. Nevertheless, the version property was detected to be needed by some products that interact with Red Hat build of Keycloak. Now that property is included for administrators in the realm with permission manage-realm.
The workaround of the view-system permission is more restricted too. It can only be assigned by administrators in the master realm. For more details, see Delegating realm administration using permissions. This permission will be deleted in a future version.
2.4.27. Maximum inflating size for the SAML redirect binding
Since this release, the Red Hat build of Keycloak SAML implementation limits the data that can be inflated through the REDIRECT binding. The default maximum size is 128KB, the decompression stops when that value is exceeded and returns an error. The option spi-login-protocol—saml—max-inflating-size can be used to increase the default limit.
Increasing limit to 512KB
bin/kc.[sh|bat] --spi-login-protocol--saml--max-inflating-size=524288
The same restriction is applied for the Red Hat build of Keycloak SAML Galleon feature pack. Although, in this case, you need to add a system property to the Wildfly/EAP server to change the default maximum size: -Dorg.keycloak.adapters.saml.maxInflatingSize=524288.
2.4.28. HTTP Access log does not contain specific sensitive information
Specific sensitive information is omitted from the HTTP Access log, such as the value of the Authorization HTTP header. Moreover, values of specific sensitive Red Hat build of Keycloak cookies, such as KEYCLOAK_SESSION, KEYCLOAK_IDENTITY, or AUTH_SESSION_ID, are also omitted.
2.4.29. Maximum length of the parameters in the OIDC token endpoint
When the OIDC token endpoint request (or OAuth2 token endpoint request) is sent, a new limit exists for the maximum length of every OIDC/OAuth2 parameter. The maximum length of each parameter is 4,000 characters, which is aligned with the same limit, which already exists for the parameters sent to OIDC/OAuth authentication request.
To adjust those numbers, start the server with the req-params-default-max-size option for the default maximum length of the OIDC/OAuth2 parameters. Alternatively, you can use something such as req-params-max-size for one specific parameter. For more details, see login protocol configuration topic.
2.4.30. WebAuthn acceptable AAGUIDs option restricts authenticators strictly
The WebAuthn policy presents the option Acceptable AAGUIDs to restrict the authenticators that are allowed to register new credentials. The AAGUID (Authenticator Attestation Global Unique Identifier) is an identifier for the authenticator’s type (such as make and model). This option requires the Attestation conveyance preference to be configured too (normally Direct), in order to force the authenticator to include the attestation inside the registration data.
Since this release, when this option is set up, the attestation is required to be present and signed with a valid certificate for the Red Hat build of Keycloak trust-store. The None attestation format is explicitly not permitted. Previously, there were some corner cases in which a self attestation was accepted. The change is expected to be harmless, but maybe there are combinations of authenticators and WebAuthn policies that can present issues.
For more details, see Managing policy in the Server Administration Guide.
2.4.31. Workflow schedule synchronization across cluster nodes
A new cluster event was introduced to synchronize workflow scheduled settings across cluster nodes. You might see errors when updating workflow definitions during a rolling update when upgrading from 26.6.x. Defer updating workflow definitions until the rolling update has completed.
2.4.32. Required actions are one-time actions by default
Since this release, all Required Actions are now one-time actions by default to ensure they cannot be reused once completed. This change impacts the email action tokens created by the execute-actions-email endpoint, which is executed via the Credential reset button in the Admin Console. Any action token generated through this endpoint (with whatever reset actions) is now strictly one-time use, ensuring that once a user completes the required steps, the token is immediately invalidated.
Chapter 3. Upgrading the Red Hat build of Keycloak server
You upgrade the server before you upgrade the adapters.
3.1. Preparing for an upgrade
Starting with Red Hat build of Keycloak 26.6.0 rolling updates of patch releases are supported. See the Rolling Updates Guide to determine if a rolling update is possible.
Perform the following steps before you upgrade the server.
Procedure
- Shut down Red Hat build of Keycloak if no rolling update is supported, for example if you perform a minor or major upgrade.
- Back up the old installation, such as configuration, themes, and so on.
-
If XA transactions are enabled, handle any open transactions and delete the
data/transaction-logs/transaction directory. - Back up the database using the instructions in the documentation for your relational database.
The database schema will no longer be compatible with the old server after the upgrade. Because Red Hat build of Keycloak does not support rolling back the database changes, if you need to roll back to the previous version, first restore the old installation, and then restore the database from the backup copy.
If the persistent-user-sessions feature is disabled in your current setup and the server is upgraded, all user sessions will be lost except for offline user sessions. Users with these sessions will have to log in again. Note that the persistent-user-sessions feature is disabled by default in Red Hat build of Keycloak server releases prior to 26.0.0.
Information about failed logins for brute force detection and currently ongoing authentication flows is only stored in the internal caches that are cleared when Red Hat build of Keycloak is shut down. Users currently authenticating, changing their passwords, or resetting their passwords will need to restart the authentication flow once Red Hat build of Keycloak is up and running again.
3.2. Downloading the Red Hat build of Keycloak server
Once you have prepared for the upgrade, you can download the server.
Procedure
Download and extract This content is not included.rhbk-26.6.3.zip from the Red Hat build of Keycloak website.
After extracting this file, you should have a directory that is named
rhbk-26.6.3.- Move this directory to the desired location.
-
Copy
providers/andthemes/from the previous installation to the new installation. -
Copy all files except
cache-ispn.xmlfromconf/from the previous installation to the new installation. If you modified
cache-ispn.xmlor created a custom cache configuration file:-
Re-apply your changes based on the
cache-ispn.xmlfile shipped with the new installation, and place them in the new installation. - Review the latest Red Hat build of Keycloak configuration options for cache sizes and transport stacks if they can be used instead of your modifications as they provide better documentation, additional validations and functionality, and a simpler upgrade experience.
-
Re-apply your changes based on the
3.3. Migrating the database
Red Hat build of Keycloak can automatically migrate the database schema, or you can choose to do it manually. By default, the database is automatically migrated when you start the new installation for the first time.
Before you migrate the database, shut down all Red Hat build of Keycloak nodes running the old version of Red Hat build of Keycloak.
Migration is not supported with the default H2 based dev-file database type.
3.3.1. Migration timeout configuration
The migration time of the database schema and its contents can vary depending on hardware, release and the amount of data. By default Red Hat build of Keycloak sets a migration timeout of 30 minutes.
To change the migration timeout, use the option transaction-setup-timeout to configure a longer value if your environment requires this.
kc.[sh|bat] start --transaction-setup-timeout=60m
3.3.2. Automatic relational database migration
To perform an automatic migration, start the server connected to the desired database. If the database schema has changed for the new server version, the migration starts automatically unless the database has too many records.
For example, creating an index on tables with millions of records can be time-consuming and cause a major service disruption. Therefore, a threshold of 300000 records exists for automatic migration. If the number of records exceeds this threshold, the index is not created. Instead, you find a warning in the server logs with the SQL commands that you can apply manually.
To change the threshold, set the index-creation-threshold property, value for the connections-liquibase provider:
kc.[sh|bat] start --spi-connections-liquibase--quarkus--index-creation-threshold=300000
You can disable this feature by setting it to zero or a negative number:
kc.[sh|bat] start --spi-connections-liquibase--quarkus--index-creation-threshold=0
3.3.3. Manual relational database migration
To enable manual upgrading of the database schema, set the migration-strategy property value to "manual" for the default connections-jpa provider:
kc.[sh|bat] start --spi-connections-jpa--quarkus--migration-strategy=manual
When you start the server with this configuration, the server checks if the database needs to be migrated. If migration is needed, the required changes are written to the bin/keycloak-database-update.sql SQL file. You can review and manually run these commands against the database.
To change the path and name of the exported SQL file, set the migration-export property for the default connections-jpa provider:
kc.[sh|bat] start --spi-connections-jpa--quarkus--migration-export=<path>/<file.sql>
After the changes have been written to the file, the server exits.
For further details on how to run the statements in the file against the database, see the documentation for your relational database.
Once you have run the statements, you can start the new Red Hat build of Keycloak version. On the first startup, it might perform additional data migrations that are required in addition to the schema migrations.
3.4. Migrating themes
If you created custom themes, those themes must be migrated to the new server. Also, any changes to the built-in themes might need to be reflected in your custom themes, depending on which aspects you customized.
Procedure
-
Copy your custom themes from the old server
themesdirectory to the new serverthemesdirectory. Use the following sections to migrate templates, messages, and styles.
- If you customized any of the updated templates listed in Migration Changes, compare the template from the base theme to check for any changes you need to apply.
- If you customized messages, you might need to change the key or value or to add additional messages.
- If you customized any styles and you are extending the Red Hat build of Keycloak themes, review the changes to the styles. If you are extending the base theme, you can skip this step.
3.4.1. Migrating templates
If you customized any template, compare it to the new version of that template. This comparison shows you what changes you need to apply to your customized template. You can use a diff tool to compare the templates. The following screenshot compares the info.ftl template from the Login theme and an example custom theme:
Updated version of a Login theme template versus a custom Login theme template
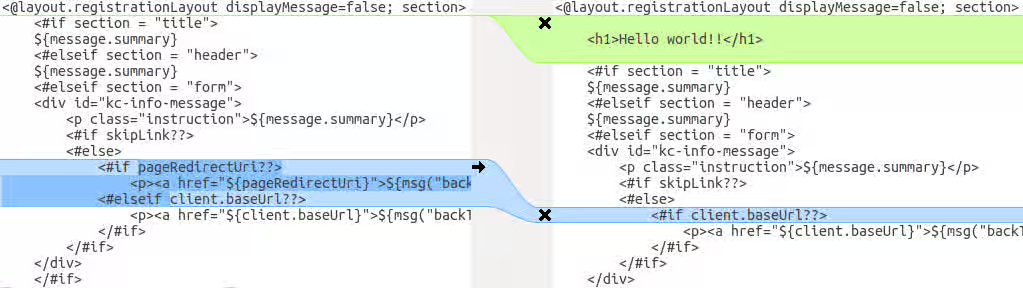
This comparison shows that the first change (Hello world!!) is a customization, while the second change (if pageRedirectUri) is a change to the base theme. By copying the second change to your custom template, you have successfully updated your customized template.
In an alternative approach, the following screenshot compares the info.ftl template from the old installation with the updated info.ftl template from the new installation:
Login theme template from the old installation versus the updated Login theme template
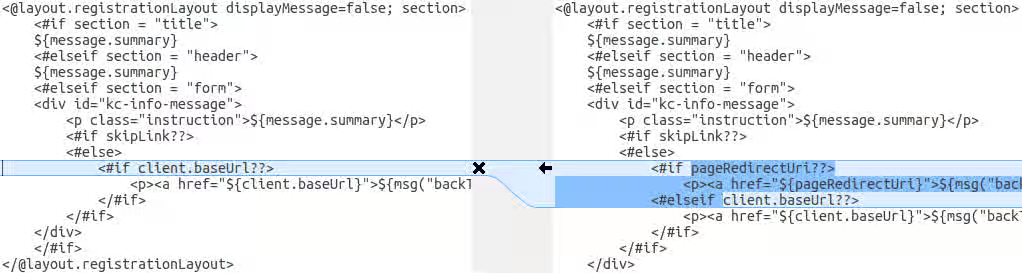
This comparison shows what has been changed in the base template. You can then manually make the same changes to your modified template. Since this approach is more complex, use this approach only if the first approach is not feasible.
3.4.2. Migrating messages
If you added support for another language, you need to apply all the changes listed above. If you have not added support for another language, you might not need to change anything. You need to make changes only if you have changed an affected message in your theme.
Procedure
- For added values, review the value of the message in the base theme to determine if you need to customize that message.
- For renamed keys, rename the key in your custom theme.
- For changed values, check the value in the base theme to determine if you need to make changes to your custom theme.
3.4.3. Migrating styles
You might need to update your custom styles to reflect changes made to the styles from the built-in themes. Consider using a diff tool to compare the changes to stylesheets between the old server installation and the new server installation.
For example:
$ diff RHSSO_HOME_OLD/themes/keycloak/login/resources/css/login.css \
RHSSO_HOME_NEW/themes/keycloak/login/resources/css/login.css
Review the changes and determine if they affect your custom styling.
Chapter 4. Upgrading Red Hat build of Keycloak adapters
After upgrading the Red Hat build of Keycloak server, you upgrade the adapters. Versions of adapters and Red Hat build of Keycloak are now decoupled, meaning that they are released on different schedules. Therefore, use these rules to determine which adapters you upgrade:
- Earlier versions of an adapter might work with later versions of the Red Hat build of Keycloak server.
- Earlier versions of the Red Hat build of Keycloak server might not work with later versions of an adapter.
Each adapter upgrade section provides details on supported adapter versions.
4.1. Upgrading the JBoss EAP SAML adapter
As of Red Hat build of Keycloak 26.0, the JBoss EAP SAML adapter is no longer released with Red Hat build of Keycloak. If you deployed an application with version 6.x or 7.x of that adapter, it is not supported by Red Hat build of Keycloak. Those versions of the adapter are only supported to be used in combination with Red Hat Single Sign-On 7.6.
The fully supported adapter for SAML is the Keycloak SAML Adapter feature pack or RPM for JBoss EAP 8.x.
To upgrade a JBoss EAP SAML adapter that has been copied to your web application, perform the following procedure.
Procedure
-
Remove the previous adapter modules by deleting the
EAP_HOME/modules/system/add-ons/keycloak/directory. - Install the new version of the adapter. For full details, see Installing JBoss EAP by using the RPM installation method.
4.2. Upgrading the JBoss EAP OpenID connect adapter
As of Red Hat build of Keycloak 26.0, the JBoss EAP OpenID connect (OIDC) adapter is no longer released with Red Hat build of Keycloak. This adapter has reached end of life and it is only supported to be used in combination with Red Hat Single Sign-On 7.6. The supported adapter for OIDC is supplied by JBoss EAP 8.x.
To upgrade a JBoss EAP OIDC adapter that has been copied to your web application, perform the following procedure.
Procedure
-
Remove the previous adapter modules by deleting the
EAP_HOME/modules/system/add-ons/keycloak/directory. - Install the OIDC client supplied by JBoss EAP 8.x. For details, see Securing Applications with OIDC.
4.3. Upgrading the JavaScript adapter
For this release of Red Hat build of Keycloak, the supported version of this adapter is 26.2.x. To upgrade a JavaScript adapter that has been copied to your web application, perform the following procedure.
Procedure
- Remove the previous version of the JavaScript adapter.
Use these NPM commands to install the 26.2.x version of the adapter:
npm config set @redhat:registry https://npm.registry.redhat.com
npm install @redhat/keycloak-js@latest
4.4. Upgrading the Node.js adapter
For this release of Red Hat build of Keycloak, the supported version of this adapter is 26.1.1. To upgrade a Node.js adapter that has been copied to your web application, perform the following procedure.
Procedure
- Remove the previous version of the Node.js adapter.
Use these NPM commands to install the 26.1.1 version of the Node.js adapter:
npm config set @redhat:registry https://npm.registry.redhat.com
npm install @redhat/keycloak-connect@latest
-
Change the dependency for keycloak-connect in the
package.jsonof your application.