Serving
Getting started with Knative Serving and configuring services
Abstract
Chapter 1. Getting started with Knative Serving
1.1. Creating serverless applications
Serverless applications are created and deployed as Kubernetes services, defined by a route and a configuration, and contained in a YAML file. To deploy a serverless application by using OpenShift Serverless, you must create a Knative Service object.
Example Knative Service object YAML file
apiVersion: serving.knative.dev/v1
kind: Service
metadata:
  name: showcase 1
  namespace: default 2
spec:
  template:
    spec:
      containers:
        - image: quay.io/openshift-knative/showcase 3
          env:
            - name: GREET 4
              value: Ciao
You can create a serverless application by using one of the following methods:
Create a Knative service from the OpenShift Container Platform web console.
For OpenShift Container Platform, see Creating applications for more information.
-
Create a Knative service by using the Knative (
kn) CLI. -
Create and apply a Knative
Serviceobject as a YAML file, by using theocCLI.
1.1.1. Creating serverless applications by using the Knative CLI
Using the Knative (kn) CLI to create serverless applications provides a more streamlined and intuitive user interface over modifying YAML files directly. You can use the kn service create command to create a basic serverless application.
Prerequisites
- You have installed OpenShift Serverless Operator and Knative Serving on your cluster.
-
You have installed the Knative (
kn) CLI. - You have created a project or have access to a project with the appropriate roles and permissions to create applications and other workloads in OpenShift Container Platform.
Procedure
Create a Knative service:
$ kn service create <service_name> --image <image> --tag <tag_value>
Where:
-
--imageis the URI of the image for the application. --tagis an optional flag that you can use to add a tag to the initial revision that Knative creates with the service.You get an output similar to the following example command:
$ kn service create showcase \ --image quay.io/openshift-knative/showcaseYou get an output similar to the following example:
Creating service 'showcase' in namespace 'default':

  0.271s The Route is still working to reflect the latest desired specification.
  0.580s Configuration "showcase" is waiting for a Revision to become ready.
  3.857s ...
  3.861s Ingress has not yet been reconciled.
  4.270s Ready to serve.

Service 'showcase' created with latest revision 'showcase-00001' and URL:
http://showcase-default.apps-crc.testing
-
1.1.2. Creating serverless applications using YAML
Use YAML files to create Knative resources with a declarative API. Define a Knative Service object in a YAML file and apply it by using oc apply to deploy your serverless application.
When you create the service and deploy the application, Knative creates an immutable revision for that version of the application. Knative also configures the route, ingress, service, and load balancer for the application and scales pods based on traffic.
Prerequisites
- You have installed OpenShift Serverless Operator and Knative Serving on your cluster.
- You have created a project or have access to a project with the appropriate roles and permissions to create applications and other workloads in OpenShift Container Platform.
-
Install the OpenShift CLI (
oc).
Procedure
Create a YAML file containing the following sample code:
apiVersion: serving.knative.dev/v1 kind: Service metadata: name: showcase namespace: default spec: template: spec: containers: - image: quay.io/openshift-knative/showcase env: - name: GREET value: BonjourNavigate to the directory that has the YAML file and run the following command to deploy the application:
$ oc apply -f <filename>
1.1.3. Creating a service using offline mode
You can run kn service commands in offline mode so the command does not change the cluster and instead creates a service descriptor file on your local machine. After you create the descriptor file, you can change it before propagating changes to the cluster.
The offline mode of the Knative CLI is a Technology Preview feature only. Technology Preview features are not supported with Red Hat production service level agreements (SLAs) and might not be functionally complete. Red Hat does not recommend using them in production. These features provide early access to upcoming product features, enabling customers to test functionality and provide feedback during the development process.
For more information about the support scope of Red Hat Technology Preview features, see Technology Preview Features Support Scope.
Prerequisites
- You have installed OpenShift Serverless Operator and Knative Serving on your cluster.
-
You have installed the Knative (
kn) CLI.
Procedure
In offline mode, create a local Knative service descriptor file:
$ kn service create showcase \ --image quay.io/openshift-knative/showcase \ --target ./ \ --namespace testYou get an output similar to the following example:
Service 'showcase' created in namespace 'test'.
The
--target ./flag enables offline mode and specifies./as the directory for storing the new directory tree.If you do not specify an existing directory but use a filename, such as
--target my-service.yaml, the command does not create a directory tree. Instead, the command creates the service descriptor filemy-service.yamlin the current directory.The filename can have the
.yaml,.yml, or.jsonextension. Choosing.jsoncreates the service descriptor file in the JSON format.The
--namespace testoption places the new service in thetestnamespace.If you do not use
--namespaceand you log in to an OpenShift Container Platform cluster, the command creates the descriptor file in the current namespace. If you do not log in to a cluster, the command creates the descriptor file in the default namespace.
Examine the created directory structure:
$ tree ./
You get an output similar to the following example:
./ └── test └── ksvc └── showcase.yaml 2 directories, 1 file-
The
./directory specified with--targetnow has atest/directory named after the specified namespace. -
The
test/directory has theksvcdirectory, named after the resource type. -
The
ksvcdirectory has the descriptor fileshowcase.yaml, named according to the specified service name.
-
The
Examine the generated service descriptor file:
$ cat test/ksvc/showcase.yaml
You get an output similar to the following example:
apiVersion: serving.knative.dev/v1 kind: Service metadata: creationTimestamp: null name: showcase namespace: test spec: template: metadata: annotations: client.knative.dev/user-image: quay.io/openshift-knative/showcase creationTimestamp: null spec: containers: - image: quay.io/openshift-knative/showcase name: "" resources: {} status: {}List information about the new service:
$ kn service describe showcase --target ./ --namespace test
You get an output similar to the following example:
Name:       showcase
Namespace:  test
Age:
URL:

Revisions:

Conditions:
  OK TYPE    AGE REASON
The
--target ./option specifies the root directory for the directory structure containing namespace subdirectories.You can also directly specify a YAML or JSON filename with the
--targetoption. The accepted file extensions are.yaml,.yml, and.json.The
--namespaceoption specifies the namespace, which communicates toknthe subdirectory that has the necessary service descriptor file.If you do not use
--namespaceand you log in to an OpenShift Container Platform cluster,knsearches for the service in the subdirectory that matches the current namespace. Otherwise,knsearches in thedefault/subdirectory.
Use the service descriptor file to create the service on the cluster:
$ kn service create -f test/ksvc/showcase.yaml
You get an output similar to the following example:
Creating service 'showcase' in namespace 'test':

  0.058s The Route is still working to reflect the latest desired specification.
  0.098s ...
  0.168s Configuration "showcase" is waiting for a Revision to become ready.
 23.377s ...
 23.419s Ingress has not yet been reconciled.
 23.534s Waiting for load balancer to be ready
 23.723s Ready to serve.

Service 'showcase' created to latest revision 'showcase-00001' is available at URL:
http://showcase-test.apps.example.com
1.1.4. Verifying your serverless application deployment
To verify that your serverless application deployed successfully, get the application URL that Knative created. Then send a request to that URL and observe the output. OpenShift Serverless supports both HTTP and HTTPS URLs. However, the oc get ksvc command always prints URLs in the http:// format.
Prerequisites
- You have installed the OpenShift Serverless Operator and Knative Serving your cluster.
-
You have installed the
ocCLI. - You have created a Knative service.
Prerequisites
-
Install the OpenShift CLI (
oc).
Procedure
Find the application URL:
$ oc get ksvc <service_name>
Example output
NAME       URL                                   LATESTCREATED    LATESTREADY      READY   REASON
showcase   http://showcase-default.example.com   showcase-00001   showcase-00001   True
Make a request to your cluster and observe the output.
Example HTTP request (using
HTTPietool)$ http showcase-default.example.com
Example HTTPS request
$ https showcase-default.example.com
Example output
HTTP/1.1 200 OK Content-Type: application/json Server: Quarkus/2.13.7.Final-redhat-00003 Java/17.0.7 X-Config: {"sink":"http://localhost:31111","greet":"Ciao","delay":0} X-Version: v0.7.0-4-g23d460f content-length: 49 { "artifact": "knative-showcase", "greeting": "Ciao" }Optional. If you do not have the
HTTPietool installed on your system, you can likely use curl tool instead:Example HTTPS request
$ curl http://showcase-default.example.com
Example output
{"artifact":"knative-showcase","greeting":"Ciao"}Optional. If you receive an error relating to a self-signed certificate in the certificate chain, you can add the
--verify=noflag to theHTTPiecommand to ignore the error:$ https --verify=no showcase-default.example.com
Example output
HTTP/1.1 200 OK Content-Type: application/json Server: Quarkus/2.13.7.Final-redhat-00003 Java/17.0.7 X-Config: {"sink":"http://localhost:31111","greet":"Ciao","delay":0} X-Version: v0.7.0-4-g23d460f content-length: 49 { "artifact": "knative-showcase", "greeting": "Ciao" }ImportantYou must not use Self-signed certificates in a production deployment. This method is only for testing purposes.
Optional. If your OpenShift Container Platform cluster uses a certificate signed by a certificate authority (CA) that your system does not yet trust, specify the certificate when you run the
curlcommand. Pass the certificate path to thecurlcommand by using the--cacertflag:$ curl https://showcase-default.example.com --cacert <file>
Example output
{"artifact":"knative-showcase","greeting":"Ciao"}
1.1.5. Additional resources
Chapter 2. Scalability and performance of OpenShift Serverless Serving
OpenShift Serverless consists of several different components that have different resource requirements and scaling behaviors. These components are horizontally and vertically scalable, but their resource requirements and configuration highly depend on the actual use-case.
- Control-plane components
- These components are responsible for observing and reacting to custom resources and continuously reconfiguring the system, for example, the controller pods.
- Data-plane components
- These components are directly involved in requests and response handling, for example, the Knative Servings activator component.
The following metrics and findings were recorded using the following test setup:
- A cluster running OpenShift Container Platform 4.13
- The cluster running 4 compute nodes in AWS with a machine type of m6.xlarge
- OpenShift Serverless 1.30
2.1. Overhead of OpenShift Serverless Serving
As components of OpenShift Serverless Serving are part of the data-plane, requests from clients are routed through:
- The ingress-gateway (Kourier or Service Mesh)
- The activator component
- The queue-proxy sidecar container in each Knative Service
These components introduce an additional hop in networking and perform additional tasks, for example, adding observability and request queuing. The following are the measured latency overheads:
- Each additional network hop adds 0.5 ms to 1 ms latency to a request. Depending on the current load of the Knative Service and if the Knative Service was scaled to zero before the request, the activator component is not always a part of the data-plane.
- Depending on the payload size, each of the components is consuming up to 1 vCPU of CPU for handling 2500 requests per second.
2.2. Known limitations of OpenShift Serverless Serving
The maximum number of Knative Services that can be created is 3,000. This corresponds to the OpenShift Container Platform Kubernetes services limit of 10,000, since 1 Knative Service creates 3 Kubernetes services.
2.3. Scaling and performance of OpenShift Serverless Serving
OpenShift Serverless Serving has to be scaled and configured based on the following parameters:
- Number of Knative Services
- Number of Revisions
- Amount of concurrent requests in the system
- Size of payloads of the requests
- The startup-latency and response latency of the Knative Service added by the user’s web application
- Number of changes of the KnativeService custom resource (CR) over time
2.3.1. KnativeServing default configuration
Per default, OpenShift Serverless Serving is configured to run all components with high-availability and medium-sized CPU and memory requests and limits. This means that the high-available field in KnativeServing CR is automatically set to a value of 2 and all system components are scaled to two replicas. This configuration is suitable for medium workload scenarios and has been tested with:
- 170 Knative Services
- 1-2 Revisions per Knative Service
- 89 test scenarios mainly focused on testing the control plane
- 48 re-creating scenarios where Knative Services are deleted and re-created
- 41 stable scenarios, in which requests are slowly but continuously sent to the system
During these test cases, the system components effectively consumed:
| Component | Measured Resources |
|---|---|
|
Operator in project | 1 GB Memory, 0.2 Cores of CPU |
|
Serving components in project | 5 GB Memory, 2.5 Cores of CPU |
2.3.2. Minimal requirements of OpenShift Serverless Serving
While the default setup is suitable for medium-sized workloads, it might be over-sized for smaller setups or under-sized for high-workload scenarios. To configure OpenShift Serverless Serving for a minimal workload scenario, you need to know the idle consumption of the system components.
2.3.2.1. Idle consumption
The idle consumption is dependent on the number of Knative Services. The following memory usage has been measured for the components in the knative-serving and knative-serving-ingress OpenShift Container Platform projects:
| Component | 0 Services | 100 Services | 500 Services | 1000 Services |
|---|---|---|---|---|
|
| 55Mi | 86Mi | 300Mi | 450Mi |
|
| 52Mi | 102Mi | 225Mi | 350Mi |
|
| 100Mi | 135Mi | 310Mi | 500Mi |
|
| 60Mi | 60Mi | 60Mi | 60Mi |
|
| 20Mi | 60Mi | 190Mi | 330Mi |
|
| 90Mi | 170Mi | 340Mi | 430Mi |
Either 3scale-kourier-gateway and net-kourier-controller components or istio-ingressgateway and net-istio-controller components are installed.
The memory consumption of net-istio is based on the total number of pods within the mesh.
2.3.3. Configuring Serving for minimal workloads
You can configure Knative Serving with reduced resource requirements for minimal workload scenarios to optimize resource consumption. This configuration adjusts replicas, CPU, and memory settings for system components such as activator, controller, and webhook.
Procedure
You can configure Knative Serving for minimal workloads using the
KnativeServingcustom resource (CR):A minimal workload configuration in
KnativeServingCRapiVersion: operator.knative.dev/v1beta1 kind: KnativeServing metadata: name: knative-serving namespace: knative-serving spec: high-availability: replicas: 1 1 workloads: - name: activator replicas: 2 2 resources: - container: activator requests: cpu: 250m 3 memory: 60Mi 4 limits: cpu: 1000m memory: 600Mi - name: controller replicas: 1 5 resources: - container: controller requests: cpu: 10m memory: 100Mi limits: 6 cpu: 200m memory: 300Mi - name: webhook replicas: 2 resources: - container: webhook requests: cpu: 100m 7 memory: 60Mi limits: cpu: 200m memory: 200Mi podDisruptionBudgets: 8 - name: activator-pdb minAvailable: 1 - name: webhook-pdb minAvailable: 1- 1
- Setting this to
1scales all system components to one replica. - 2
- Always scale the activator to at least
2instances to avoid downtime. - 3
- Set the activator CPU request to at least
250m, because theHorizontalPodAutoscaleruses this value to scale the activator up or down. - 4
- Adjust memory requests to the idle values from the earlier table. Also adjust memory limits according to your expected load (this might need custom testing to find the best values).
- 5
- One webhook and one controller are enough for a minimal-workload scenario
- 6
- These limits are enough for a minimal-workload scenario, but they also might need adjustments depending on your concrete workload.
- 7
- Set the webhook CPU request to at least
100m, because theHorizontalPodAutoscaleruses this value to scale the webhook up or down. - 8
- Adjust the
PodDistruptionBudgetsto a value lower thanreplicas, to avoid problems during node maintenance.
2.3.4. Configuring Serving for high workloads
You can configure Knative Serving for high workloads by using the KnativeServing custom resource (CR). The following findings are relevant to configuring Knative Serving for a high workload:
These findings have been tested with requests with a payload size of 0-32 kb. The Knative Service backends used in those tests had a startup latency between 0 to 10 seconds and response times between 0 to 5 seconds.
- All data-plane components are mostly increasing CPU usage on higher requests and payload scenarios, so the CPU requests and limits have to be tested and potentially increased.
- The activator component might require additional memory when it buffers more or larger request payloads. In such cases, increase the memory requests and limits.
- One activator pod can handle about 2500 requests per second before it starts to increase latency and, at some point, leads to errors.
-
One
3scale-kourier-gatewayoristio-ingressgatewaypod can also handle about 2500 requests per second before it starts to increase latency and, at some point, leads to errors. - Each of the data-plane components consumes up to 1 vCPU of CPU for handling 2500 requests per second. Note that this highly depends on the payload size and the response times of the Knative Service backend.
Fast startup and fast response-times of your Knative Service user workloads are critical for good performance of the overall system. The Knative Serving components are buffering incoming requests when the Knative Service user backend is scaling up or when request concurrency has reached its capacity. If your Knative Service user workload introduces long startup or request latency, it will either overload the activator component (when the CPU and memory configuration is too low) or lead to errors for the calling clients.
Procedure
To fine-tune your installation, use the earlier findings combined with your own test results to configure the
KnativeServingcustom resource:A high workload configuration in
KnativeServingCRapiVersion: operator.knative.dev/v1beta1 kind: KnativeServing metadata: name: knative-serving namespace: knative-serving spec: high-availability: replicas: 2 1 workloads: - name: component-name 2 replicas: 2 3 resources: - container: container-name requests: cpu: 4 memory: limits: cpu: memory: podDisruptionBudgets: 5 - name: name-of-pod-disruption-budget minAvailable: 1- 1
- Set this parameter to at least
2to make sure you always have at least two instances of every component running. You can also useworkloadsto override the replicas for certain components. - 2
- Use the
workloadslist to configure specific components. Use thedeploymentname of the component and set thereplicasfield. - 3
- For the
activator,webhook, and3scale-kourier-gatewaycomponents, which use horizontal pod autoscalers (HPAs), thereplicasfield sets the minimum number of replicas. The actual number of replicas depends on the CPU load and scaling done by the HPAs. - 4
- Set the requested and limited CPU and memory according to at least the idle consumption while also taking the earlier findings and your own test results into consideration.
- 5
- Adjust the
PodDistruptionBudgetsto a value lower thanreplicasto avoid problems during node maintenance. The defaultminAvailablesets to1, so if you increase the required replicas, you must also increaseminAvailable.
As each environment is highly specific, it is essential to test and find your own ideal configuration. Use the monitoring and alerting functionality of OpenShift Container Platform to continuously monitor your actual resource consumption and make adjustments if needed.
When you use the OpenShift Serverless and Service Mesh integration, the istio-proxy sidecar containers increase CPU usage.
Chapter 3. Autoscaling
3.1. Autoscaling
Knative Serving provides automatic scaling, or autoscaling, for applications to match incoming demand. For example, if an application is receiving no traffic, and scale-to-zero is enabled, Knative Serving scales the application down to zero replicas. If scale-to-zero is disabled, the application is scaled down to the minimum number of replicas configured for applications on the cluster. Replicas can also be scaled up to meet demand if traffic to the application increases.
Autoscaling settings for Knative services can be global settings that are configured by cluster administrators (or dedicated administrators for Red Hat OpenShift Service on AWS and OpenShift Dedicated), or per-revision settings that are configured for individual services.
You can modify per-revision settings for your services by using the OpenShift Container Platform web console, by modifying the YAML file for your service, or by using the Knative (kn) CLI.
Any limits or targets that you set for a service are measured against a single instance of your application. For example, setting the target annotation to 50 configures the autoscaler to scale the application so that each revision handles 50 requests at a time.
3.2. Scale bounds
Scale bounds determine the minimum and maximum numbers of replicas that can serve an application at any given time. You can set scale bounds for an application to help prevent cold starts or control computing costs.
3.2.1. Minimum scale bounds
The min-scale annotation sets the minimum number of replicas that serve an application. If you do not enable scale to zero, the min-scale value defaults to 1.
The min-scale value defaults to 0 replicas when the following conditions apply:
-
You do not set the
min-scaleannotation. - You enable scaling to zero.
-
You use the
KPAclass.
Example service spec with min-scale annotation
apiVersion: serving.knative.dev/v1
kind: Service
metadata:
  name: showcase
  namespace: default
spec:
  template:
    metadata:
      annotations:
        autoscaling.knative.dev/min-scale: "0"
...3.2.1.1. Setting the min-scale annotation by using the Knative CLI
Using the Knative (kn) CLI to set the min-scale annotation provides a more streamlined and intuitive user interface over modifying YAML files directly. You can use the kn service command with the --scale-min flag to create or change the min-scale value for a service.
Prerequisites
- You have installed Knative Serving on the cluster.
-
You have installed the Knative (
kn) CLI.
Procedure
Set the minimum number of replicas for the service by using the
--scale-minflag:$ kn service create <service_name> --image <image_uri> --scale-min <integer>
Example command
$ kn service create showcase --image quay.io/openshift-knative/showcase --scale-min 2
3.2.2. Maximum scale bounds
The max-scale annotation determines the maximum number of replicas that can serve an application. If the max-scale annotation is not set, there is no upper limit for the number of replicas created.
Example service spec with max-scale annotation
apiVersion: serving.knative.dev/v1
kind: Service
metadata:
  name: showcase
  namespace: default
spec:
  template:
    metadata:
      annotations:
        autoscaling.knative.dev/max-scale: "10"
...3.2.2.1. Setting the max-scale annotation by using the Knative CLI
Using the Knative (kn) CLI to set the max-scale annotation provides a more streamlined and intuitive user interface over modifying YAML files directly. You can use the kn service command with the --scale-max flag to create or change the max-scale value for a service.
Prerequisites
- You have installed Knative Serving on the cluster.
-
You have installed the Knative (
kn) CLI.
Procedure
Set the maximum number of replicas for the service by using the
--scale-maxflag:$ kn service create <service_name> --image <image_uri> --scale-max <integer>
Example command
$ kn service create showcase --image quay.io/openshift-knative/showcase --scale-max 10
3.3. Concurrency
Concurrency determines the number of simultaneous requests that can be processed by each replica of an application at any given time. Concurrency can be configured as a soft limit or a hard limit:
- A soft limit is a targeted requests limit, rather than a strictly enforced bound. For example, if there is a sudden burst of traffic, the soft limit target can be exceeded.
A hard limit is a strictly enforced upper bound requests limit. If concurrency reaches the hard limit, surplus requests are buffered and must wait until there is enough free capacity to execute the requests.
ImportantUsing a hard limit configuration is only recommended if there is a clear use case for it with your application. Having a low, hard limit specified may have a negative impact on the throughput and latency of an application, and might cause cold starts.
Adding a soft target and a hard limit means that the autoscaler targets the soft target number of concurrent requests, but imposes a hard limit of the hard limit value for the maximum number of requests.
If the hard limit value is less than the soft limit value, the soft limit value is tuned down, because there is no need to target more requests than the number that can actually be handled.
3.3.1. Configuring a soft concurrency target
A soft limit sets a target for the number of requests rather than a strictly enforced bound. For example, during a sudden traffic burst, concurrency can exceed the soft limit. You can specify a soft concurrency target for your Knative service by setting the autoscaling.knative.dev/target annotation in the spec, or by using the kn service command with the correct flags.
Procedure
Optional: Set the
autoscaling.knative.dev/targetannotation for your Knative service in the spec of theServicecustom resource:Example service spec
apiVersion: serving.knative.dev/v1 kind: Service metadata: name: showcase namespace: default spec: template: metadata: annotations: autoscaling.knative.dev/target: "200"Optional: Use the
kn servicecommand to specify the--concurrency-targetflag:$ kn service create <service_name> --image <image_uri> --concurrency-target <integer>
Example command to create a service with a concurrency target of 50 requests
$ kn service create showcase --image quay.io/openshift-knative/showcase --concurrency-target 50
3.3.2. Configuring a hard concurrency limit
A hard concurrency limit sets a strict upper bound on the number of requests. When concurrency reaches this limit, the system buffers additional requests until capacity becomes available. You can specify a hard concurrency limit for your Knative service by modifying the containerConcurrency spec, or by using the kn service command with the correct flags.
Procedure
Optional: Set the
containerConcurrencyspec for your Knative service in the spec of theServicecustom resource:Example service spec
apiVersion: serving.knative.dev/v1 kind: Service metadata: name: showcase namespace: default spec: template: spec: containerConcurrency: 50The default value is
0, which means that the system does not limit the number of simultaneous requests that can reach a single service replica.A value greater than
0sets the exact number of requests that can reach a single service replica at one time. In this example, the system limits concurrency to 50 requests.Optional: Use the
kn servicecommand to specify the--concurrency-limitflag:$ kn service create <service_name> --image <image_uri> --concurrency-limit <integer>
Example command to create a service with a concurrency limit of 50 requests
$ kn service create showcase --image quay.io/openshift-knative/showcase --concurrency-limit 50
3.3.3. Concurrency target utilization
This value specifies the percentage of the concurrency limit that is actually targeted by the autoscaler. This is also known as specifying the hotness at which a replica runs, which enables the autoscaler to scale up before the defined hard limit is reached.
For example, if the containerConcurrency value is set to 10, and the target-utilization-percentage value is set to 70 percent, the autoscaler creates a new replica when the average number of concurrent requests across all existing replicas reaches 7. Requests numbered 7 to 10 are still sent to the existing replicas, but additional replicas are started in anticipation of being required after the containerConcurrency value is reached.
Example service configured using the target-utilization-percentage annotation
apiVersion: serving.knative.dev/v1
kind: Service
metadata:
  name: showcase
  namespace: default
spec:
  template:
    metadata:
      annotations:
        autoscaling.knative.dev/target-utilization-percentage: "70"
...3.4. Scale-to-zero
Knative Serving provides automatic scaling, or autoscaling, for applications to match incoming demand.
3.4.1. Enabling scale-to-zero
You can use the enable-scale-to-zero spec to enable or disable scale-to-zero globally for applications on the cluster.
Prerequisites
- You have installed OpenShift Serverless Operator and Knative Serving on your cluster.
- You have cluster administrator permissions on OpenShift Container Platform, or you have cluster or dedicated administrator permissions on Red Hat OpenShift Service on AWS or OpenShift Dedicated.
- You are using the default Knative Pod Autoscaler. The scale to zero feature is not available if you are using the Kubernetes Horizontal Pod Autoscaler.
Procedure
Change the
enable-scale-to-zerospec in theKnativeServingcustom resource (CR):Example
KnativeServingCRapiVersion: operator.knative.dev/v1beta1 kind: KnativeServing metadata: name: knative-serving spec: config: autoscaler: enable-scale-to-zero: "false" 1- 1
- The
enable-scale-to-zerospec accepts eithertrueorfalse. When you set the value totrue, the system enablesscale-to-zero. When you set the value tofalse, the system scales applications down to the configured minimum scale bound. The default value istrue.
3.4.2. Configuring the scale-to-zero grace period
Knative Serving provides automatic scaling down to zero pods for applications. You can use the scale-to-zero-grace-period spec to define an upper bound time limit that Knative waits for scale-to-zero machinery to be in place before the last replica of an application is removed.
Prerequisites
- You have installed OpenShift Serverless Operator and Knative Serving on your cluster.
- You have cluster administrator permissions on OpenShift Container Platform, or you have cluster or dedicated administrator permissions on Red Hat OpenShift Service on AWS or OpenShift Dedicated.
- You are using the default Knative Pod Autoscaler. The scale-to-zero feature is not available if you are using the Kubernetes Horizontal Pod Autoscaler.
Procedure
Modify the
scale-to-zero-grace-periodspec in theKnativeServingcustom resource (CR):Example KnativeServing CR
apiVersion: operator.knative.dev/v1beta1 kind: KnativeServing metadata: name: knative-serving spec: config: autoscaler: scale-to-zero-grace-period: "30s" 1- 1
- The grace period time in seconds. The default value is 30 seconds.
Chapter 4. Configuring OpenShift Serverless applications
4.1. Multi-container support for Serving
You can deploy a multi-container pod by using a single Knative service. This method is useful for separating application responsibilities into smaller, specialized parts.
4.1.1. Configuring a multi-container service
By default, Knative Serving supports multi-container pods. You can specify many containers in the service to create a multi-container pod.
Procedure
Change your service to include additional containers. Only one container can handle requests, so specify
portsfor exactly one container. Here is an example configuration with two containers:Many containers configuration
apiVersion: serving.knative.dev/v1
kind: Service
...
spec:
  template:
    spec:
      containers:
        - name: first-container 1
          image: gcr.io/knative-samples/helloworld-go
          ports:
            - containerPort: 8080 2
        - name: second-container 3
          image: gcr.io/knative-samples/helloworld-java
4.1.2. Probing a multi-container service
You can specify readiness and liveness probes for multiple containers. This feature is not enabled by default and you must configure it using the KnativeServing custom resource (CR).
Procedure
Configure multi-container probing for your service by enabling the
multi-container-probingfeature in theKnativeServingCR.Multi-container probing configuration
... spec: config: features: "multi-container-probing": enabled 1 ...- 1
- Enabled multi-container-probing feature
Apply the updated
KnativeServingCR.$ oc apply -f <filename>
Modify your multi-container service to include the specified probes.
Multi-container probing
apiVersion: serving.knative.dev/v1
kind: Service
...
spec:
 template:
   spec:
     containers:
       - name: first-container
         image: ghcr.io/knative/helloworld-go:latest
         ports:
           - containerPort: 8080
         readinessProbe: 1
           httpGet:
             port: 8080
       - name: second-container
         image: gcr.io/knative-samples/helloworld-java
         readinessProbe: 2
           httpGet:
             port: 8090
4.1.2.1. Additional resources
4.2. EmptyDir volumes
emptyDir volumes are empty volumes that are created when a pod is created, and are used to provide temporary working disk space. emptyDir volumes are deleted when the pod they were created for is deleted.
4.2.1. Configuring the EmptyDir extension
You can use the kubernetes.podspec-volumes-emptydir extension to control whether Knative Serving allows emptyDir volumes. To enable using emptyDir volumes, you must change the KnativeServing custom resource (CR) to include the following YAML:
Example KnativeServing CR
apiVersion: operator.knative.dev/v1beta1
kind: KnativeServing
metadata:
  name: knative-serving
spec:
  config:
    features:
      kubernetes.podspec-volumes-emptydir: enabled
...4.3. Persistent Volume Claims for Serving
Some serverless applications require permanent data storage. By configuring different volume types, you can provide data storage for Knative services. Serving supports mounting of the volume types such as secret, configMap, projected, and emptyDir.
You can configure persistent volume claims (PVCs) for your Knative services. The Persistent volume types are implemented as plugins. To determine if there are any persistent volume types available, you can check the available or installed storage classes in your cluster. Persistent volumes are supported, but require a feature flag to be enabled.
The mounting of large volumes can lead to a considerable delay in the start time of the application.
4.3.1. Enabling PVC support
Procedure
To enable Knative Serving to use PVCs and write to them, change the
KnativeServingcustom resource (CR) to include the following YAML:Enabling PVCs with write access
... spec: config: features: "kubernetes.podspec-persistent-volume-claim": enabled "kubernetes.podspec-persistent-volume-write": enabled ...-
The
kubernetes.podspec-persistent-volume-claimextension controls whether Knative Serving can use persistent volumes (PVs). -
The
kubernetes.podspec-persistent-volume-writeextension controls whether PVs are available to Knative Serving with the write access.
-
The
To claim a PV, change your service to include the PV configuration. For example, you might have a persistent volume claim with the following configuration:
NoteUse the storage class that supports the access mode you are requesting. For example, you can use the
ocs-storagecluster-cephfsstorage class for theReadWriteManyaccess mode.The
ocs-storagecluster-cephfsstorage class is supported and comes from This page is not included, but the link has been rewritten to point to the nearest parent document.Red Hat OpenShift Data Foundation.PersistentVolumeClaimconfigurationapiVersion: v1 kind: PersistentVolumeClaim metadata: name: example-pv-claim namespace: my-ns spec: accessModes: - ReadWriteMany storageClassName: ocs-storagecluster-cephfs resources: requests: storage: 1GiIn this case, to claim a PV with write access, change your service as follows:
Knative service PVC configuration
apiVersion: serving.knative.dev/v1 kind: Service metadata: namespace: my-ns ... spec: template: spec: containers: ... volumeMounts: 1 - mountPath: /data name: mydata readOnly: false volumes: - name: mydata persistentVolumeClaim: 2 claimName: example-pv-claim readOnly: false 3NoteTo successfully use persistent storage in Knative services, you need additional configuration, such as the user permissions for the Knative container user.
4.3.2. Additional resources for OpenShift Container Platform
4.4. Init containers
Content from kubernetes.io is not included.Init containers are specialized containers that are run before application containers in a pod. They are generally used to implement initialization logic for an application, which may include running setup scripts or downloading required configurations. You can enable the use of init containers for Knative services by modifying the KnativeServing custom resource (CR).
Init containers may cause longer application start-up times and should be used with caution for serverless applications, which are expected to scale up and down frequently.
4.4.1. Enabling init containers
You can enable the use of init containers in Knative Serving workloads by configuring the KnativeServing custom resource. Init containers run before application containers start and are useful for setup tasks such as configuration, database migrations, or permission adjustments.
Prerequisites
- You have installed OpenShift Serverless Operator and Knative Serving on your cluster.
- You have cluster administrator permissions on OpenShift Container Platform, or you have cluster or dedicated administrator permissions on Red Hat OpenShift Service on AWS or OpenShift Dedicated.
Procedure
Enable the use of init containers by adding the
kubernetes.podspec-init-containersflag to theKnativeServingCR:Example
KnativeServingCRapiVersion: operator.knative.dev/v1beta1 kind: KnativeServing metadata: name: knative-serving spec: config: features: kubernetes.podspec-init-containers: enabled ...
4.5. Startup probes
Startup probes verify whether a service has started successfully, helping to reduce cold start times for containers with slow startup processes. Startup probes run only during the container’s initialization phase and do not execute periodically. If a startup probe fails, the container adheres to the defined restartPolicy.
4.5.1. Progress deadline
By default, services have a progress deadline that defines the time limit for a service to complete its initial startup. When using startup probes, ensure that the progress deadline is set to exceed the maximum time required by the startup probes. If the progress deadline is set too low, the startup probes might not finish before the deadline is reached, which can prevent the service from starting.
Consider increasing the progress deadline if you encounter any of these conditions in your deployment:
- The service image takes a long time to pull due to its size.
-
The service takes a long time to become
READYbecause of initial cache priming. - The cluster relies on autoscaling to allocate resources for new pods.
4.5.2. Configuring startup probing
For OpenShift Serverless Serving, startup probes are not defined by default. You can define startup probes for your containers in your deployment configuration.
Procedure
Define startup probes for your service by modifying your deployment configuration. The following example shows a configuration with two containers:
Example of defined starup probes
apiVersion: serving.knative.dev/v1
kind: Service
# ...
spec:
  template:
    spec:
       containers:
        - name: first-container
          image: <image>
          ports:
            - containerPort: 8080
          # ...
          startupProbe: 1
          httpGet:
            port: 8080
            path: "/"
        - name: second-container
          image: <image>
          # ...
          startupProbe: 2
          httpGet:
            port: 8081
            path: "/"
4.5.3. Configuring the progress deadline
You can configure progress deadline settings to specify the maximum time allowed for your deployment to progress before the system reports a failure for the Knative Revision. You can specify the time limit in seconds or minutes.
To configure the progress deadline effectively, consider the following parameters:
-
initialDelaySeconds -
failureThreshold -
periodSeconds -
timeoutSeconds
If the initial scale is not achieved within the specified time limit, the Knative Autoscaler component scales the revision to 0, and the Knative service enters a terminal Failed state.
By default, the system sets the progress deadline to 600 seconds. Specify this value as a Golang time.Duration string and round it to the nearest second.
Procedure
To configure the progress deadline setting, use an annotation in your deployment configuration.
Example of progress deadline set to 60 seconds
apiVersion: serving.knative.dev/v1
kind: Service
...
spec:
  template:
    metadata:
       annotations:
            serving.knative.dev/progress-deadline: "60s"
    spec:
        containers:
            - image: ghcr.io/knative/helloworld-go:latest
4.6. Resolving image tags to digests
If the Knative Serving controller has access to the container registry, Knative Serving resolves image tags to a digest when you create a revision of a service. This is known as tag-to-digest resolution, and helps to provide consistency for deployments.
4.6.1. Tag-to-digest resolution
To give the controller access to the container registry on OpenShift Container Platform, you must create a secret and then configure controller custom certificates. You can configure controller custom certificates by modifying the controller-custom-certs spec in the KnativeServing custom resource (CR). The secret must reside in the same namespace as the KnativeServing CR.
If a secret is not included in the KnativeServing CR, this setting defaults to using public key infrastructure (PKI). When using PKI, the cluster-wide certificates are automatically injected into the Knative Serving controller by using the config-service-sa config map. The OpenShift Serverless Operator populates the config-service-sa config map with cluster-wide certificates and mounts the config map as a volume to the controller.
4.6.1.1. Configuring tag-to-digest resolution by using a secret
If the controller-custom-certs spec uses the Secret type, the system mounts the secret as a volume. Knative components consume the secret directly and assume that the secret has the required certificates.
Prerequisites
- You have cluster administrator permissions on OpenShift Container Platform, or you have cluster or dedicated administrator permissions on Red Hat OpenShift Service on AWS or OpenShift Dedicated.
- You have installed the OpenShift Serverless Operator and Knative Serving on your cluster.
Procedure
Create a secret:
Example command
$ oc -n knative-serving create secret generic custom-secret --from-file=<secret_name>.crt=<path_to_certificate>
Configure the
controller-custom-certsspec in theKnativeServingcustom resource (CR) to use theSecrettype:Example
KnativeServingCRapiVersion: operator.knative.dev/v1beta1 kind: KnativeServing metadata: name: knative-serving namespace: knative-serving spec: controller-custom-certs: name: custom-secret type: Secret
4.7. Configuring deployment resources
In Knative Serving, the config-deployment config map contains settings that determine how Kubernetes Deployment resources are configured for Knative services. In OpenShift Serverless Serving, you can configure these settings in the deployment section of your KnativeServing custom resource (CR).
You can use the deployment section to configure the following:
- Tag resolution
- Runtime environments
- Progress deadlines
4.7.1. Skipping tag resolution
Skipping tag resolution in OpenShift Serverless Serving can speed up deployments by avoiding unnecessary queries to the container registry, reducing latency and dependency on registry availability.
You can configure Serving to skip tag resolution by modifying the registriesSkippingTagResolving setting in your KnativeServing custom resource (CR).
Procedure
In your
KnativeServingCR, modify theregistriesSkippingTagResolvingsetting with the list of registries for which tag resoution will be skipped:Example of configured tag resolution skipping
apiVersion: operator.knative.dev/v1beta1
kind: KnativeServing
metadata:
  name: knative-serving
spec:
  config:
    deployment:
      registriesSkippingTagResolving: "registry.example.com, another.registry.com"
4.7.2. Configuring selectable RuntimeClassName
You can configure OpenShift Serverless Serving to set a specific RuntimeClassName resource for Deployments by updating the runtime-class-name setting in your KnativeServing custom resource (CR).
This setting interacts with service labels, applying either the default RuntimeClassName or the one that matches the most labels associated with the service.
Procedure
In your
KnativeServingCR, configure theruntime-class-namesetting:Example of configured
runtime-class-namesettingapiVersion: operator.knative.dev/v1beta1 kind: KnativeServing metadata: name: knative-serving spec: config: deployment: runtime-class-name: | kata: {} gvisor: selector: my-label: selector
4.7.3. Progress deadline
By default, services have a progress deadline that defines the time limit for a service to complete its initial startup.
Consider increasing the progress deadline if you encounter any of these conditions in your deployment:
- The service image takes a long time to pull due to its size.
-
The service takes a long time to become
READYbecause of initial cache priming. - The cluster relies on autoscaling to allocate resources for new pods.
If the initial scale is not achieved within the specified time limit, the Knative Autoscaler component scales the revision to 0, and the service enters a terminal Failed state.
4.7.3.1. Configuring the progress deadline
Configure progress deadline settings to set the maximum time allowed in seconds or minutes for deployment progress before the system reports a Knative Revision failure.
By default, the progress deadline is set to 600 seconds. This value is specified as a Go time.Duration string and must be rounded to the nearest second.
Procedure
Configure progress deadline by modifying your KnativeServing custom resource (CR).
In your
KnativeServingCR, set the value ofprogressDeadline:Example of progress deadline set to 60 seconds
apiVersion: operator.knative.dev/v1beta1
kind: KnativeServing
metadata:
  name: knative-serving
spec:
  config:
    deployment:
      progressDeadline: "60s"
4.8. Configuring Kourier
Kourier is a lightweight Kubernetes-native Ingress for Knative Serving. Kourier acts as a gateway for Knative, routing HTTP traffic to Knative services.
4.8.1. Accessing the current Envoy bootstrap configuration
The Envoy proxy component in Kourier handles inbound and outbound HTTP traffic for the Knative services. By default, Kourier has an Envoy bootstrap configuration in the kourier-bootstrap config map in the knative-serving-ingress namespace.
Procedure
To get the current Envoy bootstrap configuration, run the following command:
Example command
$ oc get cm kourier-bootstrap -n knative-serving-ingress -o yaml
For example, with the default configuration, the example command produces the following output:
Example output
Name: kourier-bootstrap Namespace: knative-serving-ingress Labels: app.kubernetes.io/component=net-kourier app.kubernetes.io/name=knative-serving app.kubernetes.io/version=release-v1.10 networking.knative.dev/ingress-provider=kourier serving.knative.openshift.io/ownerName=knative-serving serving.knative.openshift.io/ownerNamespace=knative-serving Annotations: manifestival: newExample
Dataoutputdynamic_resources: ads_config: transport_api_version: V3 api_type: GRPC rate_limit_settings: {} grpc_services: - envoy_grpc: {cluster_name: xds_cluster} cds_config: resource_api_version: V3 ads: {} lds_config: resource_api_version: V3 ads: {} node: cluster: kourier-knative id: 3scale-kourier-gateway static_resources: listeners: - name: stats_listener address: socket_address: address: 0.0.0.0 port_value: 9000 filter_chains: - filters: - name: envoy.filters.network.http_connection_manager typed_config: "@type": type.googleapis.com/envoy.extensions.filters.network.http_connection_manager.v3.HttpConnectionManager stat_prefix: stats_server http_filters: - name: envoy.filters.http.router typed_config: "@type": type.googleapis.com/envoy.extensions.filters.http.router.v3.Router route_config: virtual_hosts: - name: admin_interface domains: - "*" routes: - match: safe_regex: regex: '/(certs|stats(/prometheus)?|server_info|clusters|listeners|ready)?' headers: - name: ':method' string_match: exact: GET route: cluster: service_stats clusters: - name: service_stats connect_timeout: 0.250s type: static load_assignment: cluster_name: service_stats endpoints: lb_endpoints: endpoint: address: pipe: path: /tmp/envoy.admin - name: xds_cluster # This keepalive is recommended by envoy docs. # https://www.envoyproxy.io/docs/envoy/latest/api-docs/xds_protocol typed_extension_protocol_options: envoy.extensions.upstreams.http.v3.HttpProtocolOptions: "@type": type.googleapis.com/envoy.extensions.upstreams.http.v3.HttpProtocolOptions explicit_http_config: http2_protocol_options: connection_keepalive: interval: 30s timeout: 5s connect_timeout: 1s load_assignment: cluster_name: xds_cluster endpoints: lb_endpoints: endpoint: address: socket_address: address: "net-kourier-controller.knative-serving-ingress.svc.cluster.local." port_value: 18000 type: STRICT_DNS admin: access_log: - name: envoy.access_loggers.stdout typed_config: "@type": type.googleapis.com/envoy.extensions.access_loggers.stream.v3.StdoutAccessLog address: pipe: path: /tmp/envoy.admin layered_runtime: layers: - name: static-layer static_layer: envoy.reloadable_features.override_request_timeout_by_gateway_timeout: falseExample
BinaryDataoutputEvents: <none>
4.8.2. Customizing kourier-bootstrap for Kourier getaways
The Envoy proxy component in Kourier handles inbound and outbound HTTP traffic for the Knative services. By default, Kourier has an Envoy bootstrap configuration in the kourier-bootstrap config map in the knative-serving-ingress namespace. You can change this config map to a custom one.
Prerequisites
- You have installed the OpenShift Serverless Operator and Knative Serving.
- You have cluster administrator permissions on OpenShift Container Platform, or you have cluster or dedicated administrator permissions on Red Hat OpenShift Service on AWS or OpenShift Dedicated.
Procedure
Specify a custom bootstrapping config map by changing the
spec.ingress.kourier.bootstrap-configmapfield in theKnativeServingcustom resource (CR):Example
KnativeServingCRapiVersion: operator.knative.dev/v1beta1 kind: KnativeServing metadata: name: knative-serving namespace: knative-serving spec: config: network: ingress-class: kourier.ingress.networking.knative.dev ingress: kourier: bootstrap-configmap: my-configmap enabled: true # ...
4.8.3. Enabling administrator interface access
You can change the envoy bootstrap configuration to enable access to the administrator interface.
This procedure assumes enough knowledge of Knative, as changing envoy bootstrap configuration might result in Knative failure. Red Hat does not support custom configurations that are not tested or shipped with the product.
Prerequisites
- You have installed the OpenShift Serverless Operator and Knative Serving.
- You have cluster administrator permissions on OpenShift Container Platform, or you have cluster or dedicated administrator permissions on Red Hat OpenShift Service on AWS or OpenShift Dedicated.
Procedure
To enable administrator interface access, locate this configuration in your bootstrapping config map:
pipe:
  path: /tmp/envoy.admin
Substitute it with the following configuration:
socket_address: 1 address: 127.0.0.1 port_value: 9901- 1
- This configuration enables access to the Envoy admin interface on the loopback address (127.0.0.1) and port 9901.
Apply the
socket_addressconfiguration in theservice_statscluster configuration and in theadminconfiguration:The first is in the
service_statscluster configuration:clusters: - name: service_stats connect_timeout: 0.250s type: static load_assignment: cluster_name: service_stats endpoints: lb_endpoints: endpoint: address: socket_address: address: 127.0.0.1 port_value: 9901The second is in the
adminconfiguration:admin: access_log: - name: envoy.access_loggers.stdout typed_config: "@type": type.googleapis.com/envoy.extensions.access_loggers.stream.v3.StdoutAccessLog address: socket_address: address: 127.0.0.1 port_value: 9901
4.9. Restrictive network policies
4.9.1. Clusters with restrictive network policies
If you are using a cluster that multiple users have access to, your cluster might use network policies to control which pods, services, and namespaces can communicate with each other over the network. If your cluster uses restrictive network policies, it is possible that Knative system pods are not able to access your Knative application. For example, if your namespace has the following network policy, which denies all requests, Knative system pods cannot access your Knative application:
Example NetworkPolicy object that denies all requests to the namespace
kind: NetworkPolicy
apiVersion: networking.k8s.io/v1
metadata:
  name: deny-by-default
  namespace: example-namespace
spec:
  podSelector:
  ingress: []
4.9.2. Enabling communication with Knative applications on a cluster with restrictive network policies
To allow access to your applications from Knative system pods, you must add a label to each of the Knative system namespaces, and then create a NetworkPolicy object in your application namespace that allows access to the namespace for other namespaces that have this label.
A network policy that denies requests to non-Knative services on your cluster still prevents access to these services. However, by allowing access from Knative system namespaces to your Knative application, you are allowing access to your Knative application from all namespaces in the cluster.
If you do not want to allow access to your Knative application from all namespaces on the cluster, you might want to use JSON Web Token authentication for Knative services instead. JSON Web Token authentication for Knative services requires Service Mesh.
Prerequisites
-
Install the OpenShift CLI (
oc). - OpenShift Serverless Operator and Knative Serving are installed on your cluster.
Procedure
Add the
knative.openshift.io/system-namespace=truelabel to each Knative system namespace that requires access to your application:Label the
knative-servingnamespace:$ oc label namespace knative-serving knative.openshift.io/system-namespace=true
Label the
knative-serving-ingressnamespace:$ oc label namespace knative-serving-ingress knative.openshift.io/system-namespace=true
Label the
knative-eventingnamespace:$ oc label namespace knative-eventing knative.openshift.io/system-namespace=true
Label the
knative-kafkanamespace:$ oc label namespace knative-kafka knative.openshift.io/system-namespace=true
Create a
NetworkPolicyobject in your application namespace to allow access from namespaces with theknative.openshift.io/system-namespacelabel:Example
NetworkPolicyobjectapiVersion: networking.k8s.io/v1 kind: NetworkPolicy metadata: name: <network_policy_name> 1 namespace: <namespace> 2 spec: ingress: - from: - namespaceSelector: matchLabels: knative.openshift.io/system-namespace: "true" podSelector: {} policyTypes: - Ingress
4.10. Configuring revision timeouts
You can configure timeout durations for revisions globally or individually to control the time spent on requests.
4.10.1. Configuring revision timeout
You can configure the default number of seconds for the revision timeout based on the request.
Prerequisites
- You have installed the OpenShift Serverless Operator and Knative Serving.
You have the required permissions for your cluster:
- Cluster administrator permissions on OpenShift Container Platform
- Cluster administrator or dedicated administrator permissions on Red Hat OpenShift Service on AWS
- Cluster administrator or dedicated administrator permissions on OpenShift Dedicated
Procedure
Choose the appropriate method to configure the revision timeout:
To configure the revision timeout globally, set the
revision-timeout-secondsfield in theKnativeServingcustom resource (CR):apiVersion: operator.knative.dev/v1beta1 kind: KnativeServing metadata: name: knative-serving namespace: knative-serving spec: config: defaults: revision-timeout-seconds: "300"To configure the timeout per revision by setting the
timeoutSecondsfield in your service definition:apiVersion: serving.knative.dev/v1 kind: Service metadata: namespace: my-ns spec: template: spec: timeoutSeconds: 300 containers: - image: ghcr.io/knative/helloworld-go:latest
NoteTo set the revision timeout to a value over 600 seconds (10 minutes), you must increase the default OpenShift Container Platform route timeout and the maximum revision timeout.
For instructions on how to configure timeouts for requests exceeding the default 600 seconds (10 minutes), see "Long-running requests".
4.10.2. Configuring maximum revision timeout
By setting the maximum revision timeout, you ensure that no revision exceeds a specific limit. The maximum revision timeout must not exceed the terminationGracePeriodSeconds value of the activator to prevent the activator from disrupting in-flight requests.
Prerequisites
- You have installed the OpenShift Serverless Operator and Knative Serving.
You have the required permissions for your cluster:
- Cluster administrator permissions on OpenShift Container Platform
- Cluster administrator or dedicated administrator permissions on Red Hat OpenShift Service on AWS
- Cluster administrator or dedicated administrator permissions on OpenShift Dedicated
Procedure
To configure the maximum revision timeout, set the
max-revision-timeout-secondsfield in theKnativeServingcustom resource (CR):apiVersion: operator.knative.dev/v1beta1 kind: KnativeServing metadata: name: knative-serving namespace: knative-serving spec: config: defaults: max-revision-timeout-seconds: "600"NoteTo set the maximum revision timeout to a value over 600 seconds (10 minutes), you must increase the default OpenShift Container Platform route timeout.
For instructions on how to configure timeouts for requests exceeding the default 600 seconds (10 minutes), see "Long-running requests".
4.10.3. Configuring revision response start timeout
You can set the revision response start timeout to define how long Serving waits for a revision to start sending network traffic. The revision response start timeout must not exceed the revision timeout. The default value is 300 seconds (5 minutes).
Prerequisites
- You have installed the OpenShift Serverless Operator and Knative Serving.
You have the required permissions for your cluster:
- Cluster administrator permissions on OpenShift Container Platform
- Cluster administrator or dedicated administrator permissions on Red Hat OpenShift Service on AWS
- Cluster administrator or dedicated administrator permissions on OpenShift Dedicated
Procedure
Choose the appropriate method to configure the revision response start timeout:
To configure the timeout globally, set the
revision-response-start-timeout-secondsfield in yourKnativeServingcustom resource (CR). If your required response start timeout exceeds the revision timeout, also adjust therevision-timeout-secondsfield:Example of revision response start timeout globally set to 300 seconds (5 minutes)
apiVersion: operator.knative.dev/v1beta1 kind: KnativeServing metadata: name: knative-serving namespace: knative-serving spec: config: defaults: revision-timeout-seconds: "600" revision-response-start-timeout-seconds: "300"To configure the timeout per revision, set the
responseStartTimeoutSecondsfield in your service definition. If your required response start timeout exceeds the revision timeout, also adjust thetimeoutSecondsfield:Example of a service definition with revision response start timeout set to 300 seconds (5 minutes)
apiVersion: serving.knative.dev/v1
kind: Service
metadata:
  namespace: my-ns
spec:
  template:
    spec:
      timeoutSeconds: 600
      responseStartTimeoutSeconds: 300
      containers:
# ...
NoteTo set the revision response start timeout and the revision timeout to a value over 600 seconds (10 minutes), you must increase the default OpenShift Container Platform route timeout and the maximum revision timeout.
For instructions on how to configure timeouts for requests exceeding the default 600 seconds (10 minutes), see "Long-running requests".
4.10.4. Configuring revision idle timeout
By setting the revision idle timeout, you can specify the maximum duration in seconds a request allowes to stay open without receiving data from the application. The default duration is 0 (infinite).
Prerequisites
- You have installed the OpenShift Serverless Operator and Knative Serving.
You have the required permissions for your cluster:
- Cluster administrator permissions on OpenShift Container Platform
- Cluster administrator or dedicated administrator permissions on Red Hat OpenShift Service on AWS
- Cluster administrator or dedicated administrator permissions on OpenShift Dedicated
Procedure
Choose the appropriate method to configure the revision idle timeout:
To configure the timeout globally, set the
revision-idle-timeout-secondsfield in yourKnativeServingcustom resource (CR):Example of revision idle timeout globally set to 300 seconds (5 minutes)
apiVersion: operator.knative.dev/v1beta1 kind: KnativeServing metadata: name: knative-serving namespace: knative-serving spec: config: defaults: revision-idle-timeout-seconds: "300"To configure the timeout per revision, set the
idleTimeoutSecondsfield in your service definition:Example of a service definition with revision idle timeout set to 300 seconds (5 minutes)
apiVersion: serving.knative.dev/v1
kind: Service
metadata:
  namespace: my-ns
spec:
  template:
    spec:
      idleTimeoutSeconds: 300
      containers:
# ...
4.10.5. Long-running requests
To ensure that requests exceeding the default 600 second timeout set by Knative are not prematurely terminated, you need to adjust the timeouts in the following components:
- OpenShift Container Platform route
- OpenShift Serverless Serving
- Load balancer, depending on the cloud provider
You can configure the timeouts globally or per revision. You can configure the timeouts globally if you have requests across all Knative services that need extended durations, or per revision for specific workloads that require different timeout values, such as AI deployments.
4.10.5.1. Configuring the default route timeouts globally
By configuring the route timeouts globally, you can ensure consistent timeout settings across all services, simplifying management for workloads that have similar timeout needs and reducing the need for individual adjustments.
You can configure the route timeouts globally by updating the ROUTE_HAPROXY_TIMEOUT environment value in your serverless-operator subscription and updating the max-revision-timeout-seconds field in your KnativeServing custom resource (CR). This applies the timeout changes across all Knative services, and you can deploy services with specific timeouts up to the maximum value set.
The Serverless Operator manages the ROUTE_HAPROXY_TIMEOUT environment variable. The default value is 600.
Procedure
Set the value of
ROUTE_HAPROXY_TIMEOUTin your subscription to the required timeout in seconds by running the following command. Note that this change redeploys the pods in theopenshift-serverlessnamespace.Setting the
ROUTE_HAPROXY_TIMEOUTvalue to 900 seconds$ oc patch subscription.operators.coreos.com serverless-operator -n openshift-serverless --type='merge' -p '{"spec": {"config": {"env": [{"name": "ROUTE_HAPROXY_TIMEOUT", "value": "900"}]}}}'You can also set the value of
ROUTE_HAPROXY_TIMEOUTin your subscription directly:A subscription definition with
ROUTE_HAPROXY_TIMEOUTset to 900 secondsapiVersion: operators.coreos.com/v1alpha1 kind: Subscription metadata: #... spec: channel: stable config: env: - name: ROUTE_HAPROXY_TIMEOUT value: '900' #...NoteIf you created your routes manually and disabled auto-generation with the
serving.knative.openshift.io/disableRouteannotation, you can configure the timeouts directly in the route definitions.Set the maximum revision timeout in your
KnativeServingCR:KnativeServingCR withmax-revision-timeout-secondsset to 900 secondsapiVersion: operator.knative.dev/v1beta1 kind: KnativeServing metadata: name: knative-serving spec: config: defaults: max-revision-timeout-seconds: "900" #...The Serverless Operator automatically adjusts the
terminationGracePeriodvalue of the activator to the maximum revision timeout value to avoid request termination when the cluster terminates activator pods.Optional: Verify the timeout value by running the following command:
$ oc get deployment activator -n knative-serving -o jsonpath="{.spec.template.spec.terminationGracePeriodSeconds}"If necessary for your cloud provider, adjust the load balancer timeout by running the following command:
Load balancer timeout change for AWS Classic LB
$ oc -n openshift-ingress-operator patch ingresscontroller/default --type=merge --patch=' \ {"spec":{"endpointPublishingStrategy": \ {"type":"LoadBalancerService", "loadBalancer": \ {"scope":"External", "providerParameters":{"type":"AWS", "aws": \ {"type":"Classic", "classicLoadBalancer": \ {"connectionIdleTimeout":"20m"}}}}}}}'Deploy a Knative service with the needed timeouts less or equal to the
max-revision-timeout-secondsvariable:A Service definition with timeouts set to 800 seconds
apiVersion: serving.knative.dev/v1 kind: Service metadata: name: example-service-name spec: template: spec: timeoutSeconds: 800 responseStartTimeoutSeconds: 800ImportantWhen you use Service Mesh, the activator pod might stop while a long-running request is in flight, which interrupts the request. To prevent this interruption, adjust the value of the
terminationDrainDurationfield in theServiceMeshControlPlaneCR:+
apiVersion: maistra.io/v2 kind: ServiceMeshControlPlane #... spec: techPreview: meshConfig: defaultConfig: terminationDrainDuration: 1000s 1 #...- 1
- Ensure that the value exceeds the request duration to avoid the Istio proxy shutdown, which would interrupt the request.
Verification
If you are using Kourier, you can verify the current value of the timeout at the OpenShift Container Platform route by running the following command:
$ oc get route <route_name> -n knative-serving-ingress ess -o jsonpath="{.metadata.annotations.haproxy\.router\.openshift\.io/timeout}"
800s
4.10.5.2. Configuring the default route timeouts per revision
By configuring the route timeouts per revision, you can fine-tune timeouts for workloads with unique requirements, such as AI or data processing applications, without impacting the global timeout settings for other services. You can configure the timeouts of a specific revision by updating your KnativeServing custom resource (CR), the Service definition, and using the serving.knative.openshift.io/setRouteTimeout annotation to adjust the OpenShift Container Platform route timeout.
Procedure
Set the
max-revision-timeoutannotation in yourKnativeServingCR as you require:apiVersion: operator.knative.dev/v1beta1 kind: KnativeServing metadata: name: knative-serving spec: config: defaults: max-revision-timeout-seconds: "900"Optional: Verify the termination grace period of an activator by running the following command:
$ oc get deployment activator -n knative-serving -o jsonpath="{.spec.template.spec.terminationGracePeriodSeconds}" 900If necessary for your cloud provider, adjust the load balancer timeout by running the following command:
Load balancer timeout change for AWS Classic LB
$ oc -n openshift-ingress-operator patch ingresscontroller/default \ --type=merge --patch='{"spec":{"endpointPublishingStrategy": \ {"type":"LoadBalancerService", "loadBalancer": \ {"scope":"External", "providerParameters":{"type":"AWS", "aws": \ {"type":"Classic", "classicLoadBalancer": \ {"connectionIdleTimeout":"20m"}}}}}}}'Set the timeout for your specific service:
apiVersion: serving.knative.dev/v1f kind: Service metadata: name: <your_service_name> annotations: serving.knative.openshift.io/setRouteTimeout: "800" 1 spec: template: metadata: annotations: #... spec: timeoutSeconds: 800 2 responseStartTimeoutSeconds: 800 3- 1
- This annotation sets the timeout for the OpenShift Container Platform route. You can fine-tune this for each service instead of setting a global maximum.
- 2
- This ensures that the request does not exceed the specific value.
- 3
- This ensures that the response start timeout does not trigger before the request reaches the maximum threshold. The default value is
300.
ImportantWhen you use Service Mesh, the activator pod might stop while a long-running request is in flight, which interrupts the request. To prevent this interruption, adjust the value of the
terminationDrainDurationfield in theServiceMeshControlPlaneCR:+
apiVersion: maistra.io/v2 kind: ServiceMeshControlPlane #... spec: techPreview: meshConfig: defaultConfig: terminationDrainDuration: 1000s 1 #...- 1
- Ensure that the value exceeds the request duration to avoid the Istio proxy shutdown, which would interrupt the request.
Verification
If you are using Kourier, you can verify the current value of the timeout at the OpenShift Container Platform route by running the following command:
$ oc get route <route_name> -n knative-serving-ingress ess -o jsonpath="{.metadata.annotations.haproxy\.router\.openshift\.io/timeout}"
800s
Chapter 5. Debugging Serverless applications
You can use a variety of methods to troubleshoot a Serverless application.
5.1. Checking terminal output
You can check your deploy command output to see whether deployment succeeded or not. If the deployment process terminates, the output displays an error message that explains the failure. This kind of failure is most likely due to either a misconfigured manifest or an invalid command.
Procedure
Open the command output on the client where you deploy and manage your application. The following example is an error that you might see after a failed
oc applycommand:Example output
Error from server (InternalError): error when applying patch: {"metadata":{"annotations":{"kubectl.kubernetes.io/last-applied-configuration":"{\"apiVersion\":\"serving.knative.dev/v1\",\"kind\":\"Route\",\"metadata\":{\"annotations\":{},\"name\":\"route-example\",\"namespace\":\"default\"},\"spec\":{\"traffic\":[{\"configurationName\":\"configuration-example\",\"percent\":50}]}}\n"}},"spec":{"traffic":[{"configurationName":"configuration-example","percent":50}]}} to: &{0xc421d98240 0xc421e77490 default route-example STDIN 0xc421db0488 264682 false} for: "STDIN": Internal error occurred: admission webhook "webhook.knative.dev" denied the request: mutation failed: The route must have traffic percent sum equal to 100. ERROR: Non-zero return code '1' from command: Process exited with status 1This output indicates that you must configure the route traffic percent to be equal to 100.
5.2. Checking pod status
You might need to check the status of your Pod object to identify the issue with your Serverless application.
Procedure
List all pods for your deployment by running the following command:
$ oc get pods
Example output
NAME                                                      READY     STATUS             RESTARTS   AGE
configuration-example-00001-deployment-659747ff99-9bvr4   2/2       Running            0          3h
configuration-example-00002-deployment-5f475b7849-gxcht   1/2       CrashLoopBackOff   2          36s
In the output, you can see all pods with selected data about their status.
View the detailed information on the status of a pod by running the following command:
Example output
$ oc get pod <pod_name> --output yaml
In the output, the
conditionsandcontainerStatusesfields might be particularly useful for debugging.
5.3. Checking revision status
You might need to check the status of your revision to identify the issue with your Serverless application.
Procedure
If you configure your route with a
Configurationobject, get the name of theRevisionobject created for your deployment by running the following command:$ oc get configuration <configuration_name> --output jsonpath="{.status.latestCreatedRevisionName}"You can find the configuration name in the
Route.yamlfile, which specifies routing settings by defining an OpenShiftRouteresource.If you configure your route with revision directly, look up the revision name in the
Route.yamlfile.Query for the status of the revision by running the following command:
$ oc get revision <revision_name> --output yaml
A ready revision should have the
reason: ServiceReady,status: "True", andtype: Readyconditions in its status. If these conditions are present, you might want to check pod status or Istio routing. Otherwise, the resource status has the error message.
5.3.1. Additional resources
5.4. Checking Ingress status
You might need to check the status of your Ingress to identify the issue with your Serverless application.
Procedure
Check the IP address of your Ingress by running the following command:
$ oc get svc -n istio-system istio-ingressgateway
The
istio-ingressgatewayservice is theLoadBalancerservice used by Knative.If there is no external IP address, run the following command:
$ oc describe svc istio-ingressgateway -n istio-system
This command prints the reason why IP addresses were not provisioned. Most likely, it is due to a quota issue.
5.5. Checking route status
In some cases, the Route object has issues. You can check its status by using the OpenShift CLI (oc).
Procedure
View the status of the
Routeobject with which you deployed your application by running the following command:$ oc get route <route_name> --output yaml
Substitute
<route_name>with the name of yourRouteobject.The
conditionsobject in thestatusobject states the reason in case of a failure.
5.6. Checking Ingress and Istio routing
Sometimes, when you use Istio as an Ingress layer, the Ingress and Istio routing have issues. You can see the details on them by using the OpenShift CLI (oc).
Procedure
List all Ingress resources and their corresponding labels by running the following command:
$ oc get ingresses.networking.internal.knative.dev -o=custom-columns='NAME:.metadata.name,LABELS:.metadata.labels'
Example output
NAME            LABELS
helloworld-go   map[serving.knative.dev/route:helloworld-go serving.knative.dev/routeNamespace:default serving.knative.dev/service:helloworld-go]
In this output, the labels
serving.knative.dev/routeandserving.knative.dev/routeNamespaceindicate theRoutefor the Ingress resource. The output lists yourRouteand Ingress.If your Ingress does not exist, the route controller assumes that the
Revisionobjects targeted by yourRouteorServiceobject are not ready. Proceed with other debugging procedures to diagnoseRevisionreadiness status.If your Ingress is displayed in the output, run the following command to examine the
ClusterIngressobject for your route.$ oc get ingresses.networking.internal.knative.dev <ingress_name> --output yaml
In the status section of the output, if the condition with
type=Readyhas the status ofTrue, then Ingress is working correctly. Otherwise, the output has error messages.If Ingress has the status of
Ready, then there is a correspondingVirtualServiceobject. Verify the configuration of theVirtualServiceobject by running the following command:$ oc get virtualservice -l networking.internal.knative.dev/ingress=<ingress_name> -n <ingress_namespace> --output yaml
The network configuration in the
VirtualServiceobject must match that of theIngressandRouteobjects. Because theVirtualServiceobject does not expose aStatusfield, you might need to wait for its settings to propagate.
5.6.1. Additional resources
Chapter 6. Kourier and Istio ingresses
OpenShift Serverless supports the following two ingress solutions:
- Kourier
- Istio using Red Hat OpenShift Service Mesh
The default is Kourier.
6.1. Kourier and Istio ingress solutions
6.1.1. Kourier
Kourier is the default ingress solution for OpenShift Serverless. It has the following properties:
- It is based on envoy proxy.
- It is simple and lightweight.
- It provides the basic routing functionality that Serverless needs to provide its set of features.
- It supports basic observability and metrics.
- It supports basic TLS termination of Knative Service routing.
- It provides only limited configuration and extension options.
6.1.2. Istio using OpenShift Service Mesh
Using Istio as the ingress solution for OpenShift Serverless enables an additional feature set that is based on what Red Hat OpenShift Service Mesh offers:
- Native mTLS between all connections
- Serverless components are part of a service mesh
- Additional observability and metrics
- Authorization and authentication support
- Custom rules and configuration, as supported by Red Hat OpenShift Service Mesh
However, the additional features come with a higher overhead and resource consumption. For details, see the Red Hat OpenShift Service Mesh documentation.
See the "Integrating Service Mesh with OpenShift Serverless" section of Serverless documentation for Istio requirements and installation instructions.
6.1.3. Traffic configuration and routing
You can find the architecture diagrams for the Kourier and Istio ingresses on the Content from openshift-knative.github.io is not included.Technology and Developer Preview Releases site.
Regardless of whether you use Kourier or Istio, the traffic for a Knative Service is configured in the knative-serving namespace by the net-kourier-controller or the net-istio-controller respectively.
The controller reads the KnativeService and its child custom resources to configure the ingress solution. Both ingress solutions provide an ingress gateway pod that becomes part of the traffic path. Both ingress solutions are based on Envoy. By default, Serverless has two routes for each KnativeService object:
-
A cluster-external route that is forwarded by the OpenShift router, for example
myapp-namespace.example.com. -
A cluster-local route containing the cluster domain, for example
myapp.namespace.svc.cluster.local. This domain can and should be used to call Knative services from Knative or other user workloads.
The ingress gateway can forward requests either in the serve mode or the proxy mode:
- In the serve mode, requests go directly to the Queue-Proxy sidecar container of the Knative service.
-
In the proxy mode, requests first go through the Activator component in the
knative-servingnamespace.
The choice of mode depends on the configuration of Knative, the Knative service, and the current traffic. For example, if a Knative Service is scaled to zero, requests are sent to the Activator component, which acts as a buffer until a new Knative service pod is started.
Chapter 7. Serving transport encryption
You can enable OpenShift Serverless Serving transport encryption to allow transporting data over secured and encrypted HTTPS connections using TLS.
OpenShift Serverless Serving transport encryption is a Technology Preview feature only. Technology Preview features are not supported with Red Hat production service level agreements (SLAs) and might not be functionally complete. Red Hat does not recommend using them in production. These features provide early access to upcoming product features, enabling customers to test functionality and provide feedback during the development process.
For more information about the support scope of Red Hat Technology Preview features, see Technology Preview Features Support Scope.
Serving Transport Encryption is only available for Kourier as an ingress layer. For Red Hat OpenShift Service Mesh, use the service mesh mTLS capabilities to ensure encrypted traffic.
7.1. Overview of Serving transport encryption
There are three parts to OpenShift Serverless Serving transport encryption:
- External domain encryption
-
Transport encryption on the ingress layer external to the cluster. For example, a cluster-external domain, such as
myapp-<namespace>.example.com. - Cluster-local encryption
-
Transport encryption on the ingress layer internal to the cluster. For example, cluster-local domains, such as
myapp.<namespace>.svc.cluster.local. - System-internal encryption
-
Transport encryption between the
ingress-gateway,activator, andqueue-proxyKnative internal components.
Control-plane traffic, including Kubernetes PreStopHooks, metadata, and metrics, contains no user data and is not encrypted.
The different parts are independent of each other and can be enabled and disabled individually. They can use the same or different Certificate Authorities (CAs) to sign the necessary certificates.
For diagrams illustrating transport encryption, see Content from openshift-knative.github.io is not included.OpenShift Serverless Serving Transport Encryption.
7.1.1. External domain encryption
The transport encryption for external domains is handled by the ingress layer of the cluster, which is either the OpenShift Container Platform ingress or Red Hat OpenShift Service Mesh.
7.1.2. Cluster-local encryption
Cluster-local encryption enables transport encryption for cluster-local domains. It has the following properties:
-
The Certificate Common Name (CN) or Subject Alternative Name (SAN) contains the cluster-local domains of a Knative Service, for example
myapp.namespace.svc.cluster.local,myapp.namespace.svc,myapp.namespace. -
The cluster-local endpoint of the
ingress-controllercomponent uses SNI to select the certificates. -
To create the certificates, Knative relies on
cert-manager, which needs to be installed and configured for the feature to work. For more information, see cert-manager Operator for Red Hat OpenShift.
The caller must trust the CA that signed the cluster-local certificates. This is out of the scope of OpenShift Serverless.
7.1.3. System-internal encryption
System-internal encryption enables transport encryption for the ingress-gateway, activator, and queue-proxy Knative internal components. These components host TLS endpoints when this configuration is used.
The following prerequisites must be satisfied to use this feature:
-
For OpenShift Serverless to get the certificates,
cert-managermust be installed and configured. - Specific SANs are used to verify each connection. Each component must trust the CA that signed the certificates. To satisfy this requirement, OpenShift Serverless system components consume and trust a bundle of CAs. The CA bundle must be provided by the cluster administrator.
7.2. Choice of a certificate issuer
Issuers refer to cert-manager issuers and cluster issuers. They represent certificate authorities (CAs) that can generate signed certificates by honoring certificate signing requests. For more information, see Content from cert-manager.io is not included.cert-manager documentation on issuers.
Depending on the encryption features that you use, OpenShift Serverless requires your certificate issuer to be able to sign certain certificates. To identify your certificate issuer, refer to the Content from cert-manager.io is not included.list of cert-manager integrations, which contains examples for the following:
- A custom CA stored in a Kubernetes secret
- HTTP-01 challenges
- DNS-01 challenges
- Self-signed issuers
7.2.1. Compatible certificate issuers
Not all issuer types work for each Knative Serving encryption feature.
For cluster-local encryption, the issuer must be able to sign certificates for the following cluster-local domain types:
-
myapp.<namespace> -
myapp.<namespace>.svc -
myapp.<namespace>.svc.cluster.local
As the CA usually is not within the cluster, verification using the Automated Certificate Management Environment (ACME) protocol (DNS01/HTTP01) is not possible. You can use an issuer that allows creating these certificates, such as the
cert-managerCA issuer.-
For system-internal encryption, the issuer must be able to sign certificates with the following Subject Alternative Names (SANs):
-
kn-routing -
names of format
kn-user-<namespace>, where<namespace>is a namespace where Knative Services are created -
data-plane.knative.dev
Knative requires these SANs to verify connections between the internal components. Because this is not possible using the ACME protocol (DNS01/HTTP01), you must configure an issuer that allows creating these certificates, for example,
cert-managerCA issuer.-
7.3. Setting up OpenShift Serverless transport encryption
Prerequisites
- You have access to an OpenShift Container Platform account with cluster administrator access.
- Install the {oc-first}.
- Install the cert-manager Operator for Red Hat OpenShift.
- Install the OpenShift Serverless Operator.
If you install the OpenShift Serverless Operator before installing the cert-manager Operator for Red Hat OpenShift, you must restart the controller and activator deployments in the knative-serving namespace. Failure to restart these deployments prevents Knative from creating the necessary cert-manager resources, which results in pending Knative Services and prevents enabling the Knative Serving cert-manager integration.
7.3.1. Configuring a SelfSigned cluster issuer
The following procedure uses a SelfSigned issuer as the root certificate. For information about the implications and limitations of this method, see the Content from cert-manager.io is not included.SelfSigned cert-manager documentation.
If you manage your own company-specific Private Key Infrastructure (PKI), use the CA issuer. For more information, see Content from cert-manager.io is not included.cert-manager documentation on CA issuers.
Procedure
Create a
SelfSignedClusterIssuercustom resource (CR):Example ClusterIssuer CR
apiVersion: cert-manager.io/v1 kind: ClusterIssuer metadata: name: knative-serving-selfsigned-issuer spec: selfSigned: {}Apply the
ClusterIssuerCR by running the following command:$ oc apply -f <filename>
Create a root certificate that refers to the
ClusterIssuerCR:Example root certificate
apiVersion: cert-manager.io/v1
kind: Certificate
metadata:
  name: knative-serving-selfsigned-ca
  namespace: cert-manager 1
spec:
  secretName: knative-serving-ca 2

  isCA: true
  commonName: selfsigned-ca
  privateKey:
    algorithm: ECDSA
    size: 256

  issuerRef:
    name: knative-serving-selfsigned-issuer
    kind: ClusterIssuer
    group: cert-manager.io
Apply the
CertificateCR by running the following command:$ oc apply -f <filename>
7.3.2. Creating a ClusterIssuer to be used by Serving
To enable the use of certificates by Serving, you must create a cluster issuer.
Procedure
Create the
knative-serving-ca-issuerClusterIssuerfor Serving:apiVersion: cert-manager.io/v1 kind: ClusterIssuer metadata: name: knative-serving-ca-issuer spec: ca: secretName: knative-serving-ca 1- 1
- Secret name in the cert-manager Operator for Red Hat OpenShift namespace (
cert-managerby default) containing the certificate that can be used by OpenShift Serverless Serving components for new certificates.
Apply the
ClusterIssuerresource by running the following command:$ oc apply -f <filename>
7.3.3. Configuring transport encryption
Configuring transport encryption consists of two parts:
Specifying the
ClusterIssuerissuer to use:-
clusterLocalIssuerRef: issuer for cluster-local-domain certificates used for ingress. -
systemInternalIssuerRef: issuer for certificates for system-internal-tls certificates used by Knative internal components.
-
Specifying transport encryption features to use:
-
cluster-local-domain-tls: Enables the transport encryption feature for cluster-local domains -
system-internal-tls: Enables the transport encryption feature for OpenShift Serverless Serving internal components.
-
Procedure
Enable transport encryption in the
KnativeServingresource:apiVersion: operator.knative.dev/v1beta1 kind: KnativeServing metadata: name: knative-serving namespace: knative-serving spec: ... config: certmanager: clusterLocalIssuerRef: | kind: ClusterIssuer name: knative-serving-ca-issuer 1 systemInternalIssuerRef: | kind: ClusterIssuer name: knative-serving-ca-issuer 2 network: cluster-local-domain-tls: Enabled 3 system-internal-tls: Enabled 4Apply the
KnativeServingresource by running the following command:$ oc apply -f <filename>
Optionally, change the
defaultCertificatevalue in the Ingress Controller:apiVersion: operator.openshift.io/v1 kind: IngressController ... spec: defaultCertificate: name: ca-ingress-certIf you changed the
defaultCertificatevalue, you must specify the custom certificate name in theopenshift-ingress-default-certificatefield in theKnativeServingcustom resource.For example, if the custom certificate name is
ca-ingress-cert, add the following configuration:... spec: config: network: system-internal-tls: Enabled openshift-ingress-default-certificate: "ca-ingress-cert" ...If you enabled
cluster-local-domain-tlsorsystem-internal-tls, restart the Controller component by running the following command.ImportantWhen either the
cluster-local-domain-tlsor thesystem-internal-tlsfeature is enabled, you must restart the Controller component to enable the Knative Servingcert-managerintegration.$ oc rollout restart deploy/controller -n knative-serving
If you enabled
system-internal-tls, restart the Activator component by running the following command.ImportantWhen the
system-internal-tlsfeature is activated, you must restart the Activator component to reconfigure its internal web server, as this is not possible during runtime.$ oc rollout restart deploy/activator -n knative-serving
7.4. Trust configuration
When you enable any of the transport encryption features, you must make sure that all clients calling trust the Certificate Authority (CA) issuing the certificates used for the transport encryption.
There are multiple places where trust must be ensured:
- Cluster external client, such as Browser or other application. This is out of the scope of OpenShift Serverless.
- OpenShift Serverless system components, such as Activator, Queue-Proxy, and Ingress-Controller.
- Cluster internal client, such as a Knative Service or other workload.
7.4.1. Trust configuration for OpenShift Serverless Serving components and Knative Services
To ensure that OpenShift Serverless Serving components and Knative Services trust the CA that issues certificates, you can create a ConfigMap in the following namespaces with the label networking.knative.dev/trust-bundle: true:
knative-serving- for the system components of OpenShift Serverless Serving.
knative-serving-ingress- for the ingress layer of OpenShift Serverless Serving.
istio-systemor your own Service Mesh namespace- when the Service Mesh integration is enabled.
Knative reads all data keys in ConfigMaps with this label, regardless of the name. One key can contain one or multiple CAs or intermediate certificates. If they are valid, they are added to the trust store of the Knative components.
This is an example ConfigMap:
apiVersion: v1
data:
  cacerts.pem: | 1
    -----BEGIN CERTIFICATE-----
    MIIDDTCCAfWgAwIBAgIQMQuip05h7NLQq2TB+j9ZmTANBgkqhkiG9w0BAQsFADAW
    MRQwEgYDVQQDEwtrbmF0aXZlLmRldjAeFw0yMzExMjIwOTAwNDhaFw0yNDAyMjAw
    OTAwNDhaMBYxFDASBgNVBAMTC2tuYXRpdmUuZGV2MIIBIjANBgkqhkiG9w0BAQEF
    AAOCAQ8AMIIBCgKCAQEA3clC3CV7sy0TpUKNuTku6QmP9z8JUCbLCPCLACCUc1zG
    FEokqOva6TakgvAntXLkB3TEsbdCJlNm6qFbbko6DBfX6rEggqZs40x3/T+KH66u
    4PvMT3fzEtaMJDK/KQOBIvVHrKmPkvccUYK/qWY7rgBjVjjLVSJrCn4dKaEZ2JNr
    Fd0KNnaaW/dP9/FvviLqVJvHnTMHH5qyRRr1kUGTrc8njRKwpHcnUdauiDoWRKxo
    Zlyy+MhQfdbbyapX984WsDjCvrDXzkdGgbRNAf+erl6yUm6pHpQhyFFo/zndx6Uq
    QXA7jYvM2M3qCnXmaFowidoLDsDyhwoxD7WT8zur/QIDAQABo1cwVTAOBgNVHQ8B
    Af8EBAMCAgQwEwYDVR0lBAwwCgYIKwYBBQUHAwEwDwYDVR0TAQH/BAUwAwEB/zAd
    BgNVHQ4EFgQU7p4VuECNOcnrP9ulOjc4J37Q2VUwDQYJKoZIhvcNAQELBQADggEB
    AAv26Vnk+ptQrppouF7yHV8fZbfnehpm07HIZkmnXO2vAP+MZJDNrHjy8JAVzXjt
    +OlzqAL0cRQLsUptB0btoJuw23eq8RXgJo05OLOPQ2iGNbAATQh2kLwBWd/CMg+V
    KJ4EIEpF4dmwOohsNR6xa/JoArIYH0D7gh2CwjrdGZr/tq1eMSL+uZcuX5OiE44A
    2oXF9/jsqerOcH7QUMejSnB8N7X0LmUvH4jAesQgr7jo1JTOBs7GF6wb+U76NzFa
    8ms2iAWhoplQ+EHR52wffWb0k6trXspq4O6v/J+nq9Ky3vC36so+G1ZFkMhCdTVJ
    ZmrBsSMWeT2l07qeei2UFRU=
    -----END CERTIFICATE-----
kind: ConfigMap
metadata:
  labels:
    networking.knative.dev/trust-bundle: "true"
  name: knative-bundle 2
  namespace: knative-serving
When a CA bundle ConfigMap is created or updated, the Serving components automatically pick them up and add the CAs or intermediate certificates to their CA trust store. The trust store is refreshed for every new HTTP connection.
7.4.2. Trust configuration on your custom workload
As OpenShift Serverless Serving does not control all workloads and managing trust is highly dependent on your runtime and language, custom workloads are out of the scope of OpenShift Serverless. The following are other options for custom workloads:
- Adding a CA bundle to a Container image on build-time. Note that this complicates CA rotation, as you must rebuild and redeploy every application when the CA rotates.
- Mounting a CA bundle to the filesystem, such as from a Secret or ConfigMap, and making sure your application uses it to verify TLS connections.
- Reading a CA bundle from an environment variable and making sure that your application uses it to verify TLS connections.
- Accessing a CA bundle from a secret or ConfigMap using Kubernetes API and making sure your application uses it to verify TLS connections.
7.5. Ensuring seamless CA rotation
Ensuring seamless CA rotation is essential to avoid service downtime, or to deal with an emergency.
Procedure
- Create a new CA certificate.
- Add the public key of the new CA certificate to the CA trust bundles as described in the "Trust configuration for OpenShift Serverless Operator Serving components and Knative Services" section. Retain the public key of the existing CA.
- Ensure that all clients have consumed the latest set of CA trust bundles. OpenShift Serverless Serving components will automatically reload the changed CA trust bundles.
- If you have custom workload consuming trust bundles, reload or restart them accordingly.
-
Update the
knative-serving-ca-issuercluster issuer to reference the secret containing the new CA certificate. -
Either wait for
cert-managerto renew all your certificates or enforce it to renew all the certificates. For more information, see thecert-managerdocumentation. - Once the CA rotation is fully completed, you can remove the public key of the old CA from the trust bundle configmap. Allow enough time for all components to apply the changes.
7.6. Verifying transport encryption is enabled
Procedure
Create a Knative Service:
apiVersion: serving.knative.dev/v1 kind: Service metadata: name: test-webapp namespace: test-namespace spec: template: spec: containers: - image: docker.io/openshift/hello-openshift env: - name: RESPONSE value: "Hello Serverless!"Apply the Knative Service YAML by running the following command:
$ oc apply -f <filename>
Examine status of the Knative Service:
Example command
$ oc get ksvc -n test-namespace -o yaml
Example output
apiVersion: serving.knative.dev/v1 kind: Service metadata: name: test-webapp namespace: test-namespace # spec: # ... status: address: # cluster-local-domain: url: https://helloworld.test.svc.cluster.local 1- 1
- If you have enabled
cluster-local-domain-tls, you will see the HTTPS URL.
To verify that
system-internal-tlsis enabled, check the output of Queue-Proxy logs by running the following command:Example command
$ oc logs your-pod -n test-namespace -c queue-proxy | grep -E 'certDir|Certificate|tls'
If you see lines similar to the following,
system-internal-tlsis enabled:{"severity":"INFO","timestamp":"2024-01-03T07:07:32.892810888Z","logger":"queueproxy","caller":"certificate/watcher.go:62","message":"Starting to watch the following directories for changes{certDir 15 0 /var/lib/knative/certs <nil>} {keyDir 15 0 /var/lib/knative/certs <nil>}","commit":"86420f2-dirty","knative.dev/key":"first/helloworld-00001","knative.dev/pod":"helloworld-00001-deployment-75fbb7d488-qgmxx"} {"severity":"INFO","timestamp":"2024-01-03T07:07:32.89397512Z","logger":"queueproxy","caller":"certificate/watcher.go:131","message":"Certificate and/or key have changed on disk and were reloaded.","commit":"86420f2-dirty","knative.dev/key":"first/helloworld-00001","knative.dev/pod":"helloworld-00001-deployment-75fbb7d488-qgmxx"} {"severity":"INFO","timestamp":"2024-01-03T07:07:32.894232939Z","logger":"queueproxy","caller":"sharedmain/main.go:282","message":"Starting tls server admin:8022","commit":"86420f2-dirty","knative.dev/key":"first/helloworld-00001","knative.dev/pod":"helloworld-00001-deployment-75fbb7d488-qgmxx"} {"severity":"INFO","timestamp":"2024-01-03T07:07:32.894268548Z","logger":"queueproxy","caller":"sharedmain/main.go:282","message":"Starting tls server main:8112","commit":"86420f2-dirty","knative.dev/key":"first/helloworld-00001","knative.dev/pod":"helloworld-00001-deployment-75fbb7d488-qgmxx"}
Chapter 8. Traffic splitting
8.1. Traffic splitting overview
In a Knative application, traffic can be managed by creating a traffic split. A traffic split is configured as part of a route, which is managed by a Knative service.
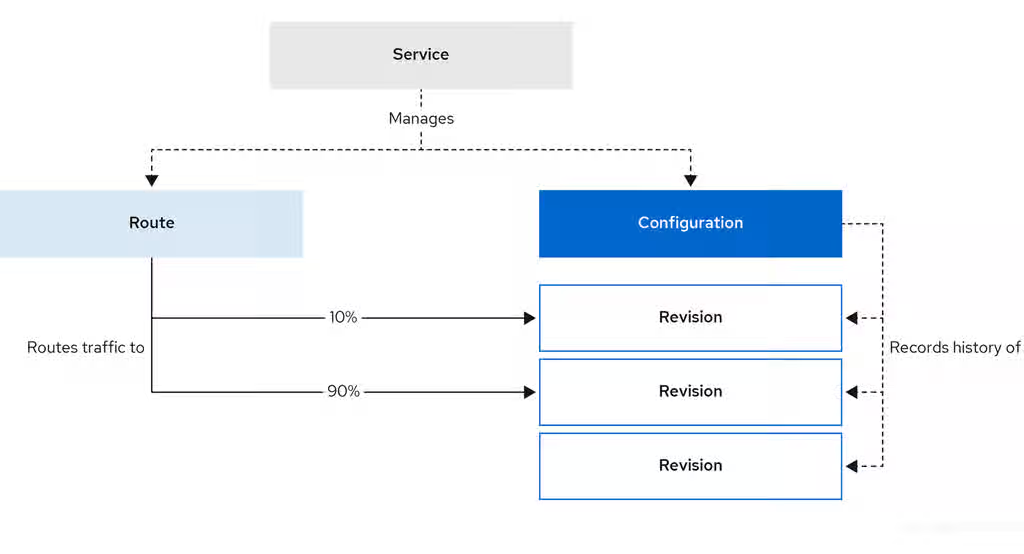
Configuring a route allows requests to be sent to different revisions of a service. This routing is determined by the traffic spec of the Service object.
A traffic spec declaration consists of one or more revisions, each responsible for handling a portion of the overall traffic. The percentages of traffic routed to each revision must add up to 100%, which is ensured by a Knative validation.
The revisions specified in a traffic spec can either be a fixed, named revision, or can point to the “latest” revision, which tracks the head of the list of all revisions for the service. The "latest" revision is a type of floating reference that updates if a new revision is created. Each revision can have a tag attached that creates an additional access URL for that revision.
The traffic spec can be modified by:
-
Editing the YAML of a
Serviceobject directly. -
Using the Knative (
kn) CLI--trafficflag. - Using the OpenShift Container Platform web console.
When you create a Knative service, it does not have any default traffic spec settings.
8.2. Traffic spec examples
The following example shows a traffic spec where 100% of traffic is routed to the latest revision of the service. Under status, you can see the name of the latest revision that latestRevision resolves to:
apiVersion: serving.knative.dev/v1
kind: Service
metadata:
  name: example-service
  namespace: default
spec:
...
  traffic:
  - latestRevision: true
    percent: 100
status:
  ...
  traffic:
  - percent: 100
    revisionName: example-service
The following example shows a traffic spec where 100% of traffic is routed to the revision tagged as current, and the name of that revision is specified as example-service. The revision tagged as latest is kept available, even though no traffic is routed to it:
apiVersion: serving.knative.dev/v1
kind: Service
metadata:
  name: example-service
  namespace: default
spec:
...
  traffic:
  - tag: current
    revisionName: example-service
    percent: 100
  - tag: latest
    latestRevision: true
    percent: 0
The following example shows how the list of revisions in the traffic spec can be extended so that traffic is split between multiple revisions. This example sends 50% of traffic to the revision tagged as current, and 50% of traffic to the revision tagged as candidate. The revision tagged as latest is kept available, even though no traffic is routed to it:
apiVersion: serving.knative.dev/v1
kind: Service
metadata:
  name: example-service
  namespace: default
spec:
...
  traffic:
  - tag: current
    revisionName: example-service-1
    percent: 50
  - tag: candidate
    revisionName: example-service-2
    percent: 50
  - tag: latest
    latestRevision: true
percent: 08.3. Traffic splitting using the Knative CLI
Using the Knative (kn) CLI to create traffic splits provides a more streamlined and intuitive user interface over modifying YAML files directly. You can use the kn service update command to split traffic between revisions of a service.
8.3.1. Creating a traffic split by using the Knative CLI
You can configure traffic distribution across many revisions of a Knative service by using the kn CLI. This enables gradual rollouts, A/B testing, or canary deployments by controlling the percentage of traffic each revision receives.
Prerequisites
- You have installed the OpenShift Serverless Operator and Knative Serving on your cluster.
-
You have installed the Knative (
kn) CLI. - You have created a Knative service.
Procedure
Specify the revision of your service and what percentage of traffic you want to route to it by using the
--traffictag with a standardkn service updatecommand:Example command
$ kn service update <service_name> --traffic <revision>=<percentage>
Where:
-
<service_name>is the name of the Knative service that you are configuring traffic routing for. -
<revision>is the revision that you want to configure to receive a percentage of traffic. You can either specify the name of the revision, or a tag that you assigned to the revision by using the--tagflag. -
<percentage>is the percentage of traffic that you want to send to the specified revision.
-
Optional: Specify the
--trafficflag many times in a single command. For example, if you have a revision tagged as@latestand a revision namedstable, you can specify the percentage of traffic that you want to split to each revision as follows:Example command
$ kn service update showcase --traffic @latest=20,stable=80
If you have many revisions and do not specify the traffic percentage for the latest revision, the
--trafficflag calculates it automatically. For example, if you have a third revision namedexample, and you use the following command:Example command
$ kn service update showcase --traffic @latest=10,stable=60
The system sends the remaining 30% of traffic to the
examplerevision, even though the command does not specify it.
8.4. CLI flags for traffic splitting
The Knative (kn) CLI supports traffic operations on the traffic block of a service as part of the kn service update command.
8.4.1. Knative CLI traffic splitting flags
The following table displays a summary of traffic splitting flags, value formats, and the operation the flag performs. The Repetition column denotes whether repeating the particular value of flag is allowed in a kn service update command.
| Flag | Value(s) | Operation | Repetition |
|---|---|---|---|
|
|
|
Gives | Yes |
|
|
|
Gives | Yes |
|
|
|
Gives | No |
|
|
|
Gives | Yes |
|
|
|
Gives | No |
|
|
|
Removes | Yes |
8.4.1.1. Multiple flags and order precedence
All traffic-related flags can be specified using a single kn service update command. kn defines the precedence of these flags. The order of the flags specified when using the command is not taken into account.
The precedence of the flags as they are evaluated by kn are:
-
--untag: All the referenced revisions with this flag are removed from the traffic block. -
--tag: Revisions are tagged as specified in the traffic block. -
--traffic: The referenced revisions are assigned a portion of the traffic split.
You can add tags to revisions and then split traffic according to the tags you have set.
8.4.1.2. Custom URLs for revisions
When you assign the --tag flag to a service by using the kn service update command, the command creates a custom URL for the revision created during the service update. The custom URL follows the pattern Content from <tag>-<service_name>-<namespace>.<domain> is not included.https://<tag>-<service_name>-<namespace>.<domain> or Content from <tag>-<service_name>-<namespace>.<domain> is not included.http://<tag>-<service_name>-<namespace>.<domain>.
The --tag and --untag flags use the following syntax:
- Require one value.
- Denote a unique tag in the traffic block of the service.
- Specify many times in one command.
8.4.1.2.1. Example: Assign a tag to a revision
The following example assigns the tag latest to a revision named example-revision:
$ kn service update <service_name> --tag @latest=example-tag
8.4.1.2.2. Example: Remove a tag from a revision
You can remove a tag to remove the custom URL, by using the --untag flag.
If you remove all tags from a revision and assign 0% of the traffic to it, the system removes the revision from the traffic block.
The following command removes all tags from the revision named example-revision:
$ kn service update <service_name> --untag example-tag
8.5. Splitting traffic between revisions
After you create a serverless application, the application is displayed in the Topology view in the OpenShift Container Platform web console. The application revision is represented by the node, and the Knative service is indicated by a quadrilateral around the node.
Any new change in the code or the service configuration creates a new revision, which is a snapshot of the code at a given time. For a service, you can manage the traffic between the revisions of the service by splitting and routing it to the different revisions as required.
8.5.1. Managing traffic between revisions by using the OpenShift Container Platform web console
You can use the OpenShift Container Platform web console to split traffic between many revisions of a serverless application. Gradually roll out new versions or run different versions simultaneously for testing and production workloads.
Prerequisites
- You have installed the OpenShift Serverless Operator and Knative Serving on your cluster.
- You have logged in to the OpenShift Container Platform web console.
Procedure
To split traffic between many revisions of an application in the Topology view:
- Click the Knative service to see its overview in the side panel.
Click the Resources tab, to see a list of Revisions and Routes for the service.
Figure 8.1. Serverless application
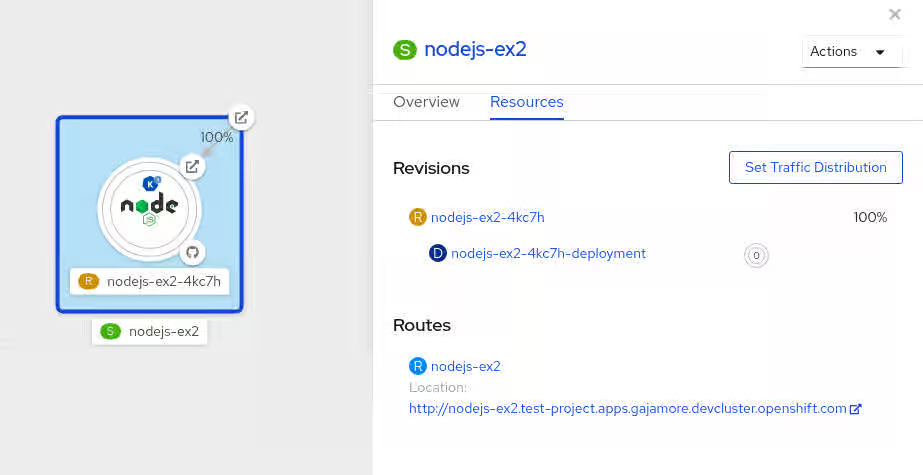
- Click the service, indicated by the S icon at the top of the side panel, to see an overview of the service details.
-
Click the YAML tab and change the service configuration in the YAML editor, and click Save. For example, change the
timeoutsecondsfrom 300 to 301 . This change in the configuration triggers a new revision. In the Topology view, the latest revision is displayed and the Resources tab for the service now displays the two revisions. In the Resources tab, click to see the traffic distribution dialog box:
- Add the split traffic percentage part for the two revisions in the Splits field.
- Add tags to create custom URLs for the two revisions.
Click Save to see two nodes representing the two revisions in the Topology view.
Figure 8.2. Serverless application revisions
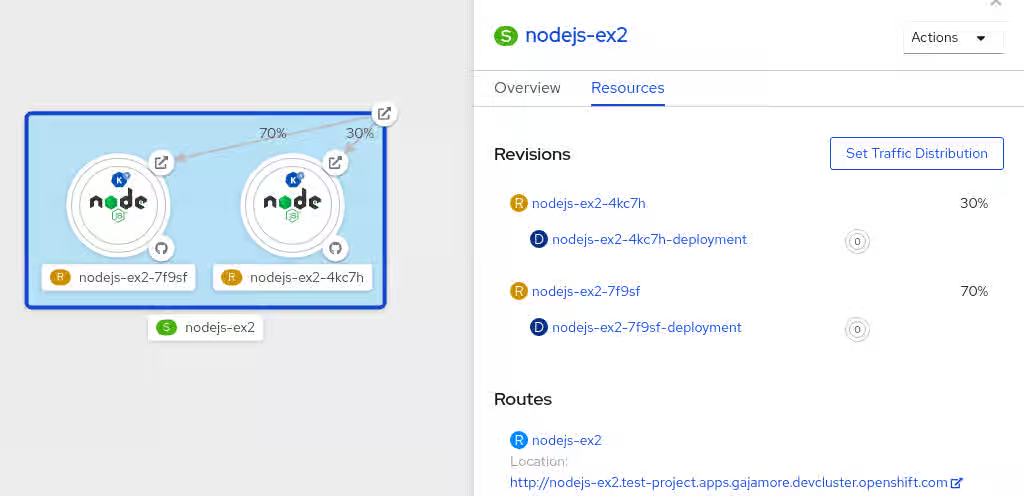
8.6. Rerouting traffic using blue-green strategy
You can safely reroute traffic from a production version of an app to a new version, by using a Content from en.wikipedia.org is not included.blue-green deployment strategy.
8.6.1. Routing and managing traffic by using a blue-green deployment strategy
You can use a blue-green deployment strategy to safely deploy new revisions of serverless applications and test new revisions before routing production traffic.
Prerequisites
- You have installed the OpenShift Serverless Operator and Knative Serving on the cluster.
-
Install the OpenShift CLI (
oc).
Procedure
- Create and deploy an app as a Knative service.
Run the following command and view the output to find the name of the first revision created during service deployment:
$ oc get ksvc <service_name> -o=jsonpath='{.status.latestCreatedRevisionName}'Example command
$ oc get ksvc showcase -o=jsonpath='{.status.latestCreatedRevisionName}'Example output
$ showcase-00001
Add the following YAML to the service
specto send inbound traffic to the revision:... spec: traffic: - revisionName: <first_revision_name> percent: 100 # All traffic goes to this revision ...Verify that you can view your app at the URL output you get from running the following command:
$ oc get ksvc <service_name>
-
Deploy a second revision of your app by modifying at least one field in the
templatespec of the service and redeploying it. For example, you can change theimageof the service, or anenvenvironment variable. You can redeploy the service by applying the service YAML file, or by using thekn service updatecommand if you have installed the Knative (kn) CLI. Run the following command to identify the latest revision created during service redeployment:
$ oc get ksvc <service_name> -o=jsonpath='{.status.latestCreatedRevisionName}'At this point, both the first and second revisions of the service are running.
Update your existing service to create a new, test endpoint for the second revision, while still sending all other traffic to the first revision:
Example of updated service spec with test endpoint
... spec: traffic: - revisionName: <first_revision_name> percent: 100 # All traffic is still being routed to the first revision - revisionName: <second_revision_name> percent: 0 # No traffic is routed to the second revision tag: v2 # A named route ...After you redeploy this service by reapplying the YAML resource, the second revision of the app is now staged. The main URL does not route traffic to the second revision. Knative creates a new service named
v2to test the newly deployed revision.Get the URL of the new service for the second revision, by running the following command:
$ oc get ksvc <service_name> --output jsonpath="{.status.traffic[*].url}"You can use this URL to validate that the new version of the app is behaving as expected before you route any traffic to it.
Update the existing service so that 50% of traffic goes to the first revision and 50% goes to the second revision:
Example of updated service spec splitting traffic 50/50 between revisions
... spec: traffic: - revisionName: <first_revision_name> percent: 50 - revisionName: <second_revision_name> percent: 50 tag: v2 ...When you are ready to route all traffic to the new version of the app, update the service again to send 100% of traffic to the second revision:
Example of updated service spec sending all traffic to the second revision
... spec: traffic: - revisionName: <first_revision_name> percent: 0 - revisionName: <second_revision_name> percent: 100 tag: v2 ...TipYou can remove the first revision instead of setting it to 0% of traffic if you do not plan to roll back the revision. Non-routeable revision objects are then garbage-collected.
- Visit the URL of the first revision to verify that the system no longer sends traffic to the old version of the application.
Chapter 9. External and Ingress routing
9.1. Routing overview
Knative leverages OpenShift Container Platform TLS termination to provide routing for Knative services. When a Knative service is created, an OpenShift Container Platform route is automatically created for the service. This route is managed by the OpenShift Serverless Operator. The OpenShift Container Platform route exposes the Knative service through the same domain as the OpenShift Container Platform cluster.
You can disable Operator control of OpenShift Container Platform routing so that you can configure a Knative route to directly use your TLS certificates instead.
Knative routes can also be used alongside the OpenShift Container Platform route to provide additional fine-grained routing capabilities, such as traffic splitting.
9.1.1. Additional resources for OpenShift Container Platform
9.2. Customizing labels and annotations
OpenShift Container Platform routes support the use of custom labels and annotations, which you can configure by modifying the metadata spec of a Knative service. Custom labels and annotations are propagated from the service to the Knative route, then to the Knative ingress, and finally to the OpenShift Container Platform route.
9.2.1. Customizing labels and annotations for OpenShift Container Platform routes
You can custom labels and annotations from Knative services to the underlying OpenShift Container Platform routes. You can apply metadata for routing policies, monitoring, or integration with other cluster services.
Prerequisites
- You must have the OpenShift Serverless Operator and Knative Serving installed on your OpenShift Container Platform cluster.
-
Install the OpenShift CLI (
oc).
Procedure
Create a Knative service that has the label or annotation that you want to propagate to the OpenShift Container Platform route:
To create a service by using YAML:
Example service created by using YAML
apiVersion: serving.knative.dev/v1 kind: Service metadata: name: <service_name> labels: <label_name>: <label_value> annotations: <annotation_name>: <annotation_value> ...To create a service by using the Knative (
kn) CLI, enter:Example service created by using a
kncommand$ kn service create <service_name> \ --image=<image> \ --annotation <annotation_name>=<annotation_value> \ --label <label_value>=<label_value>
Verify that the OpenShift Container Platform route includes the annotation or label that you added by inspecting the output of the following command:
Example command for verification
$ oc get routes.route.openshift.io \
     -l serving.knative.openshift.io/ingressName=<service_name> \ 1
     -l serving.knative.openshift.io/ingressNamespace=<service_namespace> \ 2
     -n knative-serving-ingress -o yaml \
         | grep -e "<label_name>: \"<label_value>\""  -e "<annotation_name>: <annotation_value>" 3
9.3. Configuring routes for Knative services
If you want to configure a Knative service to use your TLS certificate on OpenShift Container Platform, you must disable the automatic creation of a route for the service by the OpenShift Serverless Operator and instead manually create a route for the service.
When you complete the following procedure, the default OpenShift Container Platform route in the knative-serving-ingress namespace is not created. However, the Knative route for the application is still created in this namespace.
9.3.1. Configuring OpenShift Container Platform routes for Knative services
Prerequisites
- The OpenShift Serverless Operator and Knative Serving component must be installed on your OpenShift Container Platform cluster.
-
Install the OpenShift CLI (
oc).
Procedure
Create a Knative service that includes the
serving.knative.openshift.io/disableRoute=trueannotation:ImportantThe
serving.knative.openshift.io/disableRoute=trueannotation instructs OpenShift Serverless to not automatically create a route for you. However, the service still shows a URL and reaches a status ofReady. This URL does not work externally until you create your own route with the same hostname as the hostname in the URL.Create a Knative
Serviceresource:Example resource
apiVersion: serving.knative.dev/v1 kind: Service metadata: name: <service_name> annotations: serving.knative.openshift.io/disableRoute: "true" spec: template: spec: containers: - image: <image> ...Apply the
Serviceresource:$ oc apply -f <filename>
Optional. Create a Knative service by using the
kn service createcommand:Example
kncommand$ kn service create <service_name> \ --image=gcr.io/knative-samples/helloworld-go \ --annotation serving.knative.openshift.io/disableRoute=true
Verify that no OpenShift Container Platform route has been created for the service:
Example command
$ $ oc get routes.route.openshift.io \
  -l serving.knative.openshift.io/ingressName=$KSERVICE_NAME \
  -l serving.knative.openshift.io/ingressNamespace=$KSERVICE_NAMESPACE \
  -n knative-serving-ingress
You will see the following output:
No resources found in knative-serving-ingress namespace.
Create a
Routeresource in theknative-serving-ingressnamespace:apiVersion: route.openshift.io/v1 kind: Route metadata: annotations: haproxy.router.openshift.io/timeout: 600s 1 name: <route_name> 2 namespace: knative-serving-ingress 3 spec: host: <service_host> 4 port: targetPort: http2 to: kind: Service name: kourier weight: 100 tls: insecureEdgeTerminationPolicy: Allow termination: edge 5 key: |- -----BEGIN PRIVATE KEY----- [...] -----END PRIVATE KEY----- certificate: |- -----BEGIN CERTIFICATE----- [...] -----END CERTIFICATE----- caCertificate: |- -----BEGIN CERTIFICATE----- [...] -----END CERTIFICATE---- wildcardPolicy: None- 1
- The timeout value for the OpenShift Container Platform route. You must set the same value as the
max-revision-timeout-secondssetting (600sby default). You can also set the default timeout value for auto-generated OpenShift Container Platform routes. - 2
- The name of the OpenShift Container Platform route.
- 3
- The namespace for the OpenShift Container Platform route. This must be
knative-serving-ingress. - 4
- The hostname for external access. You can set this to
<service_name>-<service_namespace>.<domain>. - 5
- The certificates you want to use. Currently, only
edgetermination is supported.
Apply the
Routeresource:$ oc apply -f <filename>
9.3.2. Additional resources
9.4. URL scheme for external routes
The URL scheme of external routes defaults to HTTPS for enhanced security. This scheme is determined by the default-external-scheme key in the KnativeServing custom resource (CR) spec.
9.4.1. Setting the URL scheme for external routes
Default spec
...
spec:
  config:
    network:
      default-external-scheme: "https"
...
You can override the default spec to use HTTP by modifying the default-external-scheme key:
HTTP override spec
...
spec:
  config:
    network:
      default-external-scheme: "http"
...9.5. Cluster local availability
By default, Knative services are published to a public IP address. Being published to a public IP address means that Knative services are public applications, and have a publicly accessible URL.
Publicly accessible URLs are accessible from outside of the cluster. However, developers may need to build back-end services that are only be accessible from inside the cluster, known as private services. Developers can label individual services in the cluster with the networking.knative.dev/visibility=cluster-local label to make them private.
For OpenShift Serverless 1.15.0 and newer versions, the serving.knative.dev/visibility label is no longer available. You must update existing services to use the networking.knative.dev/visibility label instead.
9.5.1. Setting cluster availability to cluster local
Prerequisites
- You have installed the OpenShift Serverless Operator and Knative Serving on the cluster.
- You have created a Knative service.
Procedure
Set the visibility for your service by adding the
networking.knative.dev/visibility=cluster-locallabel:$ oc label ksvc <service_name> networking.knative.dev/visibility=cluster-local
Verification
Check that the URL for your service is now in the format
http://<service_name>.<namespace>.svc.cluster.local, by entering the following command and reviewing the output:$ oc get ksvc
Example output
NAME            URL                                                                         LATESTCREATED     LATESTREADY       READY   REASON
hello           http://hello.default.svc.cluster.local                                      hello-tx2g7       hello-tx2g7       True
9.5.2. Enabling TLS authentication for cluster local services
Cluster-local services use the Kourier local gateway kourier-internal. If you want to use TLS traffic against the Kourier local gateway, you must configure your own server certificates in the local gateway.
Prerequisites
- You have installed the OpenShift Serverless Operator and Knative Serving.
- You have administrator permissions.
-
You have installed the OpenShift (
oc) CLI.
Procedure
Deploy server certificates in the
knative-serving-ingressnamespace:$ export san="knative"
NoteSubject Alternative Name (SAN) validation ensures that these certificates can serve requests to
<app_name>.<namespace>.svc.cluster.local.Generate a root key and certificate:
$ openssl req -x509 -sha256 -nodes -days 365 -newkey rsa:2048 \ -subj '/O=Example/CN=Example' \ -keyout ca.key \ -out ca.crtGenerate a server key that uses SAN validation:
$ openssl req -out tls.csr -newkey rsa:2048 -nodes -keyout tls.key \
  -subj "/CN=Example/O=Example" \
  -addext "subjectAltName = DNS:$san"
Create server certificates:
$ openssl x509 -req -extfile <(printf "subjectAltName=DNS:$san") \
  -days 365 -in tls.csr \
  -CA ca.crt -CAkey ca.key -CAcreateserial -out tls.crt
Configure a secret for the Kourier local gateway:
Deploy a secret in
knative-serving-ingressnamespace from the certificates created by the earlier steps:$ oc create -n knative-serving-ingress secret tls server-certs \ --key=tls.key \ --cert=tls.crt --dry-run=client -o yaml | oc apply -f -Update the
KnativeServingcustom resource (CR) spec to use the secret that the Kourier gateway created:Example
KnativeServingCR... spec: config: kourier: cluster-cert-secret: server-certs ...
The Kourier controller sets the certificate without restarting the service, so that you do not need to restart the pod.
You can access the Kourier internal service with TLS through port 443 by mounting and using the ca.crt from the client.
9.6. Kourier Gateway service type
The Kourier Gateway is exposed by default as the ClusterIP service type. This service type is determined by the service-type ingress spec in the KnativeServing custom resource (CR).
Default spec
...
spec:
  ingress:
    kourier:
      service-type: ClusterIP
...9.6.1. Setting the Kourier Gateway service type
You can override the default service type to use a load balancer service type instead by modifying the service-type spec:
LoadBalancer override spec
...
spec:
  ingress:
    kourier:
      service-type: LoadBalancer
...9.7. Using HTTP2 and gRPC
OpenShift Serverless supports only insecure or edge-terminated routes. Insecure or edge-terminated routes do not support HTTP2 on OpenShift Container Platform. These routes also do not support gRPC because gRPC is transported by HTTP2. If you use these protocols in your application, you must call the application using the ingress gateway directly. To do this you must find the ingress gateway’s public address and the application’s specific host.
9.7.1. Interacting with a serverless application using HTTP2 and gRPC
This method applies to OpenShift Container Platform 4.10 and later. For older versions, see the following section.
Prerequisites
- Install OpenShift Serverless Operator and Knative Serving on your cluster.
-
Install the OpenShift CLI (
oc). - Create a Knative service.
- Upgrade OpenShift Container Platform 4.10 or later.
- Enable HTTP/2 on OpenShift Ingress controller.
Procedure
Add the
serverless.openshift.io/default-enable-http2=trueannotation to theKnativeServingCustom Resource:$ oc annotate knativeserving <your_knative_CR> -n knative-serving serverless.openshift.io/default-enable-http2=true
After you add the annotation, verify that the
appProtocolvalue of the Kourier service ish2c:$ oc get svc -n knative-serving-ingress kourier -o jsonpath="{.spec.ports[0].appProtocol}"Example output
h2c
You can use the gRPC framework over the HTTP/2 protocol for external traffic, for example:
import "google.golang.org/grpc"

grpc.Dial(
   YOUR_URL, 1
   grpc.WithTransportCredentials(insecure.NewCredentials())), 2
)
Additional resources
9.8. Using Serving with OpenShift ingress sharding
You can use Knative Serving with OpenShift ingress sharding to split ingress traffic based on domains. This allows you to manage and route network traffic to different parts of a cluster more efficiently.
Even with OpenShift ingress sharding in place, OpenShift Serverless traffic is still routed through a single Knative Ingress Gateway and the activator component in the knative-serving project.
For more information about isolating the network traffic, see Using Service Mesh to isolate network traffic with OpenShift Serverless.
Prerequisites
- You have installed the OpenShift Serverless Operator and Knative Serving.
- You have cluster administrator permissions on OpenShift Container Platform, or you have cluster or dedicated administrator permissions on Red Hat OpenShift Service on AWS or OpenShift Dedicated.
9.8.1. Configuring OpenShift ingress shards
Before configuring Knative Serving, you must configure OpenShift ingress shards.
Procedure
Use a label selector in the
IngressControllerCR to configure OpenShift Serverless to match specific ingress shards with different domains:Example
IngressControllerCRapiVersion: operator.openshift.io/v1 kind: IngressController metadata: name: ingress-dev 1 namespace: openshift-ingress-operator spec: routeSelector: matchLabels: router: dev 2 domain: "dev.serverless.cluster.example.com" 3 # ... --- apiVersion: operator.openshift.io/v1 kind: IngressController metadata: name: ingress-prod 4 namespace: openshift-ingress-operator spec: routeSelector: matchLabels: router: prod 5 domain: "prod.serverless.cluster.example.com" 6 # ...
9.8.2. Configuring custom domains in the KnativeServing CR
After configuring OpenShift ingress shards, you must configure Knative Serving to match them.
Procedure
In the
KnativeServingCR, configure Serving to use the same domains and labels as your ingress shards by adding thespec.config.domainfield:Example
KnativeServingCRspec: config: domain: 1 dev.serverless.cluster.example.com: | selector: router: dev prod.serverless.cluster.example.com: | selector: router: prod # ...- 1
- These values need to match the values in the ingress shard configuration.
9.8.3. Targeting a specific ingress shard in the Knative Service
After configuring ingress sharding and Knative Serving, you can target a specific ingress shard in your Knative Service resources using a label.
Procedure
In your
ServiceCR, add the label selector that matches a specific shard:Example Service CR
apiVersion: serving.knative.dev/v1
kind: Service
metadata:
  name: hello-dev
  labels:
    router: dev 1
spec:
  template:
    spec:
      containers:
      - image: docker.io/openshift/hello-openshift
---
apiVersion: serving.knative.dev/v1
kind: Service
metadata:
  name: hello-prod
  labels:
    router: prod 2
spec:
  template:
    spec:
      containers:
      - image: docker.io/openshift/hello-openshift
  # ...
9.8.4. Verifying Serving with OpenShift ingress sharding configuration
After configuring ingress sharding, Knative Serving, and your service, you can verify that your service uses the correct route and the selected ingress shard.
Procedure
Print information about the services in the cluster by running the following command:
$ oc get ksvc
Example output
NAME         URL                                                             LATESTCREATED      LATESTREADY        READY   REASON
hello-dev    https://hello-dev-default.dev.serverless.cluster.example.com    hello-dev-00001    hello-dev-00001    True
hello-prod   https://hello-prod-default.prod.serverless.cluster.example.com  hello-prod-00001   hello-prod-00001   True
Verify that your service uses the correct route and the selected ingress shard by running the following command:
$ oc get route -n knative-serving-ingress -o jsonpath='{range .items[*]}{@.metadata.name}{" "}{@.spec.host}{" "}{@.status.ingress[*].routerName}{"\n"}{end}'Example output
route-19e6628b-77af-4da0-9b4c-1224934b2250-323461616533 hello-prod-default.prod.serverless.cluster.example.com ingress-prod
route-cb5085d9-b7da-4741-9a56-96c88c6adaaa-373065343266 hello-dev-default.dev.serverless.cluster.example.com ingress-dev
Chapter 10. HTTP configuration
10.1. Global HTTPS redirection
HTTPS redirection provides redirection for incoming HTTP requests. These redirected HTTP requests are encrypted. You can enable HTTPS redirection for all services on the cluster by configuring the httpProtocol spec for the KnativeServing custom resource (CR).
10.1.1. HTTPS redirection global settings
Example KnativeServing CR that enables HTTPS redirection
apiVersion: operator.knative.dev/v1beta1
kind: KnativeServing
metadata:
  name: knative-serving
spec:
  config:
    network:
      httpProtocol: "redirected"
...10.2. HTTPS redirection per service
You can enable or disable HTTPS redirection for a service by configuring the networking.knative.dev/http-option annotation.
10.2.1. Redirecting HTTPS for a service
The following example shows how you can use this annotation in a Knative Service YAML object:
apiVersion: serving.knative.dev/v1
kind: Service
metadata:
  name: example
  namespace: default
  annotations:
    networking.knative.dev/http-protocol: "redirected"
spec:
...10.3. Full duplex support for HTTP/1
You can enable the HTTP/1 full duplex support for a service by configuring the features.knative.dev/http-full-duplex annotation.
Verify your HTTP clients before enabling, as earlier version clients might not provide support for HTTP/1 full duplex.
The following example shows how you can use this annotation in a Knative Service YAML object at the revision spec level:
Example KnativeServing CR that provides full duplex support for HTTP/1
apiVersion: serving.knative.dev/v1
kind: Service
metadata:
  name: example-service
  namespace: default
spec:
  template:
    metadata:
      annotations:
        features.knative.dev/http-full-duplex: "Enabled"
...Chapter 11. Configuring access to Knative services
11.1. Configuring JSON Web Token authentication for Knative services
OpenShift Serverless does not currently have user-defined authorization features. To add user-defined authorization to your deployment, you must integrate OpenShift Serverless with Red Hat OpenShift Service Mesh, and then configure JSON Web Token (JWT) authentication and sidecar injection for Knative services.
11.2. Using JSON Web Token authentication with Service Mesh 2.x
You can use JSON Web Token (JWT) authentication with Knative services by using Service Mesh 2.x and OpenShift Serverless. To do this, you must create authentication requests and policies in the application namespace that is a member of the ServiceMeshMemberRoll object. You must also enable sidecar injection for the service.
11.2.1. Configuring JSON Web Token authentication for Service Mesh 2.x and OpenShift Serverless
Adding sidecar injection to pods in system namespaces, such as knative-serving and knative-serving-ingress, is not supported when Kourier is enabled.
For OpenShift Container Platform, if you require sidecar injection for pods in these namespaces, see the OpenShift Serverless documentation on Integrating Service Mesh with OpenShift Serverless natively.
Prerequisites
- You have installed the OpenShift Serverless Operator, Knative Serving, and Red Hat OpenShift Service Mesh on your cluster.
-
Install the OpenShift CLI (
oc). - You have created a project or have access to a project with the appropriate roles and permissions to create applications and other workloads in OpenShift Container Platform.
Procedure
Add the
sidecar.istio.io/inject="true"label to your service:Example service
apiVersion: serving.knative.dev/v1 kind: Service metadata: name: <service_name> spec: template: metadata: labels: sidecar.istio.io/inject: "true" 1 annotations: sidecar.istio.io/rewriteAppHTTPProbers: "true" 2 #...Apply the
Serviceresource:$ oc apply -f <filename>
Create a
RequestAuthenticationresource in each serverless application namespace that is a member in theServiceMeshMemberRollobject:apiVersion: security.istio.io/v1beta1 kind: RequestAuthentication metadata: name: jwt-example namespace: <namespace> spec: jwtRules: - issuer: testing@secure.istio.io jwksUri: https://raw.githubusercontent.com/istio/istio/release-1.8/security/tools/jwt/samples/jwks.jsonApply the
RequestAuthenticationresource:$ oc apply -f <filename>
Allow access to the
RequestAuthenticatonresource from system pods for each serverless application namespace that is a member in theServiceMeshMemberRollobject, by creating the followingAuthorizationPolicyresource:apiVersion: security.istio.io/v1beta1 kind: AuthorizationPolicy metadata: name: allowlist-by-paths namespace: <namespace> spec: action: ALLOW rules: - to: - operation: paths: - /metrics 1 - /healthz 2Apply the
AuthorizationPolicyresource:$ oc apply -f <filename>
For each serverless application namespace that is a member in the
ServiceMeshMemberRollobject, create the followingAuthorizationPolicyresource:apiVersion: security.istio.io/v1beta1 kind: AuthorizationPolicy metadata: name: require-jwt namespace: <namespace> spec: action: ALLOW rules: - from: - source: requestPrincipals: ["testing@secure.istio.io/testing@secure.istio.io"]Apply the
AuthorizationPolicyresource:$ oc apply -f <filename>
Verification
If you try to use a
curlrequest to get the Knative service URL, it is denied:Example command
$ curl http://hello-example-1-default.apps.mycluster.example.com/
Example output
RBAC: access denied
Verify the request with a valid JWT.
Get the valid JWT token:
$ TOKEN=$(curl https://raw.githubusercontent.com/istio/istio/release-1.8/security/tools/jwt/samples/demo.jwt -s) && echo "$TOKEN" | cut -d '.' -f2 - | base64 --decode -
Access the service by using the valid token in the
curlrequest header:$ curl -H "Authorization: Bearer $TOKEN" http://hello-example-1-default.apps.example.com
The request is now allowed:
Example output
Hello OpenShift!
11.3. Using JSON Web Token authentication with Service Mesh 1.x
You can use JSON Web Token (JWT) authentication with Knative services by using Service Mesh 1.x and OpenShift Serverless. To do this, you must create a policy in the application namespace that is a member of the ServiceMeshMemberRoll object. You must also enable sidecar injection for the service.
11.3.1. Configuring JSON Web Token authentication for Service Mesh 1.x and OpenShift Serverless
Adding sidecar injection to pods in system namespaces, such as knative-serving and knative-serving-ingress, is not supported when Kourier is enabled.
For OpenShift Container Platform, if you require sidecar injection for pods in these namespaces, see the OpenShift Serverless documentation on Integrating Service Mesh with OpenShift Serverless natively.
Prerequisites
- You have installed the OpenShift Serverless Operator, Knative Serving, and Red Hat OpenShift Service Mesh on your cluster.
-
Install the OpenShift CLI (
oc). - You have created a project or have access to a project with the appropriate roles and permissions to create applications and other workloads in OpenShift Container Platform.
Procedure
Add the
sidecar.istio.io/inject="true"label to your service:Example service
apiVersion: serving.knative.dev/v1 kind: Service metadata: name: <service_name> spec: template: metadata: labels: sidecar.istio.io/inject: "true" 1 annotations: sidecar.istio.io/rewriteAppHTTPProbers: "true" 2 #...Apply the
Serviceresource:$ oc apply -f <filename>
Create a policy in a serverless application namespace which is a member in the
ServiceMeshMemberRollobject, that only allows requests with valid JSON Web Tokens (JWT):ImportantThe paths
/metricsand/healthzmust be included inexcludedPathsbecause they are accessed from system pods in theknative-servingnamespace.apiVersion: authentication.istio.io/v1alpha1 kind: Policy metadata: name: default namespace: <namespace> spec: origins: - jwt: issuer: testing@secure.istio.io jwksUri: "https://raw.githubusercontent.com/istio/istio/release-1.6/security/tools/jwt/samples/jwks.json" triggerRules: - excludedPaths: - prefix: /metrics 1 - prefix: /healthz 2 principalBinding: USE_ORIGINApply the
Policyresource:$ oc apply -f <filename>
Verification
If you try to use a
curlrequest to get the Knative service URL, it is denied:$ curl http://hello-example-default.apps.mycluster.example.com/
Example output
Origin authentication failed.
Verify the request with a valid JWT.
Get the valid JWT token:
$ TOKEN=$(curl https://raw.githubusercontent.com/istio/istio/release-1.6/security/tools/jwt/samples/demo.jwt -s) && echo "$TOKEN" | cut -d '.' -f2 - | base64 --decode -
Access the service by using the valid token in the
curlrequest header:$ curl http://hello-example-default.apps.mycluster.example.com/ -H "Authorization: Bearer $TOKEN"
The request is now allowed:
Example output
Hello OpenShift!
Chapter 12. Configuring kube-rbac-proxy for Serving
The kube-rbac-proxy component provides internal authentication and authorization capabilities for Knative Serving.
12.1. Configuring kube-rbac-proxy resources for Serving
You can globally override resource allocation for the kube-rbac-proxy container by using the OpenShift Serverless Operator CR.
You can also override resource allocation for a specific deployment.
The following configuration sets Knative Serving kube-rbac-proxy minimum and maximum CPU and memory allocation:
KnativeServing CR example
apiVersion: operator.knative.dev/v1beta1
kind: KnativeServing
metadata:
  name: knative-serving
  namespace: knative-serving
spec:
  config:
    deployment:
      "kube-rbac-proxy-cpu-request": "10m" 1
      "kube-rbac-proxy-memory-request": "20Mi" 2
      "kube-rbac-proxy-cpu-limit": "100m" 3
"kube-rbac-proxy-memory-limit": "100Mi" 4Chapter 13. Configuring burst and QPS for net-kourier
The queries per second (QPS) and burst values determine the frequency of requests or API calls to the API server.
13.1. Configuring burst and QPS values for net-kourier
The queries per second (QPS) value determines how many client requests or API calls a client sends to the API server each second.
The burst value determines how many client requests the system can store in a buffer for processing. If requests exceed this buffer, the system drops them. This is helpful for controllers that are bursty and do not spread their requests uniformly in time.
When the net-kourier-controller restarts, it parses all ingress resources deployed on the cluster, which leads to a significant number of API calls. Due to this, the net-kourier-controller can take a long time to start.
You can adjust the QPS and burst values for the net-kourier-controller in the KnativeServing CR:
Example KnativeServing CR example
apiVersion: operator.knative.dev/v1beta1
kind: KnativeServing
metadata:
  name: knative-serving
  namespace: knative-serving
spec:
  workloads:
  - name: net-kourier-controller
    env:
    - container: controller
      envVars:
      - name: KUBE_API_BURST
        value: "200" 1
      - name: KUBE_API_QPS
value: "200" 2Chapter 14. Configuring custom domains for Knative services
14.1. Configuring a custom domain for a Knative service
Knative services are automatically assigned a default domain name based on your cluster configuration. For example, <service_name>-<namespace>.example.com. You can customize the domain for your Knative service by mapping a custom domain name that you own to a Knative service.
You can do this by creating a DomainMapping resource for the service. You can also create multiple DomainMapping resources to map multiple domains and subdomains to a single service.
14.2. Custom domain mapping
You can customize the domain for your Knative service by mapping a custom domain name that you own to a Knative service. To map a custom domain name to a custom resource (CR), you must create a DomainMapping CR that maps to an Addressable target CR, such as a Knative service or a Knative route.
14.2.1. Creating a custom domain mapping
You can customize the domain for your Knative service by mapping a custom domain name that you own to a Knative service. To map a custom domain name to a custom resource (CR), you must create a DomainMapping CR that maps to an Addressable target CR, such as a Knative service or a Knative route.
Prerequisites
- You have installed the OpenShift Serverless Operator and Knative Serving on your cluster.
-
Install the OpenShift CLI (
oc). - You have created a project or have access to a project with the appropriate roles and permissions to create applications and other workloads in OpenShift Container Platform.
You have created a Knative service and control a custom domain that you want to map to that service.
NoteYour custom domain must point to the IP address of the OpenShift Container Platform cluster.
Procedure
Create a YAML file containing the
DomainMappingCR in the same namespace as the target CR you want to map to:apiVersion: serving.knative.dev/v1beta1 kind: DomainMapping metadata: name: <domain_name> 1 namespace: <namespace> 2 spec: ref: name: <target_name> 3 kind: <target_type> 4 apiVersion: serving.knative.dev/v1
Example service domain mapping
apiVersion: serving.knative.dev/v1beta1
kind: DomainMapping
metadata:
 name: example.com
 namespace: default
spec:
 ref:
   name: showcase
   kind: Service
   apiVersion: serving.knative.dev/v1
Example route domain mapping
apiVersion: serving.knative.dev/v1beta1
kind: DomainMapping
metadata:
 name: example.com
 namespace: default
spec:
 ref:
   name: example-route
   kind: Route
   apiVersion: serving.knative.dev/v1
Apply the
DomainMappingCR as a YAML file:$ oc apply -f <filename>
14.3. Custom domains for Knative services using the Knative CLI
You can customize the domain for your Knative service by mapping a custom domain name that you own to a Knative service. You can use the Knative (kn) CLI to create a DomainMapping custom resource (CR) that maps to an Addressable target CR, such as a Knative service or a Knative route.
14.3.1. Creating a custom domain mapping by using the Knative CLI
You can use Knative CLI to map custom domains to Knative services or routes and assign branded or user-friendly URLs to your applications. Use your own domain names instead of the default cluster-generated URLs.
Prerequisites
- You have installed the OpenShift Serverless Operator and Knative Serving on your cluster.
- You have created a Knative service or route, and control a custom domain that you want to map to that CR.
- Your custom domain must point to the DNS of the OpenShift Container Platform cluster.
-
You have installed the Knative (
kn) CLI. - You have created a project or have access to a project with the appropriate roles and permissions to create applications and other workloads in OpenShift Container Platform.
Procedure
Map a domain to a CR in the current namespace:
$ kn domain create <domain_mapping_name> --ref <target_name>
You get an output similar to the following example command:
$ kn domain create example.com --ref showcase
The
--refflag specifies an Addressable target CR for domain mapping.If you do not give a prefix when using the
--refflag, the system treats the target as a Knative service in the current namespace.Map a domain to a Knative service in a specified namespace:
$ kn domain create <domain_mapping_name> --ref <ksvc:service_name:service_namespace>
You get an output similar to the following example command:
$ kn domain create example.com --ref ksvc:showcase:example-namespace
Map a domain to a Knative route:
$ kn domain create <domain_mapping_name> --ref <kroute:route_name>
You get an output similar to the following example command:
$ kn domain create example.com --ref kroute:example-route
14.4. Domain mapping using the web console
You can customize the domain for your Knative service by mapping a custom domain name that you own to a Knative service. You can use the OpenShift Container Platform web console to map a DomainMapping custom resource (CR) to a Knative service.
14.4.1. Mapping a custom domain to a service
You can map a custom domain to a Knative service by using the OpenShift Container Platform web console Developer perspective. This provides a user-friendly interface for creating domain mappings without using the command line.
Prerequisites
- You have logged in to the web console.
- You have installed the OpenShift Serverless Operator and Knative Serving on your cluster. Only a cluster administrator can complete this task.
- You have created a project or have access to a project with the appropriate roles and permissions to create applications and other workloads in OpenShift Container Platform.
You have created a Knative service and control a custom domain that you want to map to that service.
NoteYour custom domain must point to the IP address of the OpenShift Container Platform cluster.
Procedure
- Navigate to the Topology page.
-
Right-click the service you want to map to a domain, and select the Edit option that has the service name. For example, if the service is
showcasenamed, select the Edit showcase option. In the Advanced options section, click Show advanced Routing options.
- If the domain mapping CR that you want to map to the service already exists, you can select it in the Domain mapping list.
-
If you want to create a new domain mapping CR, type the domain name into the box, and select the Create option. For example, if you type in
example.com, the Create option is Create "example.com".
- Click Save to save the changes to your service.
Verification
- Navigate to the Topology page.
- Click the service that you have created.
- In the Resources tab of the service information window, you can see the domain you have mapped to the service listed under Domain mappings.
14.4.2. Restricting cipher suites
When you specify net-kourier for ingress and use DomainMapping, the TLS for OpenShift routing is set to passthrough, and TLS is handled by the Kourier Gateway. In such cases, you might need to restrict which TLS cipher suites for Kourier are allowed for users.
Prerequisites
- You have logged in to the web console.
- You have installed the OpenShift Serverless Operator.
- You have installed Knative Serving.
You have created a project or have access to a project with the appropriate roles and permissions to create applications and other workloads.
NoteYour custom domain must point to the IP address of the cluster.
Procedure
In the
KnativeServingCR, use thecipher-suitesvalue to specify the cipher suites you want to enable:KnativeServing CR example
spec: config: kourier: cipher-suites: ECDHE-ECDSA-AES128-GCM-SHA256,ECDHE-ECDSA-CHACHA20-POLY1305Other cipher suites will be disabled. You can specify multiple suites by separating them with commas.
NoteThe Kourier Gateway’s container image utilizes the Envoy proxy image, and the default enabled cipher suites depend on the version of the Envoy proxy.
14.5. Securing a mapped service using a TLS certificate
14.5.1. Securing a service with a custom domain by using a TLS certificate
After you have configured a custom domain for a Knative service, you can use a TLS certificate to secure the mapped service. To do this, you must create a Kubernetes TLS secret, and then update the DomainMapping CR to use the TLS secret that you have created.
Prerequisites
-
You configured a custom domain for a Knative service and have a working
DomainMappingCR. - You have a TLS certificate from your Certificate Authority provider or a self-signed certificate.
-
You have obtained the
certandkeyfiles from your Certificate Authority provider, or a self-signed certificate. -
Install the OpenShift CLI (
oc).
Procedure
Create a Kubernetes TLS secret:
$ oc create secret tls <tls_secret_name> --cert=<path_to_certificate_file> --key=<path_to_key_file>
Add the
networking.internal.knative.dev/certificate-uid: <id>`label to the Kubernetes TLS secret:$ oc label secret <tls_secret_name> networking.internal.knative.dev/certificate-uid="<id>"
If you use a third-party secret provider such as
cert-manager, configure your secret manager to label the Kubernetes TLS secret automatically. If you usecert-manager, you can use the provided secret template to automatically generate secrets with the correct label. In this case, the system filters secrets based only on the key, but the value can include useful information, such as the certificate ID contained in the secret.NoteThe cert-manager Operator for Red Hat OpenShift is a Technology Preview feature. For more information, see the Installing the cert-manager Operator for Red Hat OpenShift documentation.
Update the
DomainMappingCR to use the TLS secret that you have created:apiVersion: serving.knative.dev/v1beta1 kind: DomainMapping metadata: name: <domain_name> namespace: <namespace> spec: ref: name: <service_name> kind: Service apiVersion: serving.knative.dev/v1 # TLS block specifies the secret to be used tls: secretName: <tls_secret_name>
Verification
Verify that the
DomainMappingCR status isTrue, and that theURLcolumn of the output shows the mapped domain with the schemehttps:$ oc get domainmapping <domain_name>
Example output
NAME                      URL                               READY   REASON
example.com               https://example.com               True
Optional: If the service is publicly exposed, verify its availability by running the following command:
$ curl https://<domain_name>
If the certificate is self-signed, skip verification by adding the
-kflag to thecurlcommand.
14.5.2. Improving net-kourier memory usage by using secret filtering
By default, the Content from aly.arriqaaq.com is not included.informers implementation for the Kubernetes client-go library fetches all resources of a particular type. This can lead to a substantial overhead when many resources are available, which can cause the Knative net-kourier ingress controller to fail on large clusters due to memory leaking. However, a filtering mechanism is available for the Knative net-kourier ingress controller, which enables the controller to only fetch Knative related secrets.
The secret filtering is enabled by default on the OpenShift Serverless Operator side. An environment variable, ENABLE_SECRET_INFORMER_FILTERING_BY_CERT_UID=true, is added by default to the net-kourier controller pods.
If you enable secret filtering, all of your secrets need to be labeled with networking.internal.knative.dev/certificate-uid: "<id>". Otherwise, Knative Serving does not detect them, which leads to failures. You must label both new and existing secrets.
Prerequisites
- You have cluster administrator permissions on OpenShift Container Platform, or you have cluster or dedicated administrator permissions on Red Hat OpenShift Service on AWS or OpenShift Dedicated.
- A project that you created or that you have roles and permissions for to create applications and other workloads.
- Install the OpenShift Serverless Operator and Knative Serving.
-
Install the OpenShift CLI (
oc).
You can disable the secret filtering by setting the ENABLE_SECRET_INFORMER_FILTERING_BY_CERT_UID variable to false by using the workloads field in the KnativeServing custom resource (CR).
Example KnativeServing CR
apiVersion: operator.knative.dev/v1beta1
kind: KnativeServing
metadata:
  name: knative-serving
  namespace: knative-serving
spec:
...
  workloads:
    - env:
        - container: controller
          envVars:
            - name: ENABLE_SECRET_INFORMER_FILTERING_BY_CERT_UID
              value: 'false'
name: net-kourier-controllerChapter 15. High availability configuration for Knative Serving
15.1. High availability for Knative services
High availability (HA) is a standard feature of Kubernetes APIs that helps to ensure that APIs stay operational if a disruption occurs. In an HA deployment, if an active controller crashes or is deleted, another controller is readily available. This controller takes over processing of the APIs that were being serviced by the controller that is now unavailable.
HA in OpenShift Serverless is available through leader election, which is enabled by default after the Knative Serving or Eventing control plane is installed. When using a leader election HA pattern, instances of controllers are already scheduled and running inside the cluster before they are required. These controller instances compete to use a shared resource, known as the leader election lock. The instance of the controller that has access to the leader election lock resource at any given time is called the leader.
15.2. High availability for Knative deployments
High availability (HA) is available by default for the Knative Serving activator, autoscaler, autoscaler-hpa, controller, webhook, domain-mapping, domainmapping-webhook, kourier-control, and kourier-gateway components, which are configured to have two replicas each. You can change the number of replicas for these components by modifying the spec.high-availability.replicas value in the KnativeServing custom resource (CR).
15.2.1. Configuring high availability replicas for Knative Serving
To specify three minimum replicas for the eligible deployment resources, set the value of the field spec.high-availability.replicas in the custom resource to 3.
Prerequisites
- You have cluster administrator permissions on OpenShift Container Platform, or you have cluster or dedicated administrator permissions on Red Hat OpenShift Service on AWS or OpenShift Dedicated.
- You have installed the OpenShift Serverless Operator and Knative broker for Apache Kafka on your cluster.
Procedure
- In the OpenShift Container Platform web console, navigate to OperatorHub → Installed Operators.
-
Select the
knative-servingnamespace. - Click Knative Serving in the list of Provided APIs for the OpenShift Serverless Operator to go to the Knative Serving tab.
- Click knative-serving, then go to the YAML tab in the knative-serving page.
Change the number of replicas in the
KnativeServingCR:Example YAML
apiVersion: operator.knative.dev/v1beta1 kind: KnativeServing metadata: name: knative-serving namespace: knative-serving spec: high-availability: replicas: 3You can also specify the number of replicas for a specific workload.
NoteWorkload-specific configuration overrides the global setting for Knative Serving.
Example YAML
apiVersion: operator.knative.dev/v1beta1 kind: KnativeServing metadata: name: knative-serving namespace: knative-serving spec: high-availability: replicas: 3 workloads: - name: webhook replicas: 4Verify that the deployment respects the high availability limits:
Example command
$ oc get hpa -n knative-serving
Example output
NAME        REFERENCE              TARGETS   MINPODS   MAXPODS   REPLICAS   AGE
activator   Deployment/activator   0%/100%   3         22        3          2m24s
webhook     Deployment/webhook     2%/100%   4         8         4          2m23s
15.2.2. Overriding disruption budgets
A Pod Disruption Budget (PDB) is a standard feature of Kubernetes APIs that helps limit the disruption to an application when its pods need to be rescheduled for maintenance reasons.
Procedure
-
Override the default PDB for a specific resource by modifying the
minAvailableconfiguration value in theKnativeServingcustom resource (CR).
Example PDB with a minAvailable seting of 70%
apiVersion: operator.knative.dev/v1beta1
kind: KnativeServing
metadata:
 name: knative-serving
 namespace: knative-serving
spec:
 podDisruptionBudgets:
 - name: activator-pdb
   minAvailable: 70%
If you disable high-availability, for example, by changing the high-availability.replicas value to 1, make sure you also update the corresponding PDB minAvailable value to 0. Otherwise, the pod disruption budget prevents automatic cluster or Operator updates.
Chapter 16. Tuning serving configuration
16.1. Overriding Knative Serving system deployment configurations
You can override the default configurations for some specific deployments by modifying the workloads spec in the KnativeServing custom resources (CRs).
16.1.1. Overriding system deployment configurations
Currently, overriding default configuration settings is supported for the resources, replicas, labels, annotations, and nodeSelector fields, and for the readiness and liveness fields for probes.
In the following example, a KnativeServing CR overrides the webhook deployment so that:
-
The
readinessprobe timeout fornet-kourier-controlleris 10 seconds. - The deployment specifies CPU and memory resource limits.
- The deployment runs with 3 replicas.
-
The deployment includes the
example-label: labellabel. -
The deployment includes the
example-annotation: annotationannotation. -
The
nodeSelectorfield selects nodes with thedisktype: hddlabel.
The KnativeServing CR label and annotation settings override the deployment’s labels and annotations for both the deployment itself and the resulting pods.
KnativeServing CR example
apiVersion: operator.knative.dev/v1beta1
kind: KnativeServing
metadata:
  name: ks
  namespace: knative-serving
spec:
  high-availability:
    replicas: 2
  workloads:
  - name: net-kourier-controller
    readinessProbes: 1
      - container: controller
        timeoutSeconds: 10
  - name: webhook
    resources:
    - container: webhook
      requests:
        cpu: 300m
        memory: 60Mi
      limits:
        cpu: 1000m
        memory: 1000Mi
    replicas: 3
    labels:
      example-label: label
    annotations:
      example-annotation: annotation
    nodeSelector:
disktype: hdd- 1
- You can use the
readinessandlivenessprobe overrides to override all fields of a probe in a container of a deployment as specified in the Kubernetes API except for the fields related to the probe handler:exec,grpc,httpGet, andtcpSocket.
Chapter 17. Configuring Queue Proxy resources
The Queue Proxy is a sidecar container to each application container within a service. It improves managing Serverless workloads, ensuring efficient resource usage. You can configure the Queue Proxy.
17.1. Configuring Queue Proxy resources for a Knative Service
In addition to configuring Queue Proxy resource requests and limits globally in the deployment config map, you can also configure them at the service level. Use the corresponding annotations for CPU, memory, and ephemeral storage resource types.
Prerequisites
- You have installed Red Hat OpenShift Pipelines on your cluster.
-
You have installed the OpenShift (
oc) CLI. -
You have installed the Knative (
kn) CLI.
Procedure
Change the config map of your service with resource requests and limits:
apiVersion: serving.knative.dev/v1 kind: Service metadata: name: example-service namespace: default spec: template: metadata: annotations: queue.sidecar.serving.knative.dev/cpu-resource-request: "1" queue.sidecar.serving.knative.dev/cpu-resource-limit: "2" queue.sidecar.serving.knative.dev/memory-resource-request: "1Gi" queue.sidecar.serving.knative.dev/memory-resource-limit: "2Gi" queue.sidecar.serving.knative.dev/ephemeral-storage-resource-request: "400Mi" queue.sidecar.serving.knative.dev/ephemeral-storage-resource-limit: "450Mi"You can use the special
queue.sidecar.serving.knative.dev/resource-percentageannotation to calculateQueue Proxyresources as a percentage of the application container. When CPU and memory resource requirements calculated from the application container requirements fall outside the following boundaries, the system adjusts the values to fit within the boundaries. In this case, the system applies the following minimum and maximum boundaries to the CPU and memory resource requirements.Table 17.1. Resource requirements boundaries
Resource requirements Min Max CPU request
25m
100m
CPU limit
40m
500m
Memory request
50Mi
200Mi
Memory limit
200Mi
500Mi
NoteIf you simultaneously set a percentage annotation and a specific resource value using the corresponding resource annotation, then the latter takes precedence.
WarningThe
queue.sidecar.serving.knative.dev/resource-percentageannotation is now deprecated, and a future version of OpenShift Serverless will remove it.