Tutorials
Red Hat OpenShift Service on AWS tutorials
Abstract
Chapter 1. Tutorials overview
Use the step-by-step tutorials from Red Hat experts to get the most out of your Managed OpenShift cluster.
This content is authored by Red Hat experts but has not yet been tested on every supported configuration.
Chapter 2. Tutorial: Activate Red Hat OpenShift Service on AWS and link your account
Before deploying your first cluster, activate your Red Hat OpenShift Service on AWS subscription, link your AWS and Red Hat accounts, and select the correct billing account.
If you have received a private offer for the product, make sure to proceed according to the instructions provided with the private offer before following this tutorial. The private offer is designed either for a case when the product is already activated, which replaces an active subscription, or for first time activations.
2.1. Enable the subscription and set up your AWS account
Activate Red Hat OpenShift Service on AWS on the AWS console page to enable billing and metering for the service.
Prerequisites
You are logged in to the Red Hat account that you want to associate with the AWS account that will activate the Red Hat OpenShift Service on AWS product subscription.
The AWS account used for service billing can only be associated with a single Red Hat account. Typically, an AWS payer account is the one that is used to subscribe to Red Hat OpenShift Service on AWS and used for account linking and billing.
All team members within the same Red Hat organization can use the linked AWS account for service billing while creating Red Hat OpenShift Service on AWS clusters.
Procedure
Click the Get started button on Content from console.aws.amazon.com is not included.AWS console page:
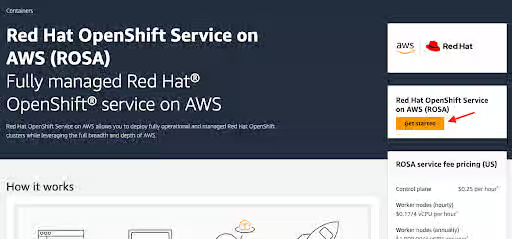
If you have activated Red Hat OpenShift Service on AWS before but did not complete the process, you can click the button and complete the account linking as described in the following steps.
Confirm that you want your contact information to be shared with Red Hat and enable the service:
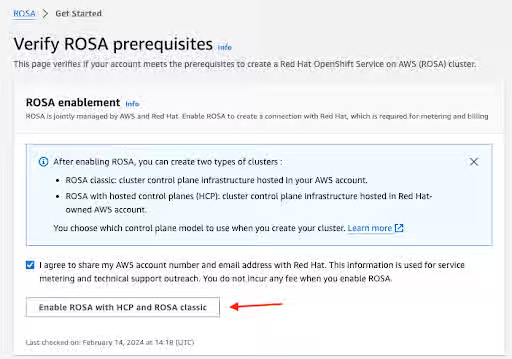
You are not charged by enabling the service in this step. The connection is made for billing and metering that takes place only after you deploy your first cluster. This could take a few minutes.
Verify that the process completed successfully by reviewing the confirmation message:
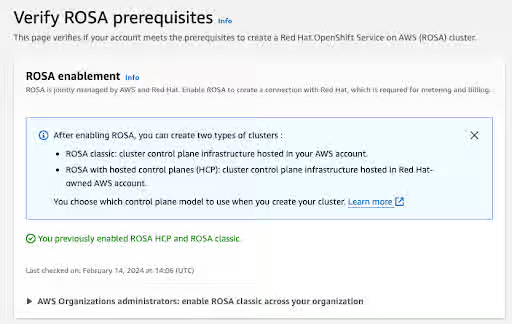
Check the status of additional prerequisites on this verification page. If any prerequisites are not met, a corresponding message is shown. The following is an example of insufficient quotas in the selected region:
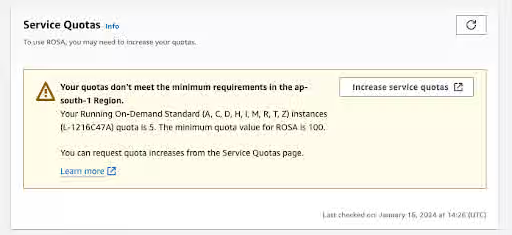
- Click the Increase service quotas button or use the Learn more link to get more information about how to manage service quotas. In the case of insufficient quotas, note that quotas are region-specific. You can use the region switcher to re-run the quota check for any region you are interested in and then submit service quota increase requests as needed.
Confirm that all the prerequisites are met:
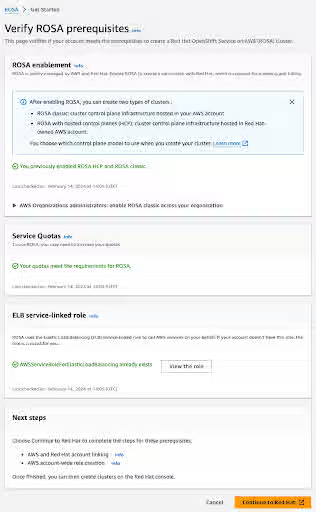
The Elastic Load Balancing (ELB) service-linked role is created for you automatically. You can click any of the small Info blue links to get context-sensitive help and resources.
2.2. Link AWS and Red Hat accounts and subscriptions
Link your AWS and Red Hat accounts to associate your Red Hat OpenShift Service on AWS subscription with a billing account.
Procedure
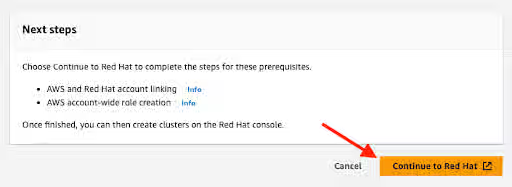
Click the Continue to Red Hat button to proceed with account linking:
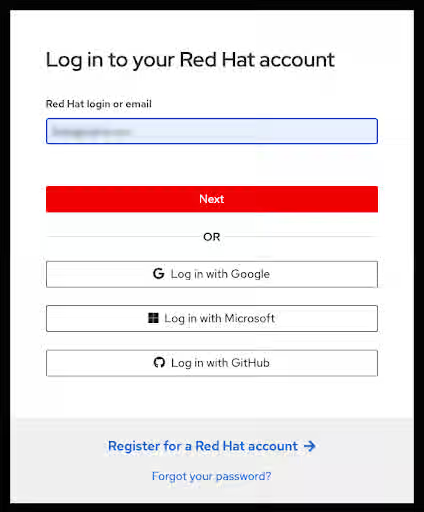
Log in to your Red Hat account, if prompted.
 Note
NoteYour AWS account must be linked to a single Red Hat organization.
- You can also register for a new Red Hat account or reset your password on this page.
- Log in to the Red Hat account that you want to associate with the AWS account that has activated the Red Hat OpenShift Service on AWS product subscription.
- The AWS account used for service billing can only be associated with a single Red Hat account. Typically, an AWS payer account is the one that is used to subscribe to Red Hat OpenShift Service on AWS and used for account linking and billing.
- All team members within the same Red Hat organization can use the linked AWS account for service billing while creating Red Hat OpenShift Service on AWS clusters.
Complete the Red Hat account linking after reviewing the terms and conditions.
NoteThis step is available only if the AWS account was not linked to any Red Hat account before.
This step is skipped if the AWS account is already linked to the user’s logged in Red Hat account.
If the AWS account is linked to a different Red Hat account, an error is displayed. See Correcting Billing Account Information for HCP clusters for troubleshooting.
On the Complete your account connection page, verify that the Red Hat and AWS account numbers are correct.
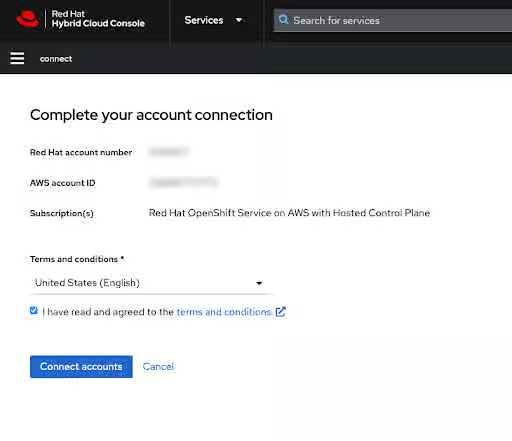
Click the Connect accounts button if you agree with the service terms.
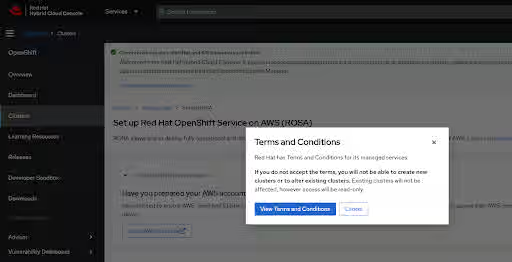
If this is the first time you are using the Red Hat Hybrid Cloud Console, you must agree with the general managed services terms and conditions before creating the first cluster:
Additional terms that need to be reviewed and accepted are shown after clicking the View Terms and Conditions button:
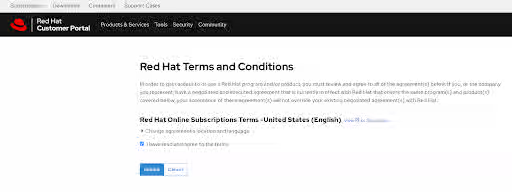
Submit your agreement once you have reviewed any additional terms when prompted at this time.
The Hybrid Cloud Console provides a confirmation that AWS account setup was completed and lists the prerequisites for cluster deployment:
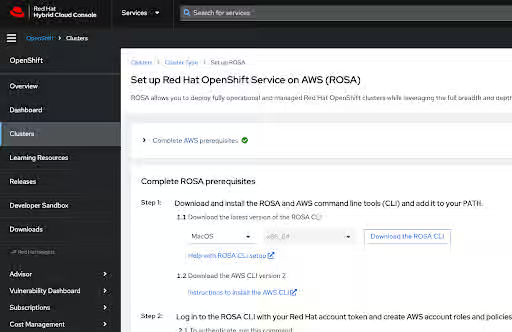
The last section of this page shows cluster deployment options, either using the ROSA command-line interface (CLI) (
rosa) or through the web console: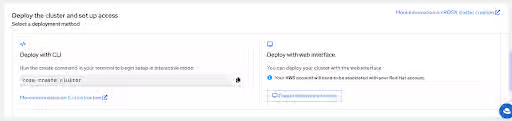
2.3. Select the AWS billing account during cluster deployment using the CLI
When deploying your cluster using ROSA command-line interface (CLI) (rosa), you must select the correct AWS billing account for Red Hat OpenShift Service on AWS.
Prerequisites
- You have installed the most recent ROSA CLI.
- You have installed the most recent Content from aws.amazon.com is not included.AWS CLI.
- You have completed the steps in Link AWS and Red Hat accounts and subscriptions.
Procedure
Initiate the cluster deployment using the
rosa create clustercommand. You can click the copy button on the This content is not included.Set up Red Hat OpenShift Service on AWS console page and paste the command in your terminal. This launches the cluster creation process in interactive mode.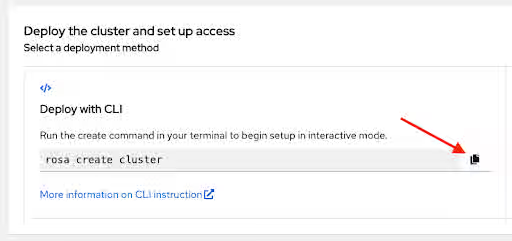
Optional: Add the
--profile <profile_name>option to therosa create clustercommand to use a non-default profile from your~/.aws/credentialsfile, for example:$ rosa create cluster --profile stage
If no profile is specified, the default AWS CLI profile determines the AWS infrastructure profile into which the cluster is deployed.
Specify the billing AWS account.
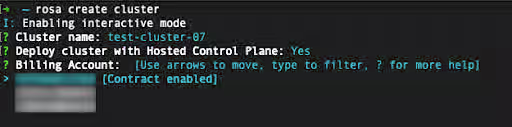
- Only AWS accounts that are linked to the user’s logged in Red Hat account are shown.
- The specified AWS account is charged for using the Red Hat OpenShift Service on AWS service.
An indicator shows if the Red Hat OpenShift Service on AWS contract is enabled or not enabled for a given AWS billing account.
- If you select an AWS billing account that shows the Contract enabled label, on-demand consumption rates are charged only after the capacity of your pre-paid contract is consumed.
- AWS accounts without the Contract enabled label are charged the applicable on-demand consumption rates.
2.4. Select the AWS billing account during cluster deployment using the web console
When deploying your cluster using OpenShift Cluster Manager, you must select the correct AWS billing account for Red Hat OpenShift Service on AWS.
Procedure
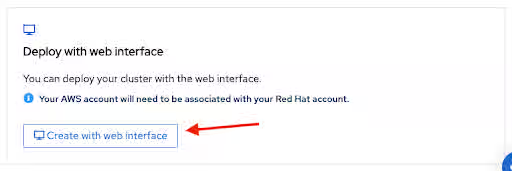
To start creating a cluster, select Create with web interface of the introductory Set up Red Hat OpenShift Service on AWS page.
 Note
NoteComplete the prerequisites before starting the web console deployment process.
The ROSA command-line interface (CLI) (
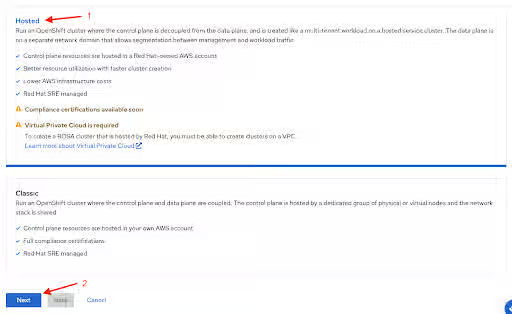
rosa) is required for certain tasks, such as creating the account roles. If you are deploying Red Hat OpenShift Service on AWS for the first time, follow the CLI steps until running therosa whoamicommand, before starting the web console deployment steps.Select the Hosted control plane option, then click Next.
In the next step Accounts and roles, specify the infrastructure AWS account, into which the Red Hat OpenShift Service on AWS cluster is deployed and where the resources are consumed and managed.
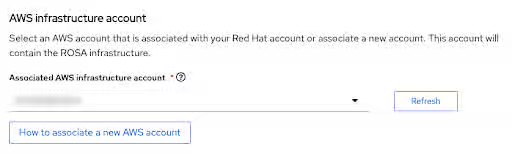
- Click the How to associate a new AWS account, if you don’t see the account into which you want to deploy the Red Hat OpenShift Service on AWS cluster for detailed information on how to create or link account roles for this association.
- The ROSA CLI is used for this.
-
If you are using multiple AWS accounts and have their profiles configured for the AWS CLI, you can use the
--profileselector to specify the AWS profile when working with the ROSA CLI commands.
Select the AWS billing account.
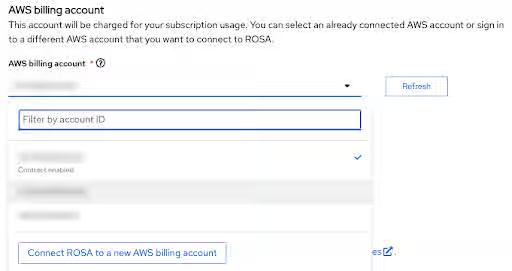
- Only AWS accounts that are linked to the user’s logged in Red Hat account are shown.
- The specified AWS account is charged for using the Red Hat OpenShift Service on AWS service.
An indicator shows if the Red Hat OpenShift Service on AWS contract is enabled or not enabled for a given AWS billing account.
- If you select an AWS billing account that shows the Contract enabled label, on-demand consumption rates are charged only after the capacity of your pre-paid contract is consumed.
AWS accounts without the Contract enabled label are charged the applicable on-demand consumption rates.
NoteThe following steps past the billing AWS account selection are beyond the scope of this tutorial.
2.5. Additional resources
Chapter 3. Tutorial: Accept and share a private offer for Red Hat OpenShift Service on AWS
Accept a private offer for Red Hat OpenShift Service on AWS and share the offer entitlement with team members in your Red Hat organization to ensure they can use the offer for the clusters they provision.
Red Hat OpenShift Service on AWS costs are composed of the AWS infrastructure costs and the Red Hat OpenShift Service on AWS service costs. AWS infrastructure costs, such as the EC2 instances that are running the needed workloads, are charged to the AWS account where the infrastructure is deployed. Red Hat OpenShift Service on AWS service costs are charged to the AWS account specified as the "AWS billing account" when deploying a cluster.
The cost components can be billed to different AWS accounts. Detailed description of how the Red Hat OpenShift Service on AWS service cost and AWS infrastructure costs are calculated can be found on the "Pricing" page linked in the Additional resources.
3.1. Accept a private offer
Accept a private offer for Red Hat OpenShift Service on AWS by reviewing available offers and selecting a new offer or upgrading an existing one.
Prerequisites
- You are logged in using the AWS account that was specified as the buyer. Attempting to access the offer using another AWS account produces a "Page not found" error message.
Procedure
- Open the private offer URL provided by the seller. You can only access the URL from the AWS account ID that was specified by the seller.
On the Offer selection page, review Available offers. Options can include:
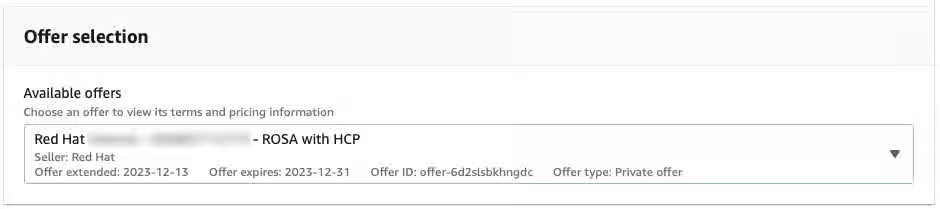
A regular private offer that is pre-selected. This type of offer can be accepted only if Red Hat OpenShift Service on AWS was not activated before using the public offer or another private offer.
A private offer that was created for an AWS account that previously activated Red Hat OpenShift Service on AWS using the public offer. The selected private offer is labeled as Upgrade and accepting this offer replaces the currently running contract for Red Hat OpenShift Service on AWS.
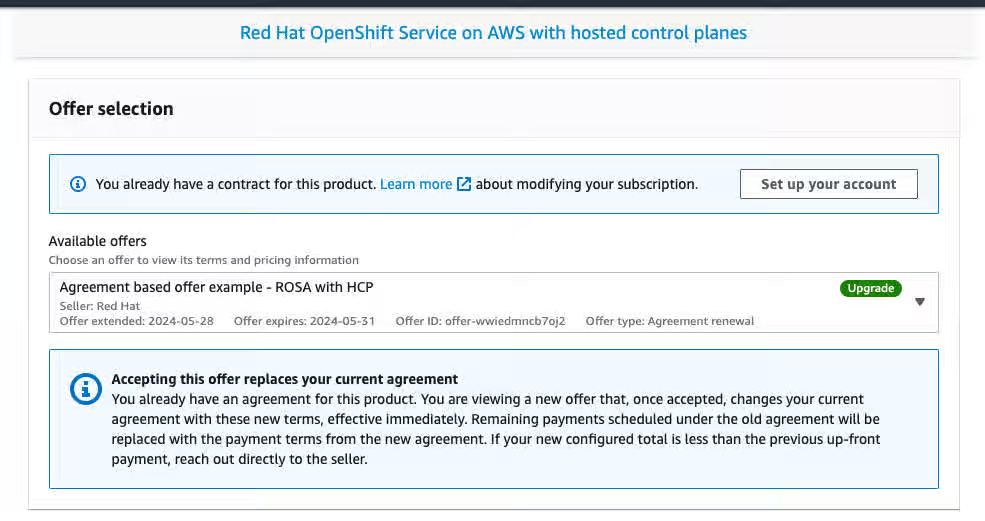
If multiple offers are available, the public offer activated earlier is shown together with the newly provided agreement-based offer that is labeled as "Upgrade".
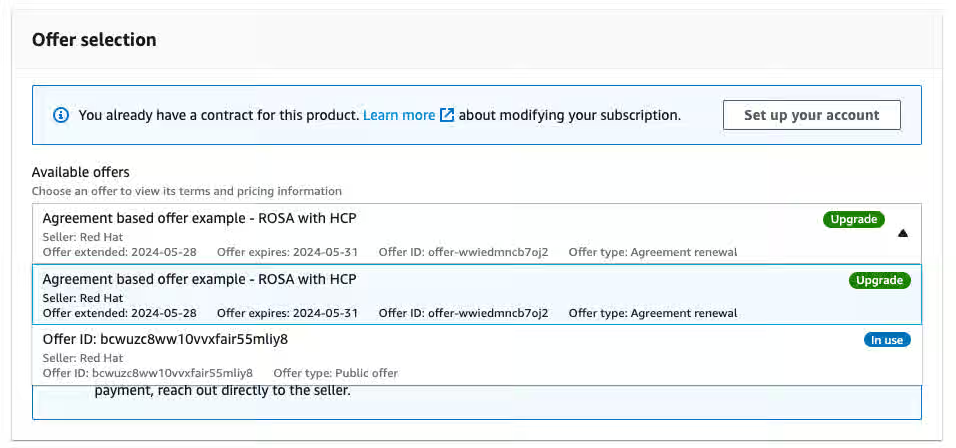
Verify that your offer configuration is selected and review the offer details.
NoteReview the contract end date, the number of units included with the offer, and the payment schedule. In this example, 1 cluster and up to 3 nodes utilizing 4 vCPUs are included.
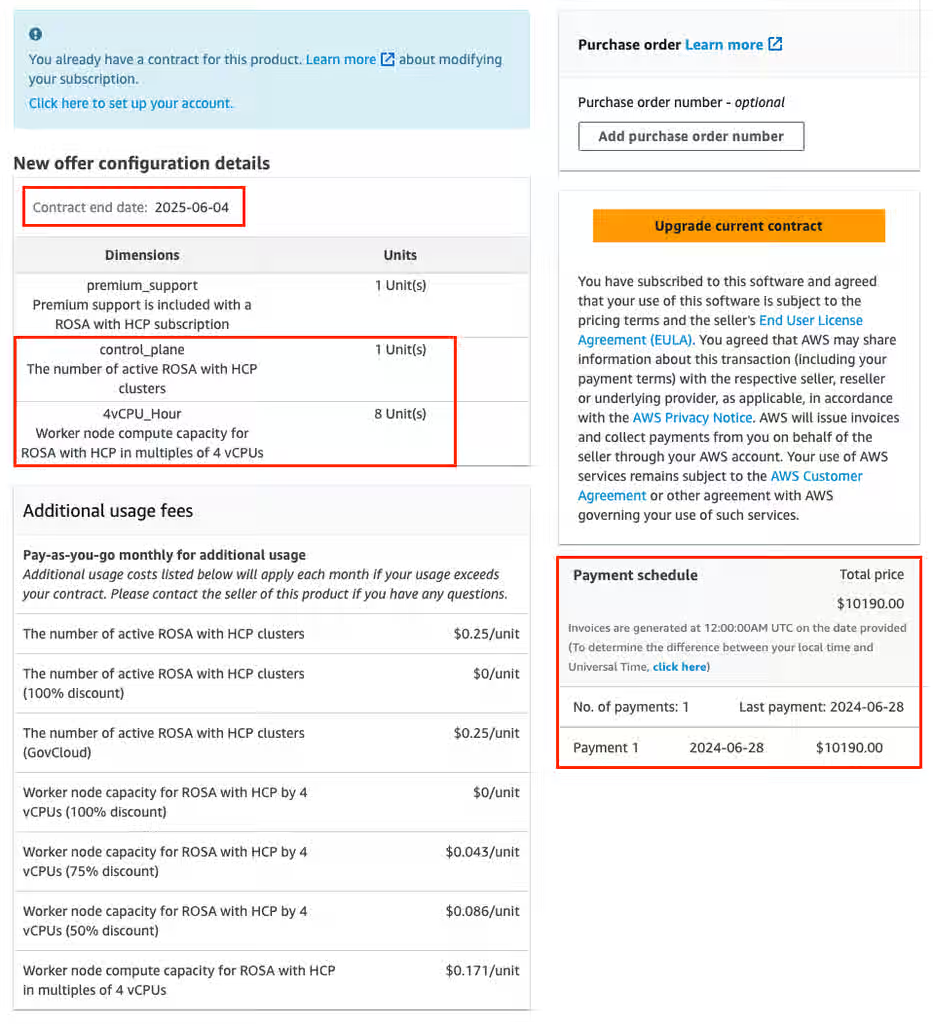
Optional: Content from docs.aws.amazon.com is not included.Add your own purchase order (PO) number to the subscription that is being purchased, so it is included on your subsequent AWS invoices. Also, check the "Additional usage fees" that are charged for any usage above the scope of the "New offer configuration details".
NotePrivate offers have several available configurations.
- It is possible that the private offer you are accepting is set up with a fixed future start date.
- If you do not have another active Red Hat OpenShift Service on AWS subscription at the time of accepting the private offer, a public offer or an older private offer entitlement, accept the private offer itself and continue with the account linking and cluster deployment steps after the specified service start date.
You must have an active Red Hat OpenShift Service on AWS entitlement to complete these steps. Service start dates are always reported in the UTC time zone
Create or upgrade your contract.
For private offers accepted by an AWS account that does not have Red Hat OpenShift Service on AWS activated yet and is creating the first contract for this service, click the Create contract button.

For agreement-based offers, click the Upgrade current contract button shown in Figures 4 and 6.

Click Confirm.
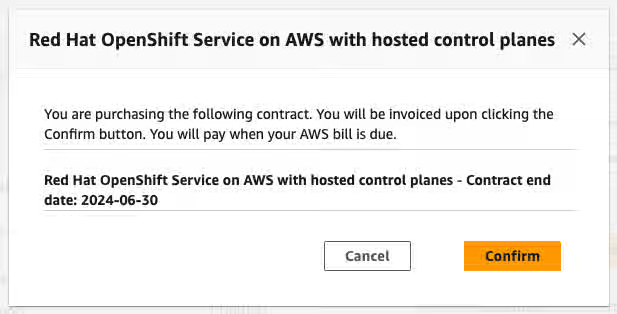
If the accepted private offer service start date is set to be immediately following the offer acceptance, click the Set up your account button in the confirmation modal window.
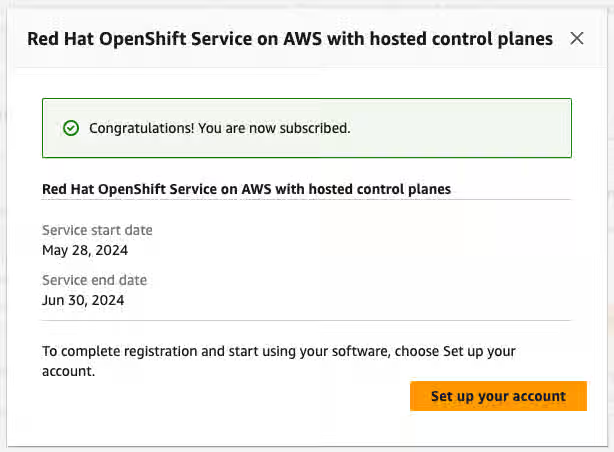
If the accepted private offer has a future start date specified, return to the private offer page after the service start date, and click the Setup your account button to proceed with the Red Hat and AWS account linking.
NoteWith no agreement active, the account linking described below is not triggered, the "Account setup" process can be done only after the "Service start date".
These are always in UTC time zone.
3.2. Share a private offer
You can share a private offer with other team members within your Red Hat organization account.
Red Hat OpenShift Service on AWS entitlement is shared with other team members through your Red Hat organization account. All existing users in the same Red Hat organization can select the billing AWS account that accepted the private offer. You can This content is not included.manage users in your Red Hat organization, when logged in as the Red Hat organization administrator, and invite or create new users.
Procedure
Click Set up your account to proceed to the AWS and Red Hat account linking step. At this time, you are already logged in with the AWS account that accepted the offer. Log in to a Red Hat account, if prompted.
NoteA Red Hat OpenShift Service on AWS private offer cannot be shared with AWS linked accounts through the AWS License Manager.
- Add any users that you want to deploy Red Hat OpenShift Service on AWS clusters. Check Common User Management Questions for more details about Red Hat account user management tasks.
- Verify that the already logged in Red Hat account includes all users that are meant to be Red Hat OpenShift Service on AWS cluster deployers benefiting from the accepted private offer.
Verify that the Red Hat account number and the AWS account ID are the desired accounts that are to be linked. This linking is unique and a Red Hat account can be connected only with a single AWS (billing) account.
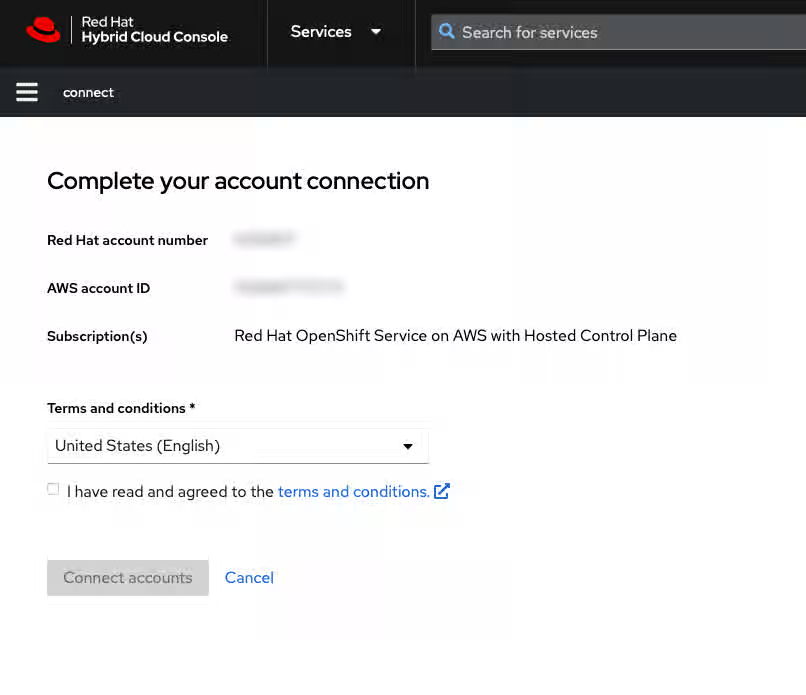
To link the AWS account with another Red Hat account, log out from the Red Hat Hybrid Cloud Console before connecting the accounts. Repeat the step of setting the account by returning to the private offer URL that is already accepted.
An AWS account can be connected with a single Red Hat account only. Once Red Hat and AWS accounts are connected, this cannot be changed by the user. If a change is needed, the user must create a support ticket.
- Agree to the terms and conditions and then click Connect accounts.
3.3. Select the AWS billing account
When deploying Red Hat OpenShift Service on AWS clusters, verify that end users select the AWS billing account that accepted the private offer.
Procedure
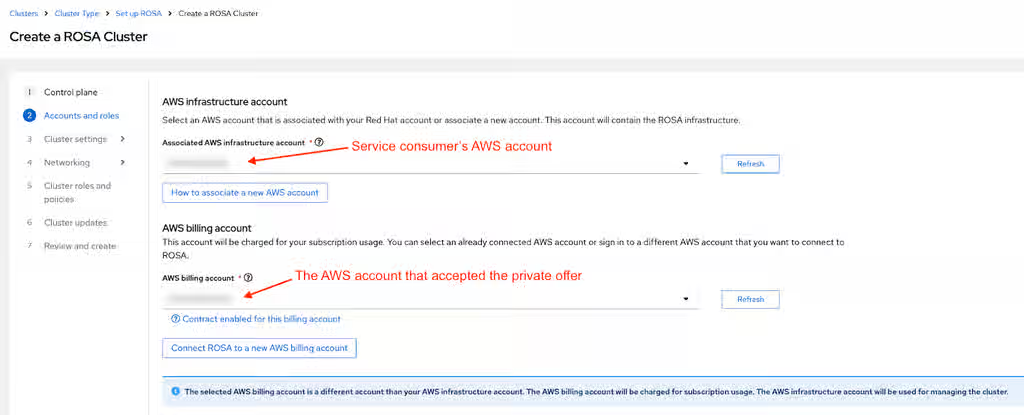
When using the web interface to deploy Red Hat OpenShift Service on AWS, verify that the AWS billing account drop-down is set to the AWS account that accepted the private offer if the purchased quota is intended for the cluster you are creating.
- The associated AWS infrastructure account is typically set to the AWS account ID used by the administrator of the cluster that is being created.
- This can be the same AWS account as the billing AWS account.
- AWS resources are deployed into this account and all the billing associated with those resources is processed accordingly.
If different AWS accounts are selected as the infrastructure and billing accounts, an informative note is displayed.
3.4. Private offer troubleshooting
Review solutions for the most frequent issues associated with private offer acceptance and Red Hat account linking.
3.4.1. Accessing a private offer using a different AWS account
If you try accessing the private offer when logged in under an AWS account ID that is not defined in the offer, and see the "Page not found" message, then verify that you are logged in as the desired AWS billing account.
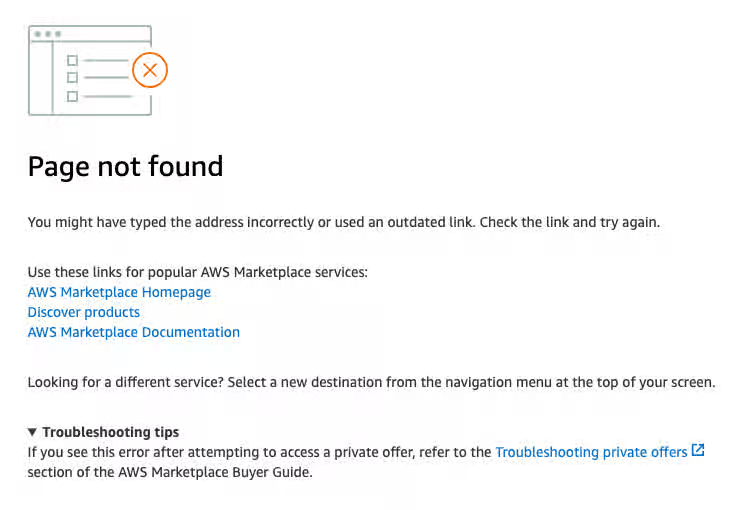
- Contact the seller if you need the private offer to be extended to another AWS account.
3.4.2. The private offer cannot be accepted because of an active subscription
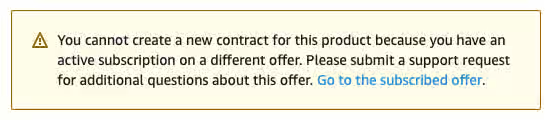
If you try accessing a private offer that was created for the first-time Red Hat OpenShift Service on AWS activation, while you already have Red Hat OpenShift Service on AWS activated using another public or private offer, and see the following notice, then contact the seller who provided you with the offer.
The seller can provide you with a new offer that will seamlessly replace your current agreement, without a need to cancel your previous subscription.
3.4.3. The AWS account is already linked to a different Red Hat account
If you see the error message "AWS account is already linked to a different Red Hat account" when you try to connect the AWS account that accepted the private offer with a presently logged-in Red Hat user, then the AWS account is already connected to another Red Hat user.
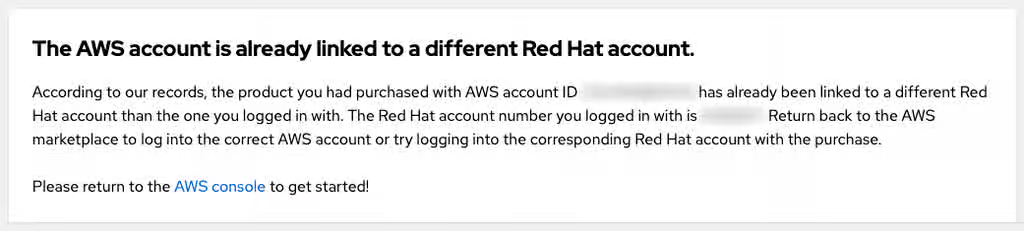
You can either log in using another Red Hat account or another AWS account.
- However, since this guide pertains to private offers, the assumption is that you are logged in with the AWS account that was specified as the buyer and already accepted the private offer so it is intended to be used as the billing account. Logging in as another AWS account is not expected after a private offer was accepted.
- You can still log in with another Red Hat user which is already connected to the AWS account that accepted the private offer. Other Red Hat users belonging to the same Red Hat organization are able to use the linked AWS account as the Red Hat OpenShift Service on AWS AWS billing account when creating clusters.
- If you believe that the existing account linking might not be correct, see the "My team members belong to different Red Hat organizations" question for tips on how you can proceed.
3.4.4. My team members belong to different Red Hat organizations
- An AWS account can be connected to a single Red Hat account only. Any user that wants to create a cluster and benefit from the private offer granted to this AWS account needs to be in the same Red Hat account. This can be achieved by inviting the user to the same Red Hat account and creating a new Red Hat user.
3.4.5. Incorrect AWS billing account was selected when creating a cluster
- If the user selected an incorrect AWS billing account, the fastest way to fix this is to delete the cluster and create a new one, while selecting the correct AWS billing account.
- If this is a production cluster that cannot be easily deleted, contact Red Hat support to change the billing account for an existing cluster. Expect some turnaround time for this to be resolved.
3.5. Additional resources
Chapter 4. Tutorial: Deploy Red Hat OpenShift Service on AWS with a custom DNS resolver
Use a custom Dynamic Host Configuration Protocol (DHCP) option set to customize your Virtual Private Cloud (VPC) with your own Domain Name System (DNS) server, domain name, and more. Red Hat OpenShift Service on AWS clusters support using custom DHCP option sets.
By default, Red Hat OpenShift Service on AWS clusters require setting the "domain name servers" option to AmazonProvidedDNS to ensure successful cluster creation and operation. If you want to use custom DNS servers for DNS resolution, you must do additional configuration to ensure successful Red Hat OpenShift Service on AWS cluster creation and operation.
In this tutorial, you configure a DNS server to forward DNS lookups for specific DNS zones to an Amazon Route 53 Inbound Resolver. For more information, see Additional resources.
This tutorial uses the open-source BIND DNS server (named) to demonstrate the configuration necessary to forward DNS lookups to an Amazon Route 53 Inbound Resolver located in the VPC you plan to deploy a Red Hat OpenShift Service on AWS cluster into. Refer to the documentation of your preferred DNS server for how to configure zone forwarding.
4.1. Set up your environment
You can use environment variables to ensure consistency across the commands within this lab.
Prerequisites
-
You have access to the ROSA command-line interface (CLI) (
rosa). -
You have access to the AWS CLI (
aws). - You have manually created an AWS Virtual Private Cloud (VPC).
- You have configured a DHCP option set to point to a custom DNS server and set as the default for your VPC.
Procedure
In your terminal, configure the following environment variables:
$ export VPC_ID=<vpc_ID>
$ export REGION=<region>
$ export VPC_CIDR=<vpc_CIDR>
where:
<vpc_ID>- Replace with the ID of the VPC you want to install your cluster into.
<region>- Replace with the AWS region you want to install your cluster into.
<vpc_CIDR>- Replace with the CIDR range of your VPC.
Ensure all fields output correctly before moving to the next section:
$ echo "VPC ID: ${VPC_ID}, VPC CIDR Range: ${VPC_CIDR}, Region: ${REGION}"
4.2. Create an Amazon Route 53 Inbound Resolver
Deploy an Amazon Route 53 Inbound Resolver in the Virtual Private Cloud (VPC) where you plan to deploy the cluster. With the inbound resolver, your DNS server can forward queries to Route 53.
In this example, the Content from docs.aws.amazon.com is not included.Amazon Route 53 Inbound Resolver is deployed into the same VPC the cluster uses. If you want to deploy it into a separate VPC, you must manually associate the private hosted zone(s) once cluster creation is started. You cannot associate the zone before the cluster creation process begins. Failure to associate the private hosted zone during the cluster creation process will result in cluster creation failures.
Procedure
Create a security group and allow access to ports
53/tcpand53/udpfrom the VPC:$ SG_ID=$(aws ec2 create-security-group --group-name rosa-inbound-resolver --description "Security group for ROSA inbound resolver" --vpc-id ${VPC_ID} --region ${REGION} --output text) $ aws ec2 authorize-security-group-ingress --group-id ${SG_ID} --protocol tcp --port 53 --cidr ${VPC_CIDR} --region ${REGION} $ aws ec2 authorize-security-group-ingress --group-id ${SG_ID} --protocol udp --port 53 --cidr ${VPC_CIDR} --region ${REGION}Create an Amazon Route 53 Inbound Resolver in your VPC:
$ RESOLVER_ID=$(aws route53resolver create-resolver-endpoint \ --name rosa-inbound-resolver \ --creator-request-id rosa-$(date '+%Y-%m-%d') \ --security-group-ids ${SG_ID} \ --direction INBOUND \ --ip-addresses $(aws ec2 describe-subnets --filter Name=vpc-id,Values=${VPC_ID} --region ${REGION} | jq -jr '.Subnets | map("SubnetId=\(.SubnetId) ") | .[]') \ --region ${REGION} \ --output text \ --query 'ResolverEndpoint.Id')NoteThe above command attaches Amazon Route 53 Inbound Resolver endpoints to all subnets in the provided VPC using dynamically allocated IP addresses. If you prefer to manually specify the subnets, the IP addresses, or both, run the following command instead:
$ RESOLVER_ID=$(aws route53resolver create-resolver-endpoint \ --name rosa-inbound-resolver \ --creator-request-id rosa-$(date '+%Y-%m-%d') \ --security-group-ids ${SG_ID} \ --direction INBOUND \ --ip-addresses SubnetId=<subnet_ID>,Ip=<endpoint_IP> SubnetId=<subnet_ID>,Ip=<endpoint_IP> \ --region ${REGION} \ --output text \ --query 'ResolverEndpoint.Id')+ where:
<subnet_ID>- Specifies the subnet ID you want inbound resolver endpoints added to.
<endpoint_IP>- Specifies the static IP addresses you want inbound resolver endpoints added to.
Get the IP addresses of your inbound resolver endpoints to configure in your DNS server configuration:
$ aws route53resolver list-resolver-endpoint-ip-addresses \ --resolver-endpoint-id ${RESOLVER_ID} \ --region=${REGION} \ --query 'IpAddresses[*].Ip'Example output
[
    "10.0.45.253",
    "10.0.23.131",
    "10.0.148.159"
]
4.3. Configure your DNS server
Configure your Domain Name System (DNS) server to forward the private hosted zones to your Amazon Route 53 Inbound Resolver so the Red Hat OpenShift Service on AWS cluster can resolve internal DNS names after creation.
The following private hosted zones must be forwarded:
-
<cluster-name>.hypershift.local -
rosa.<domain-prefix>.<unique-ID>.p3.openshiftapps.com
These Amazon Route 53 private hosted zones are created during cluster creation. The cluster-name and domain-prefix are customer-specified values, but the unique-ID is randomly generated during cluster creation and cannot be preselected. As such, you must wait for the cluster creation process to begin before configuring forwarding for the p3.openshiftapps.com private hosted zone.
Procedure
Before the cluster is created, configure your DNS server to forward all DNS requests for
<cluster-name>.hypershift.localto your Amazon Route 53 Inbound Resolver endpoints.If you use a BIND DNS server, add a new zone to the
/etc/named.conffile using the following example:zone "<cluster-name>.hypershift.local" { type forward; forward only; forwarders { 10.0.45.253; 10.0.23.131; 10.0.148.159; }; };-
Replace
<cluster-name>with your Red Hat OpenShift Service on AWS cluster name. -
Replace with the IP addresses of your inbound resolver endpoints collected above, ensuring that following each IP address there is a
;.
-
Replace
- Create your cluster.
After your cluster has begun the creation process, locate the newly created private hosted zone:
$ aws route53 list-hosted-zones-by-vpc \ --vpc-id ${VPC_ID} \ --vpc-region ${REGION} \ --query 'HostedZoneSummaries[*].Name' \ --output tableExample output
--------------------------------------------------
|             ListHostedZonesByVPC               |
+------------------------------------------------+
|  rosa.domain-prefix.lkmb.p3.openshiftapps.com. |
|  cluster-name.hypershift.local.                |
+------------------------------------------------+
NoteIt may take a few minutes for the cluster creation process to create the private hosted zones in Route 53. If you do not see a
p3.openshiftapps.comdomain, wait a few minutes and run the command again.When you know the unique ID of the cluster domain, configure your DNS server to forward all DNS requests for
rosa.<domain-prefix>.<unique-ID>.p3.openshiftapps.comto your Amazon Route 53 Inbound Resolver endpoints. If you use a BIND DNS server, add a new zone to the/etc/named.conffile using the following example:zone "rosa.<domain-prefix>.<unique-ID>.p3.openshiftapps.com" { type forward; forward only; forwarders { 10.0.45.253; 10.0.23.131; 10.0.148.159; }; };-
Replace
<domain-prefix>with your cluster domain prefix and<unique-ID>with your unique ID collected above. -
Replace with the IP addresses of your inbound resolver endpoints collected above, ensuring that following each IP address there is a
;.
-
Replace
4.4. Additional resources
Chapter 5. Tutorial: Use AWS WAF and Amazon CloudFront to protect Red Hat OpenShift Service on AWS workloads
You can use AWS Web Application Firewall (WAF) to monitor HTTP and HTTPS requests that are forwarded to your protected web application resources.
You can use an Amazon CloudFront to add a WAF to your Red Hat OpenShift Service on AWS workloads. Using an external solution protects Red Hat OpenShift Service on AWS resources from experiencing denial of service due to handling the WAF.
WAFv1, WAF classic, is no longer supported. Use WAFv2.
5.1. Set up your environment
You can use environment variables to ensure consistency across the commands within this lab.
Prerequisites
- You have created a Red Hat OpenShift Service on AWS cluster.
-
You have access to the OpenShift CLI (
oc). -
You have access to the AWS CLI (
aws).
Procedure
In your terminal, configure the following environment variables:
$ export DOMAIN=apps.example.com $ export AWS_PAGER="" $ export CLUSTER_NAME=$(oc get infrastructure cluster -o=jsonpath="{.status.infrastructureName}" | sed 's/-[a-z0-9]\{5\}$//') $ export REGION=$(oc get infrastructure cluster -o=jsonpath="{.status.platformStatus.aws.region}") $ export AWS_ACCOUNT_ID=$(aws sts get-caller-identity --query Account --output text) $ export SCRATCH="/tmp/${CLUSTER}/cloudfront-waf" $ mkdir -p ${SCRATCH} $ echo "Cluster: ${CLUSTER}, Region: ${REGION}, AWS Account ID: ${AWS_ACCOUNT_ID}"Replace the
DOMAINvalueapps.example.comwith the custom domain you want to use for theIngressController.NoteThe "Cluster" output from the previous command might be the name of your cluster, the internal ID of your cluster, or the cluster’s domain prefix. If you prefer to use another identifier, you can manually set this value by running the following command:
$ export CLUSTER=my-custom-value
5.2. Set up the secondary ingress controller
You must configure a secondary ingress controller to segment your external Web Application Firewall (WAF)-protected traffic from your standard and default cluster ingress controller.
Prerequisites
You have a publicly trusted Subject Alternative Name (SAN) or wildcard certificate for your custom domain, such as
CN=*.apps.example.comImportantAmazon CloudFront uses HTTPS to communicate with your cluster’s secondary ingress controller. As explained in the Content from docs.aws.amazon.com is not included.Amazon CloudFront documentation, you cannot use a self-signed certificate for HTTPS communication between CloudFront and your cluster. Amazon CloudFront verifies that the certificate was issued by a trusted certificate authority.
Procedure
Create a new Transport Layer Security (TLS) secret from a private key and a public certificate, where
fullchain.pemis your full wildcard certificate chain, including any intermediaries, andprivkey.pemis your wildcard certificate’s private key.Example
$ oc -n openshift-ingress create secret tls waf-tls --cert=fullchain.pem --key=privkey.pem
Create a new
IngressControllerresource, for example, awaf-ingress-controller.yaml:apiVersion: operator.openshift.io/v1 kind: IngressController metadata: name: cloudfront-waf namespace: openshift-ingress-operator spec: domain: apps.example.com defaultCertificate: name: waf-tls endpointPublishingStrategy: loadBalancer: dnsManagementPolicy: Unmanaged providerParameters: aws: type: NLB type: AWS scope: External type: LoadBalancerService routeSelector: matchLabels: route: wafwhere:
domain: apps.example.com-
Specifies the custom domain you want to use for the
IngressController. routeSelector-
Filters the set of routes serviced by the Ingress Controller. If you don’t provide a value, no filtering occurs. In this tutorial, you use the
wafroute selector.
Apply the
IngressController:Example
$ oc apply -f waf-ingress-controller.yaml
Verification
Verify that your IngressController has successfully created an external load balancer:
$ oc -n openshift-ingress get service/router-cloudfront-waf
Example output
NAME                    TYPE           CLUSTER-IP      EXTERNAL-IP                                                                     PORT(S)                      AGE
router-cloudfront-waf   LoadBalancer   172.30.16.141   a68a838a7f26440bf8647809b61c4bc8-4225395f488830bd.elb.us-east-1.amazonaws.com   80:30606/TCP,443:31065/TCP   2m19s
5.3. Configure the AWS WAF
Create AWS Web Application Firewall (WAF) rules and a web access control list (ACL) to monitor, protect, and control the HTTP and HTTPS requests that are forwarded to your Red Hat OpenShift Service on AWS workloads.
Procedure
Create an AWS WAF rules file to apply to an ACL:
$ cat << EOF > ${SCRATCH}/waf-rules.json [ { "Name": "AWS-AWSManagedRulesCommonRuleSet", "Priority": 0, "Statement": { "ManagedRuleGroupStatement": { "VendorName": "AWS", "Name": "AWSManagedRulesCommonRuleSet" } }, "OverrideAction": { "None": {} }, "VisibilityConfig": { "SampledRequestsEnabled": true, "CloudWatchMetricsEnabled": true, "MetricName": "AWS-AWSManagedRulesCommonRuleSet" } }, { "Name": "AWS-AWSManagedRulesSQLiRuleSet", "Priority": 1, "Statement": { "ManagedRuleGroupStatement": { "VendorName": "AWS", "Name": "AWSManagedRulesSQLiRuleSet" } }, "OverrideAction": { "None": {} }, "VisibilityConfig": { "SampledRequestsEnabled": true, "CloudWatchMetricsEnabled": true, "MetricName": "AWS-AWSManagedRulesSQLiRuleSet" } } ] EOFThis enables the Core (Common) and SQL AWS Managed Rule Sets.
Create an AWS WAF Web ACL using the rules you specified in the previous step:
$ WAF_WACL=$(aws wafv2 create-web-acl \
  --name cloudfront-waf \
  --region ${REGION} \
  --default-action Allow={} \
  --scope CLOUDFRONT \
  --visibility-config SampledRequestsEnabled=true,CloudWatchMetricsEnabled=true,MetricName=${CLUSTER}-waf-metrics \
  --rules file://${SCRATCH}/waf-rules.json \
  --query 'Summary.Name' \
  --output text)
5.4. Configure Amazon CloudFront
Create an Amazon CloudFront distribution that directs traffic through AWS Web Application Firewall (WAF) to protect your workloads.
Procedure
Retrieve the newly created custom ingress controller’s Network Load Balancer (NLB) hostname:
$ NLB=$(oc -n openshift-ingress get service router-cloudfront-waf \ -o jsonpath='{.status.loadBalancer.ingress[0].hostname}')Import your certificate into Amazon Certificate Manager, where
cert.pemis your wildcard certificate,fullchain.pemis your wildcard certificate’s chain andprivkey.pemis your wildcard certificate’s private key.NoteRegardless of what region your cluster is deployed, you must import this certificate to
us-east-1as Amazon CloudFront is a global AWS service.Example
$ aws acm import-certificate --certificate file://cert.pem \
  --certificate-chain file://fullchain.pem \
  --private-key file://privkey.pem \
  --region us-east-1
- Log in to the Content from us-east-1.console.aws.amazon.com is not included.AWS console to create a CloudFront distribution.
Configure the CloudFront distribution by using the following information:
NoteIf an option is not specified in the table below, leave the default, even if it is blank.
Option Value Origin domain
Output from the previous command [a]
Name
rosa-waf-ingress [b]
Viewer protocol policy
Redirect HTTP to HTTPS
Allowed HTTP methods
GET, HEAD, OPTIONS, PUT, POST, PATCH, DELETE
Cache policy
CachingDisabled
Origin request policy
AllViewer
Web Application Firewall (WAF)
Enable security protections
Use existing WAF configuration
true
Choose a web ACL
cloudfront-wafAlternate domain name (CNAME)
*.apps.example.com [c]
Custom SSL certificate
Select the certificate you imported from the step above [d]
-
Run
echo ${NLB}to get the origin domain. - If you have multiple clusters, ensure the origin name is unique.
- This should match the wildcard domain you used to create the custom ingress controller.
- This should match the alternate domain name entered above.
-
Run
Retrieve the Amazon CloudFront Distribution endpoint:
$ aws cloudfront list-distributions --query "DistributionList.Items[?Origins.Items[?DomainName=='${NLB}']].DomainName" --output textUpdate the DNS of your custom wildcard domain with a CNAME to the Amazon CloudFront Distribution endpoint from the step above.
Example
*.apps.example.com CNAME d1b2c3d4e5f6g7.cloudfront.net
5.5. Deploy a sample application
Deploy a sample application by using the OpenShift CLI (oc) tool.
Procedure
Create a new project for your sample application by running the following command:
$ oc new-project hello-world
Deploy a
hello-worldapplication:$ oc -n hello-world new-app --image=docker.io/openshift/hello-openshift
Create a route for the application specifying your custom domain name:
Example
$ oc -n hello-world create route edge --service=hello-openshift hello-openshift-tls \ --hostname hello-openshift.${DOMAIN}Label the route to admit it to your custom ingress controller:
$ oc -n hello-world label route.route.openshift.io/hello-openshift-tls route=waf
5.6. Test the WAF
Verify that your AWS Web Application Firewall (WAF) configuration is working by sending valid and malicious requests to the sample application.
Procedure
Test that the application is accessible behind Amazon CloudFront:
Example
$ curl "https://hello-openshift.${DOMAIN}"Example output
Hello OpenShift!
Test that the WAF denies a bad request:
Example
$ curl -X POST "https://hello-openshift.${DOMAIN}" \ -F "user='<script><alert>Hello></alert></script>'"Example output
<!DOCTYPE HTML PUBLIC "-//W3C//DTD HTML 4.01 Transitional//EN" "http://www.w3.org/TR/html4/loose.dtd">
<HTML><HEAD><META HTTP-EQUIV="Content-Type" CONTENT="text/html; charset=iso-8859-1">
<TITLE>ERROR: The request could not be satisfied</TITLE>
</HEAD><BODY>
<H1>403 ERROR</H1>
<H2>The request could not be satisfied.</H2>
<HR noshade size="1px">
Request blocked.
We can't connect to the server for this app or website at this time. There might be too much traffic or a configuration error. Try again later, or contact the app or website owner.
<BR clear="all">
If you provide content to customers through CloudFront, you can find steps to troubleshoot and help prevent this error by reviewing the CloudFront documentation.
<BR clear="all">
<HR noshade size="1px">
<PRE>
Generated by cloudfront (CloudFront)
Request ID: nFk9q2yB8jddI6FZOTjdliexzx-FwZtr8xUQUNT75HThPlrALDxbag==
</PRE>
<ADDRESS>
</ADDRESS>
</BODY></HTML>
The expected result is a
403 ERROR, which means the AWS WAF is protecting your application.
5.7. Additional resources
Chapter 6. Tutorial: Use AWS WAF and AWS ALBs to protect Red Hat OpenShift Service on AWS workloads
You can use AWS Web Application Firewall (WAF) to monitor HTTP and HTTPS requests that are forwarded to your protected web application resources.
You can use an AWS Application Load Balancer (ALB) to add a Web Application Firewall (WAF) to your Red Hat OpenShift Service on AWS workloads. Using an external solution protects Red Hat OpenShift Service on AWS resources from experiencing denial of service due to handling the WAF.
It is recommended that you use the more flexible CloudFront method unless you absolutely must use an ALB-based solution. For more information, see Additional resources.
6.1. Set up your environment
You can use environment variables to ensure consistency across the commands within this lab.
Prerequisites
You have created a multiple availability zone (AZ) Red Hat OpenShift Service on AWS cluster.
NoteAWS ALBs require at least two public subnets across AZs, Content from docs.aws.amazon.com is not included.per the AWS documentation. For this reason, only multiple AZ Red Hat OpenShift Service on AWS clusters can be used with ALBs.
-
You have access to the OpenShift CLI (
oc). -
You have access to the AWS CLI (
aws).
Procedure
Configure the following environment variables:
$ export AWS_PAGER=""
$ export CLUSTER=$(oc get infrastructure cluster -o=jsonpath="{.status.infrastructureName}")
$ export REGION=$(oc get infrastructure cluster -o=jsonpath="{.status.platformStatus.aws.region}")
$ export OIDC_ENDPOINT=$(oc get authentication.config.openshift.io cluster -o jsonpath='{.spec.serviceAccountIssuer}' | sed  's|^https://||')
$ export AWS_ACCOUNT_ID=$(aws sts get-caller-identity --query Account --output text)
$ export SCRATCH="/tmp/${CLUSTER}/alb-waf"
$ mkdir -p ${SCRATCH}
$ echo "Cluster: $(echo ${CLUSTER} | sed 's/-[a-z0-9]\{5\}$//'), Region: ${REGION}, OIDC Endpoint: ${OIDC_ENDPOINT}, AWS Account ID: ${AWS_ACCOUNT_ID}"
6.1.1. Tag your AWS VPC and subnets
You need to tag your subnets and Virtual Private Cloud (VPC) before using these resources.
These steps only apply to clusters that were deployed into existing VPCs. If you did not deploy your cluster into an existing VPC, proceed to the installation steps.
Procedure
Set the following variables to the proper values for your Red Hat OpenShift Service on AWS deployment:
$ export VPC_ID=<vpc-id>
$ export PUBLIC_SUBNET_IDS=(<space-separated-list-of-ids>)
$ export PRIVATE_SUBNET_IDS=(<space-separated-list-of-ids>)
where:
VPC_ID=<vpc-id>-
Replace with the VPC ID of the cluster, for example:
export VPC_ID=vpc-04c429b7dbc4680ba. PUBLIC_SUBNET_IDS=(<space-separated-list-of-ids>)-
Replace with a space-separated list of the public subnet IDs of the cluster, making sure to preserve the
(). For example:export PUBLIC_SUBNET_IDS=(subnet-056fd6861ad332ba2 subnet-08ce3b4ec753fe74c subnet-071aa28228664972f). PRIVATE_SUBNET_IDS=(<space-separated-list-of-ids>)-
Replace with a space-separated list of the private subnet IDs of the cluster, making sure to preserve the
(). For example:export PRIVATE_SUBNET_IDS=(subnet-0b933d72a8d72c36a subnet-0817eb72070f1d3c2 subnet-0806e64159b66665a).
Add a tag to your cluster’s VPC with the cluster identifier:
$ aws ec2 create-tags --resources ${VPC_ID} \ --tags Key=kubernetes.io/cluster/${CLUSTER},Value=shared --region ${REGION}Add a tag to your public subnets:
$ aws ec2 create-tags \ --resources ${PUBLIC_SUBNET_IDS} \ --tags Key=kubernetes.io/role/elb,Value='1' \ Key=kubernetes.io/cluster/${CLUSTER},Value=shared \ --region ${REGION}Add a tag to your private subnets:
$ aws ec2 create-tags \
  --resources ${PRIVATE_SUBNET_IDS} \
  --tags Key=kubernetes.io/role/internal-elb,Value='1' \
        Key=kubernetes.io/cluster/${CLUSTER},Value=shared \
  --region ${REGION}
6.2. Deploy the AWS Load Balancer Operator
The AWS Load Balancer Operator is used to install, manage, and configure an instance of aws-load-balancer-controller in a Red Hat OpenShift Service on AWS cluster. To deploy Application Load Balancers (ALBs) in Red Hat OpenShift Service on AWS, you must first deploy the AWS Load Balancer Operator.
Procedure
Create a new project to deploy the AWS Load Balancer Operator into by running the following command:
$ oc new-project aws-load-balancer-operator
Create an AWS IAM policy for the AWS Load Balancer Controller if one does not already exist by running the following command:
NoteThe policy is sourced from Content from raw.githubusercontent.com is not included.the upstream AWS Load Balancer Controller policy. This is required by the Operator to function.
$ POLICY_ARN=$(aws iam list-policies --query \ "Policies[?PolicyName=='aws-load-balancer-operator-policy'].{ARN:Arn}" \ --output text)$ if [[ -z "${POLICY_ARN}" ]]; then wget -O "${SCRATCH}/load-balancer-operator-policy.json" \ https://raw.githubusercontent.com/kubernetes-sigs/aws-load-balancer-controller/main/docs/install/iam_policy.json POLICY_ARN=$(aws --region "$REGION" --query Policy.Arn \ --output text iam create-policy \ --policy-name aws-load-balancer-operator-policy \ --policy-document "file://${SCRATCH}/load-balancer-operator-policy.json") fiCreate an AWS IAM trust policy for AWS Load Balancer Operator:
$ cat <<EOF > "${SCRATCH}/trust-policy.json" { "Version": "2012-10-17", "Statement": [ { "Effect": "Allow", "Condition": { "StringEquals" : { "${OIDC_ENDPOINT}:sub": ["system:serviceaccount:aws-load-balancer-operator:aws-load-balancer-operator-controller-manager", "system:serviceaccount:aws-load-balancer-operator:aws-load-balancer-controller-cluster"] } }, "Principal": { "Federated": "arn:aws:iam::$AWS_ACCOUNT_ID:oidc-provider/${OIDC_ENDPOINT}" }, "Action": "sts:AssumeRoleWithWebIdentity" } ] } EOFCreate an AWS IAM role for the AWS Load Balancer Operator:
$ ROLE_ARN=$(aws iam create-role --role-name "${CLUSTER}-alb-operator" \ --assume-role-policy-document "file://${SCRATCH}/trust-policy.json" \ --query Role.Arn --output text)Attach the AWS Load Balancer Operator policy to the IAM role we created previously by running the following command:
$ aws iam attach-role-policy --role-name "${CLUSTER}-alb-operator" \ --policy-arn ${POLICY_ARN}Create a secret for the AWS Load Balancer Operator to assume the newly created AWS IAM role:
$ cat << EOF | oc apply -f - apiVersion: v1 kind: Secret metadata: name: aws-load-balancer-operator namespace: aws-load-balancer-operator stringData: credentials: | [default] role_arn = ${ROLE_ARN} web_identity_token_file = /var/run/secrets/openshift/serviceaccount/token EOFInstall the AWS Load Balancer Operator:
$ cat << EOF | oc apply -f -
apiVersion: operators.coreos.com/v1
kind: OperatorGroup
metadata:
  name: aws-load-balancer-operator
  namespace: aws-load-balancer-operator
spec:
  upgradeStrategy: Default
---
apiVersion: operators.coreos.com/v1alpha1
kind: Subscription
metadata:
  name: aws-load-balancer-operator
  namespace: aws-load-balancer-operator
spec:
  channel: stable-v1.0
  installPlanApproval: Automatic
  name: aws-load-balancer-operator
  source: redhat-operators
  sourceNamespace: openshift-marketplace
  startingCSV: aws-load-balancer-operator.v1.0.0
EOF
Deploy an instance of the AWS Load Balancer Controller using the Operator:
$ cat << EOF | oc apply -f - apiVersion: networking.olm.openshift.io/v1 kind: AWSLoadBalancerController metadata: name: cluster spec: credentials: name: aws-load-balancer-operator enabledAddons: - AWSWAFv2 EOFIf you get an error, the Operator has not completed installing yet. Wait briefly and retry the step.
Check that the Operator and controller pods are both running:
$ oc -n aws-load-balancer-operator get pods
Example output
NAME                                                             READY   STATUS    RESTARTS   AGE
aws-load-balancer-controller-cluster-6ddf658785-pdp5d            1/1     Running   0          99s
aws-load-balancer-operator-controller-manager-577d9ffcb9-w6zqn   2/2     Running   0          2m4s
If the pods aren’t running yet, wait briefly and retry the step.
6.3. Deploy a sample application
Deploy a sample application with an AWS Application Load Balancer (ALB) Ingress to verify your load balancer configuration.
Procedure
Create a new project for the sample application:
$ oc new-project hello-world
Deploy a
hello-worldapplication:$ oc new-app -n hello-world --image=docker.io/openshift/hello-openshift
Convert the pre-created service resource to a NodePort service type:
$ oc -n hello-world patch service hello-openshift -p '{"spec":{"type":"NodePort"}}'Deploy an AWS ALB using the AWS Load Balancer Operator:
$ cat << EOF | oc apply -f - apiVersion: networking.k8s.io/v1 kind: Ingress metadata: name: hello-openshift-alb namespace: hello-world annotations: alb.ingress.kubernetes.io/scheme: internet-facing spec: ingressClassName: alb rules: - http: paths: - path: / pathType: Exact backend: service: name: hello-openshift port: number: 8080 EOFCurl the AWS ALB Ingress endpoint to verify the
hello-worldapplication is accessible:NoteAWS ALB provisioning takes a few minutes. If you receive an error that says
curl: (6) Could not resolve host, please wait and try again.$ INGRESS=$(oc -n hello-world get ingress hello-openshift-alb -o jsonpath='{.status.loadBalancer.ingress[0].hostname}') $ curl "http://${INGRESS}"Example output
Hello OpenShift!
6.4. Configure the AWS WAF
You can use the AWS Web Application Firewall (WAF) service to monitor, protect, and control the HTTP and HTTPS requests that are forwarded to your protected web application resources, such as Red Hat OpenShift Service on AWS.
Procedure
Create an AWS WAF rules file to apply to your web access control list (ACL):
$ cat << EOF > ${SCRATCH}/waf-rules.json [ { "Name": "AWS-AWSManagedRulesCommonRuleSet", "Priority": 0, "Statement": { "ManagedRuleGroupStatement": { "VendorName": "AWS", "Name": "AWSManagedRulesCommonRuleSet" } }, "OverrideAction": { "None": {} }, "VisibilityConfig": { "SampledRequestsEnabled": true, "CloudWatchMetricsEnabled": true, "MetricName": "AWS-AWSManagedRulesCommonRuleSet" } }, { "Name": "AWS-AWSManagedRulesSQLiRuleSet", "Priority": 1, "Statement": { "ManagedRuleGroupStatement": { "VendorName": "AWS", "Name": "AWSManagedRulesSQLiRuleSet" } }, "OverrideAction": { "None": {} }, "VisibilityConfig": { "SampledRequestsEnabled": true, "CloudWatchMetricsEnabled": true, "MetricName": "AWS-AWSManagedRulesSQLiRuleSet" } } ] EOFThis enables the Core (Common) and SQL AWS Managed Rule Sets.
Create an AWS WAF Web ACL using the rules you specified in the previous steps:
$ WAF_ARN=$(aws wafv2 create-web-acl \ --name ${CLUSTER}-waf \ --region ${REGION} \ --default-action Allow={} \ --scope REGIONAL \ --visibility-config SampledRequestsEnabled=true,CloudWatchMetricsEnabled=true,MetricName=${CLUSTER}-waf-metrics \ --rules file://${SCRATCH}/waf-rules.json \ --query 'Summary.ARN' \ --output text)Annotate the Ingress resource with the AWS WAF Web ACL (Amazon Resource Name) ARN:
$ oc annotate -n hello-world ingress.networking.k8s.io/hello-openshift-alb \
  alb.ingress.kubernetes.io/wafv2-acl-arn=${WAF_ARN}
Verification
Wait 10 seconds for the rules to propagate and test that the application still works:
$ curl "http://${INGRESS}"Example output
Hello OpenShift!
Test that the WAF denies a bad request:
$ curl -X POST "http://${INGRESS}" \ -F "user='<script><alert>Hello></alert></script>'"Example output
<html>
<head><title>403 Forbidden</title></head>
<body>
<center><h1>403 Forbidden</h1></center>
</body>
</html
NoteActivation of the AWS WAF integration can sometimes take several minutes. If you do not receive a
403 Forbiddenerror, please wait a few seconds and try again.The expected result is a
403 Forbiddenerror, which means the AWS WAF is protecting your application.
6.5. Additional resources
Chapter 7. Tutorial: Deploy OpenShift API for Data Protection on a Red Hat OpenShift Service on AWS cluster
Deploy OpenShift API for Data Protection on your Red Hat OpenShift Service on AWS cluster to back up and restore application workloads.
This content is authored by Red Hat experts, but has not yet been tested on every supported configuration.
7.1. Set up your environment
You can use environment variables to ensure consistency across the commands within this lab.
Prerequisites
- You have created a Red Hat OpenShift Service on AWS cluster.
Procedure
Prepare the environment variables:
NoteChange the cluster name to match your Red Hat OpenShift Service on AWS cluster and ensure you are logged into the cluster as an Administrator. Ensure all fields are output correctly before moving on.
$ export CLUSTER_NAME=$(oc get infrastructure cluster -o=jsonpath="{.status.infrastructureName}"  | sed 's/-[a-z0-9]\{5\}$//')
$ export ROSA_CLUSTER_ID=$(rosa describe cluster -c ${CLUSTER_NAME} --output json | jq -r .id)
$ export REGION=$(rosa describe cluster -c ${CLUSTER_NAME} --output json | jq -r .region.id)
$ export OIDC_ENDPOINT=$(oc get authentication.config.openshift.io cluster -o jsonpath='{.spec.serviceAccountIssuer}' | sed  's|^https://||')
$ export AWS_ACCOUNT_ID=`aws sts get-caller-identity --query Account --output text`
$ export CLUSTER_VERSION=`rosa describe cluster -c ${CLUSTER_NAME} -o json | jq -r .version.raw_id | cut -f -2 -d '.'`
$ export ROLE_NAME="${CLUSTER_NAME}-openshift-oadp-aws-cloud-credentials"
$ export AWS_PAGER=""
$ export SCRATCH="/tmp/${CLUSTER_NAME}/oadp"
$ mkdir -p ${SCRATCH}
$ echo "Cluster ID: ${ROSA_CLUSTER_ID}, Region: ${REGION}, OIDC Endpoint: ${OIDC_ENDPOINT}, AWS Account ID: ${AWS_ACCOUNT_ID}"
7.2. Prepare your AWS account
Create the AWS Identity and Access Management (IAM) policy, trust policy, and role to grant OpenShift API for Data Protection access to Amazon S3 and Amazon EC2 resources required for backup and restore operations.
Procedure
Create an IAM policy to enable S3 access:
$ POLICY_ARN=$(aws iam list-policies --query "Policies[?PolicyName=='RosaOadpVer1'].{ARN:Arn}" --output text) if [[ -z "${POLICY_ARN}" ]]; then $ cat << EOF > ${SCRATCH}/policy.json { "Version": "2012-10-17", "Statement": [ { "Effect": "Allow", "Action": [ "s3:CreateBucket", "s3:DeleteBucket", "s3:PutBucketTagging", "s3:GetBucketTagging", "s3:PutEncryptionConfiguration", "s3:GetEncryptionConfiguration", "s3:PutLifecycleConfiguration", "s3:GetLifecycleConfiguration", "s3:GetBucketLocation", "s3:ListBucket", "s3:GetObject", "s3:PutObject", "s3:DeleteObject", "s3:ListBucketMultipartUploads", "s3:AbortMultipartUpload", "s3:ListMultipartUploadParts", "ec2:DescribeSnapshots", "ec2:DescribeVolumes", "ec2:DescribeVolumeAttribute", "ec2:DescribeVolumesModifications", "ec2:DescribeVolumeStatus", "ec2:CreateTags", "ec2:CreateVolume", "ec2:CreateSnapshot", "ec2:DeleteSnapshot" ], "Resource": "*" } ]} EOF $ POLICY_ARN=$(aws iam create-policy --policy-name "RosaOadpVer1" \ --policy-document file:///${SCRATCH}/policy.json --query Policy.Arn \ --tags Key=rosa_openshift_version,Value=${CLUSTER_VERSION} Key=rosa_role_prefix,Value=ManagedOpenShift Key=operator_namespace,Value=openshift-oadp Key=operator_name,Value=openshift-oadp \ --output text) fi $ echo ${POLICY_ARN}Create an IAM role trust policy for the cluster:
$ cat <<EOF > ${SCRATCH}/trust-policy.json { "Version": "2012-10-17", "Statement": [{ "Effect": "Allow", "Principal": { "Federated": "arn:aws:iam::${AWS_ACCOUNT_ID}:oidc-provider/${OIDC_ENDPOINT}" }, "Action": "sts:AssumeRoleWithWebIdentity", "Condition": { "StringEquals": { "${OIDC_ENDPOINT}:sub": [ "system:serviceaccount:openshift-adp:openshift-adp-controller-manager", "system:serviceaccount:openshift-adp:velero"] } } }] } EOF $ ROLE_ARN=$(aws iam create-role --role-name \ "${ROLE_NAME}" \ --assume-role-policy-document file://${SCRATCH}/trust-policy.json \ --tags Key=rosa_cluster_id,Value=${ROSA_CLUSTER_ID} Key=rosa_openshift_version,Value=${CLUSTER_VERSION} Key=rosa_role_prefix,Value=ManagedOpenShift Key=operator_namespace,Value=openshift-adp Key=operator_name,Value=openshift-oadp \ --query Role.Arn --output text) $ echo ${ROLE_ARN}Attach the IAM policy to the IAM role:
$ aws iam attach-role-policy --role-name "${ROLE_NAME}" \
 --policy-arn ${POLICY_ARN}
7.3. Deploy OADP on the cluster
Deploy OpenShift API for Data Protection (OADP) to your cluster using the OpenShift CLI (oc) tool to enable Velero-based backup and restore.
Procedure
Create a namespace for OADP:
$ oc create namespace openshift-adp
Create a credentials secret:
$ cat <<EOF > ${SCRATCH}/credentials [default] role_arn = ${ROLE_ARN} web_identity_token_file = /var/run/secrets/openshift/serviceaccount/token region=<aws_region> EOF $ oc -n openshift-adp create secret generic cloud-credentials \ --from-file=${SCRATCH}/credentialswhere:
<aws_region>- Replace with the AWS region to use for the Security Token Service (STS) endpoint.
Deploy the OADP Operator:
NoteThere is currently an issue with version 1.1 of the Operator with backups that have a
PartiallyFailedstatus. This does not seem to affect the backup and restore process, but it should be noted as there are issues with it.$ cat << EOF | oc create -f - apiVersion: operators.coreos.com/v1 kind: OperatorGroup metadata: generateName: openshift-adp- namespace: openshift-adp name: oadp spec: targetNamespaces: - openshift-adp --- apiVersion: operators.coreos.com/v1alpha1 kind: Subscription metadata: name: redhat-oadp-operator namespace: openshift-adp spec: channel: stable-1.2 installPlanApproval: Automatic name: redhat-oadp-operator source: redhat-operators sourceNamespace: openshift-marketplace EOF
Wait for the Operator to be ready:
$ watch oc -n openshift-adp get pods
Example output
NAME                                                READY   STATUS    RESTARTS   AGE
openshift-adp-controller-manager-546684844f-qqjhn   1/1     Running   0          22s
Create Cloud Storage:
$ cat << EOF | oc create -f - apiVersion: oadp.openshift.io/v1alpha1 kind: CloudStorage metadata: name: ${CLUSTER_NAME}-oadp namespace: openshift-adp spec: creationSecret: key: credentials name: cloud-credentials enableSharedConfig: true name: ${CLUSTER_NAME}-oadp provider: aws region: $REGION EOFCheck your application’s storage default storage class by running the following command with your desired namespace:
$ oc get pvc -n <namespace>
Example output
NAME     STATUS   VOLUME                                     CAPACITY   ACCESS MODES   STORAGECLASS   AGE
applog   Bound    pvc-351791ae-b6ab-4e8b-88a4-30f73caf5ef8   1Gi        RWO            gp3-csi        4d19h
mysql    Bound    pvc-16b8e009-a20a-4379-accc-bc81fedd0621   1Gi        RWO            gp3-csi        4d19h
$ oc get storageclass
Example output
NAME                PROVISIONER             RECLAIMPOLICY   VOLUMEBINDINGMODE      ALLOWVOLUMEEXPANSION   AGE
gp2                 kubernetes.io/aws-ebs   Delete          WaitForFirstConsumer   true                   4d21h
gp2-csi             ebs.csi.aws.com         Delete          WaitForFirstConsumer   true                   4d21h
gp3                 ebs.csi.aws.com         Delete          WaitForFirstConsumer   true                   4d21h
gp3-csi (default)   ebs.csi.aws.com         Delete          WaitForFirstConsumer   true                   4d21h
Using either gp3-csi, gp2-csi, gp3 or gp2 will work. If the application(s) that are being backed up are all using Persistent Volumes (PVs) with the Container Storage Interface (CSI), include the CSI plugin in the OADP Data Protection Application (DPA) configuration.
CSI only: Deploy a Data Protection Application:
$ cat << EOF | oc create -f - apiVersion: oadp.openshift.io/v1alpha1 kind: DataProtectionApplication metadata: name: ${CLUSTER_NAME}-dpa namespace: openshift-adp spec: backupImages: true features: dataMover: enable: false backupLocations: - bucket: cloudStorageRef: name: ${CLUSTER_NAME}-oadp credential: key: credentials name: cloud-credentials prefix: velero default: true config: region: ${REGION} configuration: velero: defaultPlugins: - openshift - aws - csi restic: enable: false EOFNoteIf you run this command for CSI volumes, you can skip the next step.
Non-CSI volumes: Deploy a Data Protection Application:
$ cat << EOF | oc create -f - apiVersion: oadp.openshift.io/v1alpha1 kind: DataProtectionApplication metadata: name: ${CLUSTER_NAME}-dpa namespace: openshift-adp spec: backupImages: true features: dataMover: enable: false backupLocations: - bucket: cloudStorageRef: name: ${CLUSTER_NAME}-oadp credential: key: credentials name: cloud-credentials prefix: velero default: true config: region: ${REGION} configuration: velero: defaultPlugins: - openshift - aws restic: enable: false snapshotLocations: - velero: config: credentialsFile: /tmp/credentials/openshift-adp/cloud-credentials-credentials enableSharedConfig: 'true' profile: default region: ${REGION} provider: aws EOFNote-
In OADP 1.1.x Red Hat OpenShift Service on AWS STS environments, the container image backup and restore (
spec.backupImages) value must be set tofalseas it is not supported. -
The Restic feature (
restic.enable=false) is disabled and not supported in Red Hat OpenShift Service on AWS STS environments. -
The DataMover feature (
dataMover.enable=false) is disabled and not supported in Red Hat OpenShift Service on AWS STS environments.
-
In OADP 1.1.x Red Hat OpenShift Service on AWS STS environments, the container image backup and restore (
7.4. Back up and restore a workload
Back up and restore a workload to verify that OpenShift API for Data Protection is working correctly on your cluster.
The following sample hello-world application has no attached persistent volumes. Either Data Protection Application (DPA) configuration will work.
Procedure
Create a workload to back up:
Create a namespace by running:
$ oc create namespace hello-world
Create an application by running:
$ oc new-app -n hello-world --image=docker.io/openshift/hello-openshift
Expose the route:
$ oc expose service/hello-openshift -n hello-world
Check that the application is working:
$ curl `oc get route/hello-openshift -n hello-world -o jsonpath='{.spec.host}'`Example output
Hello OpenShift!
Back up the workload:
$ cat << EOF | oc create -f - apiVersion: velero.io/v1 kind: Backup metadata: name: hello-world namespace: openshift-adp spec: includedNamespaces: - hello-world storageLocation: ${CLUSTER_NAME}-dpa-1 ttl: 720h0m0s EOFWait until the backup is done:
$ watch "oc -n openshift-adp get backup hello-world -o json | jq .status"
Example output
{ "completionTimestamp": "2022-09-07T22:20:44Z", "expiration": "2022-10-07T22:20:22Z", "formatVersion": "1.1.0", "phase": "Completed", "progress": { "itemsBackedUp": 58, "totalItems": 58 }, "startTimestamp": "2022-09-07T22:20:22Z", "version": 1 }Delete the demo workload:
$ oc delete ns hello-world
Restore from the backup:
$ cat << EOF | oc create -f -
apiVersion: velero.io/v1
kind: Restore
metadata:
 name: hello-world
 namespace: openshift-adp
spec:
 backupName: hello-world
EOF
Wait for the restore to finish:
$ watch "oc -n openshift-adp get restore hello-world -o json | jq .status"
Example output
{ "completionTimestamp": "2022-09-07T22:25:47Z", "phase": "Completed", "progress": { "itemsRestored": 38, "totalItems": 38 }, "startTimestamp": "2022-09-07T22:25:28Z", "warnings": 9 }Check that the workload is restored:
$ oc -n hello-world get pods
Example output
NAME                              READY   STATUS    RESTARTS   AGE
hello-openshift-9f885f7c6-kdjpj   1/1     Running   0          90s
$ curl `oc get route/hello-openshift -n hello-world -o jsonpath='{.spec.host}'`Example output
Hello OpenShift!
7.5. Clean up AWS resources
Clean up your AWS resources after completing this lab tutorial.
Procedure
Delete the workload:
$ oc delete ns hello-world
Remove the backup and restore resources from the cluster if they are no longer required:
$ oc delete backups.velero.io hello-world
$ oc delete restores.velero.io hello-world
Delete the backup, restore, and remote objects in S3:
$ velero backup delete hello-world
$ velero restore delete hello-world
Delete the Data Protection Application:
$ oc -n openshift-adp delete dpa ${CLUSTER_NAME}-dpaDelete the Cloud Storage:
$ oc -n openshift-adp delete cloudstorage ${CLUSTER_NAME}-oadpWarningIf this command hangs, you might need to delete the finalizer:
$ oc -n openshift-adp patch cloudstorage ${CLUSTER_NAME}-oadp -p '{"metadata":{"finalizers":null}}' --type=mergeRemove the Operator if it is no longer required:
$ oc -n openshift-adp delete subscription oadp-operator
Remove the namespace for the Operator:
$ oc delete ns redhat-openshift-adp
Remove the Custom Resource Definitions from the cluster if you no longer wish to have them:
$ for CRD in `oc get crds | grep velero | awk '{print $1}'`; do oc delete crd $CRD; done $ for CRD in `oc get crds | grep -i oadp | awk '{print $1}'`; do oc delete crd $CRD; doneDelete the AWS S3 Bucket:
$ aws s3 rm s3://${CLUSTER_NAME}-oadp --recursive $ aws s3api delete-bucket --bucket ${CLUSTER_NAME}-oadpDetach the policy from the role:
$ aws iam detach-role-policy --role-name "${ROLE_NAME}" \ --policy-arn "${POLICY_ARN}"Delete the role:
$ aws iam delete-role --role-name "${ROLE_NAME}"
7.6. Additional resources
Chapter 8. Tutorial: AWS Load Balancer Operator on Red Hat OpenShift Service on AWS
Install and configure the AWS Load Balancer Operator to provision advanced AWS Application Load Balancers (ALBs) and Network Load Balancers (NLBs) for your Red Hat OpenShift Service on AWS cluster.
This content is authored by Red Hat experts, but has not yet been tested on every supported configuration.
8.1. AWS Load Balancer Operator overview
The AWS Load Balancer Operator installs and manages the AWS Load Balancer Controller, which provisions Application Load Balancers (ALBs) and Network Load Balancers (NLBs) with advanced annotations beyond the default in-tree provider.
Load Balancers created by the AWS Load Balancer Operator cannot be used for OpenShift Routes, and should only be used for individual services or ingress resources that do not need the full layer 7 capabilities of an OpenShift Route.
Compared with the default AWS in-tree load balancer provider, the AWS Load Balancer Controller is developed with advanced annotations for both ALBs and NLBs. Some advanced use cases are:
- Using native Kubernetes Ingress objects with ALBs.
- Integrating ALBs with the AWS Web Application Firewall (WAF) service. WAFv1, WAF classic, is no longer supported; use WAFv2.
- Specifying custom NLB source IP ranges.
- Specifying custom NLB internal IP addresses.
The AWS Load Balancer Operator is used to install, manage, and configure an instance of aws-load-balancer-controller in a Red Hat OpenShift Service on AWS cluster. For more information, see Additional resources.
8.2. Set up your environment
Set environment variables for your cluster name, region, and OpenID Connect (OIDC) endpoint to ensure consistency across AWS Load Balancer Operator commands.
Prerequisites
You have created a multi-availability zone (AZ) Red Hat OpenShift Service on AWS cluster.
NoteAWS Application Load Balancers (ALBs) require a multi-AZ cluster and three public subnets split across three AZs in the same Virtual Private Cloud (VPC) as the cluster. This makes ALBs unsuitable for many PrivateLink clusters. AWS Network Load Balancers (NLBs) do not have this restriction.
- You have created a Bring Your Own (BYO) VPC cluster.
-
You have access to the AWS CLI (
aws). -
You have access to the OpenShift CLI (
oc).
Procedure
Prepare the environment variables:
$ export AWS_PAGER=""
$ export ROSA_CLUSTER_NAME=$(oc get infrastructure cluster -o=jsonpath="{.status.infrastructureName}"  | sed 's/-[a-z0-9]\{5\}$//')
$ export REGION=$(oc get infrastructure cluster -o=jsonpath="{.status.platformStatus.aws.region}")
$ export OIDC_ENDPOINT=$(oc get authentication.config.openshift.io cluster -o jsonpath='{.spec.serviceAccountIssuer}' | sed  's|^https://||')
$ export AWS_ACCOUNT_ID=$(aws sts get-caller-identity --query Account --output text)
$ export SCRATCH="/tmp/${ROSA_CLUSTER_NAME}/alb-operator"
$ mkdir -p ${SCRATCH}
$ echo "Cluster: ${ROSA_CLUSTER_NAME}, Region: ${REGION}, OIDC Endpoint: ${OIDC_ENDPOINT}, AWS Account ID: ${AWS_ACCOUNT_ID}"
8.2.1. Tag your AWS VPC and subnets
Tag your Virtual Private Cloud (VPC) and subnets so the AWS Load Balancer Operator can identify your network resources and assign load balancers to the correct public or private subnets.
This section only applies to clusters that were deployed into existing VPCs. If you did not deploy your cluster into an existing VPC, skip this section and proceed to the installation section below.
Procedure
Set the below variables to the proper values for your cluster deployment:
$ export VPC_ID=<vpc-id> $ export PUBLIC_SUBNET_IDS=<public-subnets> $ export PRIVATE_SUBNET_IDS=<private-subnets> $ export CLUSTER_NAME=$(oc get infrastructure cluster -o=jsonpath="{.status.infrastructureName}")Add a tag to your cluster’s VPC with the cluster name:
$ aws ec2 create-tags --resources ${VPC_ID} --tags Key=kubernetes.io/cluster/${CLUSTER_NAME},Value=owned --region ${REGION}Add a tag to your public subnets:
$ aws ec2 create-tags \ --resources ${PUBLIC_SUBNET_IDS} \ --tags Key=kubernetes.io/role/elb,Value='' \ --region ${REGION}Add a tag to your private subnets:
$ aws ec2 create-tags \
     --resources "${PRIVATE_SUBNET_IDS}" \
     --tags Key=kubernetes.io/role/internal-elb,Value='' \
     --region ${REGION}
8.3. Install the AWS Load Balancer Operator
Install the AWS Load Balancer Operator to provision and manage AWS Application Load Balancers (ALBs) and Network Load Balancers (NLBs) for your Red Hat OpenShift Service on AWS cluster.
Procedure
Create an AWS Identity and Access Management (IAM) policy for the AWS Load Balancer Controller:
NoteThe policy is sourced from Content from raw.githubusercontent.com is not included.the upstream AWS Load Balancer Controller policy plus permission to create tags on subnets. This is required by the Operator to function.
$ oc new-project aws-load-balancer-operator $ POLICY_ARN=$(aws iam list-policies --query \ "Policies[?PolicyName=='aws-load-balancer-operator-policy'].{ARN:Arn}" \ --output text) $ if [[ -z "${POLICY_ARN}" ]]; then wget -O "${SCRATCH}/load-balancer-operator-policy.json" \ https://raw.githubusercontent.com/rh-mobb/documentation/main/content/rosa/aws-load-balancer-operator/load-balancer-operator-policy.json POLICY_ARN=$(aws --region "$REGION" --query Policy.Arn \ --output text iam create-policy \ --policy-name aws-load-balancer-operator-policy \ --policy-document "file://${SCRATCH}/load-balancer-operator-policy.json") fi $ echo $POLICY_ARNCreate an AWS IAM trust policy for AWS Load Balancer Operator:
$ cat <<EOF > "${SCRATCH}/trust-policy.json" { "Version": "2012-10-17", "Statement": [ { "Effect": "Allow", "Condition": { "StringEquals" : { "${OIDC_ENDPOINT}:sub": ["system:serviceaccount:aws-load-balancer-operator:aws-load-balancer-operator-controller-manager", "system:serviceaccount:aws-load-balancer-operator:aws-load-balancer-controller-cluster"] } }, "Principal": { "Federated": "arn:aws:iam::$AWS_ACCOUNT_ID:oidc-provider/${OIDC_ENDPOINT}" }, "Action": "sts:AssumeRoleWithWebIdentity" } ] } EOFCreate an AWS IAM role for the AWS Load Balancer Operator:
$ ROLE_ARN=$(aws iam create-role --role-name "${ROSA_CLUSTER_NAME}-alb-operator" \ --assume-role-policy-document "file://${SCRATCH}/trust-policy.json" \ --query Role.Arn --output text) $ echo $ROLE_ARN $ aws iam attach-role-policy --role-name "${ROSA_CLUSTER_NAME}-alb-operator" \ --policy-arn $POLICY_ARNCreate a secret for the AWS Load Balancer Operator to assume the newly created AWS IAM role:
$ cat << EOF | oc apply -f - apiVersion: v1 kind: Secret metadata: name: aws-load-balancer-operator namespace: aws-load-balancer-operator stringData: credentials: | [default] role_arn = $ROLE_ARN web_identity_token_file = /var/run/secrets/openshift/serviceaccount/token EOFInstall the AWS Load Balancer Operator:
$ cat << EOF | oc apply -f -
apiVersion: operators.coreos.com/v1
kind: OperatorGroup
metadata:
  name: aws-load-balancer-operator
  namespace: aws-load-balancer-operator
spec:
  upgradeStrategy: Default
---
apiVersion: operators.coreos.com/v1alpha1
kind: Subscription
metadata:
  name: aws-load-balancer-operator
  namespace: aws-load-balancer-operator
spec:
  channel: stable-v1.0
  installPlanApproval: Automatic
  name: aws-load-balancer-operator
  source: redhat-operators
  sourceNamespace: openshift-marketplace
  startingCSV: aws-load-balancer-operator.v1.0.0
EOF
Deploy an instance of the AWS Load Balancer Controller using the Operator:
NoteIf you get an error, the Operator has not completed installing yet. Wait briefly and retry the step.
$ cat << EOF | oc apply -f - apiVersion: networking.olm.openshift.io/v1 kind: AWSLoadBalancerController metadata: name: cluster spec: credentials: name: aws-load-balancer-operator EOFCheck that the Operator and controller pods are both running:
$ oc -n aws-load-balancer-operator get pods
Example output
NAME                                                             READY   STATUS    RESTARTS   AGE
aws-load-balancer-controller-cluster-6ddf658785-pdp5d            1/1     Running   0          99s
aws-load-balancer-operator-controller-manager-577d9ffcb9-w6zqn   2/2     Running   0          2m4s
8.4. Validate the AWS Load Balancer Operator deployment
Deploy a sample application with Application Load Balancer (ALB) and Network Load Balancer (NLB) resources to verify that the AWS Load Balancer Operator successfully provisions load balancers to your cluster.
Procedure
Create a new project:
$ oc new-project hello-world
Deploy a
hello-worldapplication:$ oc new-app -n hello-world --image=docker.io/openshift/hello-openshift
Configure a NodePort service for the AWS Application Load Balancer (ALB) to connect to:
$ cat << EOF | oc apply -f - apiVersion: v1 kind: Service metadata: name: hello-openshift-nodeport namespace: hello-world spec: ports: - port: 80 targetPort: 8080 protocol: TCP type: NodePort selector: deployment: hello-openshift EOFDeploy an AWS ALB using the AWS Load Balancer Operator:
$ cat << EOF | oc apply -f - apiVersion: networking.k8s.io/v1 kind: Ingress metadata: name: hello-openshift-alb namespace: hello-world annotations: alb.ingress.kubernetes.io/scheme: internet-facing spec: ingressClassName: alb rules: - http: paths: - path: / pathType: Exact backend: service: name: hello-openshift-nodeport port: number: 80 EOFCurl the AWS ALB Ingress endpoint to verify the
hello-worldapplication is accessible:NoteAWS ALB provisioning takes a few minutes. If you receive an error that says
curl: (6) Could not resolve host, wait and try again.$ INGRESS=$(oc -n hello-world get ingress hello-openshift-alb \ -o jsonpath='{.status.loadBalancer.ingress[0].hostname}') $ curl "http://${INGRESS}"Example output
Hello OpenShift!
Deploy an AWS Network Load Balancer (NLB) for your
hello-worldapplication:$ cat << EOF | oc apply -f - apiVersion: v1 kind: Service metadata: name: hello-openshift-nlb namespace: hello-world annotations: service.beta.kubernetes.io/aws-load-balancer-type: external service.beta.kubernetes.io/aws-load-balancer-nlb-target-type: instance service.beta.kubernetes.io/aws-load-balancer-scheme: internet-facing spec: ports: - port: 80 targetPort: 8080 protocol: TCP type: LoadBalancer selector: deployment: hello-openshift EOFTest the AWS NLB endpoint:
NoteNLB provisioning takes a few minutes. If you receive an error that says
curl: (6) Could not resolve host, wait and try again.$ NLB=$(oc -n hello-world get service hello-openshift-nlb \ -o jsonpath='{.status.loadBalancer.ingress[0].hostname}') $ curl "http://${NLB}"Example output
Hello OpenShift!
8.5. Clean up AWS resources
Remove the sample application, AWS Load Balancer Operator, and associated Identity and Access Management (IAM) roles and policies created during this tutorial.
Procedure
Delete the
hello-worldapplication namespace and all the resources in the namespace:$ oc delete project hello-world
Delete the AWS Load Balancer Operator and the AWS IAM roles:
$ oc delete subscription aws-load-balancer-operator -n aws-load-balancer-operator $ aws iam detach-role-policy \ --role-name "${ROSA_CLUSTER_NAME}-alb-operator" \ --policy-arn $POLICY_ARN $ aws iam delete-role \ --role-name "${ROSA_CLUSTER_NAME}-alb-operator"Delete the AWS IAM policy:
$ aws iam delete-policy --policy-arn $POLICY_ARN
8.6. Additional resources
- Content from kubernetes-sigs.github.io is not included.AWS Load Balancer Controller
- Content from docs.aws.amazon.com is not included.AWS Application Load Balancers
- Content from docs.aws.amazon.com is not included.AWS Network Load Balancers
- OpenShift Routes
- Content from github.com is not included.AWS Load Balancer Operator
Chapter 9. Tutorial: Configure Microsoft Entra ID as an identity provider
Configure Microsoft Entra ID (formerly Azure Active Directory) as the cluster identity provider to enable user authentication and group-based access control for your Red Hat OpenShift Service on AWS cluster by using OpenID Connect (OIDC).
This tutorial guides you to complete the following tasks:
- Register a new application in Entra ID for authentication.
- Configure the application registration in Entra ID to include optional and group claims in tokens.
- Configure the Red Hat OpenShift Service on AWS cluster to use Entra ID as the identity provider.
- Grant additional permissions to individual groups.
9.1. Register a new application in Entra ID for authentication
Register an application in Entra ID using your cluster OAuth callback URL to generate the credentials for cluster authentication.
Prerequisites
- You have created a set of security groups and assigned users by following Content from learn.microsoft.com is not included.the Microsoft documentation.
Procedure
Create the cluster’s OAuth callback URL by changing the specified variables and running the following command:
$ domain=$(rosa describe cluster -c <cluster_name> | grep "DNS" | grep -oE '\S+.openshiftapps.com') echo "OAuth callback URL: https://oauth.${domain}/oauth2callback/AAD"The
AADdirectory at the end of the OAuth callback URL must match the OAuth identity provider name that you will set up later in this process.NoteRemember to save this callback URL; it will be required later in the process.
Create the Entra ID application by logging in to the Azure portal, and select the Content from portal.azure.com is not included.App registrations blade. Then, select New registration to create a new application.
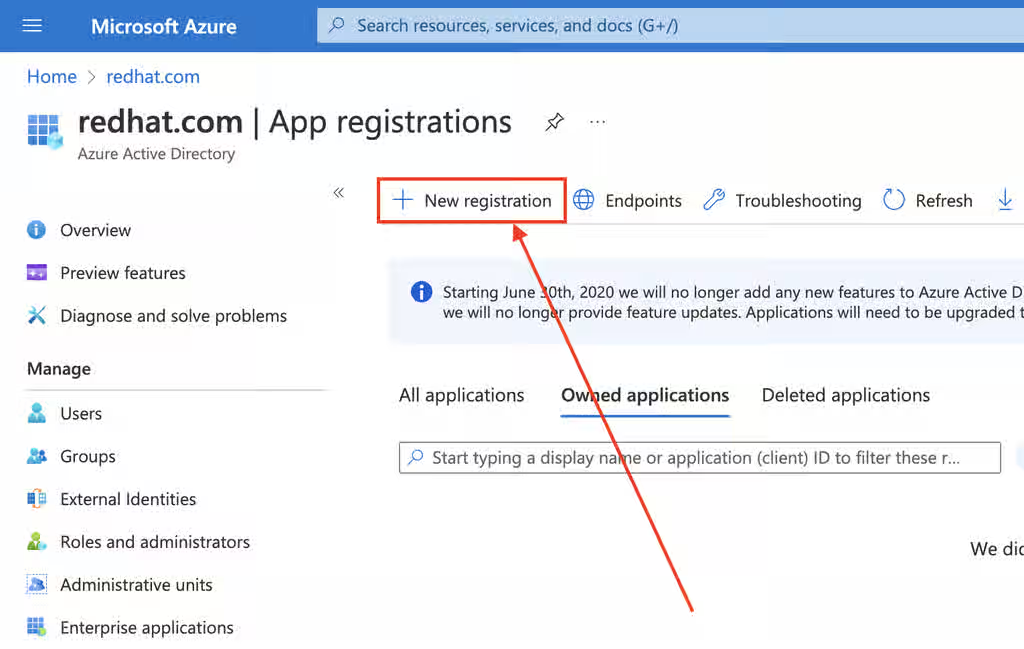
-
Name the application, for example
openshift-auth. - Select Web from the Redirect URI dropdown and enter the value of the OAuth callback URL you retrieved in the previous step.
After providing the required information, click Register to create the application.
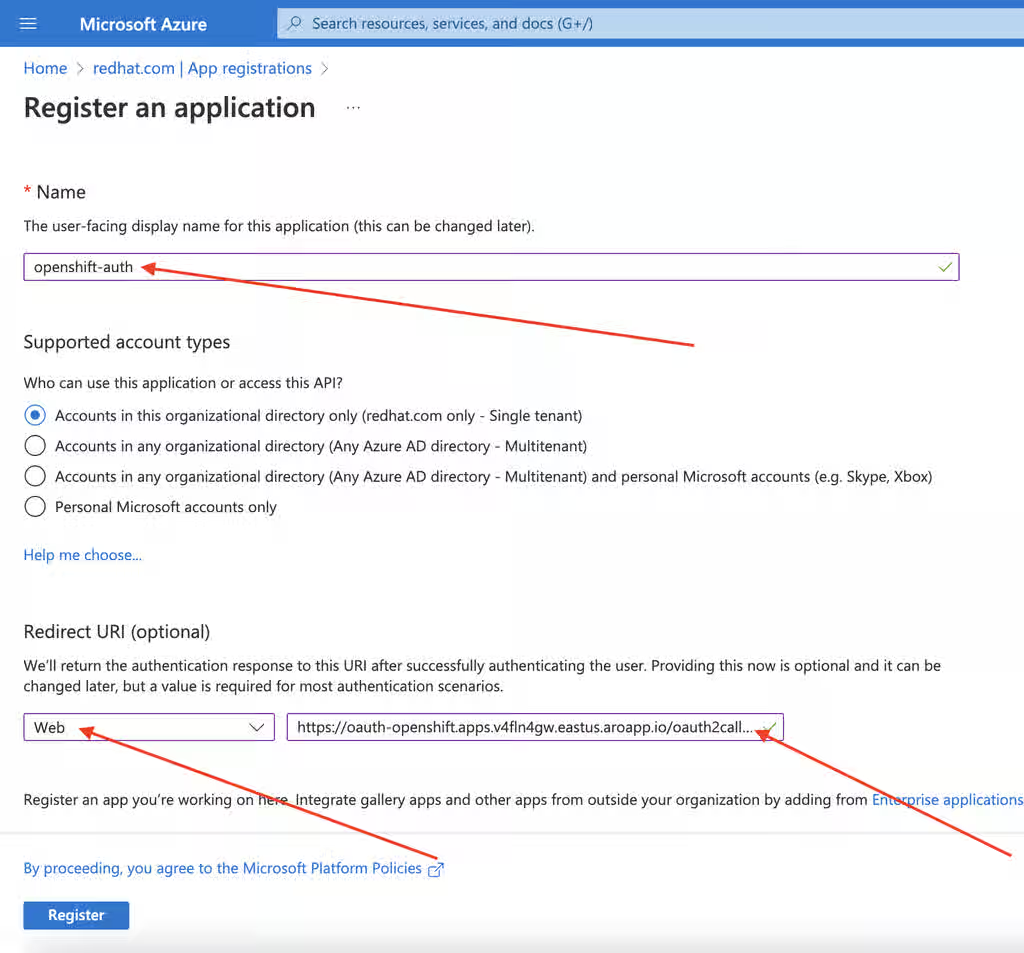
Select the Certificates & secrets sub-blade and select New client secret.
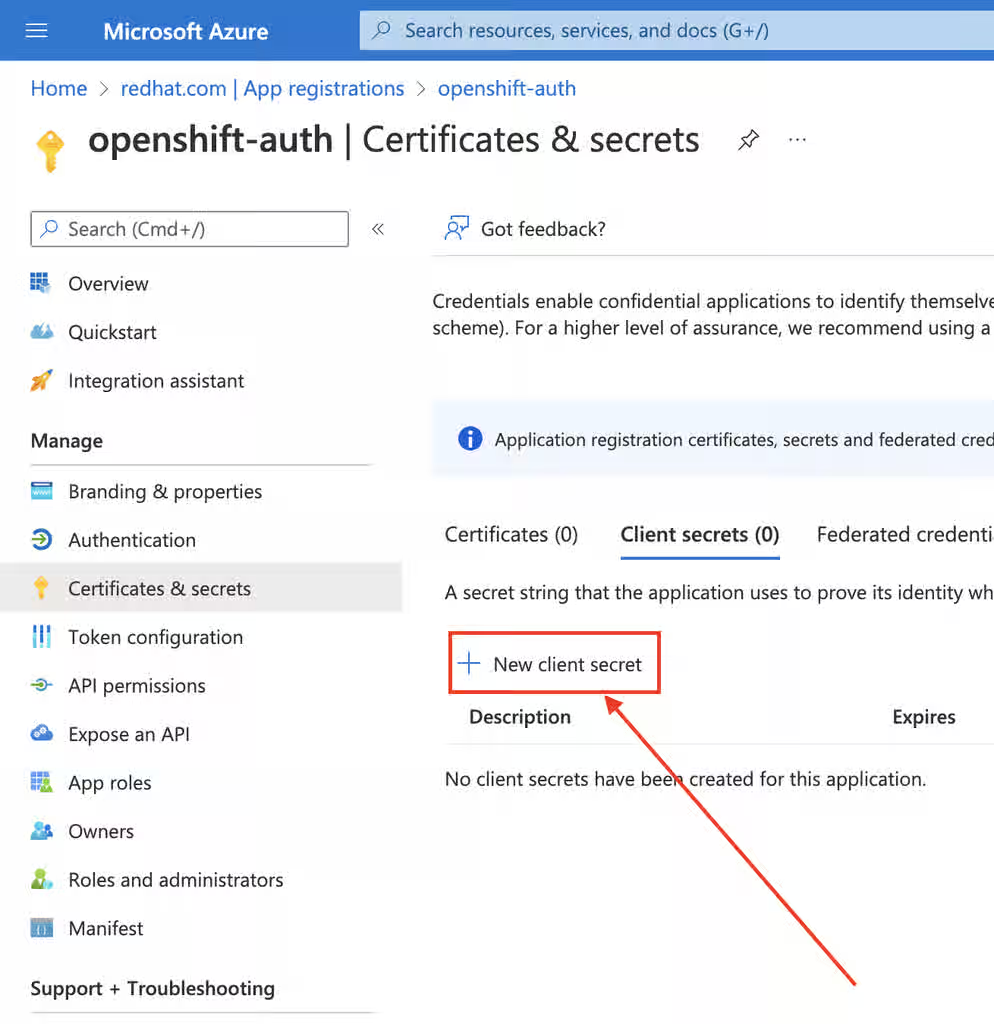
Complete the requested details and store the generated client secret value. This secret is required later in this process.
ImportantAfter initial setup, you cannot see the client secret. If you did not record the client secret, you must generate a new one.
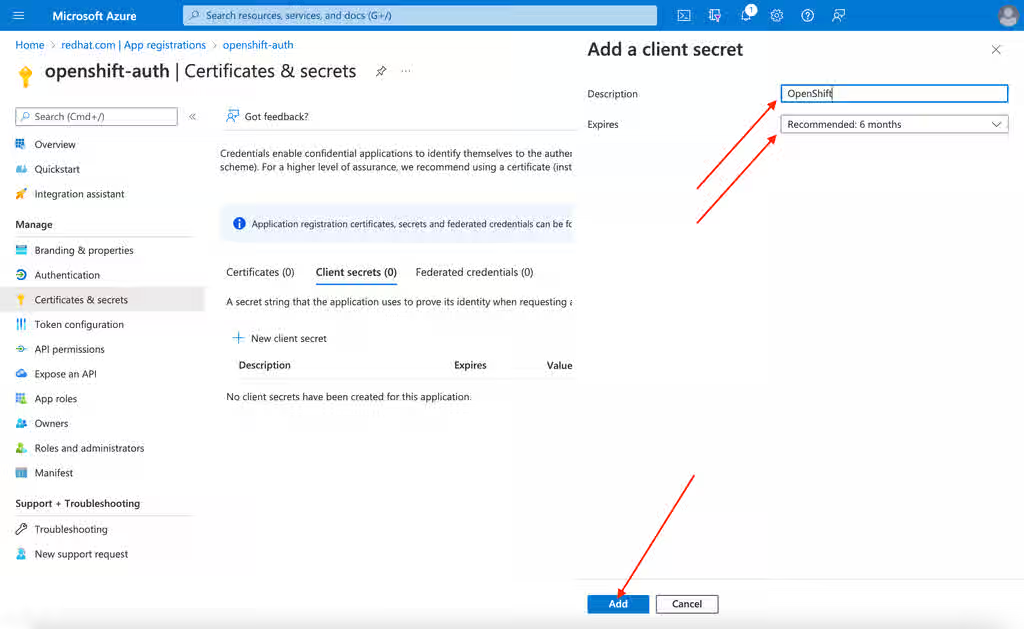
Select the Overview sub-blade and note the
Application (client) IDandDirectory (tenant) ID. You will need these values in a future step.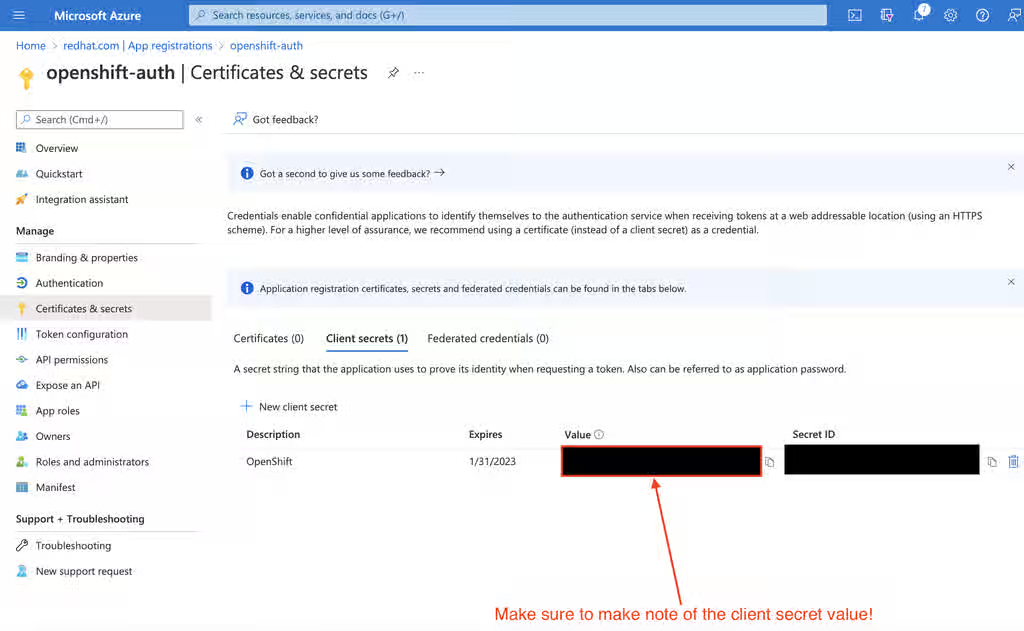
9.2. Optional and group claims for Entra ID application registration
The email and preferred_username Entra ID optional claims provide Red Hat OpenShift Service on AWS with the information it needs to create user accounts. Group claims enable group-based access control.
In addition to individual user authentication, Red Hat OpenShift Service on AWS provides group claim functionality. This functionality allows an OpenID Connect (OIDC) identity provider, such as Entra ID, to offer a user’s group membership for use within Red Hat OpenShift Service on AWS.
Additional resources
9.2.1. Configure optional claims in Entra ID
Configure the email and preferred_username optional claims in Entra ID so that Red Hat OpenShift Service on AWS can identify users during authentication.
Procedure
Click the Token configuration sub-blade and click Add optional claim.
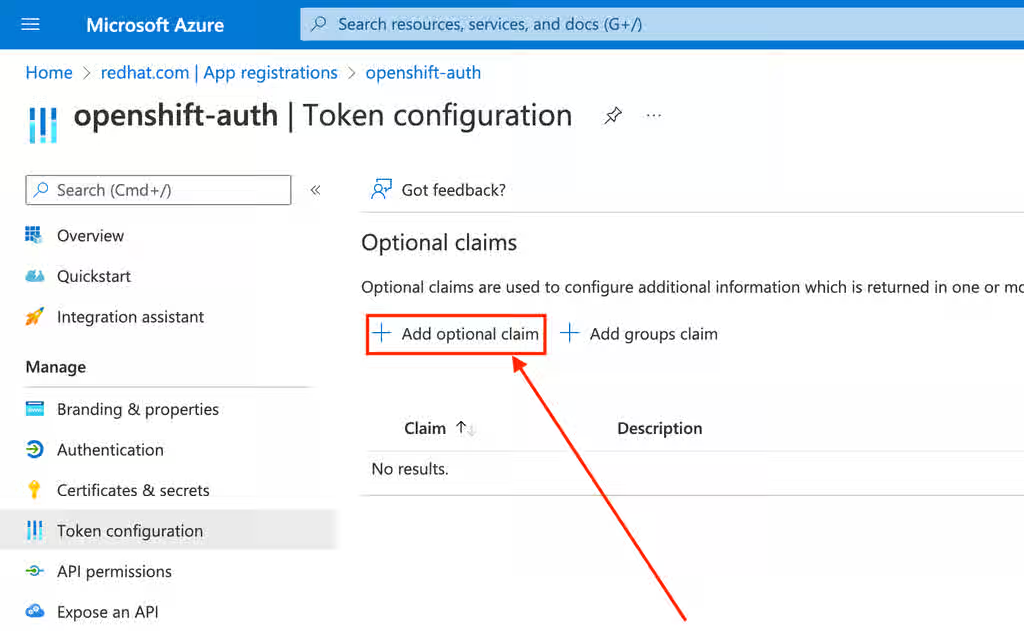
Select the ID radio button.
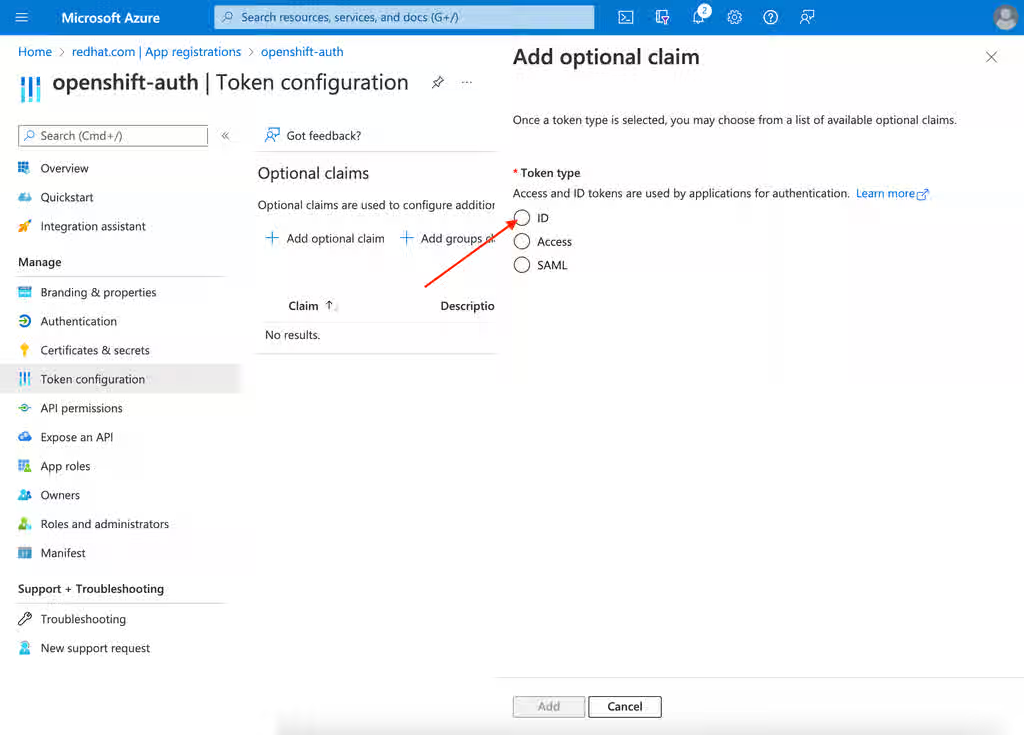
Select the email claim checkbox.
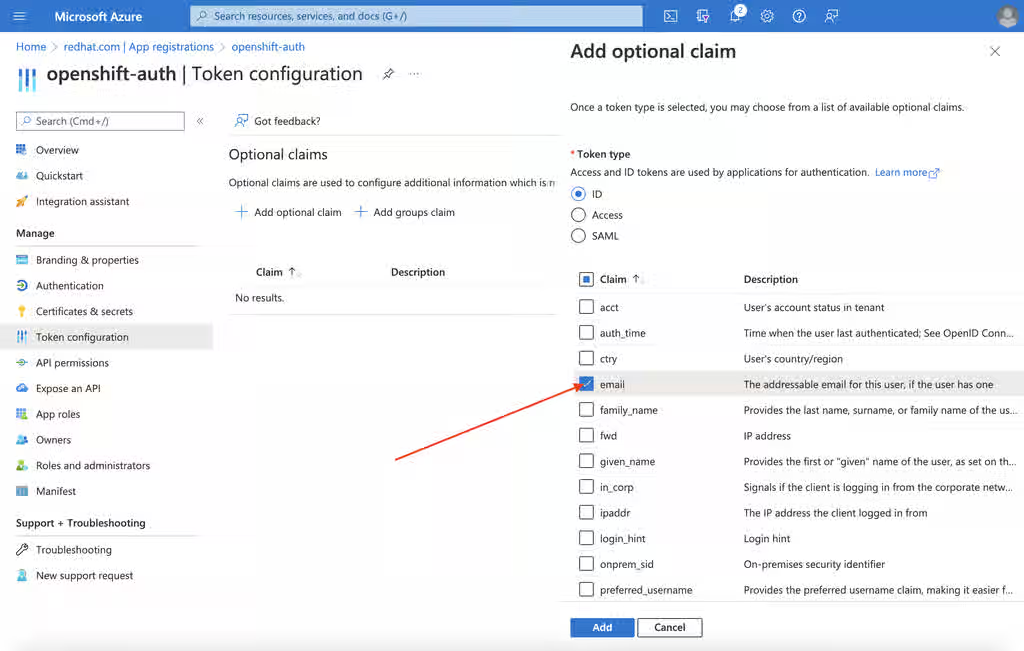
Select the
preferred_usernameclaim checkbox. Then, click Add to configure the email and preferred_username claims your Entra ID application.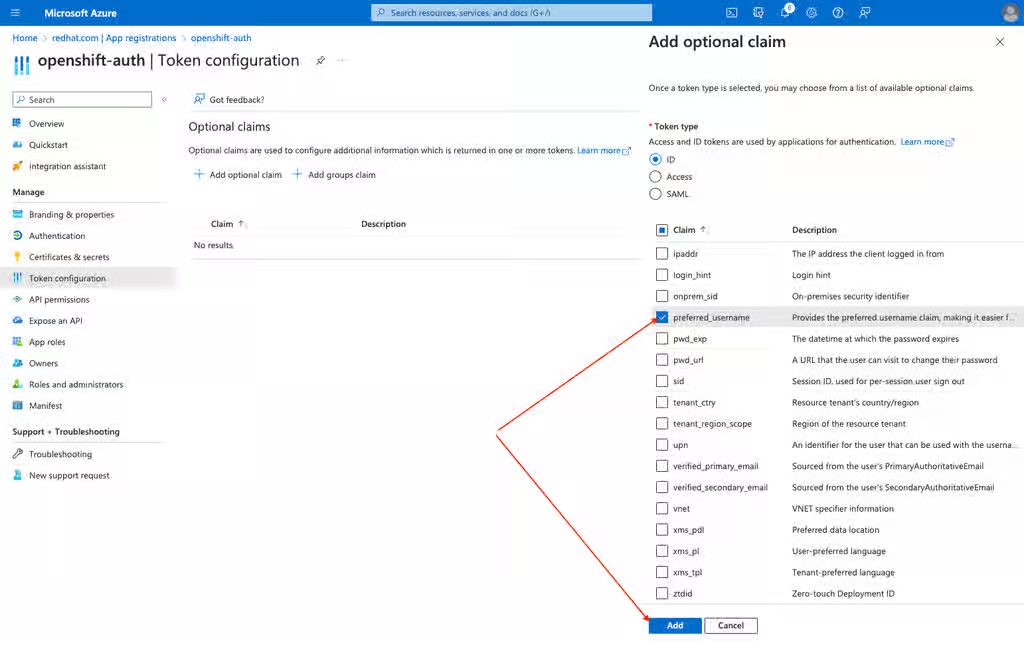
Follow the prompt in the dialog box to enable the necessary Microsoft Graph permissions.
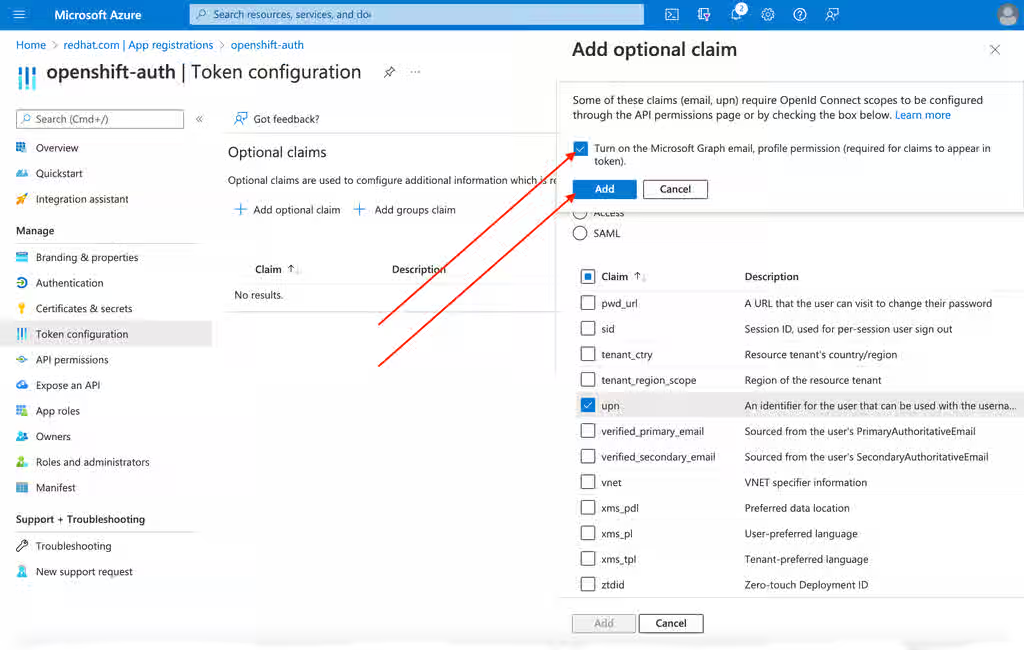
9.2.2. Configure group claims
Configure group claims in Entra ID to allow Red Hat OpenShift Service on AWS to manage user group memberships and enable group-based role bindings in the cluster.
Configuring group claims is an optional step.
Procedure
From the Token configuration sub-blade, click Add groups claim.
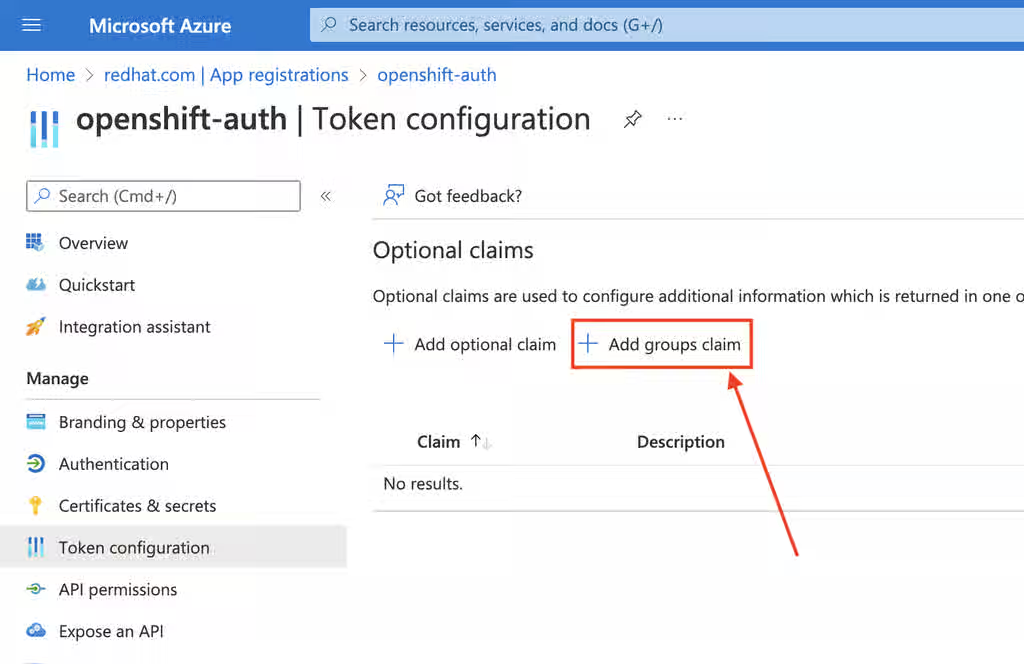
To configure group claims for your Entra ID application, select Security groups and then click Add.
NoteIn this example, the group claim includes all of the security groups that a user is a member of. In a real production environment, ensure that the group claim only includes groups that apply to Red Hat OpenShift Service on AWS.
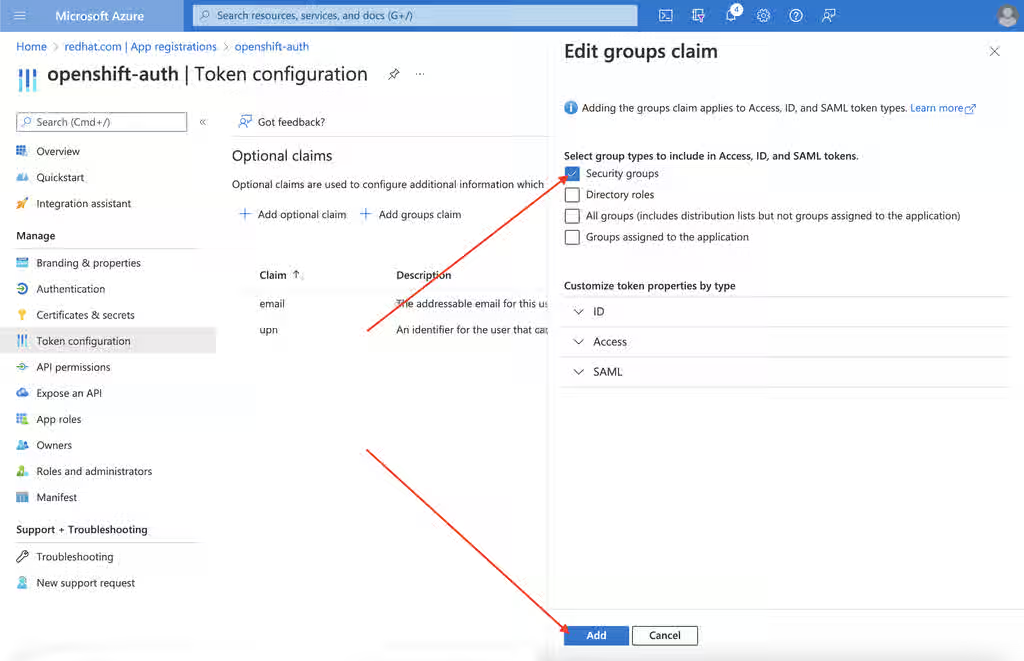
9.3. Configure Entra ID as the cluster identity provider
Use the ROSA command-line interface (CLI) (rosa) to configure the cluster’s OAuth provider to use Entra ID as its identity provider, enabling users to log in with their Microsoft credentials and optional group-based access control.
Procedure
Create the variables necessary for the identity provider configuration by running the following command:
$ CLUSTER_NAME=example-cluster
$ IDP_NAME=AAD
$ APP_ID=yyyyyyyy-yyyy-yyyy-yyyy-yyyyyyyyyyyy
$ CLIENT_SECRET=xxxxxxxx-xxxx-xxxx-xxxx-xxxxxxxxxxxx
$ TENANT_ID=zzzzzzzz-zzzz-zzzz-zzzz-zzzzzzzzzzzz
where:
example-cluster- Replace this with the name of your cluster.
AAD- Replace this value with the name you used in the OAuth callback URL that you generated earlier in this process.
yyyyyyyy-yyyy-yyyy-yyyy-yyyyyyyyyyyy- Replace this with the Application (client) ID.
xxxxxxxx-xxxx-xxxx-xxxx-xxxxxxxxxxxx- Replace this with the Client Secret.
zzzzzzzz-zzzz-zzzz-zzzz-zzzzzzzzzzzz- Replace this with the Directory (tenant) ID.
Configure the cluster’s OAuth provider by running the following command. If you enabled group claims, ensure that you use the
--group-claims groupsargument.If you enabled group claims, run the following command:
$ rosa create idp \ --cluster ${CLUSTER_NAME} \ --type openid \ --name ${IDP_NAME} \ --client-id ${APP_ID} \ --client-secret ${CLIENT_SECRET} \ --issuer-url https://login.microsoftonline.com/${TENANT_ID}/v2.0 \ --email-claims email \ --name-claims name \ --username-claims preferred_username \ --extra-scopes email,profile \ --groups-claims groupsIf you did not enable group claims, run the following command:
$ rosa create idp \ --cluster ${CLUSTER_NAME} \ --type openid \ --name ${IDP_NAME} \ --client-id ${APP_ID} \ --client-secret ${CLIENT_SECRET} \ --issuer-url https://login.microsoftonline.com/${TENANT_ID}/v2.0 \ --email-claims email \ --name-claims name \ --username-claims preferred_username \ --extra-scopes email,profileAfter a few minutes, the cluster authentication Operator reconciles your changes, and you can log in to the cluster by using Entra ID.
9.4. Additional permissions for individual users and groups
When you first log in, you might notice that you have very limited permissions. By default, Red Hat OpenShift Service on AWS only grants you the ability to create new projects, or namespaces, in the cluster. Other projects are restricted from view.
You must grant these additional abilities to individual users and groups.
9.5. Grant additional permissions to individual users
Grant the cluster-admin role to individual Entra ID users so that they have full access and control over the cluster.
Procedure
Grant a user access to the
cluster-adminrole by running the following command:$ rosa grant user cluster-admin --user=<USERNAME> --cluster=${CLUSTER_NAME}where:
<USERNAME>- Provide the Entra ID username that you want to have cluster admin permissions.
9.6. Grant additional permissions to individual groups
When group claims are enabled, the cluster OAuth provider automatically creates or updates group memberships by using the group ID, but does not create RoleBindings or ClusterRoleBindings. You must create those bindings to grant group-based permissions.
To grant an automatically generated group access to the cluster-admin role, you must create a ClusterRoleBinding to the group ID.
Procedure
Create the
ClusterRoleBindingby running the following command:$ oc create clusterrolebinding cluster-admin-group --clusterrole=cluster-admin --group=<GROUP_ID>
where:
<GROUP_ID>- Specifies the Entra ID group ID that you want to have cluster admin permissions.
Now, any user in the specified group automatically receives
cluster-adminaccess.
9.7. Additional resources
Chapter 10. Tutorial: Use AWS Secrets Manager CSI on Red Hat OpenShift Service on AWS with STS
The AWS Secrets and Configuration Provider (ASCP) provides a way to expose AWS Secrets as Kubernetes storage volumes. With the ASCP, you can store and manage your secrets in Secrets Manager and then securely retrieve them through your Red Hat OpenShift Service on AWS workloads without hardcoding sensitive data in application configurations.
10.1. Prepare your environment for AWS Secrets Manager
Before creating your application, you need to gain access to your Red Hat OpenShift Service on AWS cluster and configure it with permissions and variables required by the AWS Secrets and Configuration Provider.
Prerequisites
- You have created a Red Hat OpenShift Service on AWS cluster deployed with Security Token Service (STS).
- You have installed Helm 3.
-
You have access to the AWS CLI (
aws). -
You have access to the OpenShift CLI (
oc). -
You have access to the
jqCLI.
Procedure
Log in to your Red Hat OpenShift Service on AWS cluster by running the following command:
$ oc login --token=<your-token> --server=<your-server-url>
You can find your login token by accessing your cluster in This content is not included.pull secret from Red Hat OpenShift Cluster Manager.
Validate that your cluster has STS by running the following command:
$ oc get authentication.config.openshift.io cluster -o json \
  | jq .spec.serviceAccountIssuer
Example output
"https://xxxxx.cloudfront.net/xxxxx"
If your output is different, do not proceed. See Red Hat documentation on creating an STS cluster before continuing this process.
Set the
SecurityContextConstraintspermission to allow the Container Storage Interface (CSI) driver to run by running the following command:$ oc new-project csi-secrets-store $ oc adm policy add-scc-to-user privileged \ system:serviceaccount:csi-secrets-store:secrets-store-csi-driver $ oc adm policy add-scc-to-user privileged \ system:serviceaccount:csi-secrets-store:csi-secrets-store-provider-awsCreate environment variables to use later in this process by running the following command:
$ export REGION=$(oc get infrastructure cluster -o=jsonpath="{.status.platformStatus.aws.region}")
$ export OIDC_ENDPOINT=$(oc get authentication.config.openshift.io cluster \
   -o jsonpath='{.spec.serviceAccountIssuer}' | sed  's|^https://||')
$ export AWS_ACCOUNT_ID=`aws sts get-caller-identity --query Account --output text`
$ export AWS_PAGER=""
10.2. Deploy the AWS Secrets and Configuration Provider
Deploy the Secrets Store Container Storage Interface (CSI) Driver and the AWS Secrets and Configuration Provider by using Helm to enable your Red Hat OpenShift Service on AWS workloads to mount AWS Secrets as volumes.
Procedure
Use Helm to register the Secrets Store CSI Driver by running the following command:
$ helm repo add secrets-store-csi-driver \ https://kubernetes-sigs.github.io/secrets-store-csi-driver/chartsUpdate your Helm repositories by running the following command:
$ helm repo update
Install the Secrets Store CSI Driver by running the following command:
$ helm upgrade --install -n csi-secrets-store \ csi-secrets-store-driver secrets-store-csi-driver/secrets-store-csi-driverDeploy the AWS provider by running the following command:
$ oc -n csi-secrets-store apply -f \ https://raw.githubusercontent.com/rh-mobb/documentation/main/content/misc/secrets-store-csi/aws-provider-installer.yamlCheck that both Daemonsets are running by running the following command:
$ oc -n csi-secrets-store get ds \ csi-secrets-store-provider-aws \ csi-secrets-store-driver-secrets-store-csi-driverLabel the Secrets Store CSI Driver to allow use with the restricted pod security profile by running the following command:
$ oc label csidriver.storage.k8s.io/secrets-store.csi.k8s.io security.openshift.io/csi-ephemeral-volume-profile=restricted
10.3. Create a secret and IAM access policies
Create a secret in AWS Secrets Manager and configure the necessary AWS Identity and Access Management (IAM) policies and roles to allow your application workloads to retrieve the secret securely using the Security Token Service (STS).
Procedure
Create a secret in AWS Secrets Manager by running the following command:
$ SECRET_ARN=$(aws --region "$REGION" secretsmanager create-secret \ --name MySecret --secret-string \ '{"username":"shadowman", "password":"hunter2"}' \ --query ARN --output text); echo $SECRET_ARNCreate an IAM Access Policy document by running the following command:
$ cat << EOF > policy.json { "Version": "2012-10-17", "Statement": [{ "Effect": "Allow", "Action": [ "secretsmanager:GetSecretValue", "secretsmanager:DescribeSecret" ], "Resource": ["$SECRET_ARN"] }] } EOFCreate an IAM Access Policy by running the following command:
$ POLICY_ARN=$(aws --region "$REGION" --query Policy.Arn \
--output text iam create-policy \
--policy-name openshift-access-to-mysecret-policy \
--policy-document file://policy.json); echo $POLICY_ARN
Create an IAM Role trust policy document by running the following command:
NoteThe trust policy is locked down to the default service account of a namespace you create later in this process.
$ cat <<EOF > trust-policy.json { "Version": "2012-10-17", "Statement": [ { "Effect": "Allow", "Condition": { "StringEquals" : { "${OIDC_ENDPOINT}:sub": ["system:serviceaccount:my-application:default"] } }, "Principal": { "Federated": "arn:aws:iam::$AWS_ACCOUNT_ID:oidc-provider/${OIDC_ENDPOINT}" }, "Action": "sts:AssumeRoleWithWebIdentity" } ] } EOFCreate an IAM role by running the following command:
$ ROLE_ARN=$(aws iam create-role --role-name openshift-access-to-mysecret \
--assume-role-policy-document file://trust-policy.json \
--query Role.Arn --output text); echo $ROLE_ARN
Attach the role to the policy by running the following command:
$ aws iam attach-role-policy --role-name openshift-access-to-mysecret \
    --policy-arn $POLICY_ARN
10.4. Create an application that uses an AWS Secrets Manager secret
Deploy a sample application with the SecretProviderClass Container Storage Interface (CSI) volume to verify that your workload can retrieve secrets from AWS Secrets Manager.
Procedure
Create an OpenShift project by running the following command:
$ oc new-project my-application
Annotate the default service account to use the Security Token Service (STS) role by running the following command:
$ oc annotate -n my-application serviceaccount default \ eks.amazonaws.com/role-arn=$ROLE_ARNCreate a secret provider class to access our secret by running the following command:
$ cat << EOF | oc apply -f - apiVersion: secrets-store.csi.x-k8s.io/v1 kind: SecretProviderClass metadata: name: my-application-aws-secrets spec: provider: aws parameters: objects: | - objectName: "MySecret" objectType: "secretsmanager" EOFCreate a deployment by using our secret in the following command:
$ cat << EOF | oc apply -f -
apiVersion: v1
kind: Pod
metadata:
  name: my-application
  labels:
    app: my-application
spec:
  volumes:
  - name: secrets-store-inline
    csi:
      driver: secrets-store.csi.k8s.io
      readOnly: true
      volumeAttributes:
        secretProviderClass: "my-application-aws-secrets"
  containers:
  - name: my-application-deployment
    image: k8s.gcr.io/e2e-test-images/busybox:1.29
    command:
      - "/bin/sleep"
      - "10000"
    volumeMounts:
    - name: secrets-store-inline
      mountPath: "/mnt/secrets-store"
      readOnly: true
EOF
Verification
Verify the pod has the secret mounted by running the following command:
$ oc exec -it my-application -- cat /mnt/secrets-store/MySecret
10.5. Clean up AWS resources
Clean up your AWS resources after completing this lab tutorial.
Procedure
Delete the application by running the following command:
$ oc delete project my-application
Delete the secrets store Container Storage Interface (CSI) driver by running the following command:
$ helm delete -n csi-secrets-store csi-secrets-store-driver
Delete the security context constraints by running the following command:
$ oc adm policy remove-scc-from-user privileged \ system:serviceaccount:csi-secrets-store:secrets-store-csi-driver; oc adm policy remove-scc-from-user privileged \ system:serviceaccount:csi-secrets-store:csi-secrets-store-provider-awsDelete the AWS provider by running the following command:
$ oc -n csi-secrets-store delete -f \
https://raw.githubusercontent.com/rh-mobb/documentation/main/content/misc/secrets-store-csi/aws-provider-installer.yaml
Delete AWS roles and policies by running the following command:
$ aws iam detach-role-policy --role-name openshift-access-to-mysecret \ --policy-arn $POLICY_ARN; aws iam delete-role --role-name openshift-access-to-mysecret; aws iam delete-policy --policy-arn $POLICY_ARNDelete the Secrets Manager secret by running the following command:
$ aws secretsmanager --region $REGION delete-secret --secret-id $SECRET_ARN
Chapter 11. Tutorial: Use AWS Controllers for Kubernetes on Red Hat OpenShift Service on AWS
You can use AWS Controllers for Kubernetes (ACK) to manage AWS service resources directly from Red Hat OpenShift Service on AWS. With ACK, you don’t need to define resources outside of the cluster or run services that provide supporting capabilities.
You can install various ACK Operators directly from the software catalog to quickly integrate AWS services with your applications.
Follow this tutorial to deploy the ACK S3 Operator. You can also adapt these steps for any other ACK Operator in the catalog.
11.1. Set up your environment
Set environment variables to ensure consistency across the commands within this tutorial.
Prerequisites
- You have created a Red Hat OpenShift Service on AWS cluster.
-
You have access to a user account with
cluster-adminprivileges. -
You have access to the OpenShift CLI (
oc). -
You have access to the AWS CLI (
aws).
Procedure
Configure the following environment variables, changing the cluster name to suit your cluster:
$ export CLUSTER_NAME=$(oc get infrastructure cluster -o=jsonpath="{.status.infrastructureName}" | sed 's/-[a-z0-9]\{5\}$//') $ export REGION=$(rosa describe cluster -c ${ROSA_CLUSTER_NAME} --output json | jq -r .region.id) $ export OIDC_ENDPOINT=$(oc get authentication.config.openshift.io cluster -o json | jq -r .spec.serviceAccountIssuer | sed 's|^https://||') $ export AWS_ACCOUNT_ID=`aws sts get-caller-identity --query Account --output text` $ export ACK_SERVICE=s3 $ export ACK_SERVICE_ACCOUNT=ack-${ACK_SERVICE}-controller $ export POLICY_ARN=arn:aws:iam::aws:policy/AmazonS3FullAccess $ export AWS_PAGER="" $ export SCRATCH="/tmp/${ROSA_CLUSTER_NAME}/ack" $ mkdir -p ${SCRATCH}Ensure all fields output correctly:
$ echo "Cluster: ${ROSA_CLUSTER_NAME}, Region: ${REGION}, OIDC Endpoint: ${OIDC_ENDPOINT}, AWS Account ID: ${AWS_ACCOUNT_ID}"
11.2. Prepare your AWS account
Create the AWS Identity and Access Management (IAM) trust policy and role that the AWS Controllers for Kubernetes (ACK) Operator requires to manage AWS resources from your Red Hat OpenShift Service on AWS cluster.
Procedure
Create an AWS IAM trust policy for the ACK Operator:
$ cat <<EOF > "${SCRATCH}/trust-policy.json" { "Version": "2012-10-17", "Statement": [ { "Effect": "Allow", "Condition": { "StringEquals" : { "${OIDC_ENDPOINT}:sub": "system:serviceaccount:ack-system:${ACK_SERVICE_ACCOUNT}" } }, "Principal": { "Federated": "arn:aws:iam::$AWS_ACCOUNT_ID:oidc-provider/${OIDC_ENDPOINT}" }, "Action": "sts:AssumeRoleWithWebIdentity" } ] } EOFCreate an AWS IAM role for the ACK Operator to assume with the
AmazonS3FullAccesspolicy attached:NoteYou can find the recommended policy in each project’s GitHub repository, for example Content from github.com is not included.https://github.com/aws-controllers-k8s/s3-controller/blob/main/config/iam/recommended-policy-arn.
$ ROLE_ARN=$(aws iam create-role --role-name "ack-${ACK_SERVICE}-controller" \ --assume-role-policy-document "file://${SCRATCH}/trust-policy.json" \ --query Role.Arn --output text)$ echo $ROLE_ARN
$ aws iam attach-role-policy --role-name "ack-${ACK_SERVICE}-controller" \
     --policy-arn ${POLICY_ARN}
11.3. Install the ACK S3 controller
Configure and deploy the AWS Controllers for Kubernetes (ACK) S3 controller by installing the ACK S3 Operator and associating it with an AWS Identity and Access Management (IAM) role.
Procedure
Create a project to install the ACK S3 Operator into:
$ oc new-project ack-system
Create a file with the ACK S3 Operator configuration:
NoteACK_WATCH_NAMESPACEis purposely left blank so the controller can properly watch all namespaces in the cluster.$ cat << EOF "${SCRATCH}/config.txt" ACK_ENABLE_DEVELOPMENT_LOGGING=true ACK_LOG_LEVEL=debug ACK_WATCH_NAMESPACE= AWS_REGION=${REGION} AWS_ENDPOINT_URL= ACK_RESOURCE_TAGS=${CLUSTER_NAME} ENABLE_LEADER_ELECTION=true LEADER_ELECTION_NAMESPACE= RECONCILE_DEFAULT_MAX_CONCURRENT_SYNCS=1 FEATURE_FLAGS= FEATURE_GATES= EOFUse the file from the previous step to create a ConfigMap:
$ oc -n ack-system create configmap \ --from-env-file=${SCRATCH}/config.txt ack-${ACK_SERVICE}-user-configInstall the ACK S3 Operator from the software catalog:
$ cat << EOF | oc apply -f - apiVersion: operators.coreos.com/v1 kind: OperatorGroup metadata: name: ack-${ACK_SERVICE}-controller namespace: ack-system spec: upgradeStrategy: Default --- apiVersion: operators.coreos.com/v1alpha1 kind: Subscription metadata: name: ack-${ACK_SERVICE}-controller namespace: ack-system spec: channel: alpha installPlanApproval: Automatic name: ack-${ACK_SERVICE}-controller source: community-operators sourceNamespace: openshift-marketplace EOFAnnotate the ACK S3 Operator service account with the AWS IAM role to assume and restart the deployment:
$ oc -n ack-system annotate serviceaccount ${ACK_SERVICE_ACCOUNT} \
  eks.amazonaws.com/role-arn=${ROLE_ARN} && \
  oc -n ack-system rollout restart deployment ack-${ACK_SERVICE}-controller
Verification
Verify that the ACK S3 Operator is running:
$ oc -n ack-system get pods
Example output
NAME                                 READY   STATUS    RESTARTS   AGE
ack-s3-controller-585f6775db-s4lfz   1/1     Running   0          51s
11.4. Validate the deployment
Verify that the controller is working correctly by deploying a test S3 bucket resource and confirming that it is created in AWS.
Procedure
Deploy an S3 bucket resource:
$ cat << EOF | oc apply -f - apiVersion: s3.services.k8s.aws/v1alpha1 kind: Bucket metadata: name: ${CLUSTER-NAME}-bucket namespace: ack-system spec: name: ${CLUSTER-NAME}-bucket EOFVerify the S3 bucket was created in AWS:
$ aws s3 ls | grep ${CLUSTER_NAME}-bucketExample output
2023-10-04 14:51:45 mrmc-test-maz-bucket
11.5. Clean up AWS resources
Clean up your AWS resources after completing this tutorial.
Procedure
Delete the S3 bucket resource:
$ oc -n ack-system delete bucket.s3.services.k8s.aws/${CLUSTER-NAME}-bucketDelete the AWS Controller for Kubernetes (ACK) S3 Operator and the AWS Identity and Access Management (IAM) roles:
$ oc -n ack-system delete subscription ack-${ACK_SERVICE}-controller$ aws iam detach-role-policy \ --role-name "ack-${ACK_SERVICE}-controller" \ --policy-arn ${POLICY_ARN}$ aws iam delete-role \ --role-name "ack-${ACK_SERVICE}-controller"Delete the
ack-systemproject:$ oc delete project ack-system
11.6. Additional resources
Chapter 12. Tutorial: Assign a consistent egress IP for external traffic
You can configure a set of predictable IP addresses for egress cluster traffic. Assigning a consistent IP address for outbound cluster traffic is useful when external resources, such as security groups, require an IP-based configuration to meet security standards.
By default, Red Hat OpenShift Service on AWS uses the OVN-Kubernetes container network interface (CNI) to assign random IP addresses from a pool. This can make configuring security lockdowns unpredictable or open.
12.1. Set environment variables
Set environment variables to ensure consistency across the commands in this tutorial.
Prerequisites
- You have created a Red Hat OpenShift Service on AWS cluster deployed with OVN-Kubernetes.
-
You have access to the OpenShift CLI (
oc). -
You have access to the ROSA command-line interface (CLI) (
rosa). -
You have access to the
jqcommand-line JSON processor.
Procedure
Set your environment variables by running the following command:
NoteReplace the value of the
ROSA_MACHINE_POOL_NAMEvariable to target a different machine pool.$ export ROSA_CLUSTER_NAME=$(oc get infrastructure cluster -o=jsonpath="{.status.infrastructureName}" | sed 's/-[a-z0-9]\{5\}$//')$ export ROSA_MACHINE_POOL_NAME=worker
Additional resources
12.2. Ensure IP address capacity
Confirm that your nodes have available IP address capacity. Each public cloud provider limits the number of IP addresses that you can assign to each node.
Procedure
Verify sufficient capacity by running the following command:
$ oc get node -o json | \ jq '.items[] | { "name": .metadata.name, "ips": (.status.addresses | map(select(.type == "InternalIP") | .address)), "capacity": (.metadata.annotations."cloud.network.openshift.io/egress-ipconfig" | fromjson[] | .capacity.ipv4) }'Example output
{
  "name": "ip-10-10-145-88.ec2.internal",
  "ips": [
    "10.10.145.88"
  ],
  "capacity": 14
}
{
  "name": "ip-10-10-154-175.ec2.internal",
  "ips": [
    "10.10.154.175"
  ],
  "capacity": 14
}
12.3. Create the egress IP rules
Configure egress IP rules to provide reserved, consistent IP addresses for your outbound cluster traffic. Before creating the egress IP rules, identify which egress IPs to use.
The egress IPs that you select should exist as a part of the subnets in which the worker nodes are provisioned.
Procedure
Reserve the egress IPs that you requested to avoid conflicts with the AWS Virtual Private Cloud (VPC) Dynamic Host Configuration Protocol (DHCP) service.
Request explicit IP reservations on the Content from docs.aws.amazon.com is not included.AWS documentation for CIDR reservations page.
12.4. Assign an egress IP to a namespace
Assign an egress IP to a namespace on your cluster to ensure that all pods inside it use a consistent, predictable address for external connections.
Procedure
Create a new project by running the following command:
$ oc new-project demo-egress-ns
Create the egress rule for all pods within the namespace by running the following command:
$ cat <<EOF | oc apply -f -
apiVersion: k8s.ovn.org/v1
kind: EgressIP
metadata:
  name: demo-egress-ns
spec:
  # NOTE: these egress IPs are within the subnet range(s) in which my worker nodes
  #       are deployed.
  egressIPs:
    - 10.10.100.253
    - 10.10.150.253
    - 10.10.200.253
  namespaceSelector:
    matchLabels:
      kubernetes.io/metadata.name: demo-egress-ns
EOF
12.5. Assign an egress IP to a pod
Create an egress rule to assign a consistent egress IP to a specified pod so that its outbound traffic uses a predictable IP.
Procedure
Create a new project by running the following command:
$ oc new-project demo-egress-pod
Create the egress rule for the pod by running the following command:
Notespec.namespaceSelectoris a mandatory field.$ cat <<EOF | oc apply -f - apiVersion: k8s.ovn.org/v1 kind: EgressIP metadata: name: demo-egress-pod spec: # NOTE: these egress IPs are within the subnet range(s) in which my worker nodes # are deployed. egressIPs: - 10.10.100.254 - 10.10.150.254 - 10.10.200.254 namespaceSelector: matchLabels: kubernetes.io/metadata.name: demo-egress-pod podSelector: matchLabels: run: demo-egress-pod EOF
12.5.1. Label the nodes
Apply labels to worker nodes for egress IP assignments.
Procedure
Obtain your pending egress IP assignments by running the following command:
$ oc get egressips
Example output
NAME              EGRESSIPS       ASSIGNED NODE   ASSIGNED EGRESSIPS
demo-egress-ns    10.10.100.253
demo-egress-pod   10.10.100.254
The egress IP rule that you created only applies to nodes with the
k8s.ovn.org/egress-assignablelabel. Make sure that the label is only on a specific machine pool.Assign the label to your machine pool using the following command:
WarningIf you rely on node labels for your machine pool, this command will replace those labels. Be sure to input your desired labels into the
--labelsfield to ensure your node labels remain.$ rosa update machinepool ${ROSA_MACHINE_POOL_NAME} \ --cluster="${ROSA_CLUSTER_NAME}" \ --labels "k8s.ovn.org/egress-assignable="
12.5.2. Review the egress IPs
Review egress IP assignments to verify that each egress IP address is correctly assigned to a node.
Procedure
Review the egress IP assignments by running the following command:
$ oc get egressips
Example output
NAME              EGRESSIPS       ASSIGNED NODE                   ASSIGNED EGRESSIPS
demo-egress-ns    10.10.100.253   ip-10-10-156-122.ec2.internal   10.10.150.253
demo-egress-pod   10.10.100.254   ip-10-10-156-122.ec2.internal   10.10.150.254
12.5.3. Deploy a sample application
To test the egress IP rule, create a service that is restricted to the egress IP addresses that you specified. The service simulates an external service that expects a small subset of IP addresses.
Procedure
Run the
echoservercommand to replicate a request:$ oc -n default run demo-service --image=gcr.io/google_containers/echoserver:1.4
Expose the pod as a service and limit the ingress to the egress IP addresses you specified by running the following command:
$ cat <<EOF | oc apply -f - apiVersion: v1 kind: Service metadata: name: demo-service namespace: default annotations: service.beta.kubernetes.io/aws-load-balancer-scheme: "internal" service.beta.kubernetes.io/aws-load-balancer-internal: "true" spec: selector: run: demo-service ports: - port: 80 targetPort: 8080 type: LoadBalancer externalTrafficPolicy: Local # NOTE: this limits the source IPs that are allowed to connect to our service. It # is being used as part of this demo, restricting connectivity to our egress # IP addresses only. # NOTE: these egress IPs are within the subnet range(s) in which my worker nodes # are deployed. loadBalancerSourceRanges: - 10.10.100.254/32 - 10.10.150.254/32 - 10.10.200.254/32 - 10.10.100.253/32 - 10.10.150.253/32 - 10.10.200.253/32 EOFRetrieve the load balancer hostname and save it as an environment variable by running the following command:
$ export LOAD_BALANCER_HOSTNAME=$(oc get svc -n default demo-service -o json | jq -r '.status.loadBalancer.ingress[].hostname')
12.5.4. Test the namespace egress
Verify that your namespace egress IP configuration works correctly.
Procedure
Start an interactive shell to test the namespace egress rule:
$ oc run \
  demo-egress-ns \
  -it \
  --namespace=demo-egress-ns \
  --env=LOAD_BALANCER_HOSTNAME=$LOAD_BALANCER_HOSTNAME \
  --image=registry.access.redhat.com/ubi9/ubi -- \
  bash
Send a request to the load balancer and ensure that you can successfully connect:
$ curl -s http://$LOAD_BALANCER_HOSTNAME
Check the output for a successful connection:
NoteThe
client_addressis the internal IP address of the load balancer, not your egress IP. You can verify that you have configured the client address correctly by connecting with your service limited to.spec.loadBalancerSourceRanges.Example output
CLIENT VALUES:
client_address=10.10.207.247
command=GET
real path=/
query=nil
request_version=1.1
request_uri=http://internal-a3e61de18bfca4a53a94a208752b7263-148284314.us-east-1.elb.amazonaws.com:8080/

SERVER VALUES:
server_version=nginx: 1.10.0 - lua: 10001

HEADERS RECEIVED:
accept=*/*
host=internal-a3e61de18bfca4a53a94a208752b7263-148284314.us-east-1.elb.amazonaws.com
user-agent=curl/7.76.1
BODY:
-no body in request-
Exit the pod by running the following command:
$ exit
12.5.5. Test the pod egress
Verify that your egress IP configuration works correctly.
Procedure
Start an interactive shell to test the pod egress rule:
$ oc run \
  demo-egress-pod \
  -it \
  --namespace=demo-egress-pod \
  --env=LOAD_BALANCER_HOSTNAME=$LOAD_BALANCER_HOSTNAME \
  --image=registry.access.redhat.com/ubi9/ubi -- \
  bash
Send a request to the load balancer by running the following command:
$ curl -s http://$LOAD_BALANCER_HOSTNAME
Check the output for a successful connection:
NoteThe
client_addressis the internal IP address of the load balancer, not your egress IP. You can verify that you have configured the client address correctly by connecting with your service limited to.spec.loadBalancerSourceRanges.Example output
CLIENT VALUES:
client_address=10.10.207.247
command=GET
real path=/
query=nil
request_version=1.1
request_uri=http://internal-a3e61de18bfca4a53a94a208752b7263-148284314.us-east-1.elb.amazonaws.com:8080/

SERVER VALUES:
server_version=nginx: 1.10.0 - lua: 10001

HEADERS RECEIVED:
accept=*/*
host=internal-a3e61de18bfca4a53a94a208752b7263-148284314.us-east-1.elb.amazonaws.com
user-agent=curl/7.76.1
BODY:
-no body in request-
Exit the pod by running the following command:
$ exit
12.5.6. Test blocked egress
This procedure is optional. You can test if your egress IP configuration correctly blocks traffic.
Procedure
Test that the traffic is successfully blocked when the egress rules do not apply by running the following command:
$ oc run \
  demo-egress-pod-fail \
  -it \
  --namespace=demo-egress-pod \
  --env=LOAD_BALANCER_HOSTNAME=$LOAD_BALANCER_HOSTNAME \
  --image=registry.access.redhat.com/ubi9/ubi -- \
  bash
Send a request to the load balancer by running the following command:
$ curl -s http://$LOAD_BALANCER_HOSTNAME
If the command is unsuccessful, egress is successfully blocked.
Exit the pod by running the following command:
$ exit
12.6. Clean up your cluster
Clean up your cluster environment after testing the egress IP configuration.
Procedure
Clean up your cluster by running the following commands:
$ oc delete svc demo-service -n default
$ oc delete pod demo-service -n default
$ oc delete project demo-egress-ns
$ oc delete project demo-egress-pod
$ oc delete egressip demo-egress-ns
$ oc delete egressip demo-egress-pod
Clean up the assigned node labels by running the following command:
WarningIf you rely on node labels for your machine pool, this command replaces those labels. Input your desired labels into the
--labelsfield to ensure your node labels remain.$ rosa update machinepool ${ROSA_MACHINE_POOL_NAME} \ --cluster="${ROSA_CLUSTER_NAME}" \ --labels ""