Installing and Configuring a Red Hat Enterprise Linux 7.4 (and later) High-Availability Cluster on Microsoft Azure
Before you start
-
Review Red Hat's support policies for high availability clusters. Refer to Support Policies for RHEL High Availability Clusters for details.
-
Note: This procedure is valid for Red Hat Enterprise Linux (RHEL) 7 and RHEL 8. In order for this configuration to work properly, you must be running RHEL 7.4.z, RHEL 7.5.z, RHEL 7.6.z, RHEL 7.7, or RHEL 8.0.z. If you are not on these releases (or later), contact Red Hat Support.
-
Use the Azure command-line interface (CLI) to manage resources in Microsoft Azure. Install the Azure CLI on the computer you will use to build the RHEL virtual machine (VM) image and cluster nodes. Refer to Install the Azure CLI for installation instructions.
-
You must be an Administrator of your Microsoft Azure Subscription to create the cluster.
-
You must be enrolled in the This content is not included.Red Hat Cloud Access program and have unused RHEL subscriptions.
Note: One unused subscription migrated to Azure can be used for two RHEL VMs. If you have two unused subscriptions, you can create four VMs, and so on.
-
The attached subscription must include access to the following repositories for each node in the cluster.
- Red Hat Enterprise Linux 7 Server (RPMS): rhel-7-server-rpms/7Server/x86_64
- Red Hat Enterprise Linux High Availability (for RHEL 7 Server) (RPMS): rhel-ha-for-rhel-7-server-rpms/7Server/x86_64
-
Important: Powering off a cluster node does not stop resource usage charges in Microsoft Azure. You must stop the VM in the Azure control panel (or use the Azure CLI) to deallocate the resource. Deallocated resources do not incur charges.
-
For concepts, references, and additional information about RHEL High Availability, refer to the following Red Hat documents.
Create Azure resources
Complete the following steps to create Azure resources for your RHEL high availability (HA) cluster.
-
Log in to your Azure account using the Azure CLI. Save your Azure Subscription ID and Tenant ID. You need these IDs to configure the fencing agent. If you are already logged in, enter
az account listto view account details.Note: If you have multiple subscriptions, make sure to save the IDs for the subscription you will use to build the RHEL HA cluster.
$ az loginExample:
[clouduser@localhost]$ az login

To sign in, use a web browser to open the page https://aka.ms/devicelogin and enter the code ... to authenticate.

[

{

"cloudName": "AzureCloud",

"id": "Subscription ID",

"isDefault": true,

"name": "MySubscriptionName",

"state": "Enabled",

"tenantId": "Tenant ID",

"user": {

"name": "clouduser@company.com",

"type": "user"
-
Create a resource group in an Azure region. All cluster nodes must be in the same resource group.
$ az group create --name <MyResourceGroup> --location <azure-region>Example:
[clouduser@localhost]$ az group create --name azrhelclirsgrp --location southcentralus
{
  "id": "/subscriptions/.../resourceGroups/azrhelclirsgrp",
  "location": "southcentralus",
  "managedBy": null,
  "name": "azrhelclirsgrp",
  "properties": {
    "provisioningState": "Succeeded"
-
Create a storage account. See Storage Content from docs.microsoft.com is not included.SKU Types for more information about the
--skutype option.$ az storage account create -l <azure-region> -n <MyStorageAccount> -g <MyResourceGroup> --sku <sku_type>Example:
    [clouduser@localhost]$ az storage account create -l southcentralus -n azrhelclistact -g azrhelclirsgrp --sku Standard_LRS
    {
      "accessTier": null,
      "creationTime": "2017-04-05T19:10:29.855470+00:00",
      "customDomain": null,
      "encryption": null,
      "id": "/subscriptions/.../resourceGroups/azrhelclirsgrp/providers/Microsoft.St

      ...omitted
-
Get the storage account connection string.
$ az storage account show-connection-string -n <MyStorageAccount> -g <MyResourceGroup>Example:
[clouduser@localhost]$ az storage account show-connection-string -n azrhelclistact -g azrhelclirsgrp
{
  "connectionString": "DefaultEndpointsProtocol=https;EndpointSuffix=...;AccountName=azrhelclistact;AccountKey=...=="
-
Export the connection string. Copy the connection string and paste it in the following command. This string connects your system to the storage account.
$ export AZURE_STORAGE_CONNECTION_STRING="<storage-connection-string>"Example:
[clouduser@localhost]$ export AZURE_STORAGE_CONNECTION_STRING="DefaultEndpointsProtocol=https;EndpointSuffix=...;AccountName=azrhelclistact;AccountKey=...=="
-
Create the storage container.
$ az storage container create -n <MyStorageContainer>Example:
[clouduser@localhost]$ az storage container create -n azrhelclistcont
{
  "created": true
}
-
Create the virtual network. All cluster nodes must be in the same virtual network.
$ az network vnet create --resource-group <MyResourceGroup> --name <MyVnet> --subnet-name <MyVnetSubnet>Example:
    [clouduser@localhost]$ az network vnet create --resource-group azrhelclirsgrp --name azrhelclivnet1 --subnet-name azrhelclisubnet1
    {
      "newVNet": {
        "addressSpace": {
          "addressPrefixes": [
          "10.0.0.0/16"
          ]
          },
          "dhcpOptions": {
            "dnsServers": []
            },

    ...omitted
-
Create an availability set. All cluster nodes must be in the same availability set.
$ az vm availability-set create --name <MyAvailabilitySet> --resource-group <MyResourceGroup>Example:
    [clouduser@localhost]$ az vm availability-set create --name rhelha-avset1 --resource-group azrhelclirsgrp
    {
      "additionalProperties": {},
        "id": "/subscriptions/.../resourceGroups/azrhelclirsgrp/providers/Microsoft.Compute/availabilitySets/rhelha-avset1",
        "location": "southcentralus",
        "name": “rhelha-avset1",
        "platformFaultDomainCount": 2,
        "platformUpdateDomainCount": 5,

    ...omitted
Create an Azure Active Directory application
Complete the following steps to create an Azure Active Directory (AD) application using the Azure CLI. The Azure AD application authorizes and automates access for RHEL HA operations for all nodes in the cluster.
-
Check your permissions. Make sure you are an Administrator or Owner for the Microsoft Azure subscription where you are creating Azure VMs (cluster nodes). You need this authorization to create an AD application.
-
Log in to your Azure account.
$ az login
-
Enter the following command to create the AD application. If you do not specify a password, one is created for you. If you want to use your own password, add the
--passwordoption to the command. Make sure that you create a strong password by following the Content from docs.microsoft.com is not included.Azure Active Directory password rules and restrictions.$ az ad sp create-for-rbac --name <FencingApplicationName> --role owner --scopes "/subscriptions/<SubscriptionID>/resourceGroups/<MyResourseGroup>"Example:
[clouduser@localhost ~] $ az ad sp create-for-rbac --name FencingApp --role owner --scopes "/subscriptions/2586c64b-xxxxxx-xxxxxxx-xxxxxxx/resourceGroups/azrhelclirsgrp"
Retrying role assignment creation: 1/36
Retrying role assignment creation: 2/36
Retrying role assignment creation: 3/36
{
  "appId": "1a3dfe06-df55-42ad-937b-326d1c211739",
  "displayName": "FencingApp",
  "name": "http://FencingApp",
  "password": "43a603f0-64bb-482e-800d-402efe5f3d47",
  "tenant": "77ecefb6-xxxxxxxxxx-xxxxxxx-757a69cb9485"
}
-
Make sure you have saved the following information before proceeding. This information is required to set up the fencing agent.
- AD Application ID
- AD Application Password
- Tenant ID
- Microsoft Azure Subscription ID
Create Azure VMs (Cluster Nodes)
The following procedure guides you through the process of creating This content is not included.Red Hat Cloud Access RHEL VMs (cluster nodes) on Microsoft Azure. Complete this procedure using a RHEL 7 Server or Workstation. You can use Fedora, but there may be slight differences when completing the procedure.
You need the following packages on your local machine to create and configure the VM.
| Package | Repository | Description |
|---|---|---|
| libvirt | rhel-7-server-rpms | Open source API, daemon, and management tool for managing platform virtualization |
| virt-manager | rhel-7-server-rpms | A command line and Gnome desktop virtual machine manager used to create and manage KVM virtual machines |
| libguestfs | rhel-7-server-rpms | A library for accessing and modifying virtual machine file systems |
| libguestfs-tools | rhel-7-server-rpms | System administration tools for virtual machines; includes the guestfish utility |
Review the following configuration settings. These are currently required for VMs running in Microsoft Azure.
| Setting | Requirement |
|---|---|
| ssh | ssh must be enabled to provide remote access to your Azure VMs. |
| dhcp | The primary virtual adapter should be configured for dhcp (IPv4 only). |
| Swap Space | Do not create a dedicated swap file or swap partition. Swap space is configured using the Windows Azure Linux Agent (WALinuxAgent). |
| NIC | Choose virtio device for the primary virtual network adapter. |
| encryption | Users may use Azure Disk Encryption (ADE) for on-demand (Pay-As-You-Go) operating system disks on Red Hat Enterprise Linux (RHEL) 7.2 or later versions in Microsoft Azure. Data disks may be encrypted for any supported version of RHEL on Azure. ADE uses a new encryption method in RHEL 7.6, but the extension for enabling ADE on RHEL 7.6 is not available at this time. If you need to use ADE on RHEL 7.6, choose an earlier version of RHEL, encrypt the virtual machine (VM), then upgrade to RHEL 7.6. This VM will continue to use the pre-RHEL 7.6 encryption method. OS disk encryption is not supported for RHEL VMs in Microsoft Azure when using Red Hat Cloud Access VMs, RHEL 6 or any version of RHEL where the Red Hat shipped packages were modified. |
Create a base RHEL 7.4 (or later) VM using virt-manager
-
Download the latest 7.4 (or later) version of This content is not included.Red Hat Enterprise Linux from the Red Hat Customer Portal. The Red Hat Enterprise Linux KVM Guest Image is recommended.
-
Move the image to
/var/lib/libvirt/images. -
Create a new VM using virt-manager. Note the following when creating the VM.
-
Import an existing disk image and select the downloaded qcow2 file.
-
Accept or change the memory and CPU settings to your application requirements.
-
Select the Customize configuration before install check box.
-
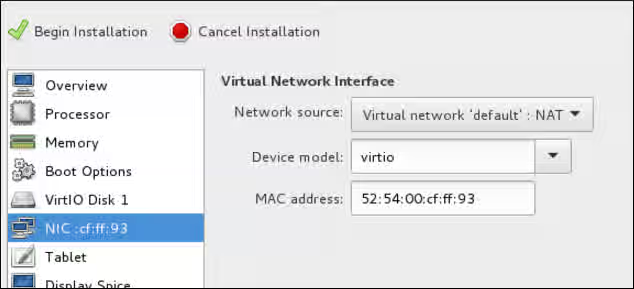
On the custom configuration dialog box, make sure that virtio is set as the NIC Device model, and then begin the installation.
-
The VM may hang momentarily at the
IPV6 eth0line when booting up. This is normal at this point in the installation.
For detailed virt-manager instructions, refer to Create the RHEL VM from a RHEL KVM Guest Image.
-
-
Shut down the VM when you see the login prompt.
-
From your RHEL system, set up root access to the VM. Use
virt-customizeto generate a root password for the VM.# virt-customize -a <guest-image-path> --root-password password:<password>Example:
# virt-customize -a /var/lib/libvirt/images/rhel-server-7.x-update-4-x86_64-kvm.qcow2 --root-password password:<password>
[   0.0] Examining the guest ...
[ 103.0] Setting a random seed
[ 103.0] Setting passwords
[ 112.0] Finishing off
-
Verify root access by starting the VM and logging in as root.
Install Hyper-V device drivers (if not present)
Microsoft provides network and storage device drivers as part of their Linux Integration Services for the Hyper-V package. Hyper-V device drivers may need to be installed on the RHEL VM prior to importing it to Microsoft Azure.
Use the lsinitrd | grep hv command to verify that the drivers are installed. If they are not installed, complete the following steps to manually configure the Hyper-V device drivers.
-
On the RHEL VM, add the driver parameters to the
/etc/dracut.conffile. Note the spaces before and after the quotes.add_drivers+=" hv_vmbus " add_drivers+=" hv_netvsc " add_drivers+=" hv_storvsc "
-
Regenerate the initramfs image.
# dracut -f -v
-
Verify the configuration changes.
# lsinitrd | grep hv
Configure the image for Microsoft Azure
Complete the following steps to finalize the image configuration for Microsoft Azure.
-
Stop and remove cloud-init. Microsoft Azure VMs use the Windows Azure Linux Agent (WALinuxAgent) for provisioning, along with managing Azure extensions.
# systemctl stop cloud-init
# yum remove cloud-init
-
Edit the
/etc/ssh/sshd_configfile and enable password authentication.PasswordAuthentication yes
-
Edit
/etc/sysconfig/network-scripts/ifcfg-eth0so it matches the following list of configuration details.DEVICE=eth0 BOOTPROTO=dhcp ONBOOT=yes TYPE=Ethernet USERCTL=no PEERDNS=yes IPV6INIT=no
-
Remove any persistent network device rules.
# rm -f /etc/udev/rules.d/70-persistent-net.rules
# rm -f /etc/udev/rules.d/75-persistent-net-generator.rules
-
Set the network service to start automatically.
# chkconfig network on
-
Set the ssh service to start automatically.
# systemctl enable sshd
# systemctl is-enabled sshd
# systemctl restart sshd
-
Add crashkernel=256M to the start of the GRUB_CMDLINE_LINUX line in the
/etc/default/grubfile. If crashkernel=auto is present, change this entry to crashkernel=256M.Add the following options to the end of the GRUB_CMDLINE_LINUX line.
earlyprintk=ttyS0
console=ttyS0
rootdelay=300
Remove the following options, if present.
rhgb
quiet
-
Regenerate the
grub.cfgfile.# grub2-mkconfig -o /boot/grub2/grub.cfg
-
Register the VM with Red Hat Subscription Manager.
# subscription-manager register --username <MyUsername> --password <password>
-
Attach the subscription to the Red Hat Enterprise Linux 7 Server repository.
# subscription-manager attach --pool=<POOL_ID>
-
Enable the RHEL Extras repository.
# subscription-manager repos --enable rhel-7-server-extras-rpms
-
Install the WALinuxAgent.
# yum install WALinuxAgent
# systemctl enable waagent.service
-
Edit the following lines in the
/etc/waagent.conffile. Set swap space for whatever is appropriate for the nodes.Provisioning.DeleteRootPassword=n ResourceDisk.Filesystem=ext4 ResourceDisk.EnableSwap=y ResourceDisk.SwapSizeMB=2048
-
Unregister the VM.
# subscription-manager unregister
-
Deprovision the VM.
# waagent -deprovision -force
-
Clean the shell history and shut down the VM.
# export HISTSIZE=0
# poweroff
Convert the RHEL image to VHD format
All Azure VM images must be in fixed VHD format. This section describes how to convert the image from qcow2 to VHD.
Important: The qcow2 image file must be aligned to the nearest 1 MB boundary before it is converted to VHD. The RHEL 7 KVM Guest Image is aligned correctly. If you select a different RHEL image, you may need to resize the image.
-
To verify that the image is properly aligned, enter the following command and divide the virtual size value by 1024, twice.
$ qemu-img info --output=json -f qcow2 <path-to-image>
-
If the result is a whole number, enter the following command to convert the image to VHD format. If using Fedora 22 (qemu-img 2.6 or later), add the option
--force_sizeto the conversion command. If the result is not a whole number, you need to align the image first. Refer to Convert the RHEL Image to VHD for more information. Return to this article when the image is converted to VHD.RHEL (using qemu-img 1.5.3):
$ qemu-img convert -f qcow2 -o subformat=fixed -O vpc <image-name.qcow2> <image-name.vhd>
Fedora 22 or later (using qemu-img 2.6 or later):
$ qemu-img convert -f qcow2 -o subformat=fixed,force_size -O vpc <image-name.qcow2> <image-name.vhd>
Upload the image and create the nodes
Note: The following steps are completed using the Azure CLI. You may need to log back in and export the storage connection string to reauthorize your system to your storage account in Azure. If you need to reauthorize, refer to Steps 4 and 5 in Create Azure Resources.
-
Upload the VHD image file.
$ az storage blob upload --account-name <MyStorageAccount> --container-name <MyContainer> --type page --file <path-to-local-vhd> --name <image-name>.vhdExample:
[clouduser@localhost]$ az storage blob upload --account-name azrhelclistact --container-name azrhelclistcont --type page --file <path-to-local-vhd> --name rhelhagold.vhd
-
Get the URL for the VHD image file. Use the URL in the next step.
$ az storage blob url -c <MyContainer> -n <image-name>.vhdExample:
[clouduser@localhost]$ az storage blob url -c azrhelclistcont -n rhelhagold.vhd
"https://azrhelclistact.blob.core.windows.net/azrhelclistcont/rhelhagold.vhd"
-
Create the gold Azure image from the VHD image file.
$ az image create -n <MyGoldImage> -g <MyResourceGroup> -l <azure-region> --source <URL> --os-type linuxExample:
[clouduser@localhost]$ az image create -n rhelHAgoldImage -g azrhelclirsgrp -l southcentralus --source https://azrhelclistact.blob.core.windows.net/azrhelclistcont/rhelhagold.vhd --os-type linux
-
Create the RHEL 7 Azure VM (cluster node). The example uses the VM size Standard_A2. Refer to Content from docs.microsoft.com is not included.Sizes for Linux virtual machines in Azure for higher-capacity options.
Repeat this step for each RHEL HA cluster node you want to create. Change the node name and simple operating system disk name for each VM created.
$ az vm create -g <MyResourceGroup> -l <azure-region> --vnet-name <MyVnet> --subnet <MySubnet> --availability-set <MyAvailabilitySet> -n <node-name> --size <VM-capacity> --os-disk-name <simple-disk-name> --authentication-type password --admin-username <MyAdminName> --admin-password <password> --image <MyGoldImage>Example:
[clouduser@localhost]$ az vm create -g azrhelclirsgrp -l southcentralus --vnet-name azrhelclivnet1 --subnet azrhelclisubnet1 --availability-set rhelha-avset1 -n node01 --size Standard_A2 --os-disk-name osdisk-node01 --authentication-type password --admin-username clouduser --admin-password <password> --image rhelHAgoldImage
If the command fails on the image name, use the full path to the image. Enter the following command to get the path.
$ az image show -g <MyResourceGroup> -n <MyGoldImage>
Example using the full path to the image:
[clouduser@localhost]$ az vm create -g azrhelclirsgrp -l southcentralus --vnet-name azrhelclivnet1 --subnet azrhelclisubnet1 --availability-set rhelha-avset1 -n node01 --size Standard_A2 --os-disk-name osdisk-node01 --authentication-type password --admin-username clouduser --admin-password <password> --image "/subscriptions/..../resourceGroups/MyResourceGroup/providers/Microsoft.Compute/images/rhelHAgoldimage"
Install the Red Hat High Availability packages and agents
Complete the following steps on all nodes.
-
Launch an SSH terminal session and connect to the VM using the administrator name and public IP address.
$ ssh administrator@PublicIPTo get the public IP address for an Azure VM, open the VM properties in the Content from portal.azure.com is not included.Azure portal or enter the following Azure CLI command.
$ az vm list -g <resource-group> -d --output tableExample:
[clouduser@localhost ~] $ az vm list -g azrhelclirsgrp -d --output table
Name    ResourceGroup           PowerState      PublicIps        Location
------  ----------------------  --------------  -------------    --------------
node01  azrhelclirsgrp          VM running      192.98.152.251    southcentralus
node02  azrhelclirsgrp          VM running      192.102.162.225   southcentralus
node03  azrhelclirsgrp          VM running      192.214.119.113   southcentralus
-
Register the VM with Red Hat.
$ sudo -i
# subscription-manager register --auto-attach
Note: If
--auto-attachfails, manually register the VM to your subscription. Enable a pool ID that contains the RHEL 7 Server and RHEL 7 Server HA repositories. -
Disable all unnecessary repositories.
# subscription-manager repos --disable=*
-
Enable the RHEL 7 Server and RHEL 7 Server HA repositories.
# subscription-manager repos --enable=rhel-7-server-rpms
# subscription-manager repos --enable=rhel-ha-for-rhel-7-server-rpms
-
Update all software.
# yum update -y
-
Install the Red Hat High Availability Add-On software packages, along with all available fencing agents from the High Availability channel.
# yum install pcs pacemaker fence-agents-azure-arm
-
The user hacluster was created during the pcs and pacemaker installation in the previous step. Create a password for hacluster on all cluster nodes. Use the same password for all nodes.
Note: You must run all pcs commands as the root user.
# passwd hacluster -
Add the high availability service to the RHEL Firewall if
firewalld.serviceis installed. Note thatfirewalld.serviceis not installed on the KVM Guest image by default.# firewall-cmd --permanent --add-service=high-availability # firewall-cmd --reload
-
Start the pcs service and enable it to start on boot.
# systemctl start pcsd.service
# systemctl enable pcsd.service
Created symlink from /etc/systemd/system/multi-user.target.wants/pcsd.service to /usr/lib/systemd/system/pcsd.service.
-
Make sure the pcs service is running.
# systemctl status pcsd.service
● pcsd.service - PCS GUI and remote configuration interface
  Loaded: loaded (/usr/lib/systemd/system/pcsd.service; enabled; vendor preset: disabled)
  Active: active (running) since Fri 2018-02-23 11:00:58 EST; 1min 23s ago
    Docs: man:pcsd(8)
          man:pcs(8)
Main PID: 46235 (pcsd)
  CGroup: /system.slice/pcsd.service
          └─46235 /usr/bin/ruby /usr/lib/pcsd/pcsd > /dev/null &
-
Edit
/etc/hostsand add RHEL host names and internal IP addresses. See How should the /etc/hosts file be set up on RHEL cluster nodes? for details.
Create the cluster
Complete the following steps to create the cluster of nodes.
-
On one of the nodes, enter the following command to authenticate the pcs user hacluster. Use the host name for each node in the cluster in the command.
# pcs cluster auth <hostname1> <hostname2> <hostname3>
Username: hacluster
Password:
<hostname1>: Authorized
<hostname2>: Authorized
<hostname3>: Authorized
Example:
[root@node01 clouduser]# pcs cluster auth node01 node02 node03
Username: hacluster
Password:
node01: Authorized
node02: Authorized
node03: Authorized
-
Create the cluster.
# pcs cluster setup --name <cluster-name> <hostname1> <hostname2> <hostname3>Example:
    [root@node01 clouduser]# pcs cluster setup --name newcluster node01 node02 node03

    ...omitted

    Synchronizing pcsd certificates on nodes node01, node02, node03...
    node02: Success
    node03: Success
    node01: Success
    Restarting pcsd on the nodes in order to reload the certificates...
    node02: Success
    node03: Success
    node01: Success
-
Enable and start the cluster.
Example:
[root@node01 clouduser]# pcs cluster enable --all
node02: Cluster Enabled
node03: Cluster Enabled
node01: Cluster Enabled
[root@node01 clouduser]# pcs cluster start --all node02: Starting Cluster... node03: Starting Cluster... node01: Starting Cluster...
Configure fencing
Complete the following steps to configure fencing. You can complete these commands from any node in the cluster.
-
Enter the following command to get the Azure node name for each RHEL VM. These names are used in the next step to configure the fence device.
Note: If you no longer have your AD Application Password, you can reset your credentials using the Azure CLI command
az ad sp reset-credentials --name <Fencing-App-URL>.# fence_azure_arm -l <AD-Application-ID> -p <AD-Password> --resourceGroup <MyResourceGroup> --tenantId <Tenant-ID> --subscriptionId <Subscription-ID> -o listExample:
[root@node01 clouduser]# fence_azure_arm -l e04a6a49-9f00-xxxx-xxxx-a8bdda4af447 -p z/a05AwCN0IzAjVwXXXXXXXEWIoeVp0xg7QT//JE= --resourceGroup azrhelclirsgrp --tenantId 77ecefb6-cff0-XXXX-XXXX-757XXXX9485 --subscriptionId XXXXXXXX-38b4-4527-XXXX-012d49dfc02c -o list
node01,
node02,
node03,
-
Use the following command to configure the fence device.
Note: If the RHEL host names and the Azure node names are identical, then pcmk_host_map is not required in the command. Refer to the bold section in the command.
pcs stonith create [name] fence_azure_arm login=[AD-Application-ID] passwd=[AD-Password] resourceGroup=[My ResourceGroup] tenantId=[Tenant-ID] subscriptionId=[Subscription-ID] pcmk_host_map="rhel-hostname-1:azure-name-1;rhel-hostname-2:azure-name-2;rhel-hostname-3:azure-name-3" pcmk_reboot_retries=4
</tt></pre>

Example:<br>
<tt><pre>
pcs stonith create clusterfence fence_azure_arm login=e04a6a49-9f00-XXXX-XXXX-a8bdda4af447 passwd=a05AwCN-0IzAjVw-XXXXXXXEWI-oeVp0xg7QT resourceGroup=azrhelclirsgrp tenantId=77ecefb6-cff0-XXXX-XXXX-757a69cb9485 subscriptionId=XXXXXXXX-38b4-4527-XXXX-012d49dfc02c pcmk_host_map="node01:192.98.152.251;node02:192.102.162.225;node03:192.214.119.113" power_timeout=240 pcmk_reboot_timeout=480 pcmk_reboot_retries=4
</tt></pre>

This enables a three-node fencing agent for your cluster.

**Note:**  Adjustments may be required in some Azure environments where the fence-action API response is delayed longer than normal. Refer to [Red Hat's Knowledgebase Solution](https://access.redhat.com/solutions/3408711) for more information about this condition.
-
Test the fencing agent for one of the other nodes.
Note: The command response may take up to 5 minutes to display. Refer to Red Hat's Knowledgebase Solution if this occurs with your RHEL HA deployment.
# pcs stonith fence <hostname>Example:
    [root@node01 clouduser]# pcs stonith fence node02

    Node: node02 fenced
Check the status to verify that the node is fenced.
Example:
    [root@node01 clouduser]# pcs status
    Cluster name: newcluster
    Stack: corosync
    Current DC: node01 (version 1.1.18-11.el7-2b07d5c5a9) - partition with quorum
    Last updated: Fri Feb 23 11:44:35 2018
    Last change: Fri Feb 23 11:21:01 2018 by root via cibadmin on node01

    3 nodes configured
    1 resource configured

    Online: [ node01 node03 ]
    OFFLINE: [ node02 ]

    Full list of resources:

      clusterfence	(stonith:fence_azure_arm):	Started node01

    Daemon Status:
      corosync: active/disabled
      pacemaker: active/disabled
      pcsd: active/enabled
-
Start the node that was fenced in the previous step.
# pcs cluster start <hostname>Note: Use
pcs cluster start --allif necessary.
-
Check the status to verify the node started.
# pcs statusExample:
    [root@node01 clouduser]# pcs status
    Cluster name: newcluster
    Stack: corosync
    Current DC: node01 (version 1.1.18-11.el7-2b07d5c5a9) - partition with quorum
    Last updated: Fri Feb 23 11:34:59 2018
    Last change: Fri Feb 23 11:21:01 2018 by root via cibadmin on node01

    3 nodes configured
    1 resource configured

    Online: [ node01 node02 node03 ]

    Full list of resources:

    clusterfence	(stonith:fence_azure_arm):	Started node01

    Daemon Status:
      corosync: active/disabled
      pacemaker: active/disabled
      pcsd: active/enabled
Create an Azure internal load balancer
The Azure internal load balancer removes cluster nodes that do not answer health probe requests. You create the Azure internal load balancer using the Content from portal.azure.com is not included.Azure control panel and the instructions in the Microsoft article Content from docs.microsoft.com is not included.Create an Internal load balancer in the Azure portal.
Important: The following notes provide specific details for the RHEL HA internal load balancer. Refer to these notes while completing the steps in the Microsoft article.
-
Select Internal load balancer, the Basic SKU, and Dynamic for the type of IP address assignment.
-
Associate the backend pool to the availability set created when completing the steps in Create Azure Resources. Do not set any Target network IP configurations.
-
For the health probe, select TCP and enter port 61000. Note that you can use any TCP port number that does not interfere with another service. For certain HA product applications (for example, SAP HANA and SQL Server), you may need to work with Microsoft to identify the correct port to use.
Note: Allow inbound/outbound TCP traffic over port 61000 on the RHEL firewall (if installed) for each node.
-
When you create the load balancing rule, the default values are prepopulated. Make sure to set Floating IP (direct server return) to Enabled.
-
After the health probe is created, go to the node 1 terminal session and configure the Azure load balancer resource agent. This resource agent runs a service that answers health probe requests from the Azure load balancer and removes cluster nodes that do not answer requests.
Configure the load balancer resource agent
Enter the following commands to set up resources for the load balancer resource agent azure-lb.
-
Install the nmap-ncat package and resource agents on all nodes. Make sure to install these packages on all nodes.
# yum install nmap-ncat resource-agentsThe rest of the steps are completed on one node.
-
Create the pcs resources and group. Use your load balancer FrontendIP for the IPaddr2 address.
# pcs resource create <resource-vip> IPaddr2 ip="10.0.0.7" --group <cluster-resources-group>Note: The
resource-vipandcluster-resources-groupare names you create in this command. -
Configure the load balancer resource agent.
# pcs resource create <resource-lb> azure-lb port=61000 --group <cluster-resources-group>.Note:
resource-lbis a resource name you create in this command.azure-lbis the name of the installed resource agent.port=61000is used in the example steps in this procedure and may be different for your RHEL HA application. Use the same--groupname used in the previous step. -
Run pcs status to see the results.
Example:
    [root@node01 clouduser]# pcs status
    Cluster name: clusterfence01
    Stack: corosync
    Current DC: node02 (version 1.1.16-12.el7_4.7-94ff4df) - partition with quorum
    Last updated: Tue Jan 30 12:42:35 2018
    Last change: Tue Jan 30 12:26:42 2018 by root via cibadmin on node01

    3 nodes configured
    3 resources configured

    Online: [ node01 node02 node03 ]

    Full list of resources:

      clusterfence   (stonith:fence_azure_arm):      Started node01
      Resource Group: g_azure
        vip_azure  (ocf::heartbeat:IPaddr2):       Started node02
        lb_azure   (ocf::heartbeat:azure-lb):      Started node02

    Daemon Status:
      corosync: active/disabled
      pacemaker: active/disabled
      pcsd: active/enabled
You have created a three-node RHEL HA cluster on Microsoft Azure.
Additional information
For concepts, references, and additional information about RHEL High Availability, refer to the following Red Hat documents.
- High Availability Add-On Overview
- High Availability Add-On Administration
- High Availability Add-On Reference
If you add an additional node, you need to update the agent. For example, if you add a fourth node, update the fencing agent using the following command.
# pcs stonith update fence_azure_arm pcmk_host_map="rhel-hostname-1:azure-name-1;rhel-hostname-2:azure-name-2;rhel-hostname-3:azure-name-3;rhel-hostname-4:azure-name-4"
To view the help and the additional options you can set for the Azure fencing agent, use the following commands:
# pcs stonith describe fence_azure_arm
# fence_azure_arm -h