Installing and Configuring a Red Hat Enterprise Linux 7.6 (and later) High-Availability Cluster on Google Compute Cloud
Before you start
-
Review Red Hat's Support Policies for RHEL High Availability Clusters and specifically the policies for RHEL High Availability on virtualization platforms and RHEL High Availability on GCP virtual machines.
-
You must be enrolled in the Red Hat Cloud Access program and have unused Red Hat Enterprise Linux (RHEL) subscriptions. The attached subscription must include access to the following repositories for each Google Cloud Platform (GCP) instance.
- Red Hat Enterprise Linux 7 Server (RPMS): rhel-7-server-rpms/7Server/x86_64
- Red Hat Enterprise Linux High Availability (for RHEL 7 Server) (RPMS): rhel-ha-for-rhel-7-server-rpms/7Server/x86_64
Note: One unused subscription migrated to GCP can be used for two RHEL virtual machine (VM) instances. If you have two unused subscriptions, you can create four instances, and so on.
-
You must belong to an active GCP project and have sufficient permissions to create resources in the project.
-
Your project should have a Content from cloud.google.com is not included.service account. A service account is a special type of Google account that belongs to a VM instance, not an individual user. This creates a single source that can authorize API call permissions from all instances instead of having to manage authorization for individual user accounts. See Content from cloud.google.com is not included.Using the Compute Engine Default Service Account for information about using the default service account instead of creating a separate service account.
If you or your project administrator create a custom service account, the service account should be configured for the following roles.
- Cloud Trace Agent
- Compute Admin
- Compute Network Admin
- Cloud Datastore User
- Logging Admin
- Monitoring Editor
- Monitoring Metric Writer
- Service Account Administrator
- Storage Admin
-
For concepts, references, and additional information about RHEL High Availability (HA), see the following Red Hat documents.
Install and configure the Google Cloud SDK
Most examples in this article use Content from cloud.google.com is not included.gcloud and Content from cloud.google.com is not included.gsutil to manage RHEL HA resources in GCP. You install the Google Cloud SDK to get these utilities. For information about how to install and configure the Google Cloud SDK, see the Content from cloud.google.com is not included.Quickstart for Red Hat and Centos.
Note: You can also use the Content from console.cloud.google.com is not included.GCP Console or Content from cloud.google.com is not included.API requests to manage resources in GCP. Using the API also requires the Google Cloud SDK.
Create a GCP image bucket
You use the GCP storage utility (gsutil) to create a bucket where you store your images. Enter the following command to create a bucket for your image(s).
The following command includes the minimum requirements for creating a Content from cloud.google.com is not included.multi-regional bucket in your default location. See Content from cloud.google.com is not included.Creating Storage Buckets for additional options and bucket-naming requirements.
$ gsutil mb gs://<BucketName>
Example:
$ gsutil mb gs://rhel-ha-bucket/
Create a custom Virtual Private Cloud network and subnet
Complete the following steps to create a custom Virtual Private Cloud (VPC) network and subnet.
-
Launch the Content from console.cloud.google.com is not included.GCP Console.
-
Select VPC network under Networking in the left navigation pane.
-
Click Create VPC Network.
-
Enter a name for the VPC network and create a Custom subnet in the region where you want to create the cluster.
-
Review the remaining options. None of these options are required for RHEL HA. Click Create.
Create a base RHEL 7.6 (or later) VM image
Complete the following steps to create the base RHEL 7.6 (or later) VM image for GCP. Complete this procedure using a RHEL 7 Server or Workstation. You can use Fedora, but there may be slight differences when completing the procedure.
Before you start
You need the following packages on your local system to create and configure the VM.
| Package | Repository | Description |
|---|---|---|
| libvirt | rhel-7-server-rpms | Open source API, daemon, and management tool for managing platform virtualization |
| virt-manager | rhel-7-server-rpms | A command line and Gnome desktop virtual machine manager used to create and manage KVM virtual machines |
| libguestfs | rhel-7-server-rpms | A library for accessing and modifying virtual machine file systems |
| libguestfs-tools | rhel-7-server-rpms | System administration tools for virtual machines; includes the guestfish utility |
Procedure
-
Download the latest 7.6 (or later) version of This content is not included.Red Hat Enterprise Linux from the Red Hat Customer Portal. The Red Hat Enterprise Linux KVM Guest Image is recommended.
-
Move the image to
/var/lib/libvirt/images. -
Create a new VM using virt-manager. Note the following when creating the VM.
-
Import an existing disk image and select the downloaded qcow2 file.
-
Accept or change the memory and CPU settings to your application requirements.
-
Select the Customize configuration before install check box.
-
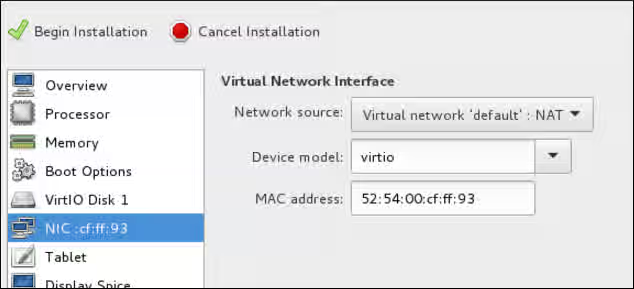
On the custom configuration dialog box, make sure that virtio is set as the NIC Device model, and then begin the installation.
-
The VM may hang momentarily at the
IPV6 eth0line when booting up. This is normal at this point in the installation.
For detailed virt-manager instructions, see Create the RHEL VM from a RHEL KVM Guest Image.
-
-
Shut down the VM when you see the login prompt.
-
From your RHEL system, set up root access to the VM. Use
virt-customizeto generate a root password for the VM. Make sure to create a strong password.# virt-customize -a <guest-image-path> --root-password password:<password>Example:
# virt-customize -a /var/lib/libvirt/images/rhel-server-7.x-update-4-x86_64-kvm.qcow2 --root-password password:<password>
[   0.0] Examining the guest ...
[ 103.0] Setting a random seed
[ 103.0] Setting passwords
[ 112.0] Finishing off
-
Verify root access by starting the VM and logging in as root.
-
Verify that
python-botoandcloud-initare installed on the VM.- Content from github.com is not included.python-boto is required for Red Hat Cloud Access RHEL VMs on GCP. This package is installed on the Red Hat Enterprise Linux KVM Guest Image. If
python-botois not installed on a custom image, enable therhel-7-rh-common-rpmsrepository and install it. cloud-inithandles cloud provisioning and is also installed on the KVM Guest image. If you need to install it, the package is available inrhel-7-server-rpms.
# rpm -qa | grep python-boto
# rpm -qa | grep cloud-init
- Content from github.com is not included.python-boto is required for Red Hat Cloud Access RHEL VMs on GCP. This package is installed on the Red Hat Enterprise Linux KVM Guest Image. If
-
Temporarily enable root password access. Edit
/etc/cloud/cloud.cfgand updatessh_pwauthfrom 0 to 1.ssh_pwauth: 1
Prepare and import the base GCP image
Complete the following steps to prepare the image for GCP.
-
Enter the following command to convert the file. Images uploaded to GCP need to be in raw format and named disk.raw.
$ qemu-img convert -f qcow2 <ImageName>.qcow2 -O raw disk.raw
-
Enter the following command to compress the raw file. Images uploaded to GCP need to be compressed.
$ tar -Sczf <ImageName>.tar.gz disk.raw
-
Import the compressed image to the bucket created earlier.
$ gsutil cp <ImageName>.tar.gz gs://<BucketName>/
Create and configure a base GCP instance
Complete the following steps to create and configure an instance so it complies with GCP operating and security requirements for running instances.
-
Enter the following command to create an image from the compressed file in the bucket.
$ gcloud compute images create <BaseImageName> --source-uri gs://<BucketName>/<BaseImageName>.tar.gzExample:
    [admin@localhost ~] $ gcloud compute images create rhel-76-server --source-uri gs://user-rhelha/rhel-server-76.tar.gz
    Created [https://www.googleapis.com/compute/v1/projects/MyProject/global/images/rhel-server-76].
    NAME            PROJECT                 FAMILY  DEPRECATED  STATUS
    rhel-76-server  rhel-ha-testing-on-gcp                      READY
-
Enter the following command to create a template instance from the image. Note that these are the basic command options to create a RHEL HA instance attached to a service account. See Before you start for more information about the service account.
Notes:
--machine-type n1-standard-2is the minimum size required for a base RHEL instance.- See Content from cloud.google.com is not included.gcloud compute instances create for additional configuration options.
$ gcloud compute instances create <BaseInstanceName> --can-ip-forward --machine-type n1-standard-2 --image <BaseImageName> --service-account <ServiceAccountEmail>Example:
[admin@localhost ~] $ gcloud compute instances create rhel-76-server-base-instance --can-ip-forward --machine-type n1-standard-2 --image rhel-76-server --service-account account@project-name-on-gcp.iam.gserviceaccount.com
Created [https://www.googleapis.com/compute/v1/projects/rhel-ha-testing-on-gcp/zones/us-east1-b/instances/rhel-76-server-base-instance].
NAME                              ZONE        MACHINE_TYPE   PREEMPTIBLE  INTERNAL_IP  EXTERNAL_IP     STATUS
rhel-76-server-base-instance      us-east1-b  n1-standard-2               10.10.10.3   192.227.54.211  RUNNING
-
Connect to the instance with an SSH terminal session.
$ ssh root@<PublicIPaddress>
-
Update the RHEL software.
a. Register with Red Hat Subscription Manager (RHSM).
b. Enable a Subscription pool ID (or use
--auto-attach).c. Disable all unnecessary repositories.
# subscription-manager repos --disable=*d. Enable the following repository.
# subscription-manager repos --enable=rhel-7-server-rpmse. Run yum update.
# yum update -y
-
Install the GCP Linux Guest Environment on the running instance (in-place installation). For instructions, see the section titled Install Guest Environment In-Place in Content from cloud.google.com is not included.Installing the Linux Guest Environment. Select the CENTOS/RHEL option. Copy the command script and paste it at the command prompt to run the script immediately.
-
Make the following configuration changes to the instance.
Note: These change are based on GCP recommendations for custom images. See Content from cloud.google.com is not included.Configuring Imported Images.
a. Edit the
/etc/chrony.conffile. Remove all NTP servers. Add the following NTP server.metadata.google.internal iburst Google NTP serverb. Remove any persistent network device rules.
# rm -f /etc/udev/rules.d/70-persistent-net.rules
# rm -f /etc/udev/rules.d/75-persistent-net-generator.rules
c. Set the network service to start automatically.
# chkconfig network ond. Set the ssh service to start automatically.
# systemctl enable sshd
# systemctl is-enabled sshd
e. Enter the following command to set the timezone to UTC.
# ln -sf /usr/share/zoneinfo/UTC /etc/localtimef. (Optional) Edit the
/etc/ssh/ssh_configfile and add the following lines to the end of the configuration. This keeps your SSH session alive during longer periods of inactivity.# Server times out connections after several minutes of inactivity. # Keep alive ssh connections by sending a packet every 7 minutes. ServerAliveInterval 420g. Edit the
/etc/ssh/sshd_configfile and make the following changes, if necessary. TheClientAliveInterval 420setting is optional; this keeps your SSH session alive during longer periods of inactivity.PermitRootLogin no PasswordAuthentication no AllowTcpForwarding yes X11Forwarding no PermitTunnel no # Compute times out connections after 10 minutes of inactivity. # Keep ssh connections alive by sending a packet every 7 minutes. ClientAliveInterval 420 -
Disable password access. Edit
/etc/cloud/cloud.cfgand change ssh_pwauth from 1 to 0.ssh_pwauth: 0Caution: Password access was enabled earlier to allow SSH session access to configure the instance in-place. Do not leave this enabled. All SSH session access must be passwordless.
-
Unregister the instance from subscription manager.
# subscription-manager unregister
-
Clean the shell history. Keep the instance running for the next procedure.
# export HISTSIZE=0
Take a snapshot and create a snapshot image
Enter the following commands to preserve the instance configuration settings and create a snapshot. See Content from cloud.google.com is not included.Creating Persistent Disk Snapshots for additional information.
-
On the running instance, enter the following command to synchronize data to disk.
# sync
-
On your system, enter the following command to create the snapshot.
$ gcloud compute disks snapshot <InstanceName> --snapshot-names <SnapshotName>
-
On your system, enter the following command to create the configured image from the snapshot.
$ gcloud compute images create <ConfiguredImageFromSnapshot> --source-snapshot <SnapshotName>
Create a RHEL HA node template instance and RHEL HA nodes
Once you have a configured image from the snapshot, you can create a node template. Use this template to create all RHEL HA nodes. Complete the following steps to create the template and RHEL HA nodes.
Note: Once the template is created, you can delete the original source instance from the project. You should keep the snapshot and the base image.
-
Enter the following command to create an instance template.
$ gcloud compute instance-templates create <InstanceTemplateName> --can-ip-forward --machine-type n1-standard-2 --image <ConfiguredImageFromSnapshot> --service-account <ServiceAccountEmailAddress>Example:
[admin@localhost ~] $ gcloud compute instance-templates create rhel-76-instance-template --can-ip-forward --machine-type n1-standard-2 --image rhel-76-gcp-image --service-account account@project-name-on-gcp.iam.gserviceaccount.com
Created [https://www.googleapis.com/compute/v1/projects/project-name-on-gcp/global/instanceTemplates/rhel-76-instance-template].
NAME                       MACHINE_TYPE   PREEMPTIBLE  CREATION_TIMESTAMP
rhel-76-instance-template  n1-standard-2               2018-07-25T11:09:30.506-07:00
-
Enter the following command to create multiple nodes in one zone.
Note: Dynamic IP addresses are assigned to your instances. See Content from cloud.google.com is not included.Reserving a Static External IP Address if you want static IPs.
# gcloud compute instances create <NodeName01> <NodeName02> --source-instance-template <InstanceTemplateName> --zone <RegionZone> --network=<NetworkName> --subnet=<SubnetName>
Example:
[admin@localhost ~] $ gcloud compute instances create rhel76-node-01 rhel76-node-02 rhel76-node-03 --source-instance-template rhel-76-instance-template --zone us-west1-b --network=projectVPC --subnet=range0
Created [https://www.googleapis.com/compute/v1/projects/project-name-on-gcp/zones/us-west1-b/instances/rhel76-node-01].
Created [https://www.googleapis.com/compute/v1/projects/project-name-on-gcp/zones/us-west1-b/instances/rhel76-node-02].
Created [https://www.googleapis.com/compute/v1/projects/project-name-on-gcp/zones/us-west1-b/instances/rhel76-node-03].
NAME            ZONE        MACHINE_TYPE   PREEMPTIBLE  INTERNAL_IP  EXTERNAL_IP    STATUS
rhel76-node-01  us-west1-b  n1-standard-2               10.10.10.4   192.230.25.81   RUNNING
rhel76-node-02  us-west1-b  n1-standard-2               10.10.10.5   192.230.76.253  RUNNING
rhel76-node-03  us-east1-b  n1-standard-2               10.10.10.6   192.230.102.15  RUNNING
Install RHEL HA packages and agents
Complete the following steps on all nodes.
-
Using the GCP console, click SSH for the instance and select the
View gcloud commandoption. Paste this command at a command prompt for passwordless access to the instance.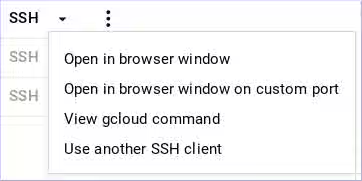
-
Enable
sudoaccount access and register with Red Hat Subscription Manager. -
Enable a Subscription pool ID (or
--auto-attach). -
Disable all unnecessary repositories.
# subscription-manager repos --disable=*
-
Enable the following repositories.
# subscription-manager repos --enable=rhel-7-server-rpms
# subscription-manager repos --enable=rhel-ha-for-rhel-7-server-rpms
-
Install pcs, pacemaker, the fence agents, and resource agents.
# yum install pcs pacemaker
# yum install fence-agents-gce
# yum install resource-agents-gcp
-
Update all software.
# yum update -y
Configure RHEL HA services
Complete the following steps on all nodes.
-
The user hacluster was created when pacemaker was installed in the previous procedure. Create a password for user hacluster on all cluster nodes. Use the same password for all nodes.
# passwd hacluster
-
If the firewalld service is installed, add the high availability service.
# firewall-cmd --permanent --add-service=high-availability
# firewall-cmd --reload
-
Start the pcs service and enable it to start on boot.
# systemctl start pcsd.service
# systemctl enable pcsd.service
Created symlink from /etc/systemd/system/multi-user.target.wants/pcsd.service to /usr/lib/systemd/system/pcsd.service.
-
Make sure the pcs service is running.
# systemctl status pcsd.service
● pcsd.service - PCS GUI and remote configuration interface
   Loaded: loaded (/usr/lib/systemd/system/pcsd.service; enabled; vendor preset: disabled)
   Active: active (running) since Mon 2018-06-25 19:21:42 UTC; 15s ago
     Docs: man:pcsd(8)
           man:pcs(8)
 Main PID: 5901 (pcsd)
   CGroup: /system.slice/pcsd.service
           └─5901 /usr/bin/ruby /usr/lib/pcsd/pcsd > /dev/null &
-
Edit
/etc/hostsand add RHEL host names and internal IP addresses for all nodes. See How should the /etc/hosts file be set up on RHEL cluster nodes? for details.
Create the cluster
Complete the following steps to create the cluster of nodes.
-
On one of the nodes, enter the following command to authenticate the pcs user hacluster. Use the host name for each node in the cluster in the command.
# pcs cluster auth <hostname1> <hostname2> <hostname3>
Username: hacluster
Password:
<hostname1>: Authorized
<hostname2>: Authorized
<hostname3>: Authorized
-
Create the cluster.
# pcs cluster setup --name <cluster-name> <hostname1> <hostname2> <hostname3>
-
(Optional) Enable the cluster to start automatically. This is useful if nodes should automatically join the cluster when started.
# pcs cluster enable --all
-
Start the cluster.
# pcs cluster start --all
-
Enter the following commands to test fencing on one of the nodes.
Important: This is for testing and verification purposes. The instance shuts down when you complete these commands.
# fence_gce --zone <ZoneName> --project=<MyProject> -n <NodeName> -o <Option>Examples:
    # fence_gce --zone us-west1-b --project=rhel-ha-on-gcp -n rhel76-node-03 -o status
    Status: ON

    # fence_gce --zone us-west1-b --project=rhel-ha-on-gcp -n rhel76-node-03 -o off
    Success: Powered OFF

    # fence_gce --zone us-west1-b --project=rhel-ha-on-gcp -n rhel76-node-03 -o on
    Success: Powered ON

    # fence_gce --zone us-west1-b --project=rhel-ha-on-gcp -n rhel76-node-02 -o reboot
    Success: Rebooted
Create a fence device
Complete the following steps to create a fence device.
Note: Content from cloud.google.com is not included.Stackdriver Logging is not currently supported for RHEL HA cluster nodes.
Note: You'll need to set the method=cycle option explicitly if you're using RHEL 8.4 or earlier. Technically this option is only required when using RHEL 8.4, but setting it on earlier versions ensures expected behavior in the event that you upgrade to RHEL 8.4 later.
-
Enter the following command to create a fence device. If the GCP instance names and the RHEL hostnames are different, see the note following the example.
# pcs stonith create <FenceDeviceName> fence_gce zone=<Region-Zone> project=<MyProject>Example:
# pcs stonith create us-west1-b-fence fence_gce zone=us-west1-b project=rhel-ha-on-gcpOr on RHEL 8.4 or earlier:
# pcs stonith create us-west1-b-fence fence_gce zone=us-west1-b project=rhel-ha-on-gcp method=cycle
Different RHEL hostnames and GCP instance names: For most default configurations, the GCP instance name and the RHEL hostname are identical. If you change the RHEL hostname on an instance, you will need to add
pcmk_host_mapto the command line to map the RHEL hostname to the GCP instance name. You can get the GCP instance name using a command or from the Content from console.cloud.google.com is not included.GCP Console.Enter the following to command get GCP instance names. Note that the output will also show the internal ID for the instance.
# fence_gce --zone us-west1-b --project=rhel-ha-on-gcp -n <HostName> -o listExample:
[root@rhel76-node-01 ~]# fence_gce --zone us-west1-b --project=rhel-ha-testing-on-gcp -o list
44358**********3181,InstanceName-3
40819**********6781,InstanceName-1
71736**********3341,InstanceName-2
The following example shows how to use
pcmk_host_mapto map hostnames to GCP instance names.# pcs stonith create us-west1-b-fence fence_gce pcmk_host_map="rhel-hostname-1:InstanceName-1;rhel-hostname-2:InstanceName-2;rhel-hostname-3:InstanceName-3" zone=us-west1-b project=rhel-ha-on-gcp
-
Verify that the fence devices started.
# pcs statusExample:
    [root@rhel76-node-01 ~]# pcs status
    Cluster name: gcp-cluster
    Stack: corosync
    Current DC: rhel76-node-02 (version 1.1.18-11.el7_5.3-2b07d5c5a9) - partition with quorum
    Last updated: Fri Jul 27 12:53:25 2018
    Last change: Fri Jul 27 12:51:43 2018 by root via cibadmin on rhel76-node-01

    3 nodes configured
    3 resources configured

    Online: [ rhel76-node-01 rhel76-node-02 rhel76-node-03 ]

    Full list of resources:

    us-west1-b-fence	(stonith:fence_gce):	Started rhel76-node-01

    Daemon Status:
    corosync: active/enabled
    pacemaker: active/enabled
    pcsd: active/enabled
Configure GCP node authorization
Enter the following command to initialize each node with your project ID and account credentials. This configures cloud SDK tools to use your account credentials to access GCP. Run this command on each node.
# gcloud-ra init
Configure the gcp-vpc-move-vip resource agent (aliasip)
The gcp-vpc-move-vip resource agent attaches a secondary IP address (alias IP) to a running instance. This is essentially a floating IP address that can be passed between different nodes in the cluster. Enter the following command to show more information about this resource.
# pcs resource describe gcp-vpc-move-vip
There are two options for configuring this resource.
- Configure the resource to use the primary subnet address range.
- Configure the resource to use a secondary subnet address range.
Use the primary subnet address range
Complete the following steps to configure the resource for the primary VPC subnet used by your nodes.
-
Enter the following command to create the aliasip resource. Create an unused internal IP address. Include the CIDR block in the command.
# pcs resource create aliasip gcp-vpc-move-vip alias_ip=<UnusedIPaddress/CIDRblock>Example:
[root@rhel76-node-01 ~]# pcs resource create aliasip gcp-vpc-move-vip alias_ip=10.10.10.200/32
Assumed agent name 'ocf:heartbeat:gcp-vpc-move-vip' (deduced from 'gcp-vpc-move-vip')
-
Enter the following command to create an
IPaddr2resource for managing the IP on the node.# pcs resource create vip IPaddr2 nic=<interface> ip=<AliasIPaddress> cidr_netmask=32Example:
[root@rhel76-node-01 ~]# pcs resource create vip IPaddr2 nic=eth0 ip=10.10.10.200 cidr_netmask=32
Assumed agent name 'ocf:heartbeat:IPaddr2' (deduced from 'IPaddr2')
-
Group the the network resources under
vipgrp.# pcs resource group add vipgrp aliasip vip
-
Verify that the resources have started and are grouped under
vipgrp.[root@rhel76-node-01 ~]# pcs status Cluster name: gcp-cluster Stack: corosync Current DC: rhel76-node-03 (version 1.1.18-11.el7_5.3-2b07d5c5a9) - partition with quorum Last updated: Fri Jul 27 17:14:49 2018 Last change: Fri Jul 27 17:14:42 2018 by root via cibadmin on rhel76-node-02 3 nodes configured 3 resources configured Online: [ rhel76-node-01 rhel76-node-02 rhel76-node-03 ] Full list of resources: gcp-fence (stonith:fence_gce): Started rhel76-node-02 Resource Group: vipgrp aliasip (ocf::heartbeat:gcp-vpc-move-vip): Started rhel76-node-02 vip (ocf::heartbeat:IPaddr2): Started rhel76-node-02 Daemon Status: corosync: active/enabled pacemaker: active/enabled pcsd: active/enabled
-
Verify that the resource can move to a different node.
# pcs resource move vip <Node>Example:
[root@rhel76-node-01 ~]# pcs resource move vip rhel76-node-03
-
Verify that the
vipsuccessfully started on a different node.[root@rhel76-node-01 ~]# pcs status Cluster name: gcp-cluster Stack: corosync Current DC: rhel76-node-02 (version 1.1.18-11.el7_5.3-2b07d5c5a9) - partition with quorum Last updated: Fri Jul 27 13:10:43 2018 Last change: Fri Jul 27 13:06:18 2018 by root via crm_resource on rhel76-node-01 3 nodes configured 3 resources configured Online: [ rhel76-node-01 rhel76-node-02 rhel76-node-03 ] Full list of resources: gcp-fence (stonith:fence_gce): Started rhel76-node-02 Resource Group: vipgrp aliasip (ocf::heartbeat:gcp-vpc-move-vip): Started rhel76-node-02 vip (ocf::heartbeat:IPaddr2): Started rhel76-node-03 Daemon Status: corosync: active/enabled pacemaker: active/enabled pcsd: active/enabled
Use a secondary subnet address range
Complete the following steps to configure the resource for a secondary subnet address range. You need to have a custom network and subnet for this option. See Create a custom network and subnet.
-
Enter the following command to create a secondary subnet address range.
# gcloud-ra compute networks subnets update <SubnetName> --region <RegionName> --add-secondary-ranges <SecondarySubnetName>=<SecondarySubnetRange>In the example, the secondary range is based on the primary subnet range being
10.10.10.0/24.Example:
# gcloud-ra compute networks subnets update range0 --region us-west1 --add-secondary-ranges range1=10.10.20.0/24
-
Enter the following command to create the
aliasipresource. Create an unused internal IP address in the secondary subnet address range. Include the CIDR block in the command.# pcs resource create aliasip gcp-vpc-move-vip alias_ip=<UnusedIPaddress/CIDRblock>Example:
[root@rhel76-node-01 ~]# pcs resource create aliasip gcp-vpc-move-vip alias_ip=10.10.20.200/32
Assumed agent name 'ocf:heartbeat:gcp-vpc-move-vip' (deduced from 'gcp-vpc-move-vip')
-
Enter the following command to create an
IPaddr2resource for managing the IP on the node.# pcs resource create vip IPaddr2 nic=<interface> ip=<AliasIPaddress> cidr_netmask=32Example:
[root@rhel76-node-01 ~]# pcs resource create vip IPaddr2 nic=eth0 ip=10.10.20.200 cidr_netmask=32
Assumed agent name 'ocf:heartbeat:IPaddr2' (deduced from 'IPaddr2')
-
Group the network resources under
vipgrp.# pcs resource group add vipgrp aliasip vip
-
Verify that the resources have started and are grouped under
vipgrp.[root@rhel76-node-01 ~]# pcs status Cluster name: gcp-cluster Stack: corosync Current DC: rhel76-node-03 (version 1.1.18-11.el7_5.3-2b07d5c5a9) - partition with quorum Last updated: Fri Jul 27 17:14:49 2018 Last change: Fri Jul 27 17:14:42 2018 by root via cibadmin on rhel76-node-02 3 nodes configured 3 resources configured Online: [ rhel76-node-01 rhel76-node-02 rhel76-node-03 ] Full list of resources: gcp-fence (stonith:fence_gce): Started rhel76-node-02 Resource Group: vipgrp aliasip (ocf::heartbeat:gcp-vpc-move-vip): Started rhel76-node-02 vip (ocf::heartbeat:IPaddr2): Started rhel76-node-02 Daemon Status: corosync: active/enabled pacemaker: active/enabled pcsd: active/enabled
-
Verify that the
vipresource can move to a different node.# pcs resource move vip <Node>Example:
[root@rhel76-node-01 ~]# pcs resource move vip rhel76-node-03
-
Verify that the
vipsuccessfully started on a different node.[root@rhel76-node-01 ~]# pcs status Cluster name: gcp-cluster Stack: corosync Current DC: rhel76-node-02 (version 1.1.18-11.el7_5.3-2b07d5c5a9) - partition with quorum Last updated: Fri Jul 27 13:10:43 2018 Last change: Fri Jul 27 13:06:18 2018 by root via crm_resource on rhel76-node-01 3 nodes configured 3 resources configured Online: [ rhel76-node-01 rhel76-node-02 rhel76-node-03 ] Full list of resources: gcp-fence (stonith:fence_gce): Started rhel76-node-02 Resource Group: vipgrp aliasip (ocf::heartbeat:gcp-vpc-move-vip): Started rhel76-node-02 vip (ocf::heartbeat:IPaddr2): Started rhel76-node-03 Daemon Status: corosync: active/enabled pacemaker: active/enabled pcsd: active/enabled
Additional resources
For concepts, references, and additional information about RHEL High Availability, see the following Red Hat documents.
- High Availability Add-On Overview
- High Availability Add-On Administration
- High Availability Add-On Reference
If you add an additional node, you need to update the agent. For example, if you add a fourth node, update the fencing agent using the following command.
# pcs stonith update pcmk_host_map="rhel-hostname-1:Instance-ID-1;rhel-hostname-2:Instance-ID;rhel-hostname-3:Instance-ID;rhel-hostname-4:Instance-ID"
Use the following commands to view the help and the additional options you can set for the GCP fencing agent.
# pcs stonith describe fence_gce
# fence_gce -h