Builders and image automation
Builders and image automation
Abstract
Preface
To automate container image builds from Dockerfiles in Red Hat Quay, you can configure builders on bare metal and virtual machines. Configure build triggers to start builds automatically when code changes occur, or start builds manually when needed.
Chapter 1. Red Hat Quay builds overview
The Red Hat Quay builds feature automates container image builds from Dockerfiles using worker nodes. You can trigger builds manually or automatically via webhooks to integrate CI/CD pipelines into your workflow.
The builds feature is supported on Red Hat Quay on OpenShift Container Platform and Kubernetes clusters. For Operator-based deployments and Kubernetes clusters, builds are created by using a build manager that coordinates and handles the build jobs. Builds support building Dockerfile on both bare metal platforms and on virtualized platforms with virtual builders. This versatility allows organizations to adapt to existing infrastructure while leveraging Red Hat Quay’s container image build capabilities.
The key features of Red Hat Quay builds feature include:
- Automated builds triggered by code commits or version control events
- Support for Docker and Podman container images
- Fine-grained control over build environments and resources
- Integration with Kubernetes and OpenShift Container Platform for scalable builds
- Compatibility with bare metal and virtualized infrastructure
Running builds directly in a container on bare metal platforms does not have the same isolation as when using virtual machines, however, it still provides good protection.
Builds are highly complex, and administrators are encouraged to review the Build automation architecture guide before continuing.
1.1. Building container images
The Red Hat Quay builds feature supports building Docker and Podman container images from Dockerfiles. You can create containerized applications by defining build contexts and using base images from public repositories.
Red Hat Quay supports the ability to build Docker and Podman container images. This functionality is valuable for developers and organizations who rely on container and container orchestration.
1.1.1. Build contexts
When building an image with Docker or Podman, a directory is specified to become the build context. This is true for both manual Builds and Build triggers, because the Build that is created by is not different than running docker build or podman build on your local machine.
Build contexts are always specified in the subdirectory from the Build setup, and fallback to the root of the Build source if a directory is not specified.
When a build is triggered, Build workers clone the Git repository to the worker machine, and then enter the Build context before conducting a Build.
For Builds based on .tar archives, Build workers extract the archive and enter the Build context. For example:
Extracted Build archive
example
├── .git
├── Dockerfile
├── file
└── subdir
└── DockerfileImagine that the Extracted Build archive is the directory structure got a Github repository called example. If no subdirectory is specified in the Build trigger setup, or when manually starting the Build, the Build operates in the example directory.
If a subdirectory is specified in the Build trigger setup, for example, subdir, only the Dockerfile within it is visible to the Build. This means that you cannot use the ADD command in the Dockerfile to add file, because it is outside of the Build context.
Unlike Docker Hub, the Dockerfile is part of the Build context on As a result, it must not appear in the .dockerignore file.
Chapter 2. Configuring the OpenShift Container Platform TLS component for builds
To enable the builds feature with unmanaged TLS in Red Hat Quay, you can add the builder route name to the Subject Alternative Name (SAN) field in your SSL/TLS certificate configuration.
The tls component of the QuayRegistry custom resource definition (CRD) allows you to control whether SSL/TLS are managed by the Red Hat Quay Operator, or self managed. In its current state, Red Hat Quay does not support the builds feature, or the builder workers, when the tls component is managed by the Red Hat Quay Operator.
When setting the tls component to unmanaged, you must supply your own ssl.cert and ssl.key files. Additionally, if you want your cluster to support builders, or the worker nodes that are responsible for building images, you must add both the Quay route and the builder route name to the SAN list in the certificate. Alternatively, however, you could use a wildcard.
Prerequisites
-
You have set the
tlscomponent tounmanagedand uploaded custom SSL/TLS certificates to the Red Hat Quay Operator. For more information, see SSL and TLS for Red Hat Quay.
Procedure
In the configuration file that defines your SSL/TLS certificate parameters, for example,
openssl.cnf, add the following information to the certificate’s Subject Alternative Name (SAN) field. For example:# ... [alt_names] <quay_registry_name>-quay-builder-<namespace>.<domain-name>:443 # ...
For example:
# ...
[alt_names]
example-registry-quay-builder-quay-enterprise.apps.cluster-new.gcp.quaydev.org:443
# ...
Chapter 3. Bare metal builds with Red Hat Quay on OpenShift Container Platform
Bare metal builds enable you to build container images on physical infrastructure using Red Hat Quay with Red Hat Quay on OpenShift Container Platform. You can create an environment for bare metal builds to leverage your existing hardware resources.
3.1. Configuring bare metal builds for Red Hat Quay on OpenShift Container Platform
To configure bare metal builds for Red Hat Quay on OpenShift Container Platform with Red Hat Quay, you can create a build project, configure service accounts, and update your configuration file.
If you are using the Red Hat Quay Operator on OpenShift Container Platform with a managed route component in your QuayRegistry CRD, see "Red Hat Quay on OpenShift Container Platform builds limitations with self-managed routes".
Prerequisites
- You have an OpenShift Container Platform cluster provisioned with the Red Hat Quay Operator running.
-
You have set the
tlscomponent tounmanagedand uploaded custom SSL/TLS certificates to the Red Hat Quay Operator. For more information, see SSL and TLS for Red Hat Quay. - You are logged into OpenShift Container Platform as a cluster administrator.
Procedure
Enter the following command to create a project where Builds will be run, for example,
bare-metal-builder:$ oc new-project bare-metal-builder
Create a new
ServiceAccountin thebare-metal-buildernamespace by entering the following command:$ oc create sa -n bare-metal-builder quay-builder
Enter the following command to grant a user the
editrole within thebare-metal-buildernamespace:$ oc policy add-role-to-user -n bare-metal-builder edit system:serviceaccount:bare-metal-builder:quay-builder
Enter the following command to retrieve a token associated with the
quay-builderservice account in thebare-metal-buildernamespace. This token is used to authenticate and interact with the OpenShift Container Platform cluster’s API server.If your OpenShift Container Platform cluster is version 4.11+, enter the following command:
oc create token quay-builder -n bare-metal-builder --duration 24h
If your OpenShift Container Platform cluster is earlier than version 4.11, for example, version 4.10, enter the following command:
$ oc sa get-token -n bare-metal-builder quay-builder
- Identify the URL for the OpenShift Container Platform cluster’s API server. This can be found in the OpenShift Container Platform web console.
Identify a worker node label to be used when scheduling build jobs. Because build pods must run on bare metal worker nodes, typically these are identified with specific labels.
Check with your cluster administrator to determine exactly which node label should be used.
Obtain the Kube API Server’s certificate authority (CA) to add to Red Hat Quay’s extra certificates.
On OpenShift Container Platform versions 4.15+, enter the following commands to obtain the name of the secret containing the CA:
$ oc extract cm/kube-root-ca.crt -n openshift-apiserver
$ mv ca.crt build_cluster.crt
On OpenShift Container Platform versions earlier than 4.15, for example, 4.14, enter the following command:
$ oc get sa openshift-apiserver-sa --namespace=openshift-apiserver -o json | jq '.secrets[] | select(.name | contains("openshift-apiserver-sa-token"))'.name-
Obtain the
ca.crtkey value from the secret in the OpenShift Container Platform Web Console. The value begins with "-----BEGIN CERTIFICATE-----"`. -
Import the CA to Red Hat Quay. Ensure that the name of this file matches the
K8S_API_TLS_CAfield used in Step 9.
Create the following
SecurityContextConstraintsresource for theServiceAccount:apiVersion: security.openshift.io/v1 kind: SecurityContextConstraints metadata: name: quay-builder priority: null readOnlyRootFilesystem: false requiredDropCapabilities: null runAsUser: type: RunAsAny seLinuxContext: type: RunAsAny seccompProfiles: - '*' supplementalGroups: type: RunAsAny volumes: - '*' allowHostDirVolumePlugin: true allowHostIPC: true allowHostNetwork: true allowHostPID: true allowHostPorts: true allowPrivilegeEscalation: true allowPrivilegedContainer: true allowedCapabilities: - '*' allowedUnsafeSysctls: - '*' defaultAddCapabilities: null fsGroup: type: RunAsAny --- apiVersion: rbac.authorization.k8s.io/v1 kind: Role metadata: name: quay-builder-scc namespace: bare-metal-builder rules: - apiGroups: - security.openshift.io resourceNames: - quay-builder resources: - securitycontextconstraints verbs: - use --- apiVersion: rbac.authorization.k8s.io/v1 kind: RoleBinding metadata: name: quay-builder-scc namespace: bare-metal-builder subjects: - kind: ServiceAccount name: quay-builder roleRef: apiGroup: rbac.authorization.k8s.io kind: Role name: quay-builder-scc
Update the
config.yamlfile of your Red Hat Quay on OpenShift Container Platform deployment to include an appropriate bare metal builds configuration by using the OpenShift Container Platform web console.- Click Operators → Installed Operators → Red Hat Quay → Quay Registry.
- Click the name of your registry, for example, example-registry.
- Under Config Bundle Secret, click the name of your configuration bundle, for example, extra-ca-certificate-config-bundle-secret.
- Click Actions → Edit Secret.
Add the following information to your Red Hat Quay
config.yamlfile, replacing each value with information that is relevant to your specific installation:FEATURE_USER_INITIALIZE: true BROWSER_API_CALLS_XHR_ONLY: false SUPER_USERS: - <superusername> FEATURE_USER_CREATION: false FEATURE_QUOTA_MANAGEMENT: true FEATURE_BUILD_SUPPORT: True BUILDMAN_HOSTNAME: ${BUILDMAN_HOSTNAME}:443 BUILD_MANAGER: - ephemeral - ALLOWED_WORKER_COUNT: 10 ORCHESTRATOR_PREFIX: buildman/production/ ORCHESTRATOR: REDIS_HOST: <sample_redis_hostname> REDIS_PASSWORD: "" REDIS_SSL: false REDIS_SKIP_KEYSPACE_EVENT_SETUP: false EXECUTORS: - EXECUTOR: kubernetes BUILDER_NAMESPACE: <sample_builder_namespace> K8S_API_SERVER: <sample_k8s_api_server> K8S_API_TLS_CA: <sample_crt_file> VOLUME_SIZE: 8G KUBERNETES_DISTRIBUTION: openshift CONTAINER_MEMORY_LIMITS: 1G CONTAINER_CPU_LIMITS: 300m CONTAINER_MEMORY_REQUEST: 1G CONTAINER_CPU_REQUEST: 300m NODE_SELECTOR_LABEL_KEY: beta.kubernetes.io/instance-type NODE_SELECTOR_LABEL_VALUE: n1-standard-4 CONTAINER_RUNTIME: podman SERVICE_ACCOUNT_NAME: <sample_service_account_name> SERVICE_ACCOUNT_TOKEN: <sample_account_token> QUAY_USERNAME: <quay_username> QUAY_PASSWORD: <quay_password> WORKER_IMAGE: <registry>/quay-quay-builder WORKER_TAG: <some_tag> BUILDER_VM_CONTAINER_IMAGE: registry.redhat.io/quay/quay-builder-qemu-rhcos-rhel8:v3.9.10-4 SETUP_TIME: 180 MINIMUM_RETRY_THRESHOLD: 0 SSH_AUTHORIZED_KEYS: - <ssh-rsa 12345 someuser@email.com> - <ssh-rsa 67890 someuser2@email.com> HTTP_PROXY: <http://10.0.0.1:80> HTTPS_PROXY: <http://10.0.0.1:80> NO_PROXY: <hostname.example.com>where:
BUILDMAN_HOSTNAME::Specifies the hostname of the Red Hat Quay registry. Obtain this by running the following command:$ oc get route quayregistry-quay-builder -n ${QUAY_PROJECT} -o jsonpath='{.spec.host}'.REDIS_HOST::Specifies the hostname for your Redis service.BUILDER_NAMESPACE::Specifies the name of your bare metal builds namespace. This example usedbare-metal-builder.K8S_API_SERVER::Specifies theK8S_API_SERVERis obtained by running$ oc cluster-info.K8S_API_TLS_CA::Specifies the name of your custom CA cert, for example,K8S_API_TLS_CA: /conf/stack/extra_ca_certs/build-cluster.crt.CONTAINER_MEMORY_LIMITS::Specifies the memory limit for your container. Defaults to5120Miif left unspecified.CONTAINER_CPU_LIMITS::Specifies the CPU limit for your container. Defaults to1000mif left unspecified.CONTAINER_MEMORY_REQUEST::Specifies the memory request for your container. Defaults to3968Miif left unspecified.CONTAINER_CPU_REQUEST::Specifies the CPU request for your container. Defaults to500mif left unspecified.SERVICE_ACCOUNT_TOKEN::Specifies the token for your service account. Obtain this by running$ oc create sa.SSH_AUTHORIZED_KEYS::Specifies the SSH authorized keys for your build environment. This key, or keys, should correspond to the private key that an admin or developer will use to SSH into the build worker for debugging purposes. This key can be obtained by establishing an SSH connection to the remote host using a specific SSH key and port. For example:$ ssh -i /path/to/ssh/key/set/in/ssh_authorized_keys -p 9999 core@localhost.
- Restart your Red Hat Quay registry to enable the builds feature.
3.1.1. Red Hat Quay on OpenShift Container Platform builds limitations with self-managed routes
The Red Hat Quay builds feature has specific networking constraints when using managed routes on Red Hat Quay on OpenShift Container Platform. Understanding these limitations helps you ensure successful communication between build executors and the build manager.
OpenShift Container Platform routes are typically restricted to serving traffic to a single port. Because Red Hat Quay Builds require gRPC communication, the Operator creates a specific Route resource to direct this traffic to the build manager server.
Key considerations for this architecture include:
- Insecure vs. Secure Traffic: OpenShift ingress must have HTTP/2 enabled to support the gRPC protocol used by the build manager.
- Identity and Trust: The build manager requires the CA certificate of the build cluster to be present in the Red Hat Quay configuration to establish a secure connection.
- Hostname Resolution: Build jobs must be able to resolve the build manager’s hostname. If using a custom subdomain, specific DNS mapping is required to point to the OpenShift router.
See "Configuring Red Hat Quay builds for managed routes" for more information.
3.1.2. Configuring Red Hat Quay builds for managed routes
To use Red Hat Quay builds with managed routes and custom hostnames, you can configure DNS records and update your registry configuration. This enables gRPC communication between build executors and the build manager.
Prerequisites
-
The Red Hat Quay Operator is installed and a
QuayRegistryexists. -
Your
kubectlorocCLI tool is configured for the target cluster.
Procedure
- Enable HTTP/2 ingress on your OpenShift Container Platform cluster to support gRPC.
Retrieve the host address of the generated build-manager route:
$ kubectl get -n <namespace> route <quayregistry-name>-quay-builder -o jsonpath={.status.ingress[0].host}-
Create a CNAME record with your DNS provider that points your custom hostname (for example,
builder-registry.example.com) to the route host retrieved in the previous step. -
Update the
Secretreferenced byspec.configBundleSecretin yourQuayRegistryto include the build cluster CA certificate. The key must be namedextra_ca_cert_build_cluster.cert. Add the
BUILDMAN_HOSTNAMEfield to yourconfig.yamland include the port number:BUILDMAN_HOSTNAME: builder-registry.example.com:443 BUILD_MANAGER: - ephemeral ALLOWED_WORKER_COUNT: 1 ...
Chapter 4. Virtual builds with Red Hat Quay on OpenShift Container Platform
To build container images in virtualized environments with Red Hat Quay on Red Hat Quay on OpenShift Container Platform, you can use virtual builds. Virtual builds run in unprivileged containers and provide isolation for your build processes.
With virtual builds, the build manager first creates the Job Object resource. Then, the Job Object creates a pod using the quay-builder-image. The quay-builder-image contains the quay-builder binary and the Podman service. The created pod runs as unprivileged. The quay-builder binary then builds the image while communicating status and retrieving build information from the build manager.
4.1. Virtual builds limitations
The following limitations apply to the virtual builds feature:
- Running virtual builds with Red Hat Quay on OpenShift Container Platform in an unprivileged context might cause some commands that were working under the previous build strategy to fail. Attempts to change the build strategy could potentially cause performance issues and reliability with the build.
- Running virtual builds directly in a container does not have the same isolation as using virtual machines. Changing the build environment might also cause builds that were previously working to fail.
4.2. Configuring virtual builds for Red Hat Quay on OpenShift Container Platform
To configure virtual builds for Red Hat Quay on OpenShift Container Platform with Red Hat Quay, you can create a build project, configure service accounts, and update your configuration file.
- If you are using Amazon Web Service (AWS) S3 storage, you must modify your storage bucket in the AWS console, prior to running builders. See "Modifying your AWS S3 storage bucket" in the following section for the required parameters.
- If you are using a Google Cloud Platform (GCP) object bucket, you must configure cross-origin resource sharing (CORS) to enable virtual builds.
Prerequisites
- You have an OpenShift Container Platform cluster provisioned with the Red Hat Quay Operator running.
-
You have set the
tlscomponent tounmanagedand uploaded custom SSL/TLS certificates to the Red Hat Quay Operator. For more information, see SSL and TLS for Red Hat Quay. - You have configured the OpenShift Container Platform TLS component for builds.
- You are logged into OpenShift Container Platform as a cluster administrator.
Procedure
Create a new project where your virtual builders will be run, for example,
virtual-builders, by running the following command:$ oc new-project virtual-builders
Create a
ServiceAccountin the project that will be used to run builds by entering the following command:$ oc create sa -n virtual-builders quay-builder
Example output
serviceaccount/quay-builder created
Provide the created service account with editing permissions so that it can run a build:
$ oc adm policy -n virtual-builders add-role-to-user edit system:serviceaccount:virtual-builders:quay-builder
Example output
clusterrole.rbac.authorization.k8s.io/edit added: "system:serviceaccount:virtual-builders:quay-builder"
Grant the builder worker
anyuid sccpermissions by entering the following command. This requires cluster administrator privileges, which is required because builders must run as the Podman user for unprivileged or rootless builds to work.$ oc adm policy -n virtual-builders add-scc-to-user anyuid -z quay-builder
Example output
clusterrole.rbac.authorization.k8s.io/system:openshift:scc:anyuid added: "quay-builder"
Obtain the token for the builder service account by entering the following command:
$ oc create token quay-builder -n virtual-builders
NoteWhen the token expires you will need to request a new token. Optionally, you can also add a custom expiration. For example, specify
--duration 20160mto retain the token for two weeks.Example output
eyJhbGciOiJSUzI1NiIsImtpZCI6IldfQUJkaDVmb3ltTHZ0dGZMYjhIWnYxZTQzN2dJVEJxcDJscldSdEUtYWsifQ...
Determine the builder route by entering the following command:
$ oc get route -n quay-enterprise
Example output
NAME: example-registry-quay-builder
HOST/PORT: example-registry-quay-builder-quay-enterprise.apps.stevsmit-cluster-new.gcp.quaydev.org
PATH:
SERVICES: example-registry-quay-app
PORT: grpc
TERMINATION: passthrough/Redirect
WILDCARD: None
Generate a self-signed SSL/TlS certificate with the
.crtextension by entering the following command:$ oc extract cm/kube-root-ca.crt -n openshift-apiserver
Example output
ca.crt
Rename the
ca.crtfile tobuild-cluster.crtby entering the following command:$ mv ca.crt build-cluster.crt
Update the
config.yamlfile of your Red Hat Quay on OpenShift Container Platform deployment to include an appropriate virtual builds configuration by using the OpenShift Container Platform web console.- Click Operators → Installed Operators → Red Hat Quay → Quay Registry.
- Click the name of your registry, for example, example-registry.
- Under Config Bundle Secret, click the name of your configuration bundle, for example, extra-ca-certificate-config-bundle-secret.
- Click Actions → Edit Secret.
Add an appropriate virtual builds configuration using the following as a reference:
FEATURE_USER_INITIALIZE: true BROWSER_API_CALLS_XHR_ONLY: false SUPER_USERS: - <superusername> FEATURE_USER_CREATION: false FEATURE_QUOTA_MANAGEMENT: true FEATURE_BUILD_SUPPORT: True BUILDMAN_HOSTNAME: <sample_build_route> BUILD_MANAGER: - ephemeral - ALLOWED_WORKER_COUNT: 1 ORCHESTRATOR_PREFIX: buildman/production/ JOB_REGISTRATION_TIMEOUT: 3600 ORCHESTRATOR: REDIS_HOST: <sample_redis_hostname> REDIS_PASSWORD: "" REDIS_SSL: false REDIS_SKIP_KEYSPACE_EVENT_SETUP: false EXECUTORS: - EXECUTOR: kubernetesPodman NAME: openshift BUILDER_NAMESPACE: <sample_builder_namespace> SETUP_TIME: 180 MINIMUM_RETRY_THRESHOLD: 0 BUILDER_CONTAINER_IMAGE: quay.io/projectquay/quay-builder:{producty} # Kubernetes resource options K8S_API_SERVER: <sample_k8s_api_server> K8S_API_TLS_CA: <sample_crt_file> VOLUME_SIZE: 8G KUBERNETES_DISTRIBUTION: openshift CONTAINER_MEMORY_LIMITS: 1G CONTAINER_CPU_LIMITS: 300m CONTAINER_MEMORY_REQUEST: 1G CONTAINER_CPU_REQUEST: 300m NODE_SELECTOR_LABEL_KEY: "" NODE_SELECTOR_LABEL_VALUE: "" SERVICE_ACCOUNT_NAME: <sample_service_account_name> SERVICE_ACCOUNT_TOKEN: <sample_account_token> HTTP_PROXY: <http://10.0.0.1:80> HTTPS_PROXY: <http://10.0.0.1:80> NO_PROXY: <hostname.example.com>where:
BUILDMAN_HOSTNAME::Specifies the hostname of the Red Hat Quay registry. Obtain this by running the following command:$ oc get route quayregistry-quay-builder -n ${QUAY_PROJECT} -o jsonpath='{.spec.host}'.REDIS_HOST::Specifies the hostname for your Redis service.BUILDER_NAMESPACE::Specifies the name of your bare metal builds namespace. This example usedbare-metal-builder.K8S_API_SERVER::Specifies theK8S_API_SERVERis obtained by running$ oc cluster-info.K8S_API_TLS_CA::Specifies the name of your custom CA cert, for example,K8S_API_TLS_CA: /conf/stack/extra_ca_certs/build-cluster.crt.CONTAINER_MEMORY_LIMITS::Specifies the memory limit for your container. Defaults to5120Miif left unspecified.CONTAINER_CPU_LIMITS::Specifies the CPU limit for your container. Defaults to1000mif left unspecified.CONTAINER_MEMORY_REQUEST::Specifies the memory request for your container. Defaults to3968Miif left unspecified.CONTAINER_CPU_REQUEST::Specifies the CPU request for your container. Defaults to500mif left unspecified.SERVICE_ACCOUNT_TOKEN::Specifies the token for your service account. Obtain this by running$ oc create sa.SSH_AUTHORIZED_KEYS::Specifies the SSH authorized keys for your build environment. This key, or keys, should correspond to the private key that an admin or developer will use to SSH into the build worker for debugging purposes. This key can be obtained by establishing an SSH connection to the remote host using a specific SSH key and port. For example:$ ssh -i /path/to/ssh/key/set/in/ssh_authorized_keys -p 9999 core@localhost.Example virtual builds configuration
FEATURE_USER_INITIALIZE: true BROWSER_API_CALLS_XHR_ONLY: false SUPER_USERS: - quayadmin FEATURE_USER_CREATION: false FEATURE_QUOTA_MANAGEMENT: true FEATURE_BUILD_SUPPORT: True BUILDMAN_HOSTNAME: example-registry-quay-builder-quay-enterprise.apps.docs.quayteam.org:443 BUILD_MANAGER: - ephemeral - ALLOWED_WORKER_COUNT: 1 ORCHESTRATOR_PREFIX: buildman/production/ JOB_REGISTRATION_TIMEOUT: 3600 ORCHESTRATOR: REDIS_HOST: example-registry-quay-redis REDIS_PASSWORD: "" REDIS_SSL: false REDIS_SKIP_KEYSPACE_EVENT_SETUP: false EXECUTORS: - EXECUTOR: kubernetesPodman NAME: openshift BUILDER_NAMESPACE: virtual-builders SETUP_TIME: 180 MINIMUM_RETRY_THRESHOLD: 0 BUILDER_CONTAINER_IMAGE: quay.io/projectquay/quay-builder:{producty} # Kubernetes resource options K8S_API_SERVER: api.docs.quayteam.org:6443 K8S_API_TLS_CA: /conf/stack/extra_ca_certs/build-cluster.crt VOLUME_SIZE: 8G KUBERNETES_DISTRIBUTION: openshift CONTAINER_MEMORY_LIMITS: 1G CONTAINER_CPU_LIMITS: 300m CONTAINER_MEMORY_REQUEST: 1G CONTAINER_CPU_REQUEST: 300m NODE_SELECTOR_LABEL_KEY: "" NODE_SELECTOR_LABEL_VALUE: "" SERVICE_ACCOUNT_NAME: quay-builder SERVICE_ACCOUNT_TOKEN: "eyJhbGciOiJSUzI1NiIsImtpZCI6IldfQUJkaDVmb3ltTHZ0dGZMYjhIWnYxZTQzN2dJVEJxcDJscldSdEUtYWsifQ" HTTP_PROXY: <http://10.0.0.1:80> HTTPS_PROXY: <http://10.0.0.1:80> NO_PROXY: <hostname.example.com>- Click Save on the Edit Secret page.
- Restart your Red Hat Quay on OpenShift Container Platform registry with the new configuration.
4.2.1. Modifying your AWS S3 storage bucket
To enable builds with AWS S3 storage in Red Hat Quay, you can configure cross-origin resource sharing (CORS) settings in your S3 bucket. This allows build workers to access and store build artifacts in your S3 bucket.
Procedure
- Log in to your AWS console at Content from s3.console.aws.amazon.com is not included.s3.console.aws.com.
-
In the search bar, search for
S3and then click S3. -
Click the name of your bucket, for example,
myawsbucket. - Click the Permissions tab.
Under Cross-origin resource sharing (CORS), include the following parameters:
  [
      {
          "AllowedHeaders": [
              "Authorization"
          ],
          "AllowedMethods": [
              "GET"
          ],
          "AllowedOrigins": [
              "*"
          ],
          "ExposeHeaders": [],
          "MaxAgeSeconds": 3000
      },
      {
          "AllowedHeaders": [
              "Content-Type",
              "x-amz-acl",
              "origin"
          ],
          "AllowedMethods": [
              "PUT"
          ],
          "AllowedOrigins": [
              "*"
          ],
          "ExposeHeaders": [],
          "MaxAgeSeconds": 3000
      }
  ]
4.2.2. Modifying your Google Cloud Platform object bucket
To enable virtual builds with Google Cloud Platform storage in Red Hat Quay, you can configure cross-origin resource sharing (CORS) settings in your GCP bucket. This allows build workers to upload Dockerfiles and access build artifacts.
Currently, modifying your Google Cloud Platform object bucket is not supported on IBM Power and IBM Z.
Procedure
Use the following reference to create a JSON file for your specific CORS needs. For example:
$ cat gcp_cors.json
Example output
[ { "origin": ["*"], "method": ["GET"], "responseHeader": ["Authorization"], "maxAgeSeconds": 3600 }, { "origin": ["*"], "method": ["PUT"], "responseHeader": [ "Content-Type", "x-goog-acl", "origin"], "maxAgeSeconds": 3600 } ]Enter the following command to update your GCP storage bucket:
$ gcloud storage buckets update gs://<bucket_name> --cors-file=./gcp_cors.json
Example output
Updating
  Completed 1
You can display the updated CORS configuration of your GCP bucket by running the following command:
$ gcloud storage buckets describe gs://<bucket_name> --format="default(cors)"
Example output
cors:
- maxAgeSeconds: 3600
  method:
  - GET
  origin:
  - '*'
  responseHeader:
  - Authorization
- maxAgeSeconds: 3600
  method:
  - PUT
  origin:
  - '*'
  responseHeader:
  - Content-Type
  - x-goog-acl
  - origin
Chapter 5. Starting a new build
Starting a build creates a container image from a Dockerfile in Red Hat Quay. You can start builds manually by uploading a Dockerfile or automatically by using build triggers.
Prerequisites
- You have navigated to the Builds page of your repository.
Procedure
- On the Builds page, click Start New Build.
- When prompted, click Upload Dockerfile to upload a Dockerfile or an archive that contains a Dockerfile at the root directory.
Click Start Build.
Note- Currently, users cannot specify the Docker build context when manually starting a build.
- Currently, BitBucket is unsupported on the Red Hat Quay v2 UI.
- You are redirected to the build, which can be viewed in real-time. Wait for the Dockerfile build to be completed and pushed.
- Optional. you can click Download Logs to download the logs, or Copy Logs to copy the logs.
Click the back button to return to the Repository Builds page, where you can view the build history.

You can check the status of your build by clicking the commit in the Build History page, or by running the following command:
$ oc get pods -n virtual-builders
Example output
NAME                                               READY   STATUS    RESTARTS   AGE
f192fe4a-c802-4275-bcce-d2031e635126-9l2b5-25lg2   1/1     Running   0          7s
After the build has completed, the
oc get pods -n virtual-builderscommand returns no resources:$ oc get pods -n virtual-builders
Example output
No resources found in virtual-builders namespace.
Chapter 6. Build triggers
To automate container image builds from Dockerfiles in Red Hat Quay, you can configure builders on bare metal and virtual machines. Configure build triggers to start builds automatically when code changes occur, or start builds manually when needed.
6.1. Creating a build trigger
To automate container image builds from your Git repositories, you can create a custom Git build trigger in Red Hat Quay. Build triggers automatically build and push images when you push code to your Git repository.
The following steps can be replicated to create a build trigger using Github, Gitlab, or Bitbucket, however, you must configure the credentials for these services in your config.yaml file.
- If you want to use Github to create a build trigger, you must configure Github to be used with Red Hat Quay by creating an OAuth application. For more information, see "Creating an OAuth application Github".
Prerequisites
- For Red Hat Quay on OpenShift Container Platform deployments, you have configured your OpenShift Container Platform environment for either bare metal builds or virtual builds.
Procedure
- Log in to your Red Hat Quay registry.
- In the navigation pane, click Repositories.
- Click Create Repository.
- Click the Builds tab.
- On the Builds page, click Create Build Trigger.
- Select the desired platform, for example, Github, Bitbucket, Gitlab, or use a custom Git repository. For this example, click Custom Git Repository Push.
-
Enter a custom Git repository name, for example,
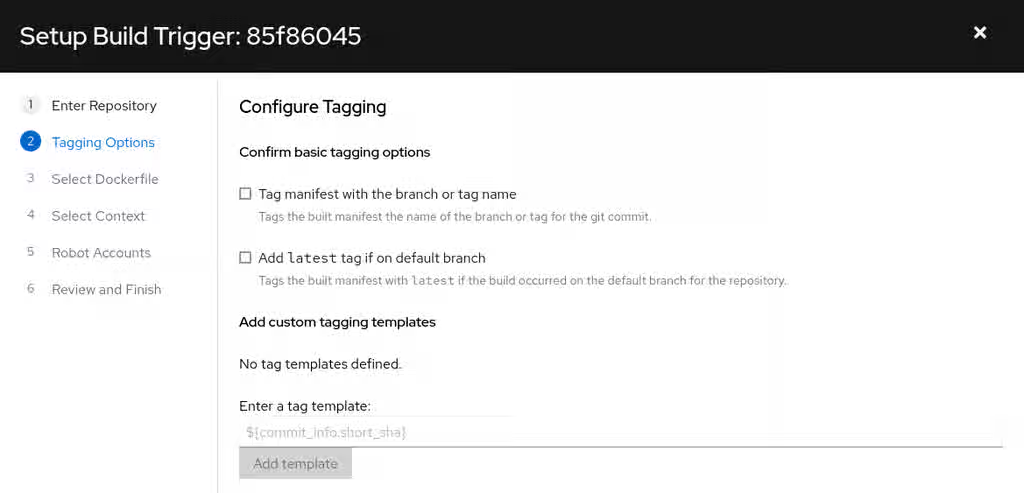
git@github.com:<username>/<repo>.git. Then, click Next. When prompted, configure the tagging options by selecting one of, or both of, the following options:
- Tag manifest with the branch or tag name. When selecting this option, the built manifest the name of the branch or tag for the git commit are tagged.
Add
latesttag if on default branch. When selecting this option, the built manifest with latest if the build occurred on the default branch for the repository are tagged.Optionally, you can add a custom tagging template. There are multiple tag templates that you can enter here, including using short SHA IDs, timestamps, author names, committer, and branch names from the commit as tags. For more information, see "Tag naming for build triggers".
After you have configured tagging, click Next.
- When prompted, select the location of the Dockerfile to be built when the trigger is invoked. If the Dockerfile is located at the root of the git repository and named Dockerfile, enter /Dockerfile as the Dockerfile path. Then, click Next.
-
When prompted, select the context for the Docker build. If the Dockerfile is located at the root of the Git repository, enter
/as the build context directory. Then, click Next. - Optional. Choose an optional robot account. This allows you to pull a private base image during the build process. If you know that a private base image is not used, you can skip this step.
- Click Next. Check for any verification warnings. If necessary, fix the issues before clicking Finish.
You are alerted that the trigger has been successfully activated. Note that using this trigger requires the following actions:
- You must give the following public key read access to the git repository.
You must set your repository to
POSTto the following URL to trigger a build.Save the SSH Public Key, then click Return to <organization_name>/<repository_name>. You are redirected to the Builds page of your repository.
On the Builds page, you now have a build trigger. For example:

After you have created a custom Git trigger, additional steps are required. Continue on to "Setting up a custom Git trigger".
If you are setting up a build trigger for Github, Gitlab, or Bitbucket, continue on to "Manually triggering a build".
6.1.1. Setting up a custom Git trigger
To complete the setup of your custom Git build trigger in Red Hat Quay, you must provide read access to the SSH public key and configure a webhook endpoint. These steps enable your Git repository to automatically trigger builds when you push code.
These steps are only required if you are using a custom Git trigger.
6.1.1.1. Obtaining build trigger credentials
To configure your custom Git trigger, you can obtain the SSH public key and webhook endpoint URL from the Red Hat Quay user interface. These credentials are available on the Builds page of your repository.
Prerequisites
- You have created a custom Git trigger.
Procedure
- On the Builds page of your repository, click the menu kebab for your custom Git trigger.
- Click View Credentials.
Save the SSH Public Key and Webhook Endpoint URL.
The key and the URL are available by selecting View Credentials from the Settings, or gear icon.
6.1.1.2. SSH public key access
SSH public key access in Red Hat Quay enables builder instances to clone Git repositories for custom build triggers. Install the SSH public key that Red Hat Quay generates in your Git server configuration, either by adding it to the authorized_keys file or using Deploy Keys.
Depending on the Git server configuration, there are multiple ways to install the SSH public key that Quay generates for a custom Git trigger.
For example, documentation for Content from git-scm.com is not included.Getting Git on a Server describes a describes how to set up a Git server on a Linux-based machine with a focus on managing repositories and access control through SSH. In this procedure, a small server is set up to add the keys to the $HOME/.ssh/authorize_keys folder, which provides access for builders to clone the repository.
For any Git repository management software that is not officially supported, there is usually a location to input the key that is often labeled as Deploy Keys.
6.1.1.3. Webhook reference
The webhook reference provides the JSON payload format required to trigger builds in Red Hat Quay. You must POST a JSON payload with commit, ref, and default_branch fields to the webhook URL to automatically start a build.
This request requires a Content-Type header containing application/json in order to be valid.
Example webhook
{
  "commit": "1c002dd",                                   // required
  "ref": "refs/heads/master",                            // required
  "default_branch": "master",                            // required
  "commit_info": {                                       // optional
    "url": "gitsoftware.com/repository/commits/1234567", // required
    "message": "initial commit",                         // required
    "date": "timestamp",                                 // required
    "author": {                                          // optional
      "username": "user",                                // required
      "avatar_url": "gravatar.com/user.png",             // required
      "url": "gitsoftware.com/users/user"                // required
    },
    "committer": {                                       // optional
      "username": "user",                                // required
      "avatar_url": "gravatar.com/user.png",             // required
      "url": "gitsoftware.com/users/user"                // required
    }
  }
}
This can typically be accomplished with a Content from git-scm.com is not included.post-receive Git hook, however it does depend on your server setup.
6.1.2. Tag naming for build triggers
Tag naming for build triggers in Red Hat Quay lets you create custom tags using templates that include commit information such as SHA, branch name, author, and date. You can use these templates to automatically tag your built images with meaningful identifiers based on the Git commit that triggered the build.
One option is to include any string of characters assigned as a tag for each built image. Alternatively, you can use the following tag templates on the Configure Tagging section of the build trigger to tag images with information from each commit:
- ${commit}: Full SHA of the issued commit
- ${parsed_ref.branch}: Branch information (if available)
- ${parsed_ref.tag}: Tag information (if available)
- ${parsed_ref.remote}: The remote name
- ${commit_info.date}: Date when the commit was issued
- ${commit_info.author.username}: Username of the author of the commit
- ${commit_info.short_sha}: First 7 characters of the commit SHA
- ${committer.properties.username}: Username of the committer
This list is not complete, but does contain the most useful options for tagging purposes. You can find the complete tag template schema on Content from github.com is not included.this page.
For more information, see Set up custom tag templates in build triggers for Red Hat Quay and Quay.io.
6.1.3. Skipping a source control-triggered build
You can skip source control-triggered builds in Red Hat Quay by adding [skip build] or [build skip] to your commit message. This prevents the build system from automatically building images for commits that do not require new builds.
6.2. Manually triggering a build
Manual build triggering in Red Hat Quay lets you start builds on demand without waiting for automatic triggers from source control. You can manually trigger builds from the Builds page by selecting a build trigger and specifying a commit ID.
Procedure
- On the Builds page, Start new build.
- When prompted, select Invoke Build Trigger.
- Click Run Trigger Now to manually start the process.
Enter a commit ID from which to initiate the build, for example,
1c002dd.After the build starts, you can see the build ID on the Repository Builds page.
You can check the status of your build by clicking the commit in the Build History page, or by running the following command:
$ oc get pods -n virtual-builders
Example output
NAME                                               READY   STATUS    RESTARTS   AGE
f192fe4a-c802-4275-bcce-d2031e635126-9l2b5-25lg2   1/1     Running   0          7s
After the build has completed, the
oc get pods -n virtual-builderscommand returns no resources:$ oc get pods -n virtual-builders
Example output
No resources found in virtual-builders namespace.
Chapter 7. Creating an OAuth application in GitHub
To enable GitHub integration for automated builds in Red Hat Quay, you can create an OAuth application in GitHub. This allows Red Hat Quay to access GitHub repositories and trigger container image builds when commits or pull requests are made.
Procedure
- Log into Content from github.com is not included.GitHub Enterprise.
- In the navigation pane, select your username → Your organizations.
- In the navigation pane, select Applications → Developer Settings.
In the navigation pane, click OAuth Apps → New OAuth App. You are navigated to the following page:
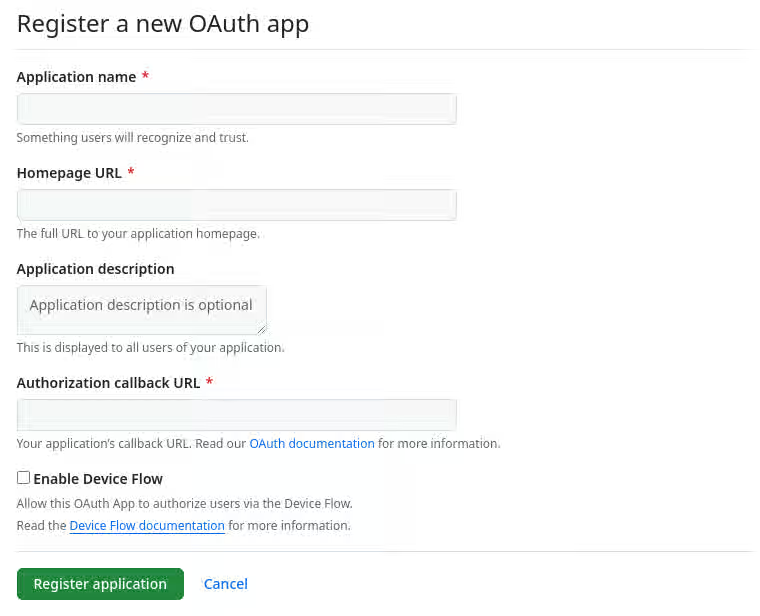
- Enter a name for the application in the Application name textbox.
In the Homepage URL textbox, enter your Red Hat Quay URL.
NoteIf you are using public GitHub, the Homepage URL entered must be accessible by your users. It can still be an internal URL.
- In the Authorization callback URL, enter Content from <red_hat_quay_url> is not included.https://<RED_HAT_QUAY_URL>/oauth2/github/callback.
- Click Register application to save your settings.
- When the new application’s summary is shown, record the Client ID and the Client Secret shown for the new application.
Chapter 8. Troubleshooting Builds
Builder instances in Red Hat Quay are ephemeral and shut down automatically after builds complete or fail. To troubleshoot build issues, you must capture logs while the builds are running.
8.1. Debug configuration flag
The DEBUG configuration flag in Red Hat Quay prevents builder instances from shutting down automatically after builds complete or fail. Set this flag to True to debug builder node issues.
  EXECUTORS:
    - EXECUTOR: ec2
      DEBUG: true
      ...
    - EXECUTOR: kubernetes
      DEBUG: true
      ...
When set to True, the debug feature prevents the build nodes from shutting down after the quay-builder service is done or fails. It also prevents the build manager from cleaning up the instances by terminating EC2 instances or deleting Kubernetes jobs. This allows debugging builder node issues.
Debugging should not be set in a production cycle. The lifetime service still exists; for example, the instance still shuts down after approximately two hours. When this happens, EC2 instances are terminated and Kubernetes jobs are completed.
Enabling debug also affects the ALLOWED_WORKER_COUNT because the unterminated instances and jobs still count toward the total number of running workers. As a result, the existing builder workers must be manually deleted if ALLOWED_WORKER_COUNT is reached to be able to schedule new builds.
8.2. Troubleshooting OpenShift Container Platform and Kubernetes Builds
To troubleshoot OpenShift Container Platform and Kubernetes builds in Red Hat Quay, you can create a port forwarding tunnel to the builder pod and access it via SSH. Check the quay-builder service logs to diagnose build issues.
Procedure
Create a port forwarding tunnel between your local machine and a pod running with either an OpenShift Container Platform cluster or a Kubernetes cluster by entering the following command:
$ oc port-forward <builder_pod> 9999:2222
Establish an SSH connection to the remote host using a specified SSH key and port, for example:
$ ssh -i /path/to/ssh/key/set/in/ssh_authorized_keys -p 9999 core@localhost
Obtain the
quay-builderservice logs by entering the following commands:$ systemctl status quay-builder
$ journalctl -f -u quay-builder