Installing and Configuring a Red Hat Enterprise Linux 7.6 (and later) High-Availability Cluster on Alibaba Cloud (Aliyun)
Before you start
-
Review Red Hat's Support Policies for RHEL High Availability Clusters and specifically the policies for RHEL High Availability on virtualization platforms and RHEL High Availability on Alibaba Cloud virtual machines.
-
You must be enrolled in the Red Hat Cloud Access program and have unused Red Hat Enterprise Linux (RHEL) subscriptions. The attached subscription must include access to the following repositories for each Alibaba Cloud instance.
- Red Hat Enterprise Linux 7 Server (RPMS): rhel-7-server-rpms/7Server/x86_64
- Red Hat Enterprise Linux High Availability (for RHEL 7 Server) (RPMS): rhel-ha-for-rhel-7-server-rpms/7Server/x86_64
Note: One unused subscription migrated to Alibaba Cloud can be used for two RHEL virtual machine (VM) instances. If you have two unused subscriptions, you can create four instances, and so on.
-
You must belong to an active Alibaba Cloud project and have sufficient permissions to create resources in the project. This includes creating or having access to the Aliyun Access Key ID and Aliyun Access Key Secret. These keys are required to configure the Aliyun command-line interface (CLI) and set up the RHEL High Availability (HA) agents.
-
Many of the procedures contain steps completed in the Content from home-intl.console.aliyun.com is not included.Alibaba Cloud Console. This user interface is frequently modified. You may need to review a procedure and investigate other user interface (UI) pathways to get to the same result. As an alternative, you may be able to use the Aliyun (Alibaba Cloud) CLI to complete the task. After the CLI is installed and configured, enter
$ aliyuncli ecs helpto get a list of all available Elastic Compute Service (ECS) commands. -
For concepts, references, and additional information about RHEL HA, see the following Red Hat documents.
Install and configure the Aliyun (Alibaba Cloud) CLI
Complete the steps below to install the Aliyun CLI on your Red Hat Enterprise Linux Server or Workstation.
-
Install extra packages from the Fedora project repository.
# yum -y localinstall https://dl.fedoraproject.org/pub/epel/epel-release-latest-7.noarch.rpm
-
Install
python2-pip.# yum -y install python2-pip
-
Install the Aliyun CLI.
    # pip install aliyuncli

    Collecting aliyuncli

    ....omitted

    Successfully installed aliyuncli-2.1.9 colorama-0.3.3 jmespath-0.7.1
-
Install the Aliyun SDK.
    # pip install aliyun-python-sdk-ecs

    Collecting aliyun-python-sdk-ecs

    ....omitted

    Successfully installed aliyun-python-sdk-core-2.8.2 aliyun-python-sdk-ecs-4.8.0 pycryptodome-3.6.1
-
Configure the CLI.
    # aliyuncli configure

    Aliyun Access Key ID [None]: <access key>
    Aliyun Access Key Secret [None: <secret key>
    Default Region Id [default region]:
    Default output format [None]: json (default), text, or table
Create a base RHEL 7.6 (or later) VM image
Complete the following steps to create the base RHEL 7.6 (or later) VM image for Alibaba Cloud. Complete this procedure using a RHEL 7 Server or Workstation. You can use Fedora, but there may be slight differences when completing the procedure.
Before you start
You need the following packages on your local system to create and configure the VM.
| Package | Repository | Description |
|---|---|---|
| libvirt | rhel-7-server-rpms | Open source API, daemon, and management tool for managing platform virtualization |
| virt-manager | rhel-7-server-rpms | A command line and Gnome desktop virtual machine manager used to create and manage KVM virtual machines |
| libguestfs | rhel-7-server-rpms | A library for accessing and modifying virtual machine file systems |
| libguestfs-tools | rhel-7-server-rpms | System administration tools for virtual machines; includes the guestfish utility |
Procedure
-
Download the latest 7.6 (or later) version of This content is not included.Red Hat Enterprise Linux from the Red Hat Customer Portal. The Red Hat Enterprise Linux KVM Guest Image is recommended.
-
Move the image to
/var/lib/libvirt/images. -
Create a new VM using virt-manager. Note the following when creating the VM.
-
Import an existing disk image and select the downloaded qcow2 file.
-
Accept or change the memory and CPU settings to your application requirements.
-
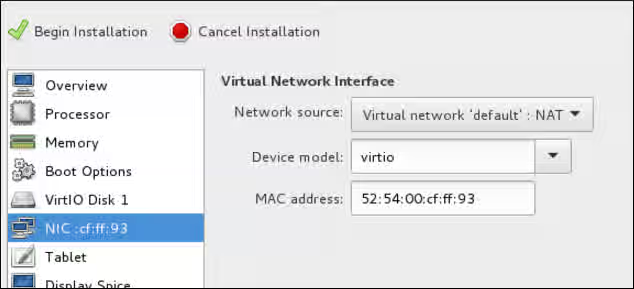
Select the Customize configuration before install check box.
-
On the custom configuration dialog box, make sure that virtio is set as the NIC Device model, and then begin the installation.
-
The VM may hang momentarily at the
IPV6 eth0line when booting up. This is normal at this point in the installation.
For detailed virt-manager instructions, refer to Create the RHEL VM from a RHEL KVM Guest Image.
-
-
Shut down the VM when you see the login prompt.
-
From your RHEL system, set up root access to the VM. Use
virt-customizeto generate a root password for the VM. Make sure to create a strong password.# virt-customize -a <guest-image-path> --root-password password:<password>Example:
# virt-customize -a /var/lib/libvirt/images/rhel-server-7.x-update-4-x86_64-kvm.qcow2 --root-password password:<password>
[   0.0] Examining the guest ...
[ 103.0] Setting a random seed
[ 103.0] Setting passwords
[ 112.0] Finishing off
-
Verify root access by starting the VM and logging in as root.
Prepare the image for Alibaba Cloud
Complete the following steps to prepare the image for Alibaba Cloud. See Content from www.alibabacloud.com is not included.Notes for importing custom images for additional information.
-
Remove any persistent network device rules.
# rm -f /etc/udev/rules.d/70-persistent-net.rules
# rm -f /etc/udev/rules.d/75-persistent-net-generator.rules
-
Set the network service to start automatically.
# chkconfig network on
-
Set the ssh service to start automatically.
# systemctl enable sshd
# systemctl is-enabled sshd
-
Enter the following command to set the timezone to UTC.
# ln -sf /usr/share/zoneinfo/UTC /etc/localtime
-
(Optional) Edit the
/etc/ssh/ssh_configfile and append the following lines. This keeps your SSH session alive during longer periods of inactivity.# Server times out connections after several minutes of inactivity. # Keep alive ssh connections by sending a packet every 7 minutes. ServerAliveInterval 420
-
Edit the
/etc/ssh/sshd_configfile and make the following changes (if needed). TheClientAliveInterval 420setting is optional. This keeps your SSH session alive during longer periods of inactivity.PermitRootLogin no AllowTcpForwarding yes X11Forwarding no PermitTunnel no # Disable PasswordAuthentication. SSH keys are more secure. PasswordAuthentication no # Compute times out connections after 10 minutes of inactivity. # Keep ssh connections alive by sending a packet every 7 minutes. ClientAliveInterval 420
-
Restart
sshdto verify configuration changes.# systemctl restart sshd
-
Shut down the VM.
Convert the RHEL image to raw format
Enter the following command to convert the image to raw format.
$ qemu-img convert -f qcow2 <ImageName>.qcow2 -O raw <ImageName>.raw
Note: You can also upload files in vhd format.
Create a storage bucket in Alibaba Cloud
Complete the following steps to create a storage bucket.
-
Launch the Content from home-intl.console.aliyun.com is not included.Alibaba Cloud Console.
-
Click Object Storage Service under Storage & CDN.
-
Click Create Bucket, enter a bucket name and select the location for your deployment. There are different costs associated with the Storage Class selection. See Content from www.alibabacloud.com is not included.Introduction to storage classes to determine the storage class you want to select.
-
You need to have a location where files can be uploaded. Open the bucket, click Files, and then click the Create Folder tab.
-
Enter a name.
Upload the image to the bucket
There are two methods for uploading the image file. The method you use depends on the virtual size of the file.
First, check the virtual size of the raw file using the following command.
$ qemu-img info <ImageName>.raw
Example:
$ qemu-img info rhel76-alibaba.raw
image: rhel76-alibaba.raw
file format: raw
virtual size: 10G (10737418240 bytes)
disk size: 1.3G
Note that in the example the virtual size is 10 GiB. A file over 5 GiB is too large to upload using the Alibaba Cloud Console. For a 10 GiB file, you upload the file using the Object Storage Service (OSS) utility. See the following procedure, Uploading the image using the OSS Utility. If the virtual size is smaller than 5 GiB, you can use either the OSS utility or the Alibaba Cloud Console. If you want to use the Alibaba Cloud Console for files smaller than 5 GiB, see Uploading the image using the Alibaba Cloud Console.
Uploading the image using the OSS utility
You first need to install and configure the OSS utility prior to using it to upload files. To install the OSS utility, follow the instructions at Content from www.alibabacloud.com is not included.OSS Download and installation.
Once the OSS utility is installed, complete the following steps to upload the file.
Important: You need to have the Aliyun Access Key ID and Aliyun Access Key Secret for your project before continuing. If you do not have these, you can use a security token (stsToken) if available. If you have the access keys, you do not need to enter anything when prompted for the stsToken.
-
Enter the following command to create an OSS configuration file and store your access credentials.
Note: In the example, no security token is entered since the Access Key ID and Key Secret are used. The project endpoint is typically in the form of
<project-name>-<region-endpoint>. (See example below.) The endpoint may also be available from your Alibaba project administrator.$ ./ossutil configExample:
    [admin@localhost ~] $ ./ossutil config
    The command creates a configuration file and stores credentials.

    Please enter the config file path(default /home/admin/.ossutilconfig, carriage return will use the default path. If you specified this option to other path, you should specify --config-file option to the path when you use other commands):
    No config file entered, will use the default config file /home/admin/.ossutilconfig

    For the following settings, carriage return means skip the configuration. Please try "help config" to see the meaning of the settings.

    Please enter language(CH/EN, default is:EN, the configuration will go into effect after the command successfully executed):
    Please enter stsToken:
    Please enter endpoint:rhel-ha-testing.us-east-1.aliyuncs.com
    Please enter accessKeyID:LTA**********OPI
    Please enter accessKeySecret:gWdJkHo***************c0u5Z5aC
    [admin@localhost ~] $
-
Upload the image file to the bucket. This may take a while.
$ ./ossutil cp <path-to-file> oss://<BucketName>/<DirectoryName>Example:
[admin@localhost ~] $ ./ossutil cp VirtualMachines/rhel76-alibaba.raw oss://admin-bucket/rhel/
Succeed: Total num: 1, size: 10,737,418,240. OK num: 1(upload 1 files).
3804.652375(s) elapsed
Uploading the image using the Alibaba Cloud Console
If the raw image file is less than 5 GiB, you can use the Alibaba Cloud Console to upload the image.
-
Launch the Content from home-intl.console.aliyun.com is not included.Alibaba Cloud Console.
-
Click Object Storage Service under Storage & CDN.
-
Select your bucket from the left navigation pane.
-
Open the directory and click Upload.
-
Click in the direct upload area and select your file for upload. The upload should begin immediately.
Import the uploaded image
Complete the following steps to import the image after it is uploaded.
-
Launch the Content from home-intl.console.aliyun.com is not included.Alibaba Cloud Console.
-
Click Object Storage Service under Storage & CDN.
-
Click and open the bucket where the uploaded image file is stored.
-
Click on the file name. This opens the Preview pane.
-
Click Copy File URL.
-
From the left navigation pane, click Elastic Compute Service.
Note: Make sure you are in the correct region where your bucket was created. If not, switch to the correct region.
-
Under Snapshots & Images, click Images.
-
Click Import Image.
-
Paste the URL copied earlier into the OSS Object Address field.
-
Complete the following fields.
- Image Name
- System Disk Size
- System Platform
- Image format
-
Click OK. It may take a few seconds for the build process to begin. Do not cancel. Once started, it will take several minutes for the build to complete to 100%. While building, there may be no incremental progress displayed, that is, the progress displayed may stay at 0% until 100% complete.
Create a Virtual Private Cloud (VPC)
Create a VPC for your instances.
-
Launch the Content from home-intl.console.aliyun.com is not included.Alibaba Cloud Console.
-
Click Virtual Private Cloud under Networking.
-
Click Create VPC.
-
Complete the web form with the following information.
- VPC Name
- Description
- VPC Destination CIDR Block
- VSwitch Name
- Zone
- VSwitch Destination CIDR Block
-
Click OK.
Create a key pair
You access your instances using a key pair. Complete the following steps to create a key pair.
-
Launch the Content from home-intl.console.aliyun.com is not included.Alibaba Cloud Console.
-
Click Elastic Compute Service under Elastic Computing.
-
Select SSH Key Pair under Networks and Security.
-
Click Create SSH Key Pair.
-
Enter a key pair name and either have a key pair automatically created or import an existing key pair.
-
Click OK. The private key is automatically downloaded.
-
Enter the following command to make the private key read-only.
$ chmod 400 <keyname>.pem
Create an instance from the image
Complete the following steps to create an instance after it has been imported.
-
Launch the Content from home-intl.console.aliyun.com is not included.Alibaba Cloud Console.
-
Click Elastic Compute Service under Elastic Computing.
-
Click Instances in the left navigation pane.
-
Click Create Instance.
-
For Instance Type, select the following configuration options.
- Region and Zone
- x86-Architecture
- Select a 2 vCPU and 8 GiB instance type.
-
For Image, select Custom Image and select your imported image.
-
For Storage, select a System Disk storage size and add a Data Disk, if necessary.
-
Click Next: Networking.
-
For Network, select the VPC and VSwitch created earlier.
-
Select Assign public IP and set bandwidth pricing.
-
Verify that the default Security Group settings are applicable. At a minimum, instances require inbound TCP traffic over port 22.
-
Click Next: System Configurations.
-
Select the Key Pair created earlier.
-
Enter an Instance Name and Host Name. These can be the same name.
-
Click Next: Grouping and add a tag for the instance (optional).
-
Click Preview. If you want to skip these steps for subsequent instances, click Save as launch template.
Note: If you use a launch template, you need to change the instance name and host name prior to creating each new instance.
-
Accept the Terms of Service and click Create Instance.
Access the instance
Complete the steps below to access the instance.
-
Launch the Content from home-intl.console.aliyun.com is not included.Alibaba Cloud Console.
-
Click Elastic Compute Service under Elastic Computing.
-
Select Instances from the left navigation pane.
-
Get the Public IP address for the instance.
-
Launch an SSH terminal session and enter the following command to access the instance.
$ ssh -i path/to/<keyname>.pem cloud-user@<PublicIP>
Note: The default user account for a RHEL KVM Guest Image is cloud-user.
Install RHEL HA packages and agents
Complete the following steps on all nodes.
-
Launch an SSH terminal session and access the instance.
-
Register with Red Hat Subscription Manager and enable a Subscription pool ID (or
--auto-attach). -
Disable all unnecessary repositories.
# subscription-manager repos --disable=*
-
Enable the following repositories.
# subscription-manager repos --enable=rhel-7-server-rpms
# subscription-manager repos --enable=rhel-ha-for-rhel-7-server-rpms
-
Install pcs, pacemaker, the fence agents, and resource agents.
# yum install pcs pacemaker
# yum install fence-agents-aliyun
# yum install resource-agents-aliyun
-
Update all software.
# yum update -y
Configure RHEL HA services
Complete the following steps on all nodes.
-
The user hacluster was created when pacemaker was installed in the previous procedure. Create a password for hacluster on all cluster nodes. Use the same password for all nodes.
# passwd hacluster
-
If firewalld.service is installed, add the high availability service.
# firewall-cmd --permanent --add-service=high-availability
# firewall-cmd --reload
-
Start the pcs service and enable it to start on boot.
# systemctl start pcsd.service
# systemctl enable pcsd.service
Created symlink from /etc/systemd/system/multi-user.target.wants/pcsd.service to /usr/lib/systemd/system/pcsd.service.
-
Make sure the pcs service is running.
# systemctl status pcsd.service
● pcsd.service - PCS GUI and remote configuration interface
   Loaded: loaded (/usr/lib/systemd/system/pcsd.service; enabled; vendor preset: disabled)
   Active: active (running) since Mon 2018-06-25 19:21:42 UTC; 15s ago
     Docs: man:pcsd(8)
           man:pcs(8)
 Main PID: 5901 (pcsd)
   CGroup: /system.slice/pcsd.service
           └─5901 /usr/bin/ruby /usr/lib/pcsd/pcsd > /dev/null &
-
Edit
/etc/hostsand add RHEL host names and internal IP addresses for all nodes. See How should the /etc/hosts file be set up on RHEL cluster nodes? for details.
Create the cluster
Complete the following steps to create the cluster of nodes.
-
On one of the nodes, enter the following command to authenticate the pcs user hacluster. Use the host name for each node in the cluster in the command.
# pcs cluster auth <hostname1> <hostname2> <hostname3>
Username: hacluster
Password:
<hostname1>: Authorized
<hostname2>: Authorized
<hostname3>: Authorized
-
Create the cluster.
# pcs cluster setup --name <cluster-name> <hostname1> <hostname2> <hostname3>
-
(Optional) Enable the cluster to start automatically. This is useful if nodes should automatically join the cluster when started.
# pcs cluster enable --all
-
Start the cluster.
# pcs cluster start --all
-
Enter the following command to get the instance ID and name for each cluster node.
# fence_aliyun -r us-east-1 -a <AlibabaAccessKey> -s <AlibabaSecretAccessKey> -o list
<InstanceID>,<InstanceName>
<InstanceID>,<InstanceName>
<InstanceID>,<InstanceName>
Example:
[root@rhelha-001 ~]# fence_aliyun -r us-east-1 -a LTA**********OPI -s gWdJkHolbUwH**********c0u5Z5aC -o list
i-0xi2t2i**********0th,rhelha-002
i-0xifc2h**********hug,rhelha-001
i-0xie35a**********9ps,rhelha-003
Note: You can also use the Alibaba query service to get instance IDs. Enter the command below to get the instance ID for a specific node.
# curl http://100.100.100.200/latest/meta-data/instance-id; echo
-
Enter the following commands to test fencing on a different node.
Important: The following commands are for testing and verification purposes. The instance shuts down when you complete these commands.
# fence_aliyun -r <Region> -a <AlibabaAccessKey> -s <AlibabaSecretAccessKey> -n <InstanceID> -o <Option>Examples:
    # fence_aliyun -r us-east-1 -a LTA**********OPI -s gWdJkHolbUwH**********c0u5Z5aC -n i-0xie35a**********9ps -o status
    Status: ON

    # fence_aliyun -r us-east-1 -a LTA**********OPI -s gWdJkHolbUwH**********c0u5Z5aC -n i-0xie35a**********9ps -o off
    Success: Powered OFF

    # fence_aliyun -r us-east-1 -a LTA**********OPI -s gWdJkHolbUwH**********c0u5Z5aC -n i-0xie35a**********9ps -o on
    Status: Powered ON

    # fence_aliyun -r us-east-1 -a LTA**********OPI -s gWdJkHolbUwH**********c0u5Z5aC -n i-0xie35a**********9ps -o reboot
    Status: Rebooted
Create a fence device
You use instance IDs to map RHEL host names to the Alibaba instance IDs when creating a fence device. Get the instance ID associated with each RHEL host name using the fence_aliyun -r <Region> -a <AlibabaAccessKey> -s <AlibabaSecretAccessKey> -o list command used in the previous procedure.
-
Enter the following command to create a fence device.
# pcs stonith create <FenceDeviceName> fence_aliyun region=<RegionID> access_key=<AlibabaAccessKey> secret_key=<AlibabaSecretAccessKey> pcmk_host_map="<RHELHostName-01>:<InstanceID>;<RHELHostName-02>:<InstanceID>;<RHELHostName-03>:<InstanceID>"Example:
# pcs stonith create alibaba-fence fence_aliyun region=us-east-1 access_key=LTA**********OPI secret_key=gWdJkHolbUwH**********c0u5Z5aC pcmk_host_map="rhelha-001:i-0xifc2h**********hug;rhelha-002:i-0xi2t2i**********0th;rhelha-003:i-0xie35a**********9ps"
-
Verify that the fence device started.
# pcs statusExample:
    [root@rhelha-001 ~]# pcs status
    Cluster name: alibaba-cluster
    Stack: corosync
    Current DC: rhelha-002 (version 1.1.18-11.el7_5.3-2b07d5c5a9) - partition with quorum
    Last updated: Wed Aug 15 15:54:41 2018
    Last change: Wed Aug 15 15:51:13 2018 by root via cibadmin on rhelha-001

    3 nodes configured
    1 resource configured

    Online: [ rhelha-001 rhelha-002 rhelha-003 ]

    Full list of resources:

     alibaba-fence	(stonith:fence_aliyun):	Started rhelha-001

    Daemon Status:
      corosync: active/enabled
      pacemaker: active/enabled
      pcsd: active/enabled
-
To ensure immediate and complete fencing, disable ACPI Soft-Off on all cluster nodes. For information about disabling ACPI Soft-Off, see Configuring ACPI For Use with Integrated Fence Devices.
Configure node authorization
Enter the following command to initialize each node with the Alibaba account keys and region ID. Run this command on each node.
# aliyuncli-ra configure
Example:
[root@rhelha-001 ~]# aliyuncli-ra configure
Aliyun Access Key ID [None]: LT********e8KOPI
Aliyun Access Key Secret [None]: gWdJkHolbUwH**********c0u5Z5aC
Default Region Id [None]: us-east-1
Default output format [None]:
Configure the aliyun-vpc-move-vip resource agent
For high availability failover operations to work, the cluster uses a networking resource agent to enable a floating IP address in the VPC. The aliyun-vpc-move-ip attaches an unused IP address to a running instance. This floating IP address can be passed between different nodes in the cluster. Enter the following command to show more information about this resource.
# pcs resource describe aliyun-vpc-move-ip
Complete the following steps to enable this resource.
-
Launch the Content from home-intl.console.aliyun.com is not included.Alibaba Cloud Console.
-
Open Elastic Compute Service go to the list of Instances for the project.
-
Click on any of the instance IDs in the cluster and open the instance details screen.
-
Click on the VPC ID link under Configuration Information.
-
Under Network Resources, click on the Route Table and click Manage.
-
Identify the primary route and the Route Table ID. For this example, CIDR block
10.0.0.0/24is the primary route. -
Identify an IP address that is outside of the range defined by the primary route. For this example, we are using
10.0.1.200. -
Enter the following command to create the move IP resource agent.
# pcs resource create vpcip aliyun-vpc-move-ip interface=<InterfaceName> address=<UnusedIPAddress> routing_table=<RouteTableID>Example:
# pcs resource create vpcip aliyun-vpc-move-ip interface=eth0 address=10.0.1.200 routing_table=vtb-0xig8y**********cs3bx
-
Verify that the resource agent started.
# pcs statusExample:
    [root@rhelha-001 ~]# pcs status
    Cluster name: alibaba-cluster
    Stack: corosync
    Current DC: rhelha-002 (version 1.1.18-11.el7_5.3-2b07d5c5a9) - partition with quorum
    Last updated: Wed Aug 15 15:54:41 2018
    Last change: Wed Aug 15 15:51:13 2018 by root via cibadmin on rhelha-001

    3 nodes configured
    2 resources configured

    Online: [ rhelha-001 rhelha-002 rhelha-003 ]

    Full list of resources:

     alibaba-fence	(stonith:fence_aliyun):	Started rhelha-001
     vpcip	(ocf::heartbeat:aliyun-vpc-move-ip):	Started rhelha-002

    Daemon Status:
      corosync: active/enabled
      pacemaker: active/enabled
      pcsd: active/enabled
-
Verify that the resource can move to a different node.
# pcs resource move vpcip <RHELHostName>Example:
# pcs resource move vpcip rhelha-003
-
Verify that the resource agent started.
# pcs statusExample:
    [root@rhelha-001 ~]# pcs status
    Cluster name: alibaba-cluster
    Stack: corosync
    Current DC: rhelha-002 (version 1.1.18-11.el7_5.3-2b07d5c5a9) - partition with quorum
    Last updated: Wed Aug 15 15:54:41 2018
    Last change: Wed Aug 15 15:51:13 2018 by root via cibadmin on rhelha-001

    3 nodes configured
    2 resources configured

    Online: [ rhelha-001 rhelha-002 rhelha-003 ]

    Full list of resources:

      alibaba-fence	(stonith:fence_aliyun):	Started rhelha-001
      vpcip	(ocf::heartbeat:aliyun-vpc-move-ip):	Started rhelha-003

    Daemon Status:
      corosync: active/enabled
      pacemaker: active/enabled
      pcsd: active/enabled
Additional resources
For instructions on configuring shared block storage for a Red Hat High-Availability Cluster on Alibaba Clud, see Configuring Shared Block Storage for a Red Hat High Availability Cluster on Alibaba Cloud .
For concepts, references, and additional information about RHEL High Availability, see the following Red Hat documents.
- High Availability Add-On Overview
- High Availability Add-On Administration
- High Availability Add-On Reference
If you add an additional node, you need to update the agent. For example, if you add a fourth node, update the fencing agent using the following command.
# pcs stonith update pcmk_host_map="rhel-hostname-1:Instance-ID-1;rhel-hostname-2:Instance-ID;rhel-hostname-3:Instance-ID;rhel-hostname-4:Instance-ID"
Use the following commands to view the help and the additional options you can set for the fencing agent.
# pcs stonith describe fence_aliyun
# fence_aliyun -h